Today marks one year since I decided to start sharing my ideas with the world through Dolled Up Design and what better way to share then in my 100th post!
I started this blog as an outlet for my creative ideas. I love reading other blogs and seeing their great parties, interior decorating and creative food ideas. I waste way too much time on Pinterest and decided I needed to start sharing back some of my own ideas rather then just creating board upon board of other people’s ideas.
This is a creative outlet for me. I enjoyed my previous job as a graphic designer, but when I made the switch to being at home with the kids I felt my skills starting to fall to the wayside. I began this blog as a way to try and establish myself as more then just “Camden and Keira’s mom” and am hoping in the process I might inspire other people to bring out their creative side.
I am surprised to see my post count as high as it is because it honestly doesn’t feel like I am able to spend as much time on my blog as I would like. Between keeping up with the kids and moving this past year, this is definitely an accomplishment for me. I am also proud and excited to have been chosen to join Moms & Munchkins as a Party Tip contributor so hopefully that gives me the push to come up with even more great ideas in the year ahead. I have tons of projects floating around in my head, but it is always a matter of finding the time to execute and document these great ideas!
Like a lot of my projects, my blog is a work in progress. The overall look of the blog still leaves something to be desired and the linking up to all the different avenues of social media makes my head spin! There is definite room for improvement and I hope as I move forward and my blog continues to grow that it only continues to become better.
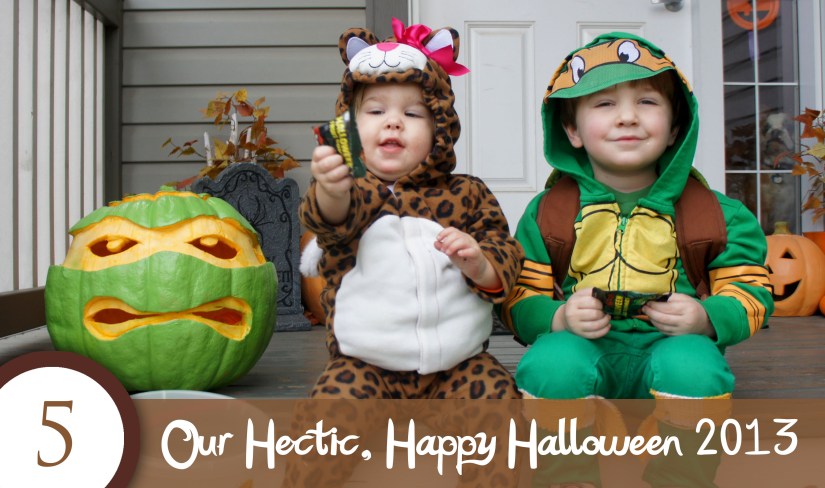
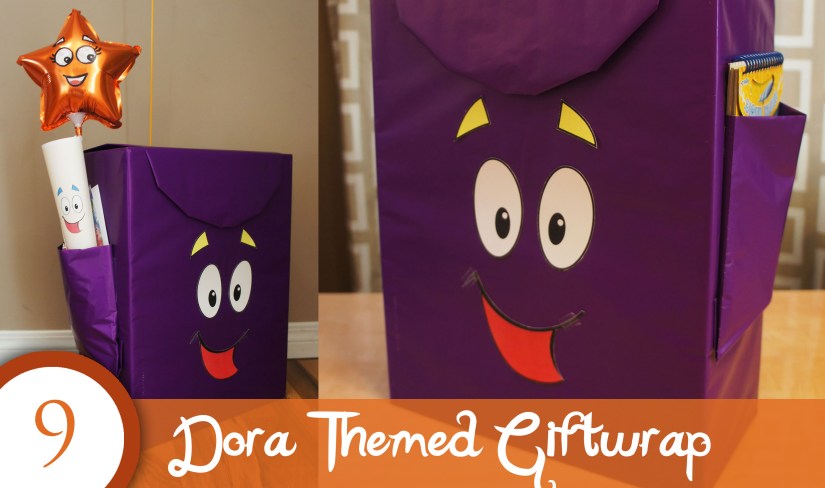
So, in celebration of One year and 100 posts, here are my top 10 favorite Dolled Up projects from the past year. Click on the links to view the full posts!
And, because it is Thursday, it only seems fitting that I throwback and link to my very first blog post – my Love is Sweet personal candy buffet.
I would like to finish this post with a big thank you to all my readers old and new!
You are the main motivation for this blog and I can’t wait to share more projects and ideas with you in the year ahead.
In my opinion, food is the most important element at a party. I love picking menu items that reflect my party theme and are something a little out of the ordinary for my guests to try.
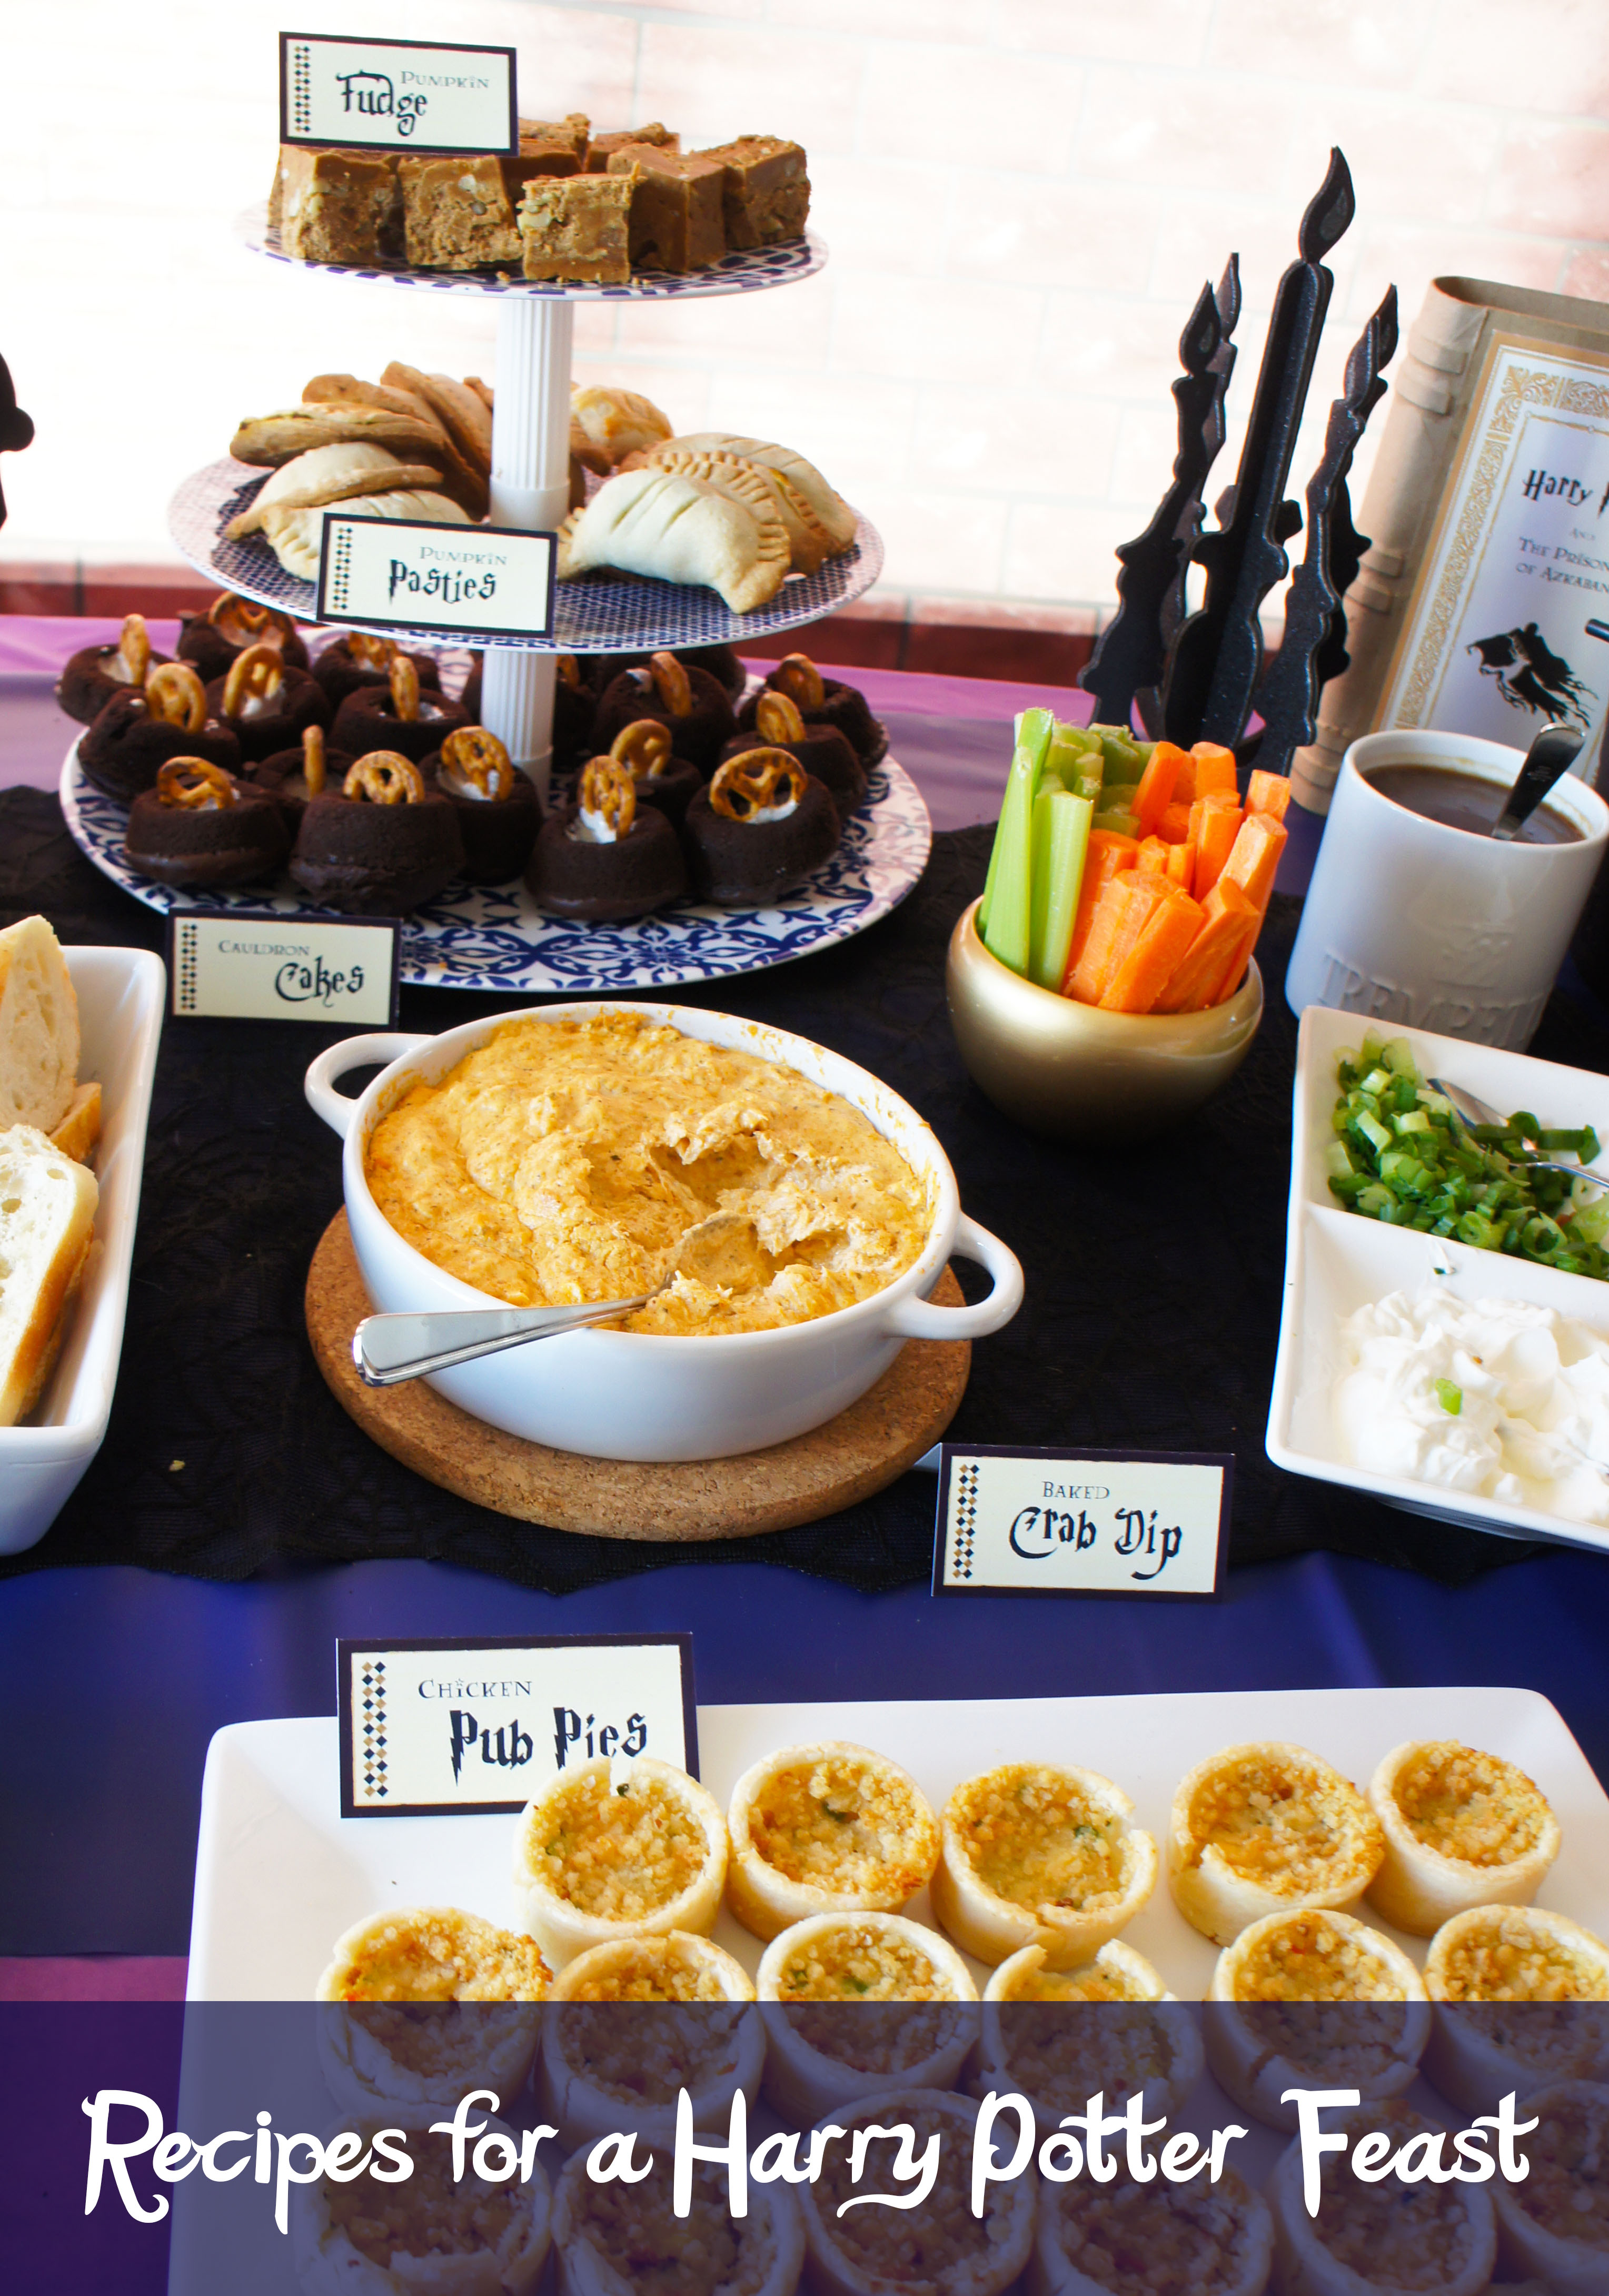
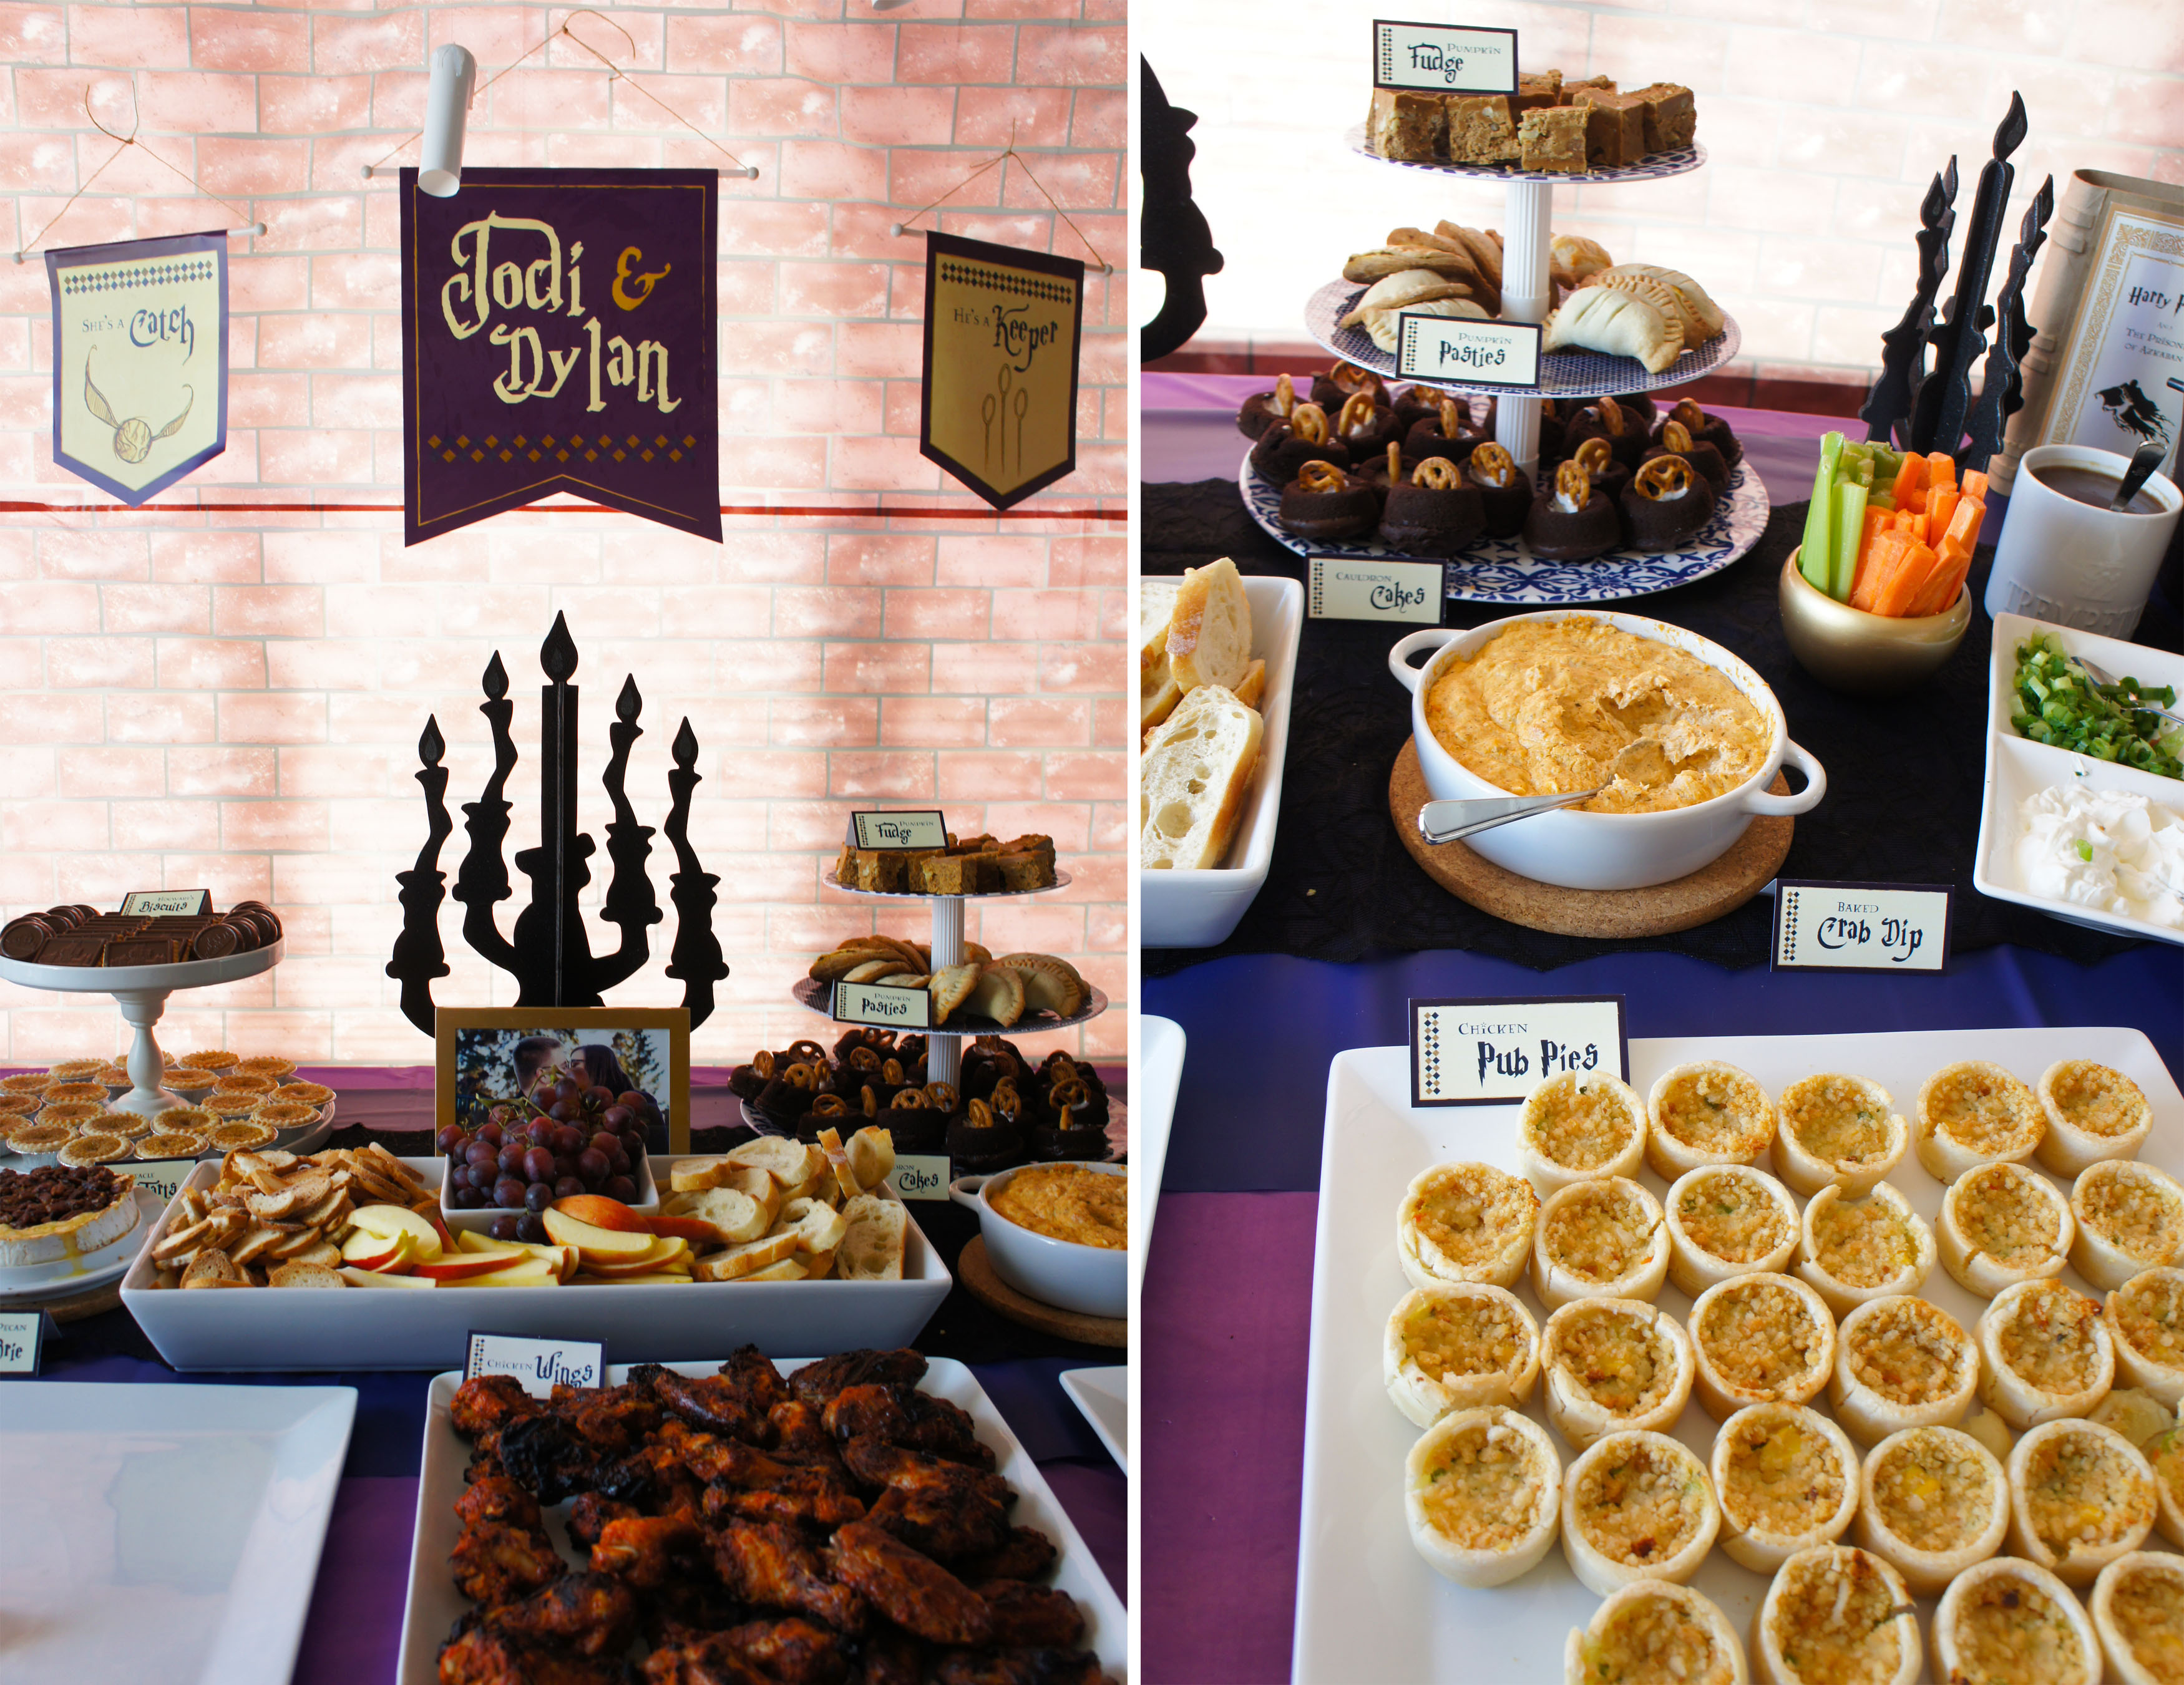
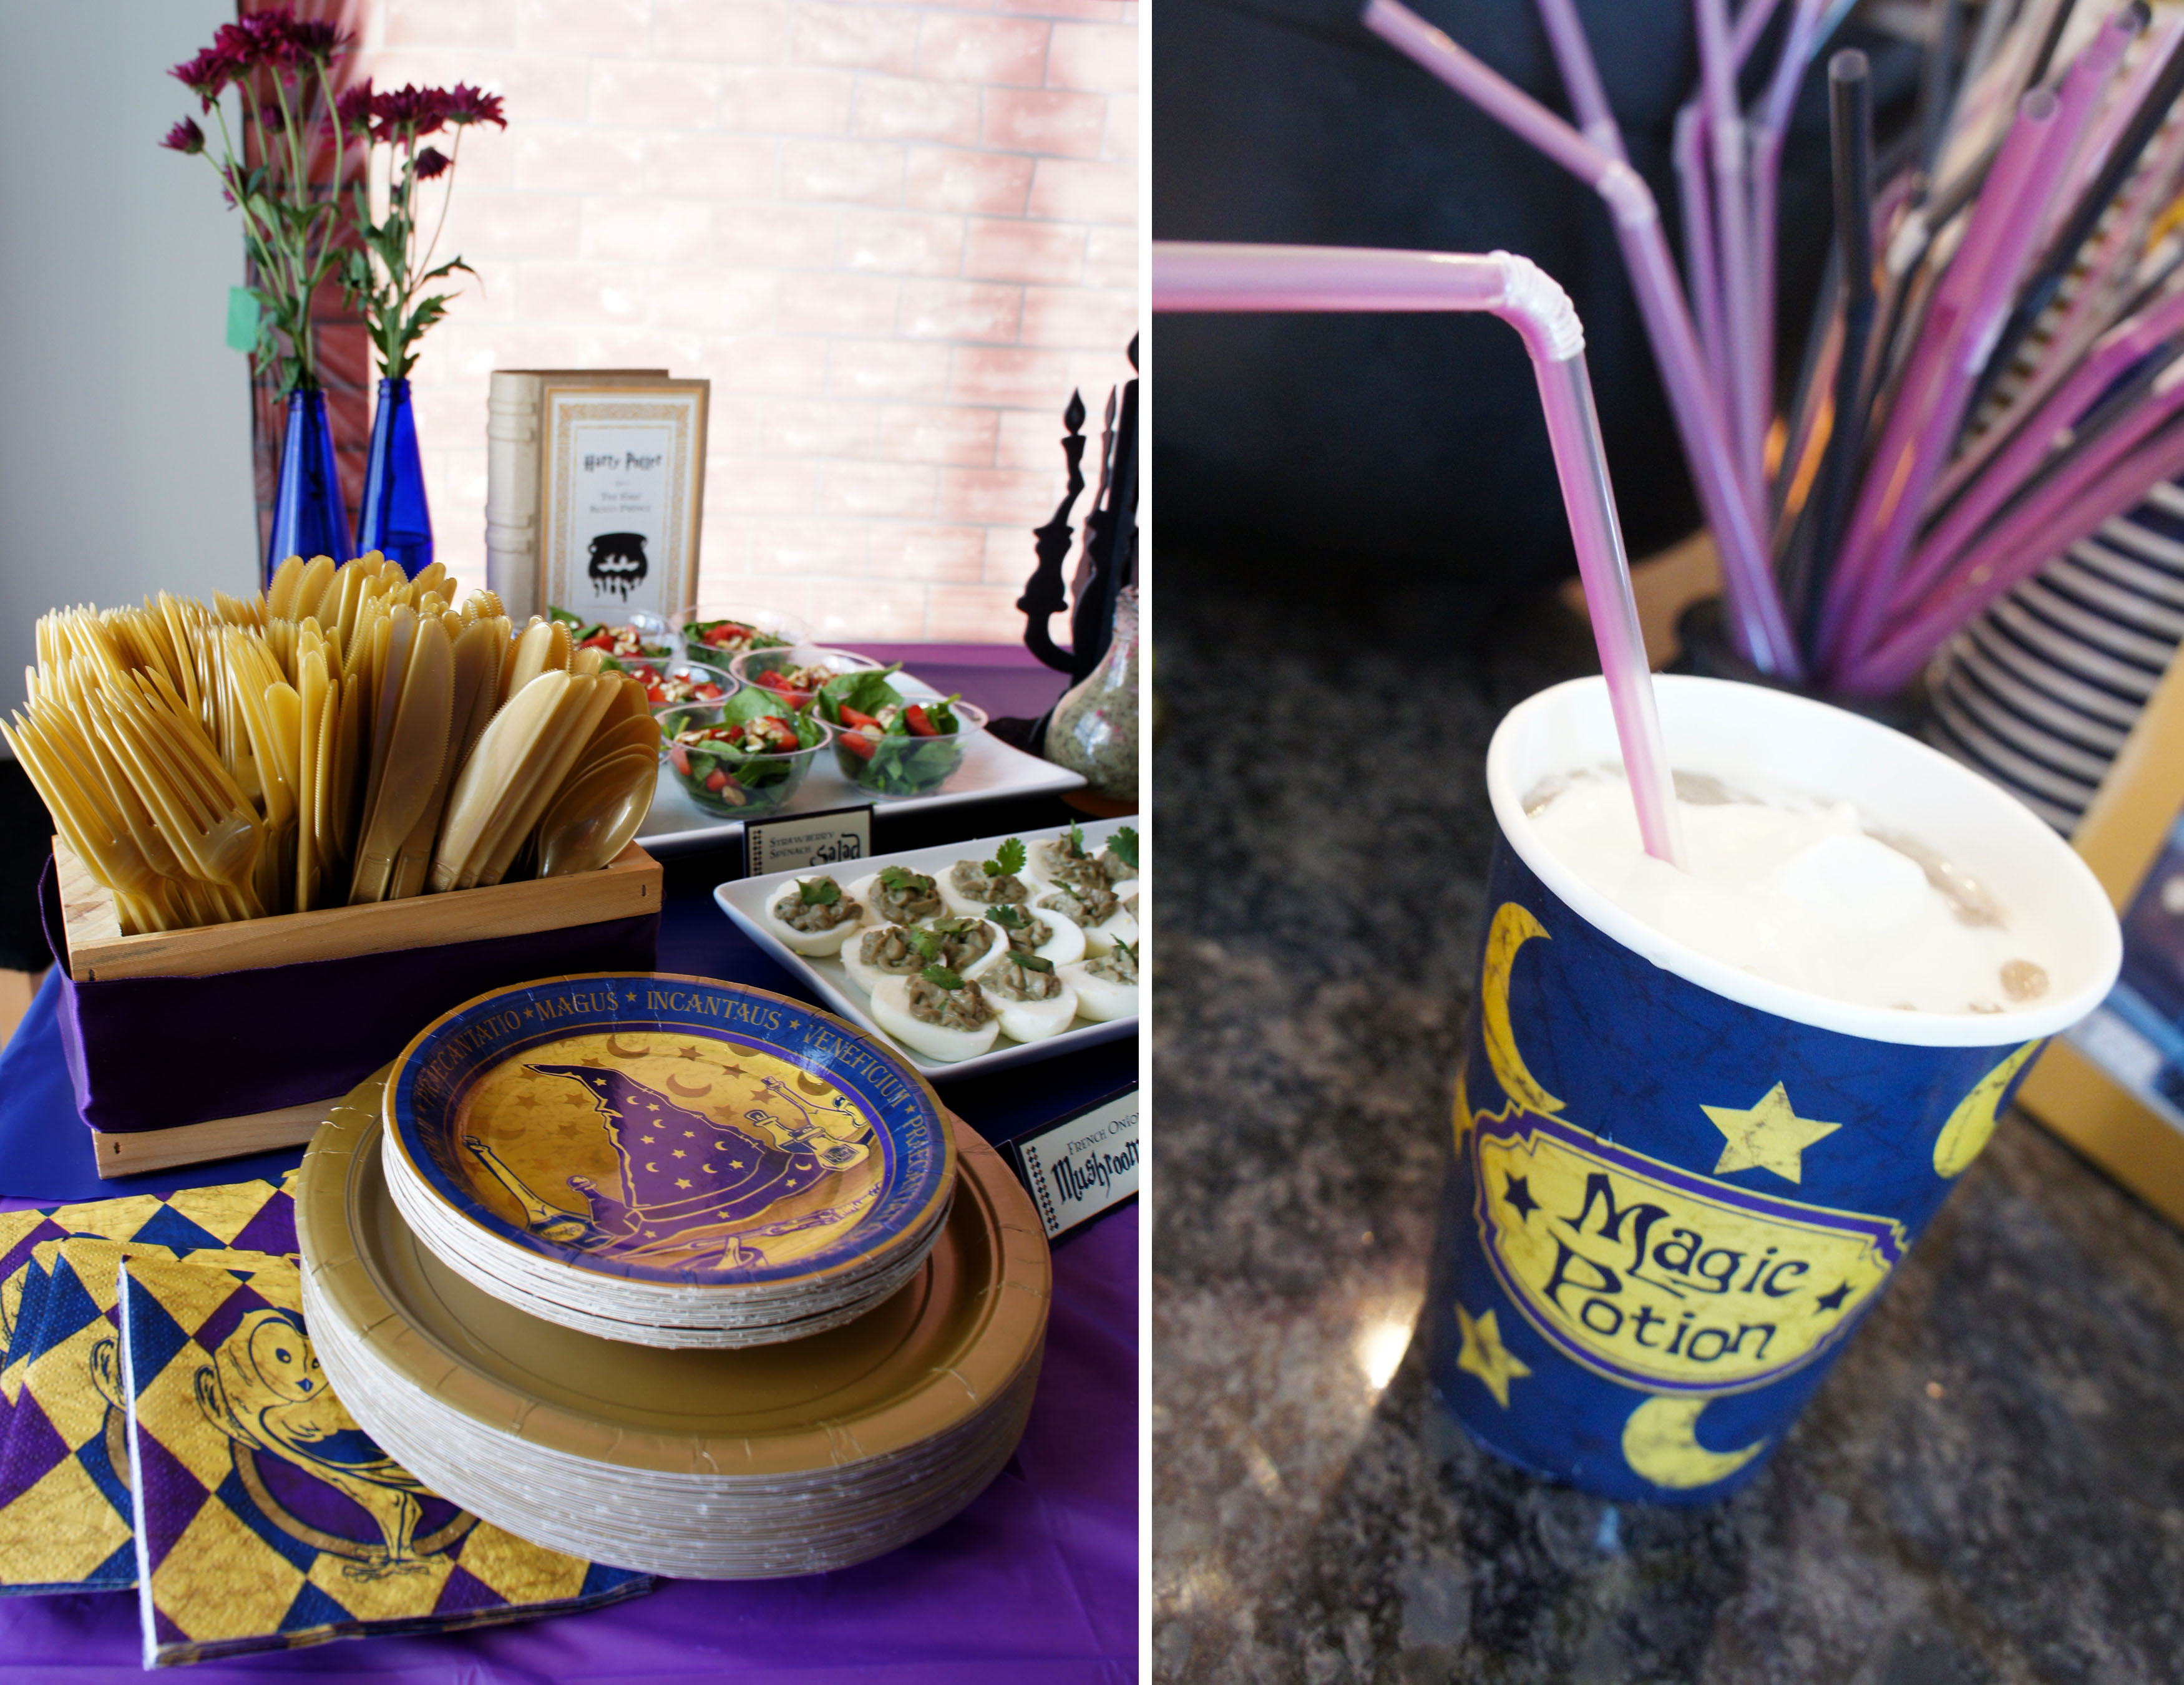
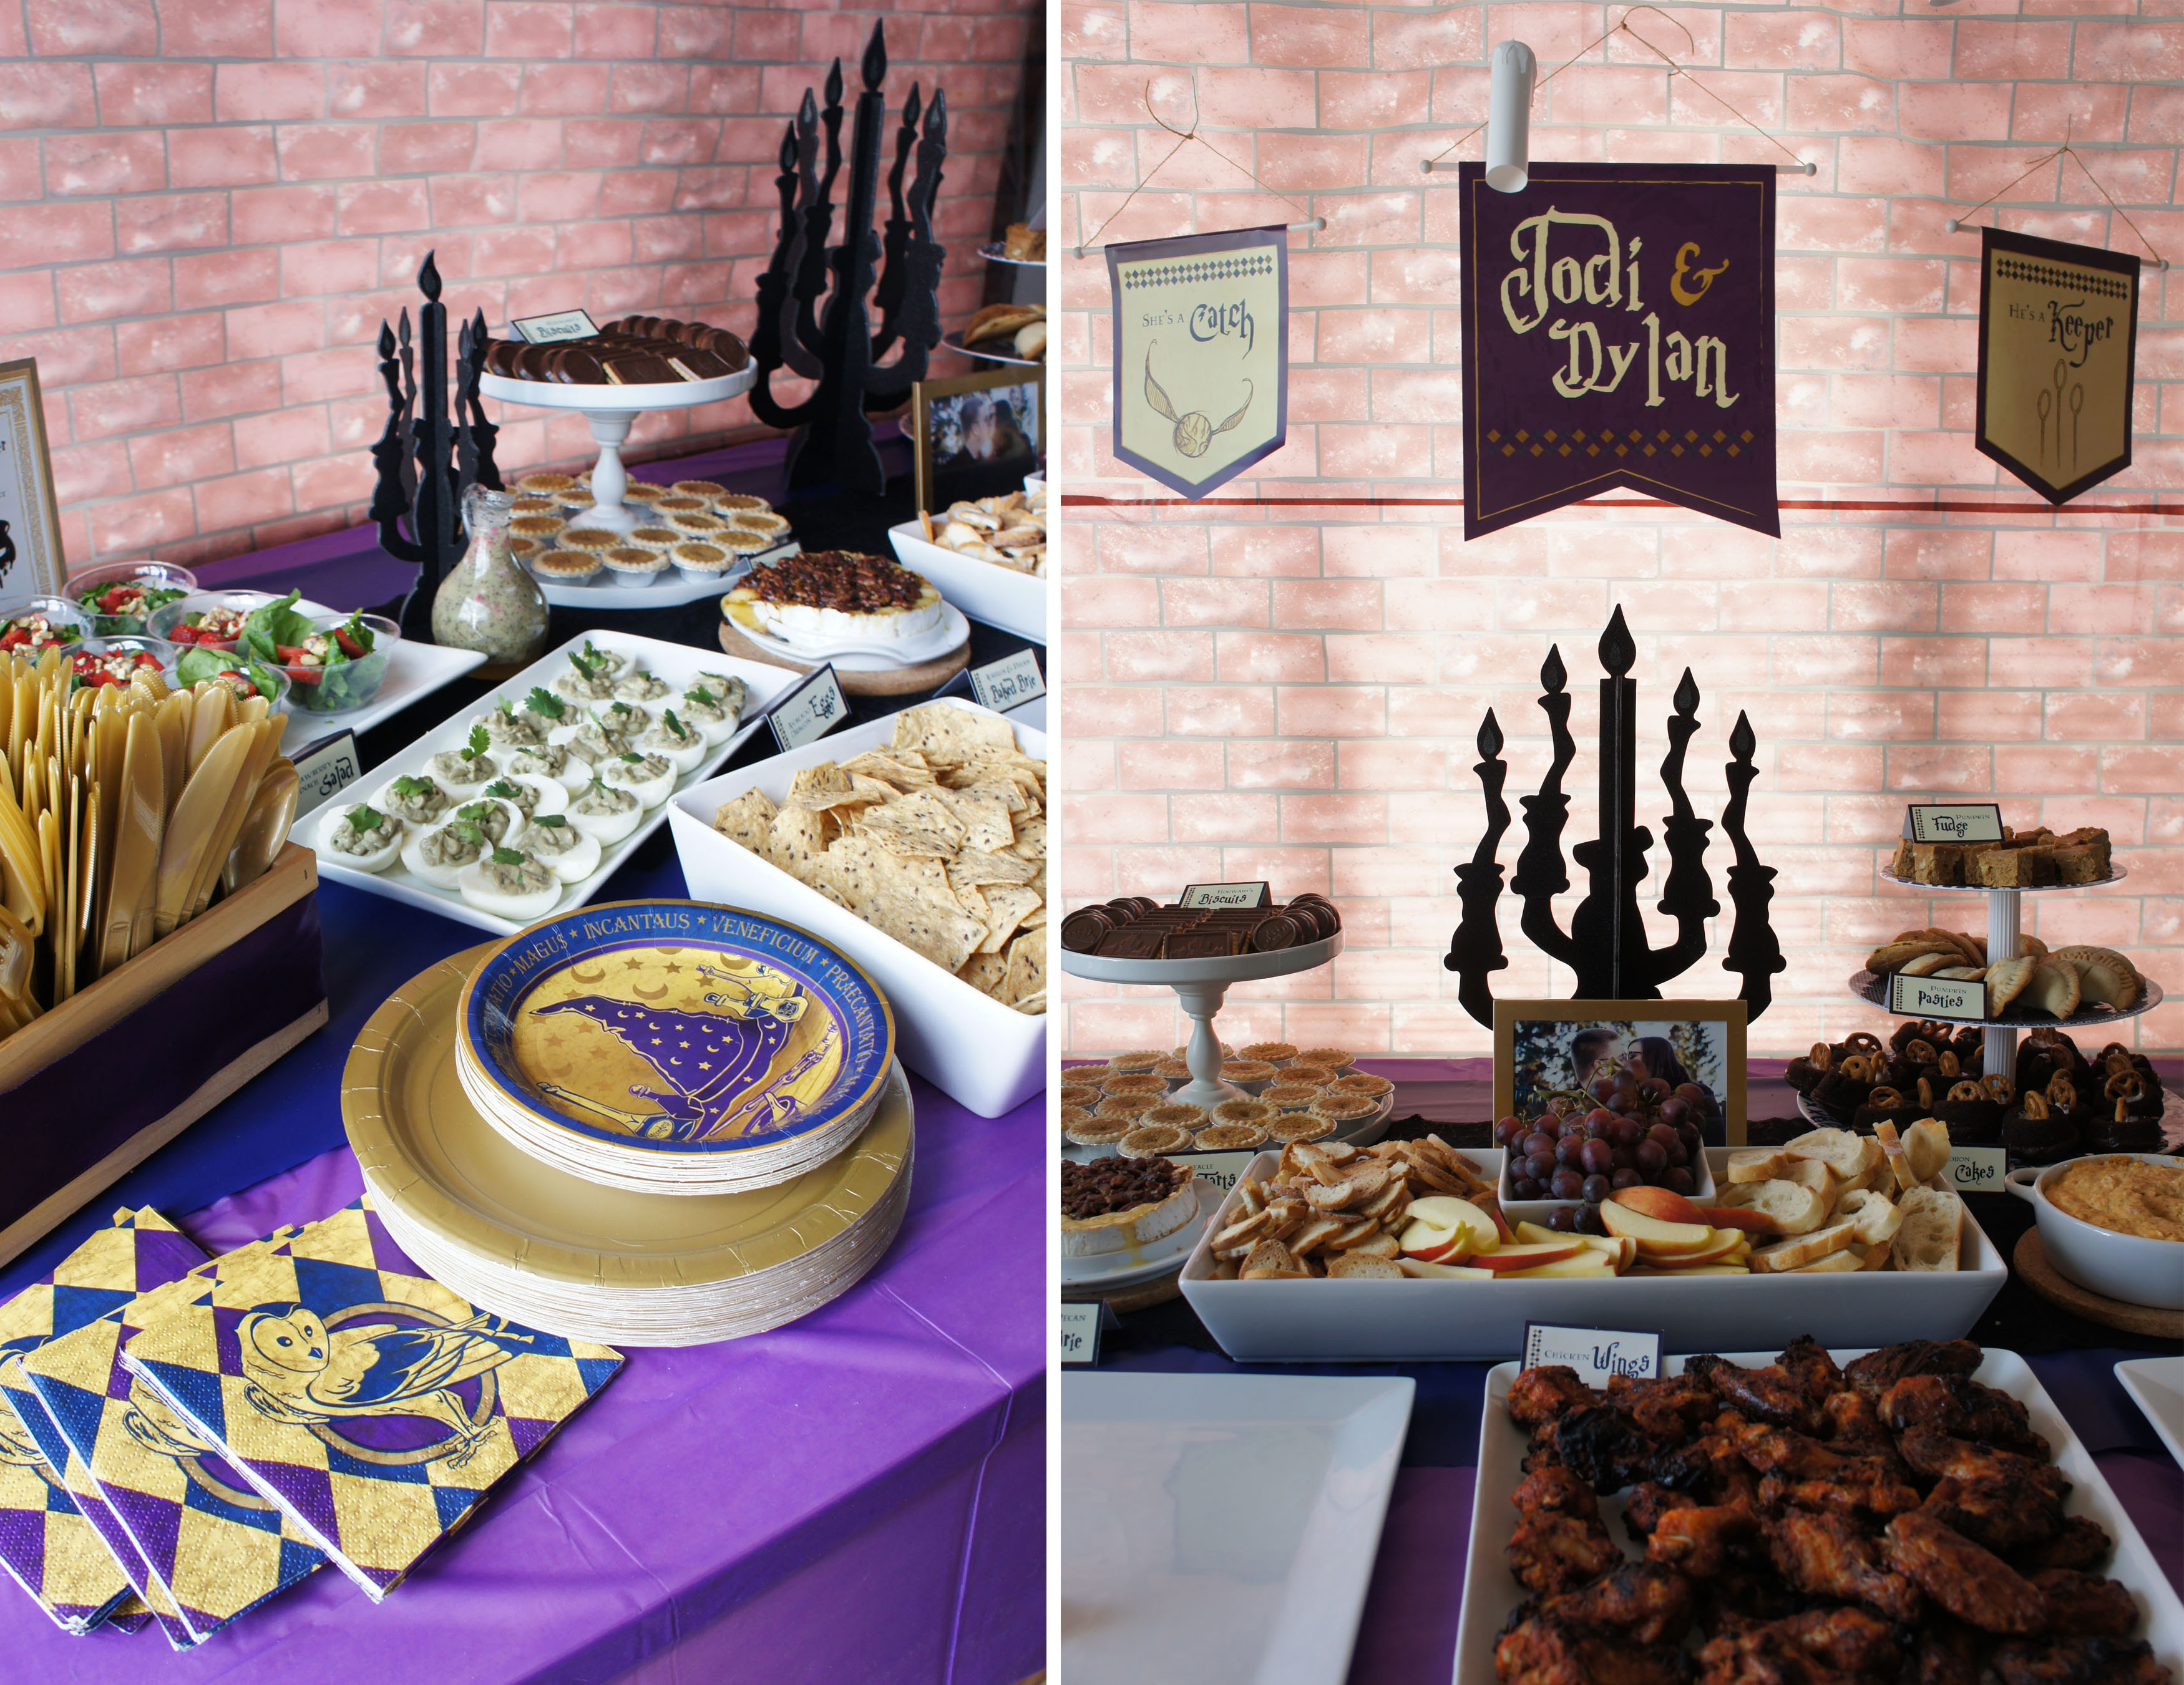
For my Harry Potter party, I wanted foods that were reflective of the great feasts described in the books and shown in the movies. I kept it to finger foods, but chose items with a British twist. My menu included mini chicken pub pies, mini beef wellington’s, barbequed chicken wings, individual spinach salads, a Kahlua baked brie with toasted baguette and grapes, warm crab dip with tortilla chips, stuffed mushroom caps, guacamole devilled eggs, a mashed potato bar and a variety of pastries and cake.
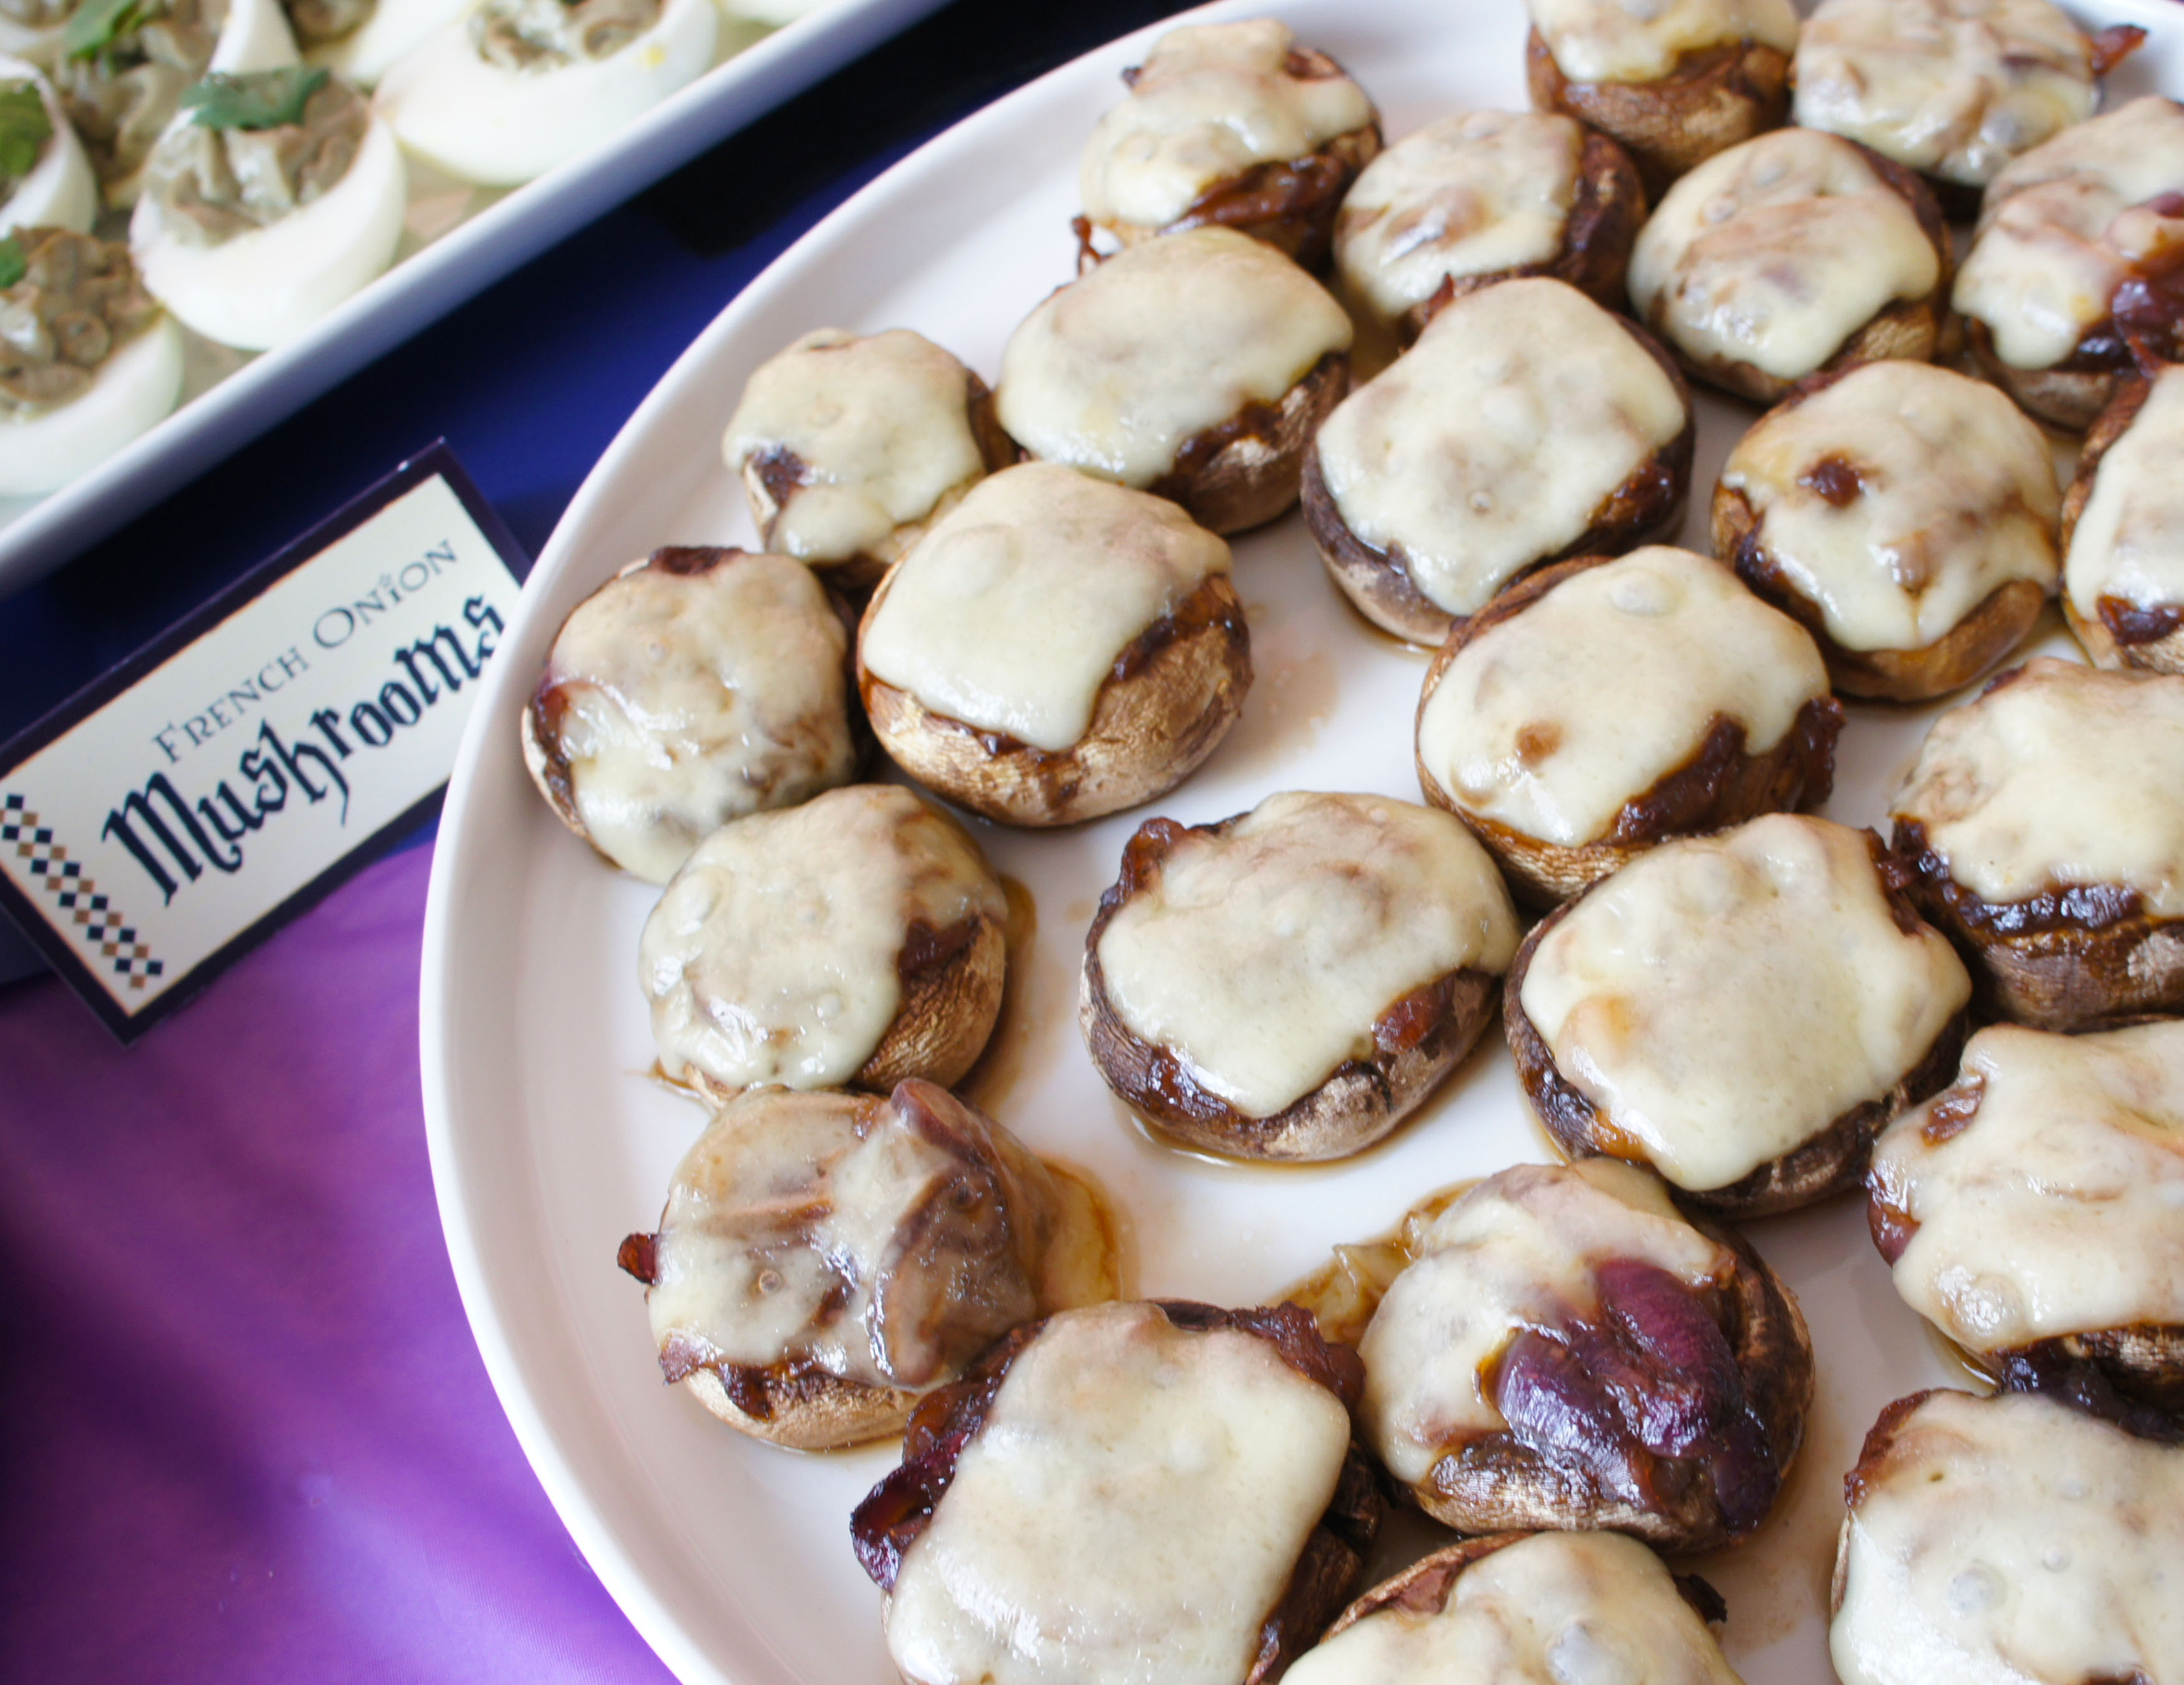
French Onion Stuffed Mushroom Caps
These were a bit of a last minute addition and one of the biggest hits on the food table. I normally do mushroom caps stuffed with a breadcrumb mixture, but I was looking for a good option for my party guests with gluten issues. The Pioneer Woman uses grated gruyere in her original recipe, but I kept it simple by using pre-sliced swiss cheese.
Ingredients
2 Tbsp butter
2 large onions, thinly sliced
1/4 cup beef broth
7 dashes Worcestershire sauce
Splash of red wine
3 sandwich sized slices of swiss cheese
24 whole white mushrooms
minced parsley (optional)
Directions
In a medium skillet, melt the butter over medium heat. Saute onions in the melted butter, 15-20 minutes until soft. Add in the wine, beef broth and Worcestershire sauce and cook for another 5 minutes. Once liquid is cooked down, set aside.
Clean mushrooms and remve stems, then spread on a cookie sheet. Fill each mushroom with some of the cooled onion mixture and top with a small piece of the swiss cheese.
Bake 10-15 minutes at 350 degrees. If desired, place under a broiler for the final minutes to brown the cheese slightly.
Sprinkle with minced parsley and serve warm.
Kahlua & Pecan Baked Brie
Melty, gooey and oh so tasty! This was my favorite and is definitely a recipe I will be repeating. It is only 4 ingredients but the end result is both impressive and delicious. The original recipe, with much prettier pictures then my lopsided mess, can be found at My Life as a Mrs.
Ingredients
1 large wheel of Brie (13.2 oz)
2/3 cup toasted pecans, chopped
1/4 cup brown sugar
2 1/2 Tablespoons Kahlua
Choice of dippers – crackers, apple slices, toasted baguette
Directions
Preheat oven to 350 degrees Fahrenheit.
Use a sharp knife to score around the top edge of the brie and remove the entire top circle of rind. Place in brie baker or center of an oven safe platter.
Mix the pecans, brown sugar and Kahlua in a bowl. Spread mixture over the top of your prepared brie.
Bake in preheated oven for 8 – 15 minutes. The brown sugar mixture should begin to bubble, but the cheese should still be holding its shape when done.
Serve warm with your dippers.
Guacamole Devilled (Dragon) Eggs
This was my least favorite recipe to prepare due to the fact that I still haven’t found the perfect way to take the shells off a boiled egg. The guacamole filling was a prettier green a couple hours before the party when I prepared them and put them in the fridge, so I would recommend making these up last minute to serve to guests. They were a nice change from the traditional devilled egg and the color worked with the Dragon Eggs label I gave them. The original recipe was found on Simply Recipes.
Ingredients
6 hard boiled eggs
2 ripe avacados
1 Tbsp lime (or lemon) juice
1/2 tsp salt
1 Tbsp sour cream
1 Tbsp cilantro, plus several leaves for garnish
1/2 jalapeno pepper, minced finely
1 Tbsp green onion (or chives)
Directions
Peel the hardboiled eggs and slice in half lengthwise. Carefully coop out the cooked yolks and arrange the egg whites nicely on a platter.
Cut the avocado in half, removing the pit and scooping out the flesh. Place in a bowl and roughly mash with a fork. Mash in 2-4 halves of cooked egg yolk into the avocado.
Sprinkle with lime juice and salt. Stir in the sour cream, chopped cilantro, jalapeno pepper and green onion.
Fill the egg whites with the avocado mixture, using a spoon or piping bag. Garnish each with a cilantro leaf.
Mini Spinach Salads with Strawberries, Candied Almonds and Homemade Poppyseed Dressing
In the past I have always just bought bottled poppyseed dressing for my spinach salad because it seemed like something that would be complicated to make. Because of my guests with gluten issues, I opted to make my own this time just to ensure all ingredients were gluten friendly. I was shocked how easily this dressing recipe from Dine & Dish came together and how delicious it was. I don’t think I will be buying bottled poppyseed dressing again!
Salad Ingredients
1/4 cup white sugar
1/2 cup slivered or sliced almonds
1 bag of fresh baby spinach
1 medium red onion, sliced thinly
1 carton of fresh strawberries, diced
Dressing Ingredients
1/3 cup white vinegar
1/3 cup sugar
1/4 cup finely chopped onion
2 Tbsp Dijon mustard
3/4 tsp salt
3/4 cup canola oil
2 tsp poppy seeds
Directions
For the candied almonds: On the stovetop, pour 1/4 cup sugar into a heavy skillet and slowly melt over low heat. Once it has liquefied, add almonds and stir to coat. Spread the coated almond mixture onto a foil sheet to cool and then break apart if necessary.
To make the dressing: Whisk together the vinegar, sugar, finely chopped onion, dijon mustard, and salt. Once thoroughly combined, gradually add in the canola oil and then stir in the poppyseeds.
To make the salad: Layer the baby spinach, chopped strawberries and sliced onions in a large bowl or individual dishes. Top with a small handful of candied almonds and pour on the poppyseed dressing to taste.
Mashed Potato Bar
This is not really a recipe, but I am sharing because it went over so well at the party. My co-host was kind enough to prepare a large batch of mashed potatoes and I provided a variety of toppings for guests to use to dress up their potatoes. We served the potatoes from a large plastic cauldron and small plastic bowls from Dollar Tree worked perfect for the individual servings of potatoes. Our toppings included gravy, sour cream, cheddar cheese, green onions and bacon bits but I have seen other more elaborate examples of potato bars that include items such as grilled shrimp and sautéed mushrooms.
Desserts
Of course there were also plenty of desserts. My co-host brought delicious pumpkin pasties and cauldron cakes, while I baked up Pumpkin Fudge and the Treacle Tarts. We also had “Hogwarts Cookies” which were simply the Celebration brand cookies that come nicely imprinted with a castle image right in the chocolate!
Treacle Tarts
My treacle tarts recipe comes from the Kitchen Magpie. There are many different treacle tart recipes out there, but I knew I needed to try this one when I saw she was another local Edmonton blogger. She also has some other great Harry Potter party ideas, so be sure to check her out.
I was expecting something close to a buttertart, but they have more of a creamy lemon flavor. I didn’t make it to the British import store to buy the actual treacle and corn syrup recommended in the recipe, but I think they were still authentic enough to pass for my Harry Potter party.
Ingredients
1/2 cup of golden corn syrup (Lyle’s golden syrup is recommended)
1/4 cup half and half cream
1 tsp grated lemon zest
2 tbsp. lemon juice
1 tbsp fancy molasses
1 tbsp. melted butter
1 egg
1/4 cup dried bread crumbs
24 mini tart shells (2 inch)
Directions
Preheat oven to 375 degrees Fahrenheit.
In a large bowl, combine the corn syrup, half and half, lemon zest, lemon juice, molasses, melted butter,egg and bread crumbs. Mix thoroughly.
Place the tart shells on a cookie sheet and fill each to the brim with the syrup mixture.
Bake in the oven for 13-15 minutes, until the tarts shells are lightly browned and the mixture is bubbling.
Enjoy either warm or cold, with or without whipped cream on top.
I have already mentioned that I know very little when it comes to Harry Potter. To create a Harry Potter themed couple’s wedding shower required a lot of browsing on pinterest and “borrowing” of other people’s ideas to nail down my theme.
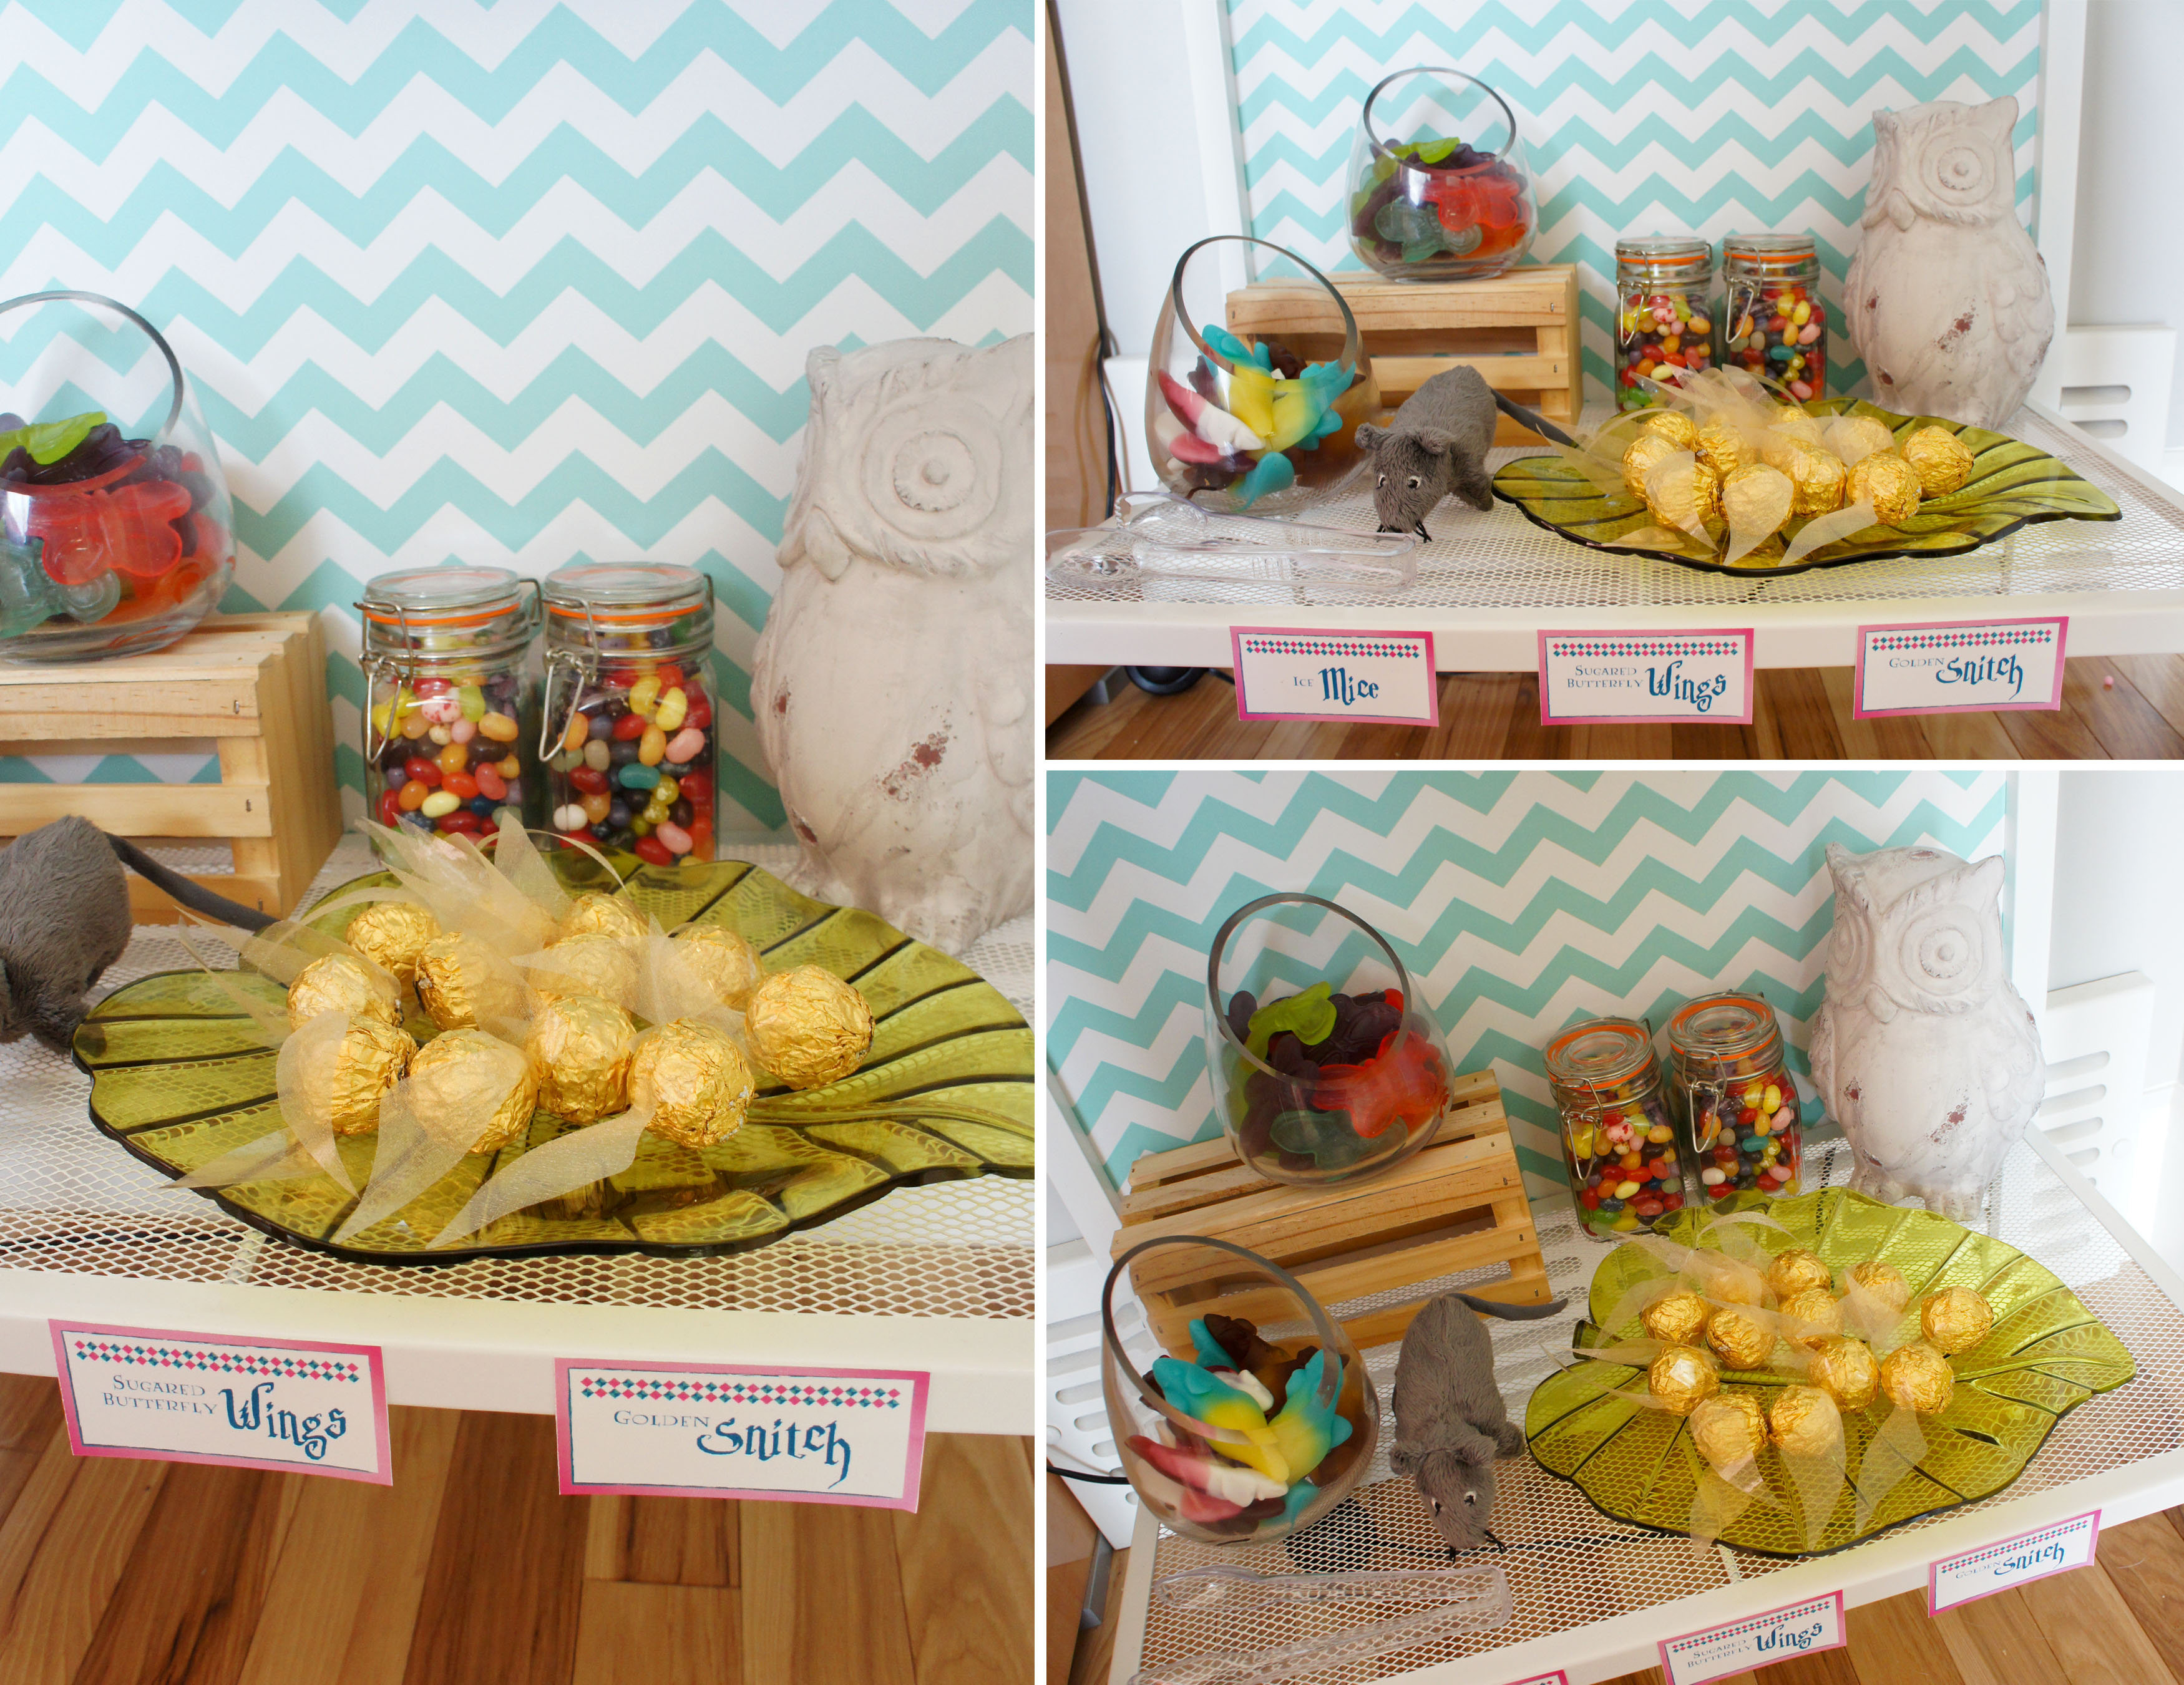
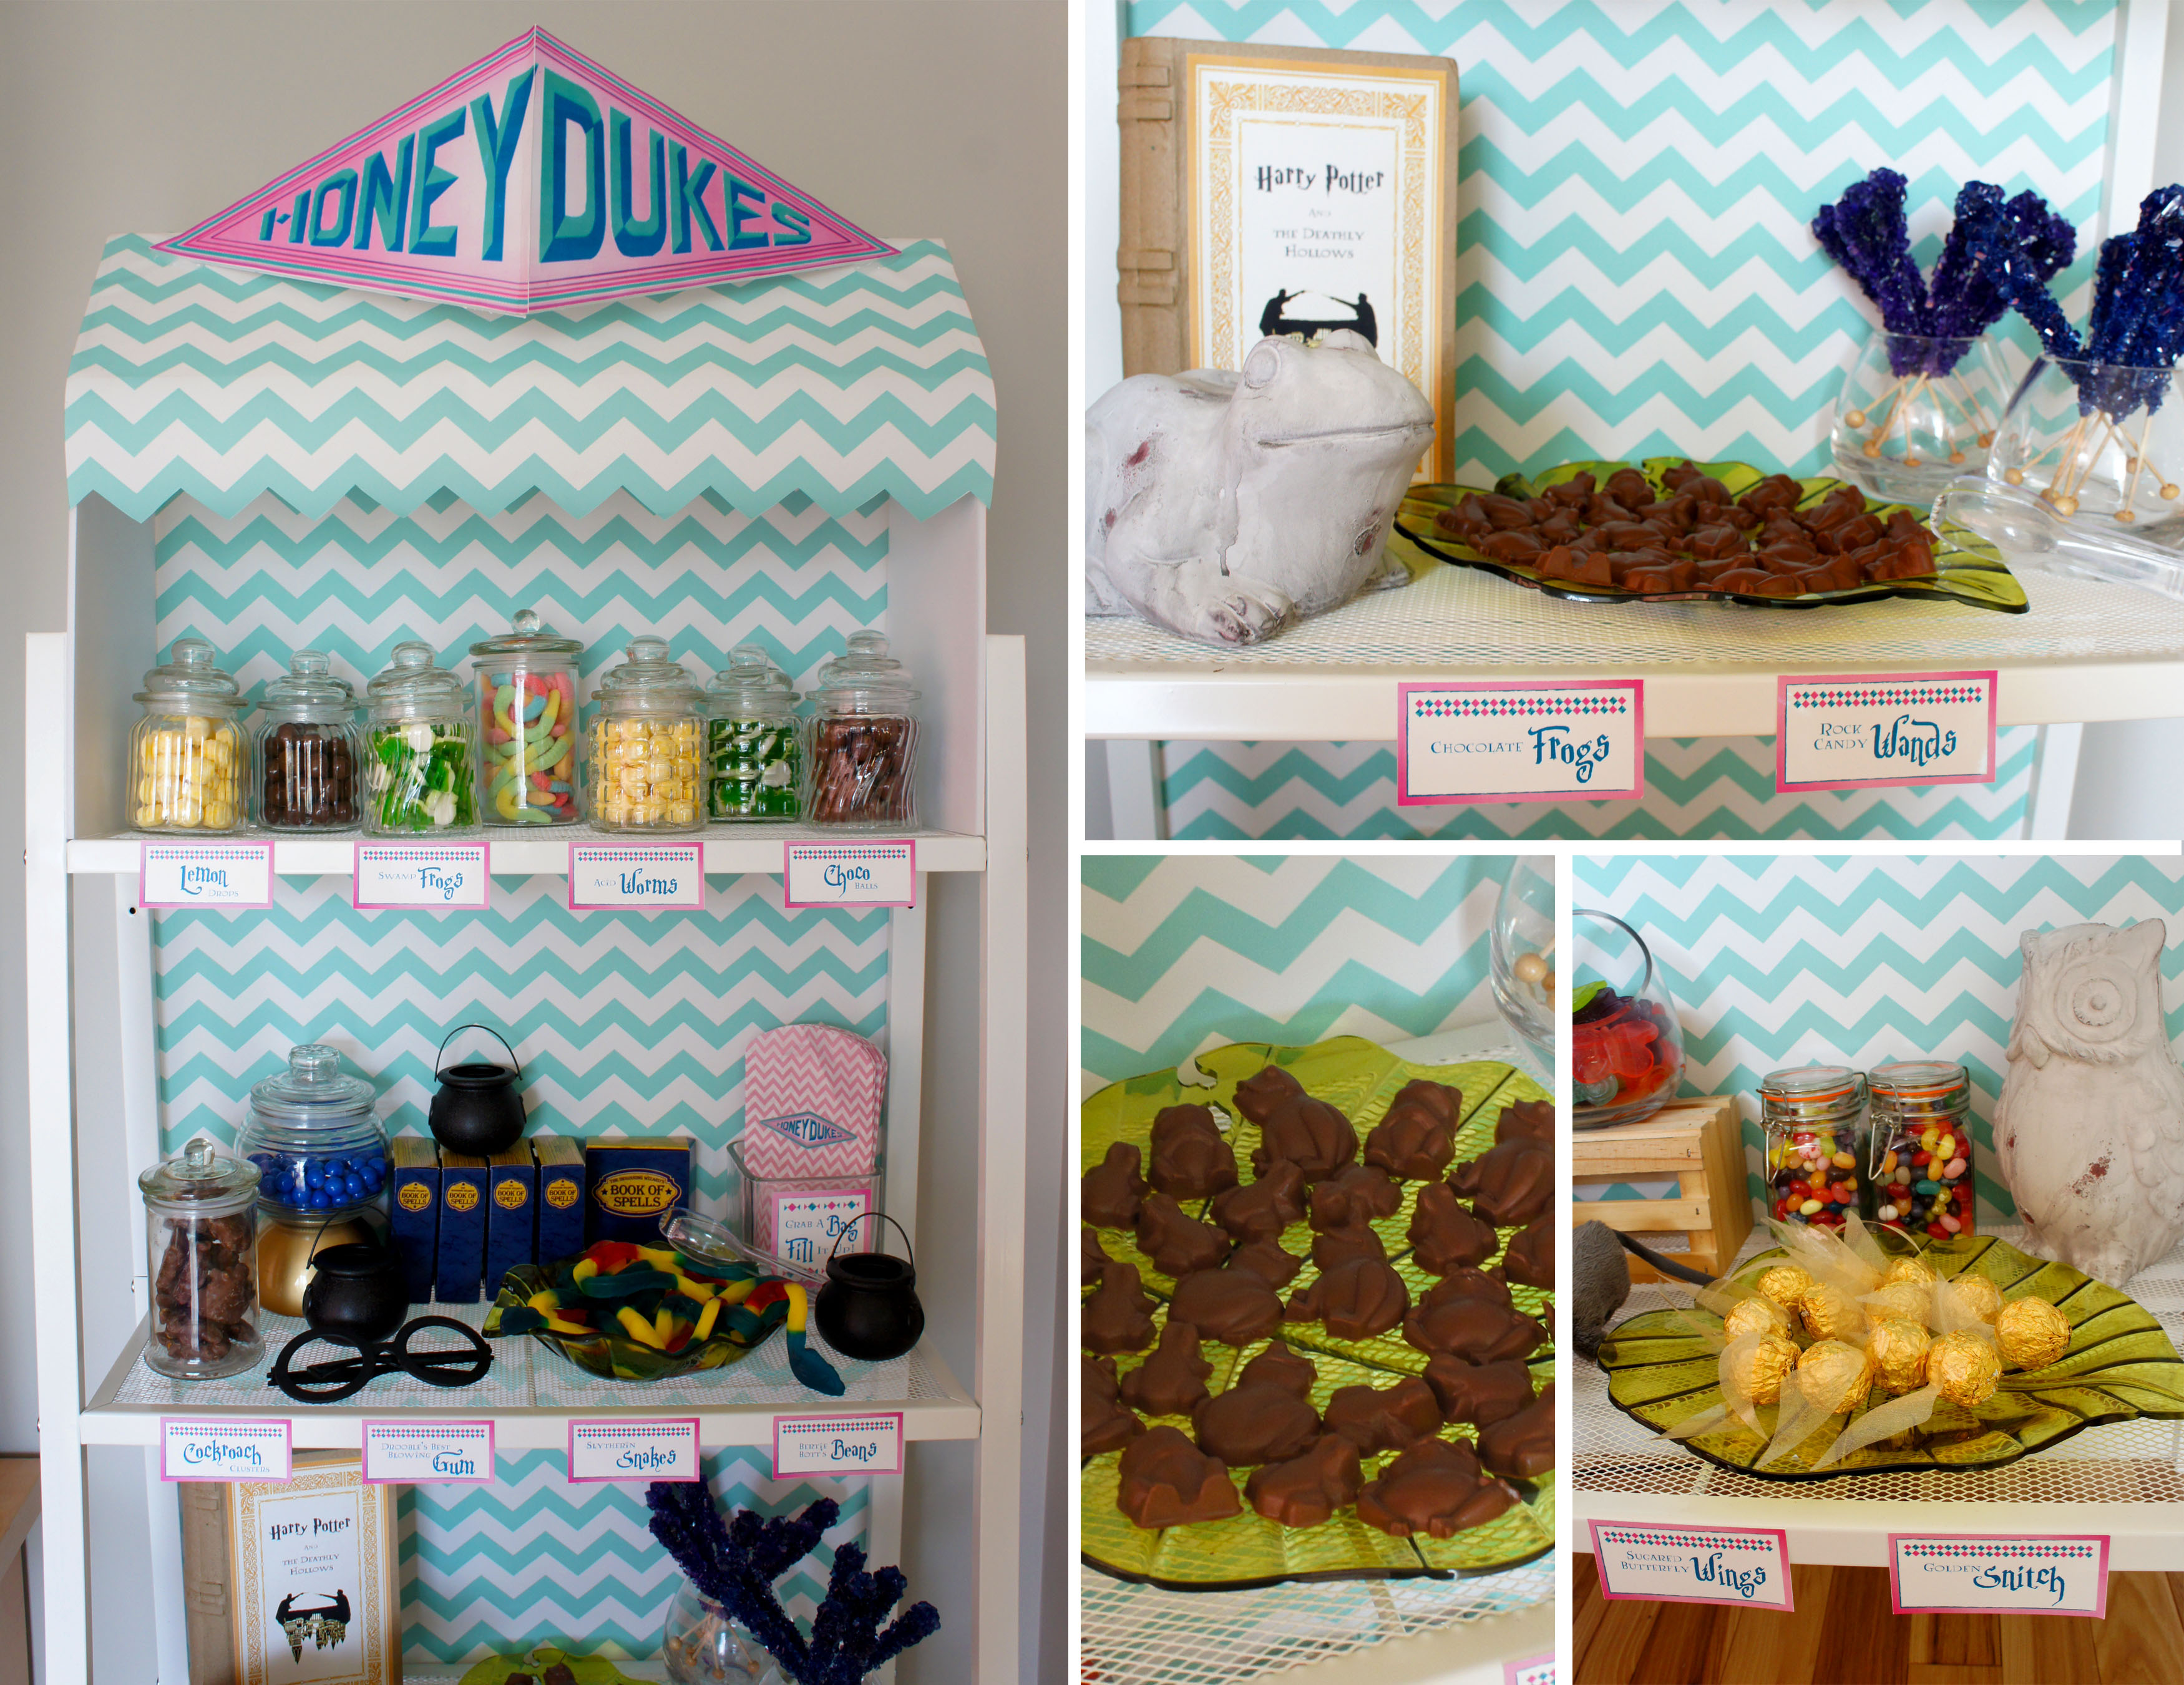
One of the first items I came across in my pinterest searches was the iconic Chocolate Frog and I knew instantly this was something we had to have at the party. As I continued to search ideas, I quickly realized the Chocolate Frogs were just one of the many magical candies in the Harry Potter realm and got excited that it was the perfect opportunity for a candy buffet.
I love candy buffets – the beautifully displayed candy adds a lot of visual appeal to the party and it is hard to find a party guests who doesn’t get just a little bit excited about candy! It also didn’t hurt that after seeing the candy buffet at my son’s third birthday, my brother hinted that he would love his own candy buffet. With him and his wife-to-be as my guests of honor at this party, I decided to seize the opportunity.
My candy stand was put together on a lightweight metal shelf we picked up from Ikea during Black Friday. My husband tried to argue we didn’t need it, but it was on sale and I knew it would come in handy for parties. I then Dolled it up by building a top valence out of dollar store foam core and gluing on some beautiful aqua and white chevron gift wrap. To finish off the look, I printed of a Honeydukes logo I found online, mounted it to foamcore and attached it to my valance with a lot of hot glue and patience. The 3D effect of the sign was partly a design decision, but more so a result of the size restrictions of my home printer and having to print the logo in two parts!
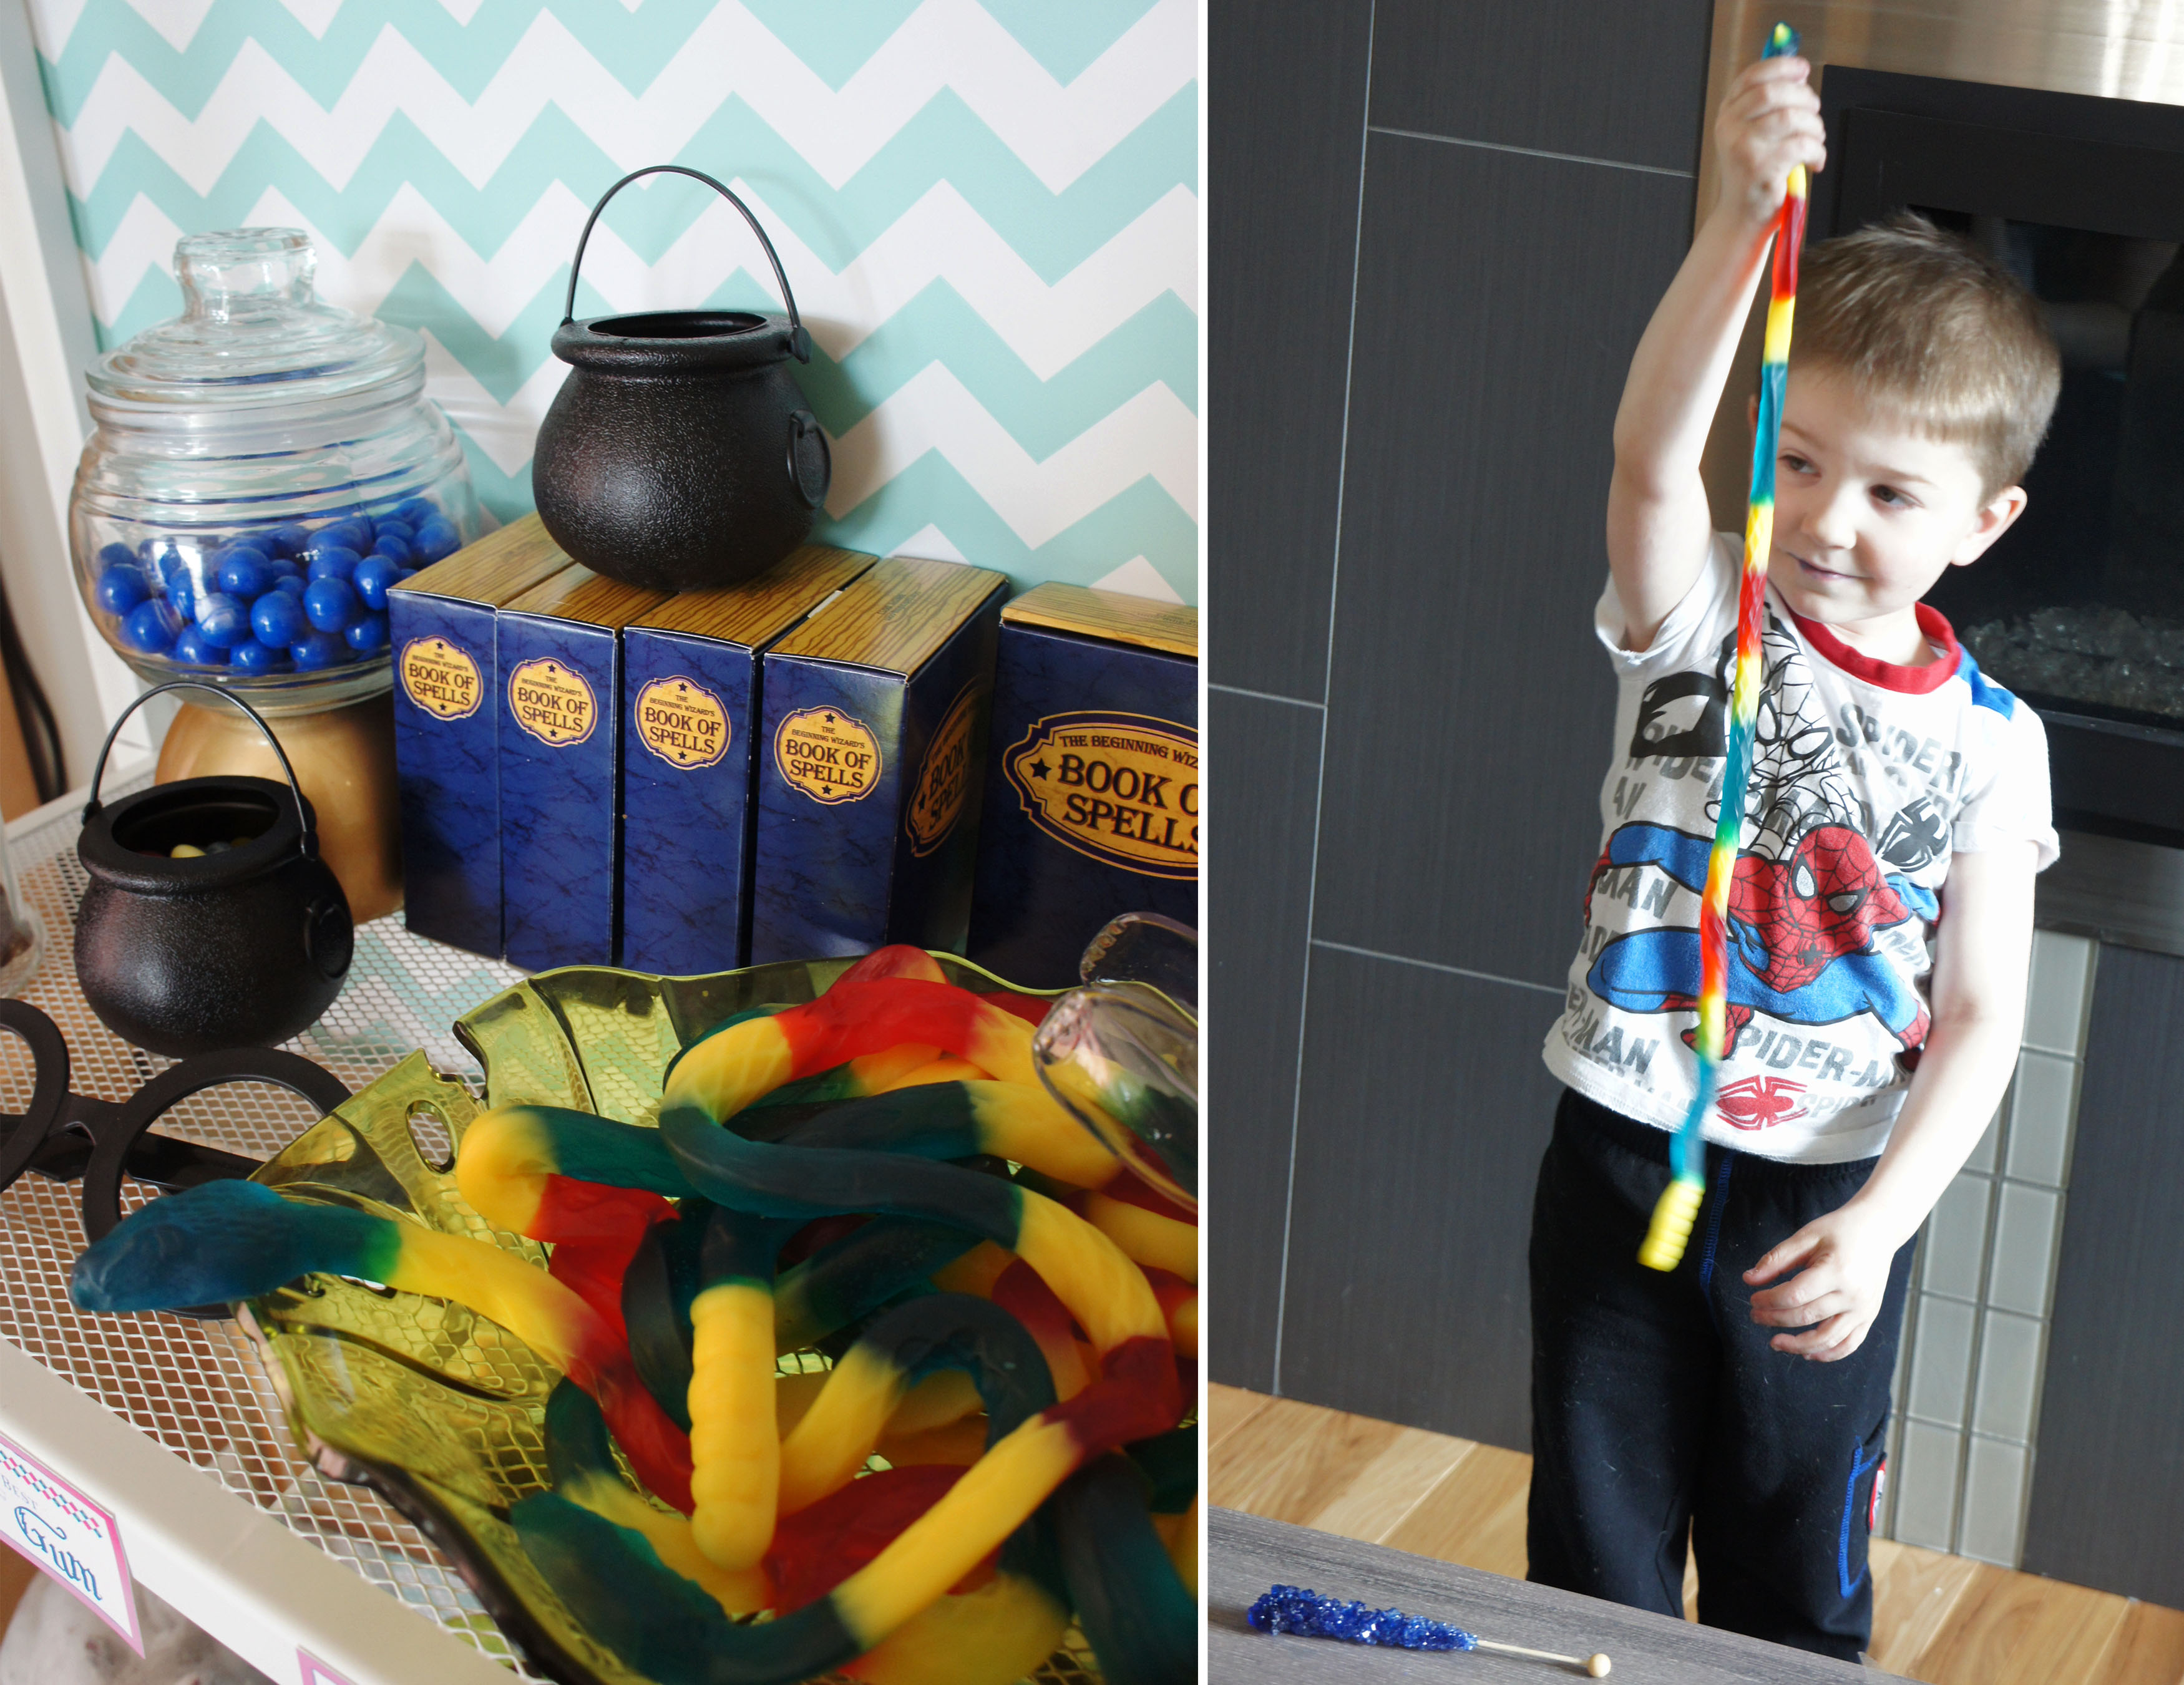
I found most of the candy at our local Bulk Barn and then labelled it with a Harry Potter spin. Gummy Frogs became “Swamp Frogs”, gummy mice were “Ice Mice”, chocolate covered nuts were “Cockroach Clusters” and my rock candy suckers were called “Rock Candy Wands”. We also had Choco Balls, Lemon Drops, Bertie Bott’s Beans, Drooble’s Best Blowing Gum, gummy Slytherin snakes, gummy Butterfly Wings and Chocolate Snitches.
I ended up ordering a frog chocolate mold off ebay and melted my own chocolate down to create the iconic Chocolate Frogs. It was my first time making molded chocolate and I was surprised how easy the process was! I already had the leaf shaped platters from hosting a Gnome themed wedding shower for my sister so those worked well to display the frogs, snakes and snitches.
My sister kindly offered to help with the party so I put her to work making the chocolate snitches. They were simply a Ferrero Rocher chocolate with cut-out wings taped to it. They were displayed alongside gummy “Ice Mice” and gummy “Sugared Butterfly Wings”.
One of the biggest hits was the ridiculously long “Slytherin snakes” I found at the bulk foods store. I had them coiled up in a leaf shaped dish so it was a surprise everytime someone would grab one from the dish only to end up with a massive gummy reptile. My little guy was with me when we picked them up and begged me for two weeks to try one, but they were so big I only ended up buying six or so for the party and needed them all. He finally got one at the party so he was happy little muggle.
I already had most of the glass containers for my display and the remainder I used were found at Dollar Tree. The plastic cauldrons, cardboard Spell Books and Harry Potter glasses were all from orientaltrading.com and I found the small pink and white chevron bags in the party aisle at Target. The Honeydukes labels on the bags were simply printed onto label paper on my home laser printer and then stuck to the bag.
After the candy was bought, the whole thing came together pretty easily and I couldn’t have been happier with the final look. It looked amazing as part of my Harry Potter Couple’s Wedding Shower, and the guests all seemed happy to go home with bags full of delicious candy.
For other examples of great Honeydukes candy displays, please visit my pinterest board!
I love the idea of a couple’s wedding shower! I’ll admit that I was a bit confused and unsure when my brother first suggested that is what he and his wife-to-be would like, but now that it is done and over with I think it is a wonderful idea. The couple gets to celebrate their upcoming marriage together with family and friends – because isn’t being together really what an engagement is all about? They will each have their separate stag and stagette parties, but I love that this gave them the opportunity to celebrate with their collective friends.
The Harry Potter theme was something the bride-to-be requested and, even though I have never read a Harry Potter book, I was happy to oblige. I love me a good themed party and my lack of Harry Potter knowledge just gave me a little extra challenge in creating the perfect party. There is no shortage of Potter party ideas on pinterest so it proved fairly easy to pull things together and the hardest part became figuring out when to stop!
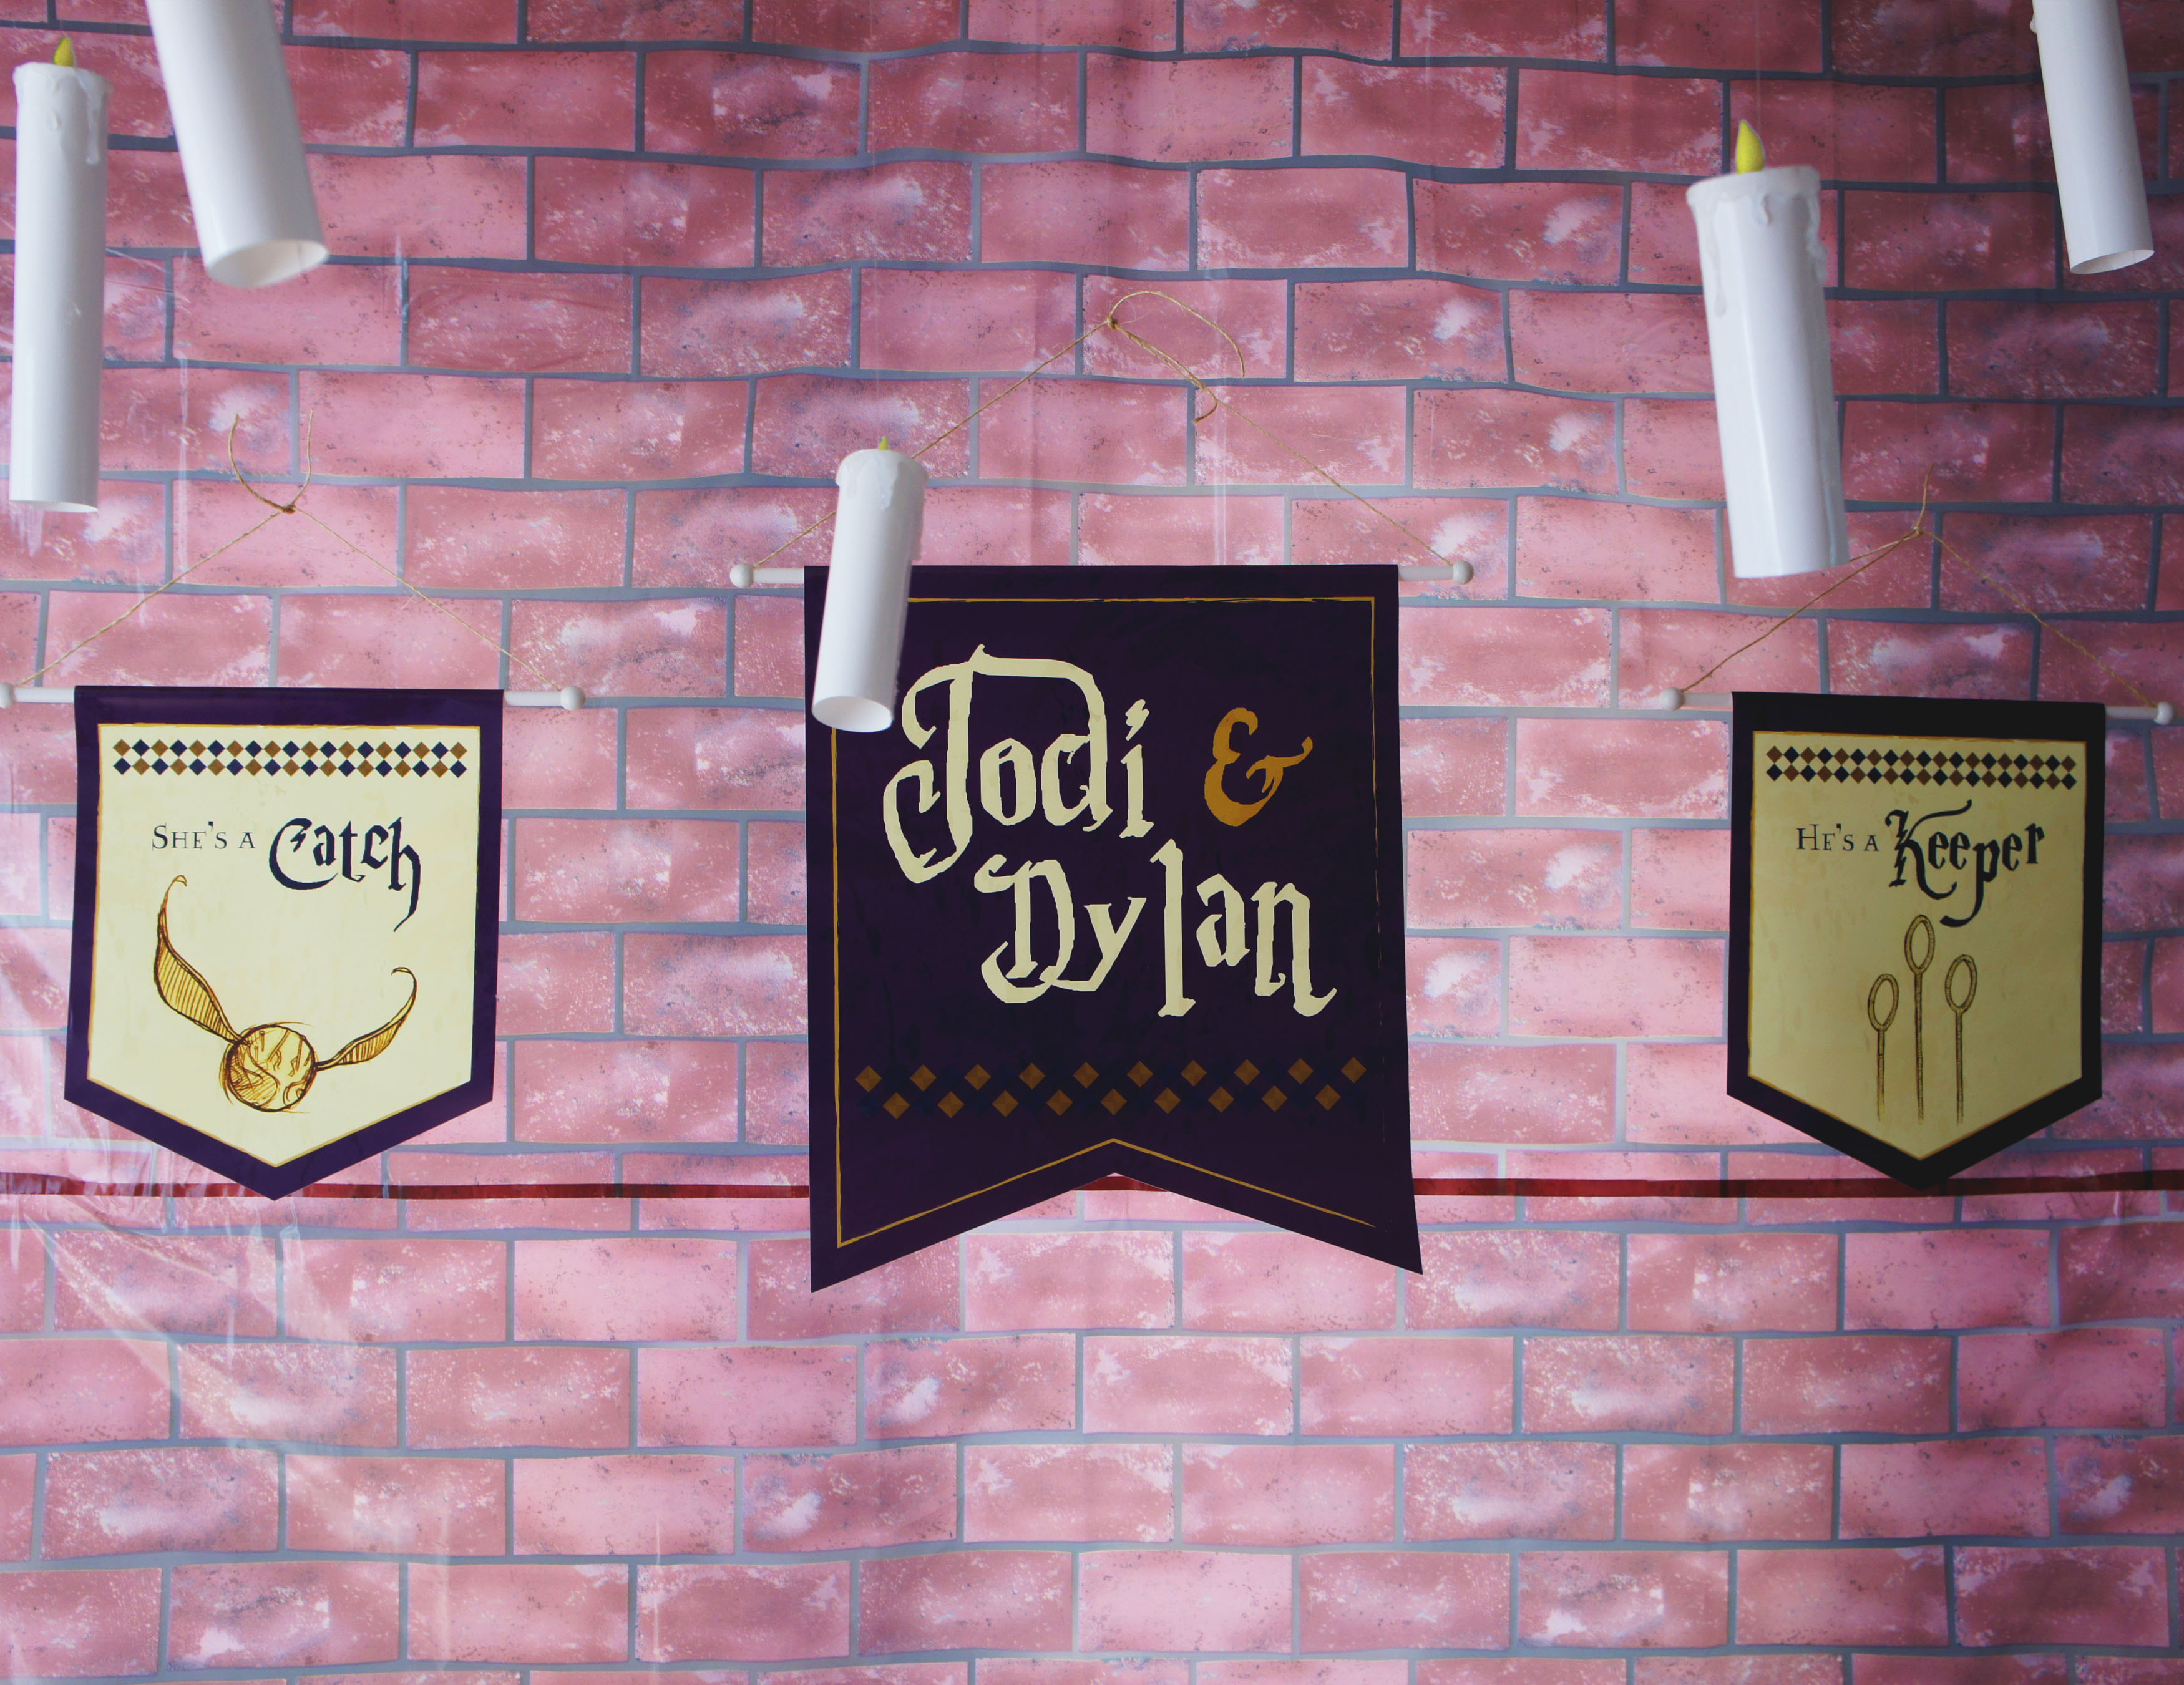
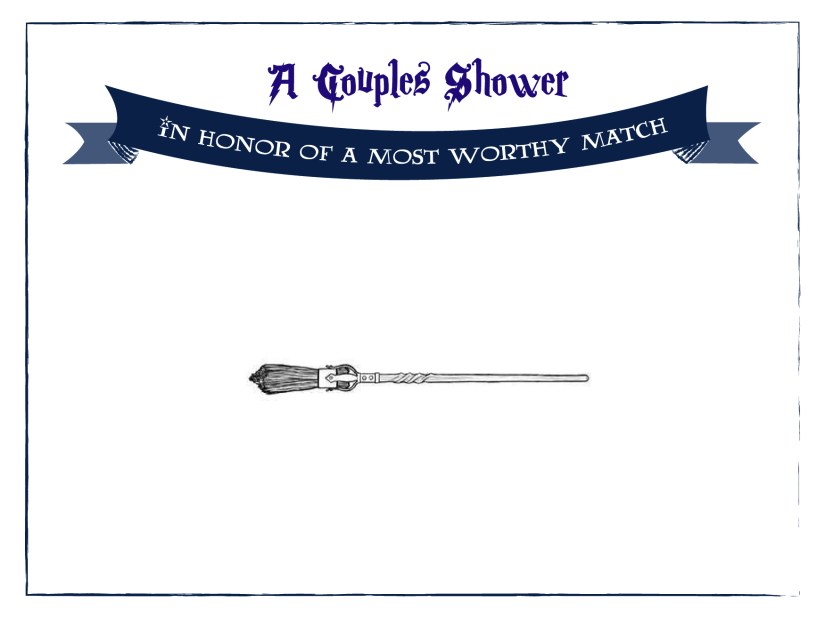
I, of course, began with the invites. You can see the full details on the invites here.
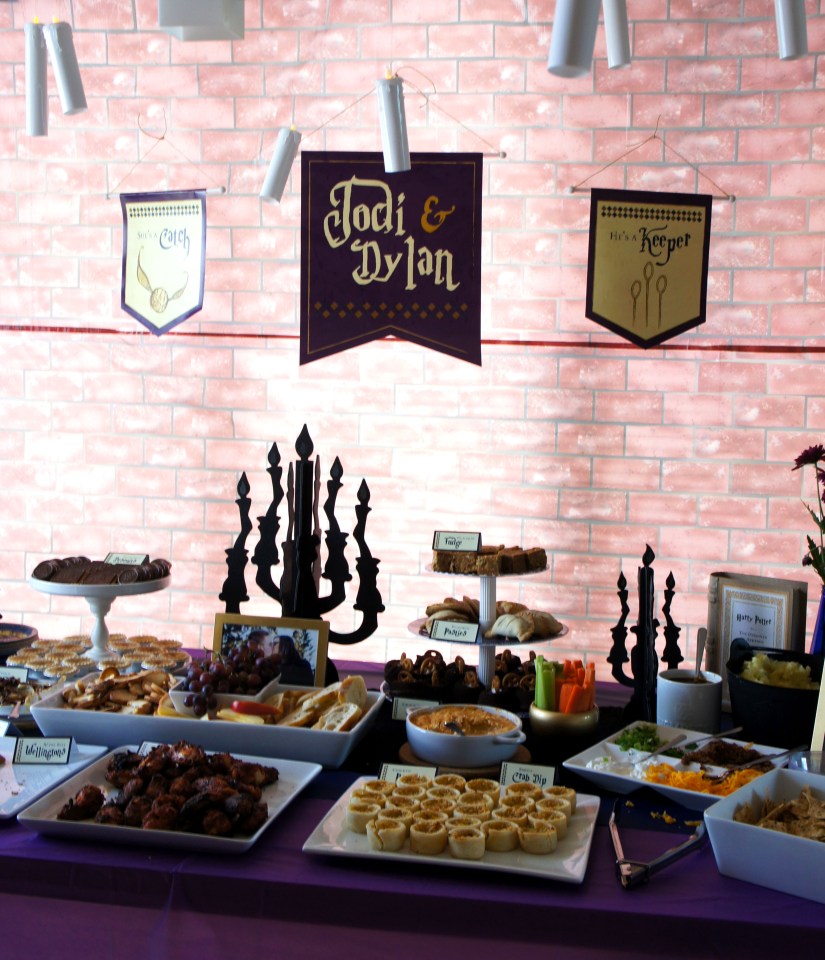
I loved the way the invites turned out, so I decided to carry the imagery across to my party décor and designed these large banners to hang behind the food table.
I used the same graphic style for a sign which greeted guests at the front door. I always dislike not knowing if I am in the location for a party so I like to have some sort of wreath or sign on my front door indicating to people that they are in the right place.
Inside, I transformed my front foyer into Platform 9 3/4 with the help of some wrapped cardboard boxes, a dollar store owl, a Harry Potter Scarf and glasses, a broom and a lovely birdcage borrowed from my sister.
The drink of choice was Butterbeer and it was served out of a barrel my sister crafted from some plastic dollar store plant pots and ribbon. The actual butterbeer was made following this great recipe from Just Sweet & Simple that included a delightful whipped topping.
There were also alcoholic choices at our Three Broomsticks stand including a couple varieties of Elf Made Wine, Ogden’s Old Firewhiskey, and a bottle of Butterscotch Schnapps, which made a delicious addition to the Butterbeer.
Drinks were served out of adorable “Magic Potion” paper cups I found on Oriental Trading. They have a whole line of Wizard Realm products so I ended up ordering the cups along with napkins, paper dessert plates, spellbook treat boxes, mini cauldrons and plastic Harry Potter glasses. They were well suited to the party and I carried their color scheme throughout my labels and pintable’s. It just so happens that the wedding colors are also blue and purple so I don’t think it could have worked out more perfectly!
The main food table was layered with purple and blue plastic table cloths and then decorated with candelabras, cardboard books, and fresh cut flowers displayed in upcycled blue glass beer bottles. The brick background was also bought off Oriental Trading and DIY floating candles created from battery operated tealights and paper were hung on fishing line above the table to add the finishing touch to my “great hall”.
Enter a caption
I served a variety of British inspired finger foods, worthy of the finest feast in the Great Hall at Hogwart’s. The food included individual chicken pub pies, mini beef wellington, barbequed chicken wings, spinach salad, guacamole devilled eggs, Kahlua and pecan baked brie, warm crab dip and a mashed potato bar.
We also couldn’t forget all the great Harry Potter sweets, so platters were filled with treacle tarts, pumpkin fudge, cauldron cakes, pumpkin pasties and Hogwart’s biscuits.
And just in case that wasn’t enough sweets, we had our very own Honeyduke’s stand right off the main food table.
I love creating candy displays so I was very excited to learn about Honeyduke’s in my research and come up with all the different candy I could incorporate into a display. Party guests were invited to fill their small Honeydukes branded paper bags with everything from Bertie Bott’s Beans, Drooble’s best blowing gum and chocolate frogs to long gummy Slytherin snakes, rock candy wands and golden snitches.
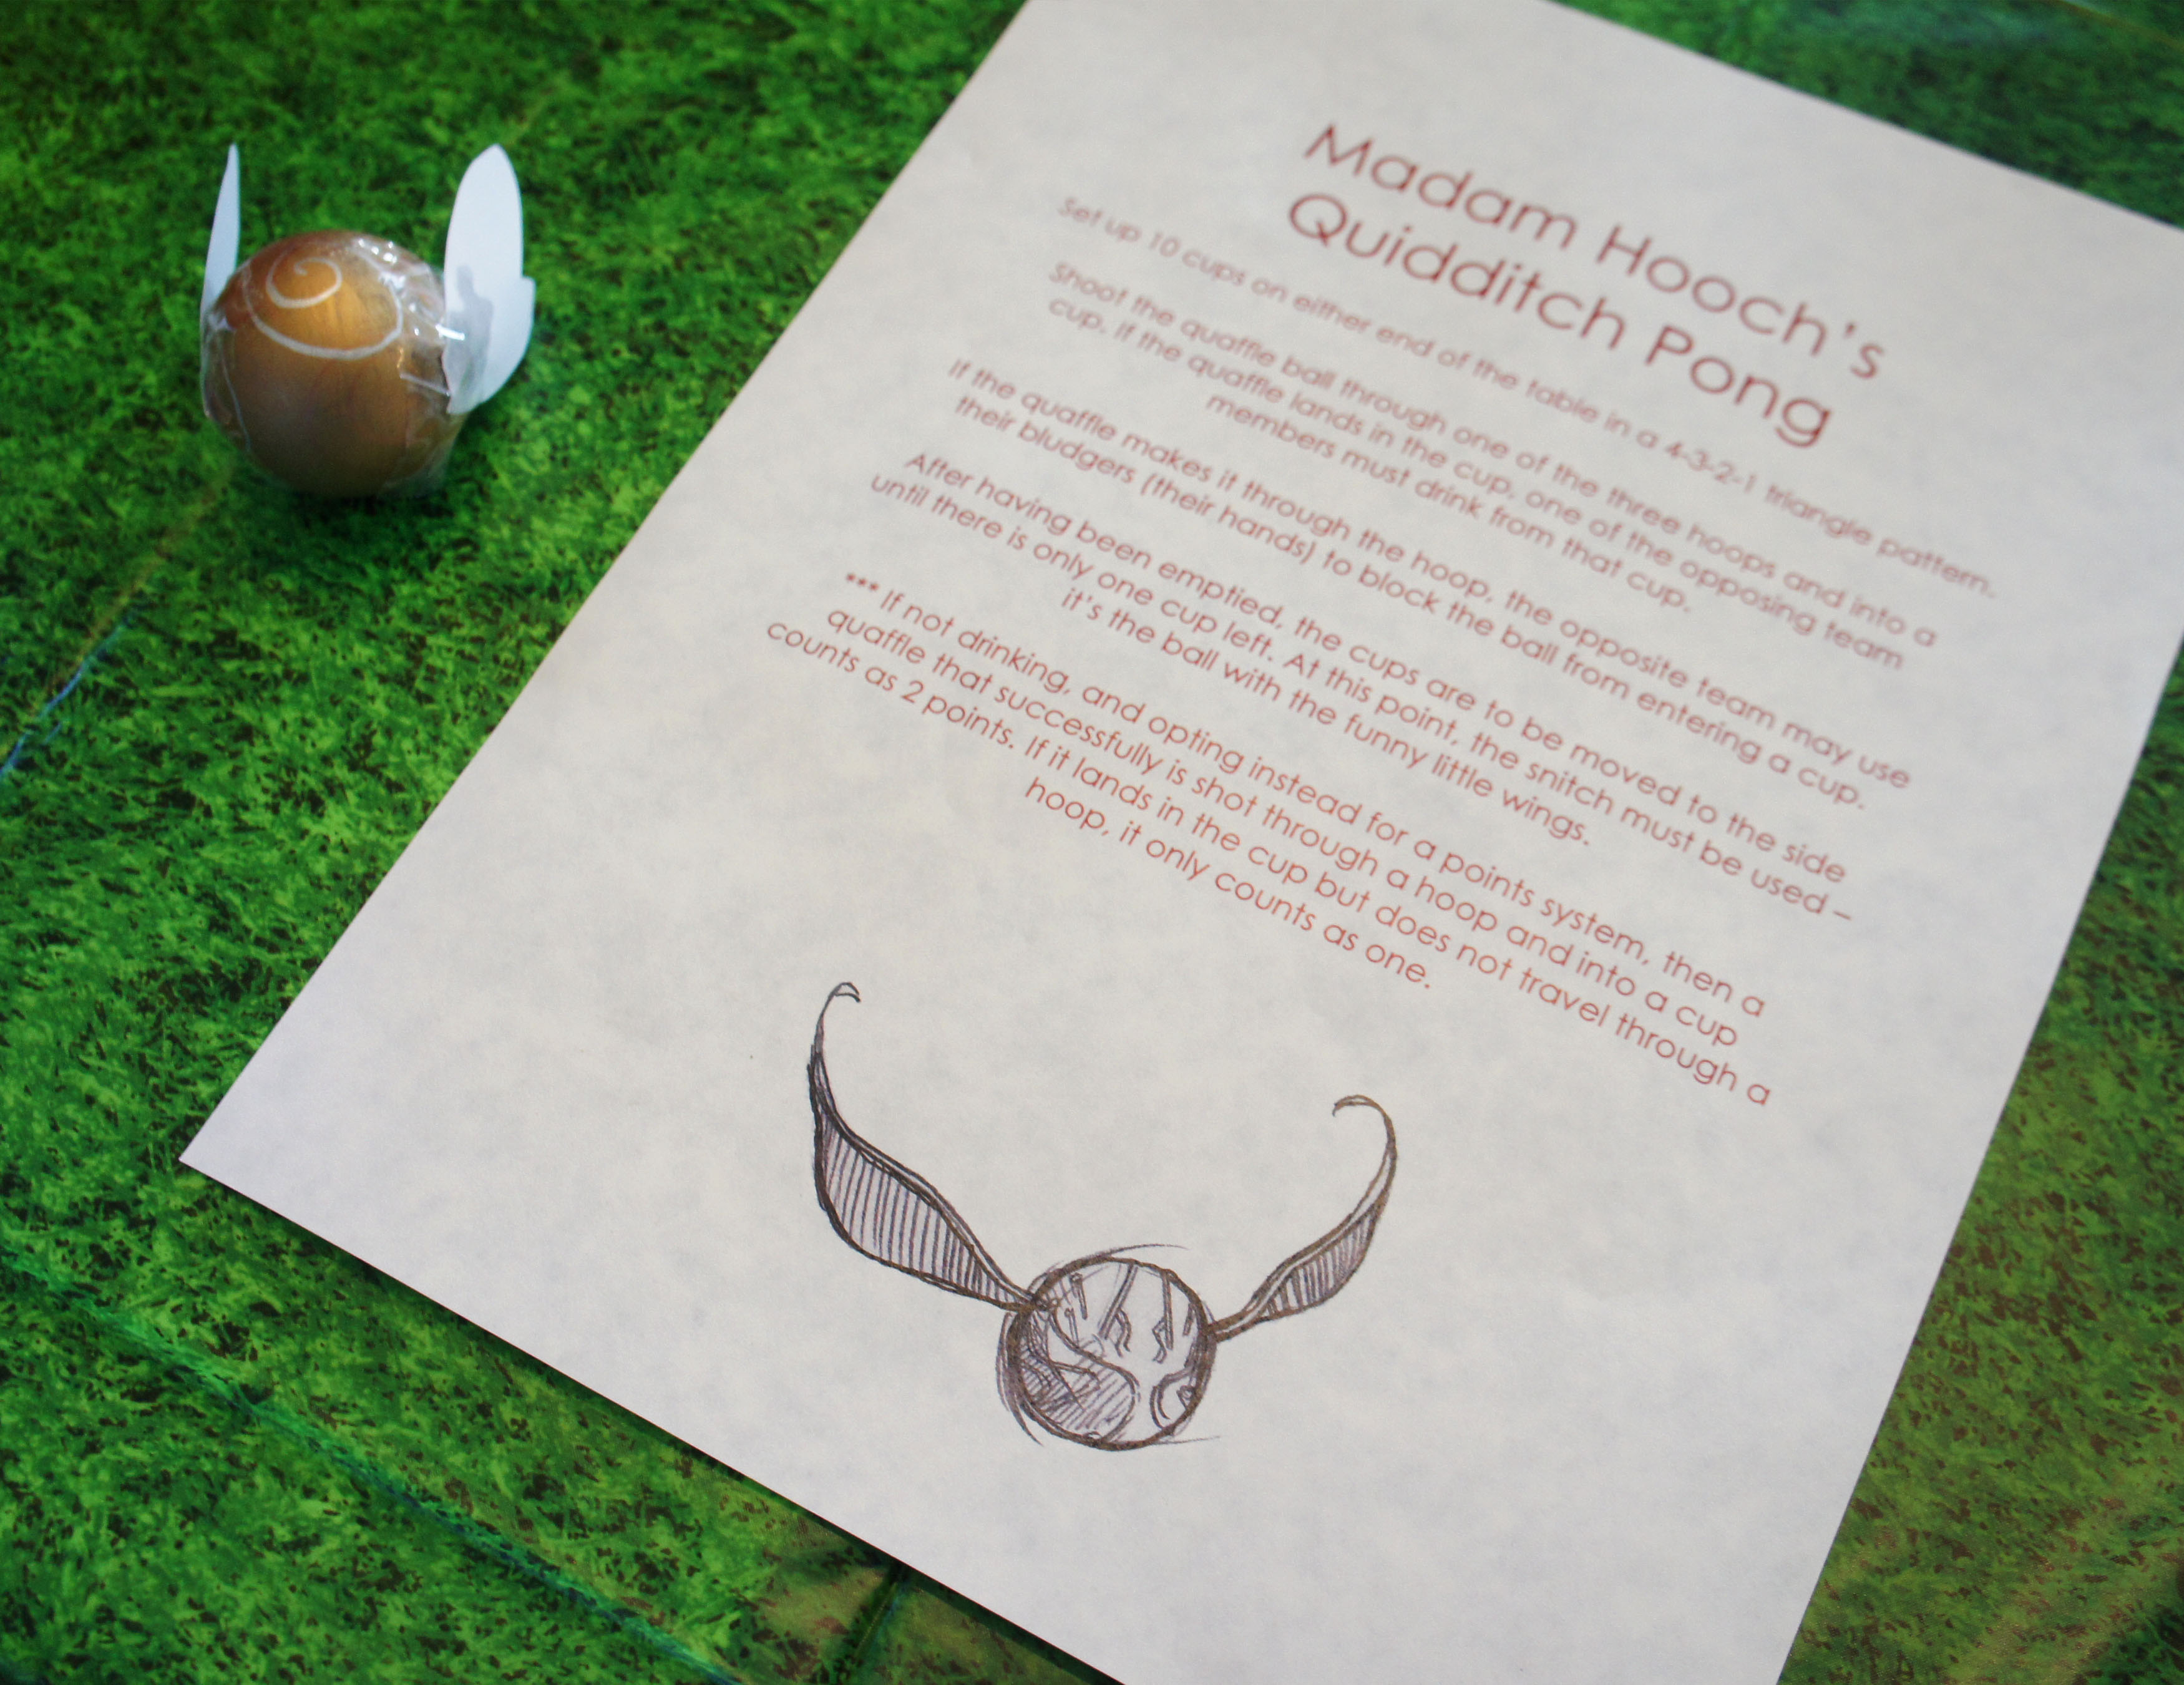
Speaking of snitches, the one shower game we did have was Quidditch Pong. The Maid of Honor did a wonderful job creating the hoops and balls that we displayed on a folding table covered in an artificial turf tablecloth.
Their wasn’t much drinking happening at the shower, but I do know the kids sure had a fun time trying to get the balls in the cups!
It turned out to be an amazing, laid back day celebrating my brother and my soon to be sister-in-law. I got to meet their lovely friends, we all got to eat some great food and I was excited that all my close family members were able to come share in the happy occasion.
Confession: I have never read Harry Potter. I vaguely remember watching the first movie, but that was way back when it first came out and I couldn’t remember any of the details now if I tried. The second closest I have come to having anything to do with Harry Potter was a small exhibit we happened upon in the Marseilles train station on our Europe trip in 2009. Displayed within the different train cars were some cool props and memorabilia from the movie, but knowing very little about the series it was not much for me to get excited about.
When my brother brought up the idea of helping plan a couple’s wedding shower for his bride-to-be and hinted that she would like a Harry Potter theme, I admit I was a little daunted and less then excited. Then my Pinterest search skills took over and I quickly learned there was a lot that could be done with the theme – hello butterbeer, chocolate frogs, and a Honeydukes themed candy buffet! I could go on, but I don’t want to spoil too many of the ideas I have in store for the happy couple.
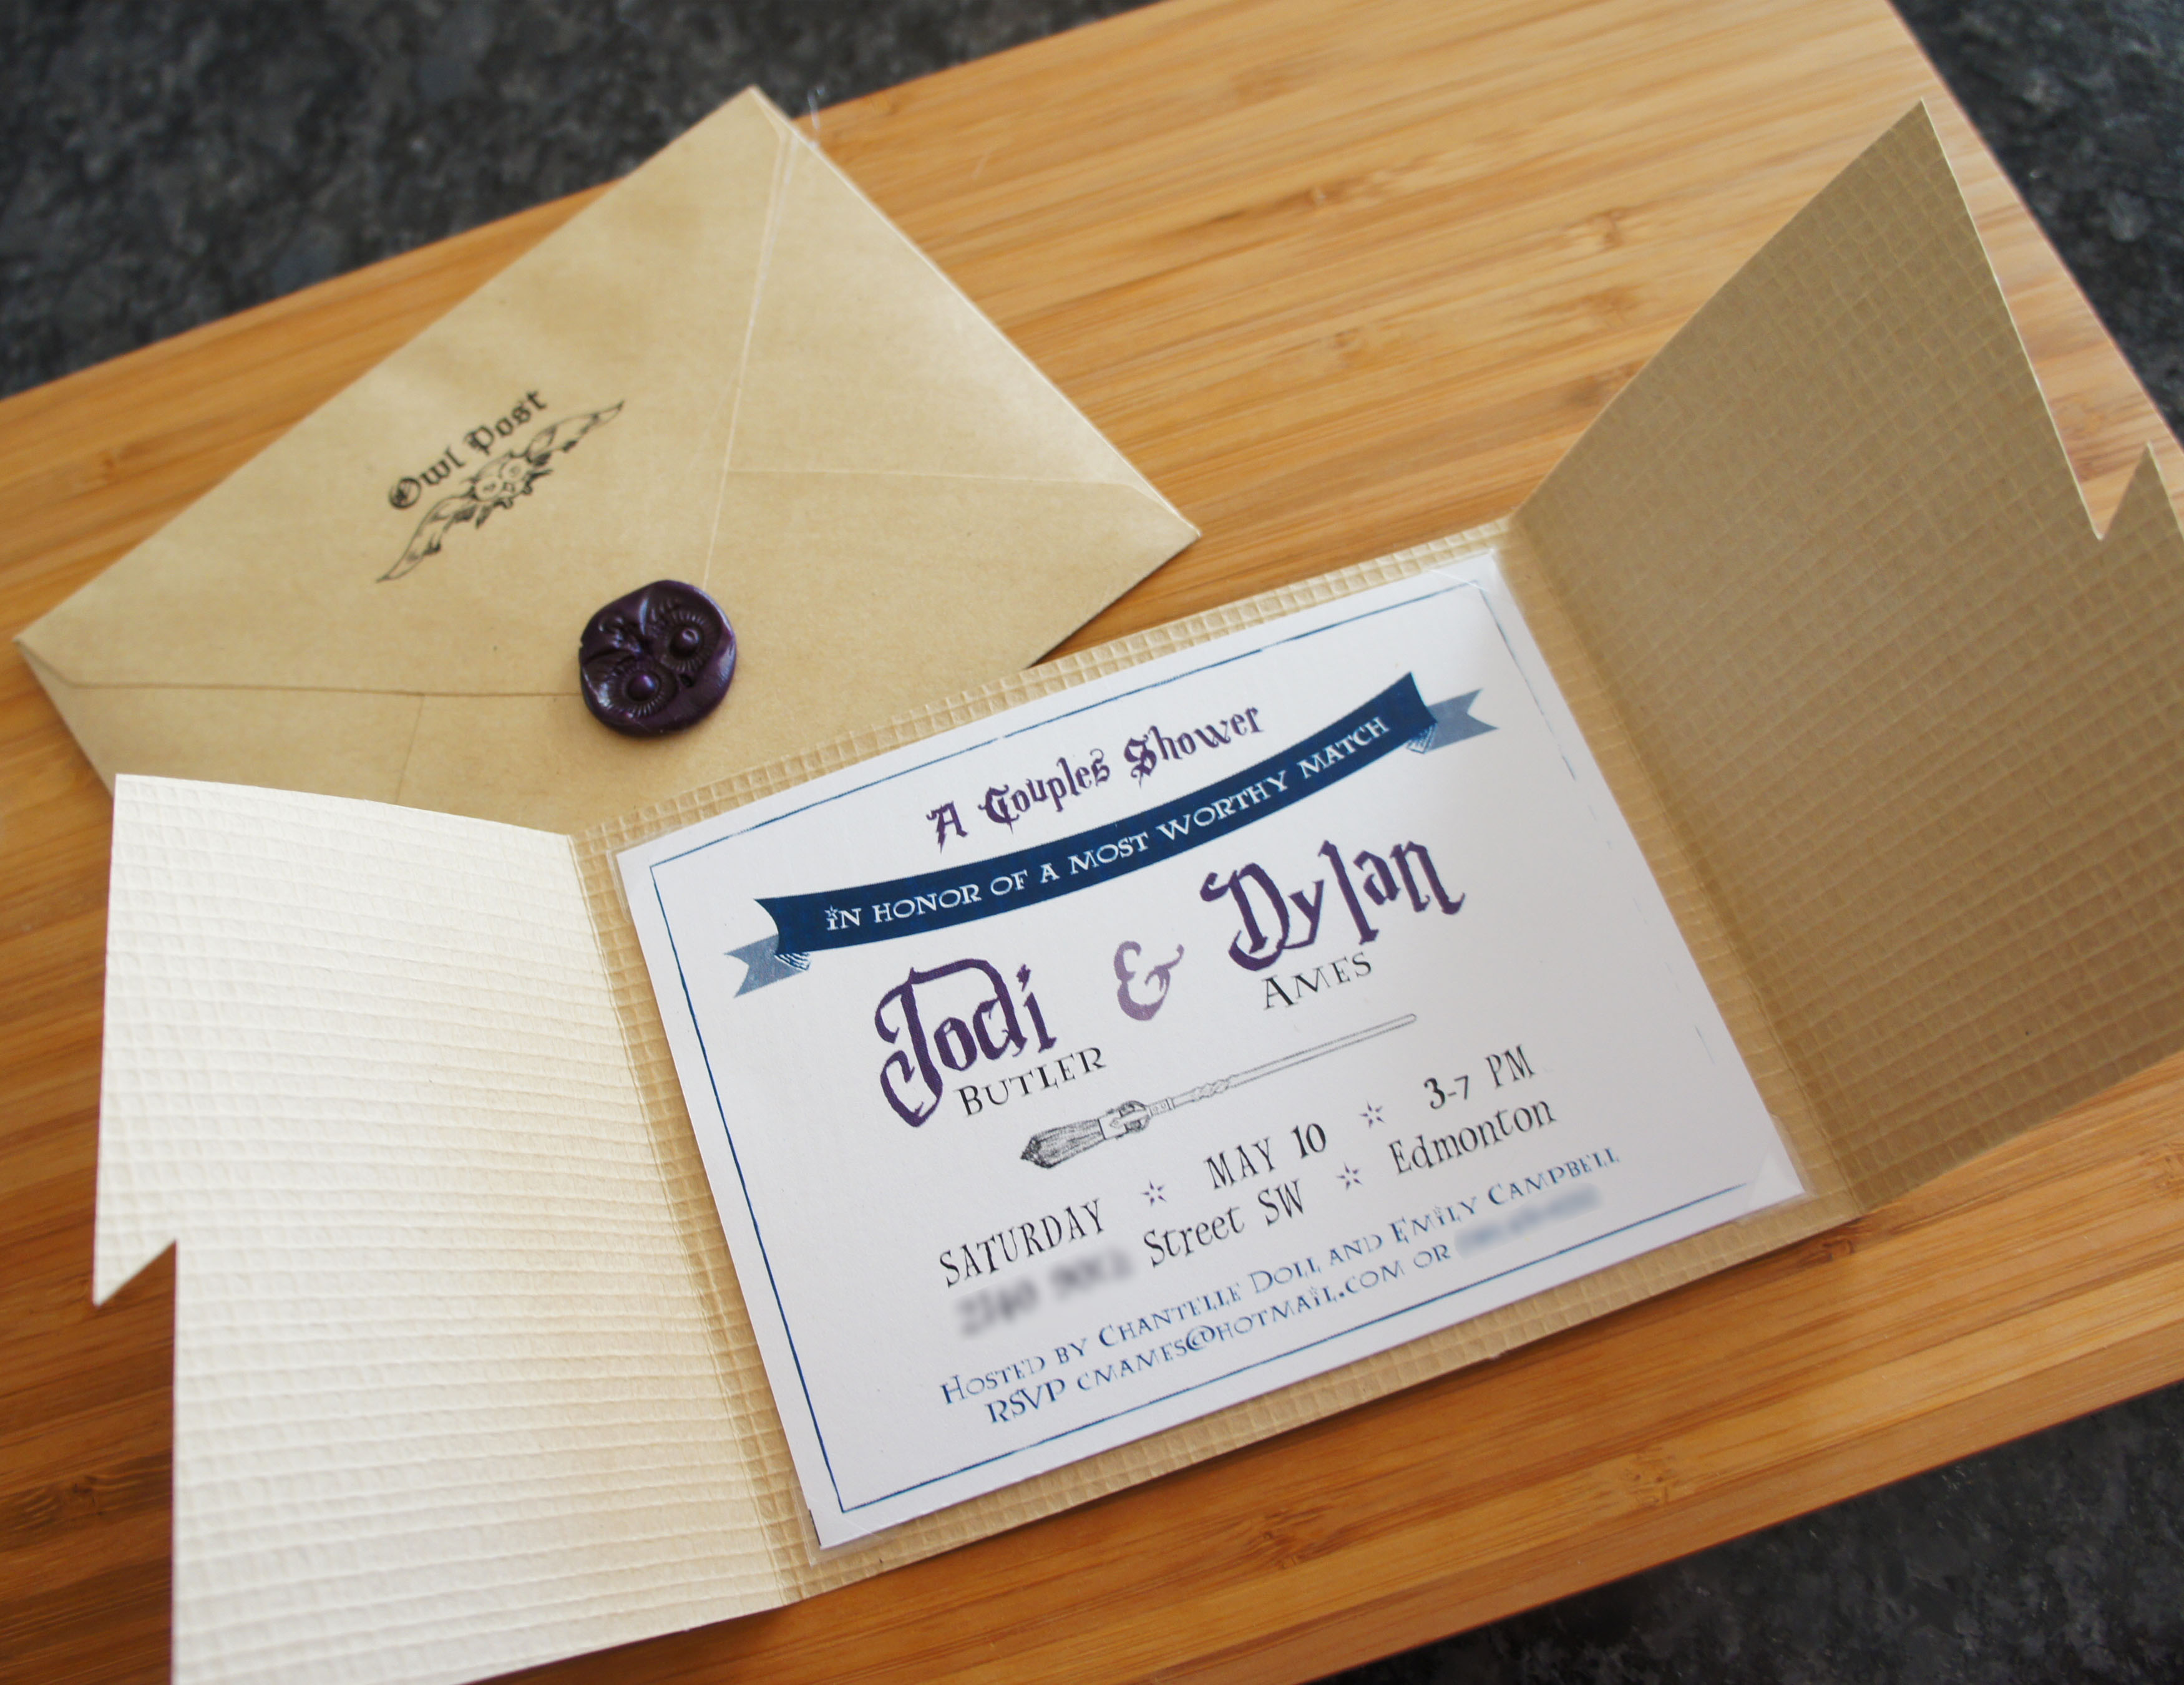
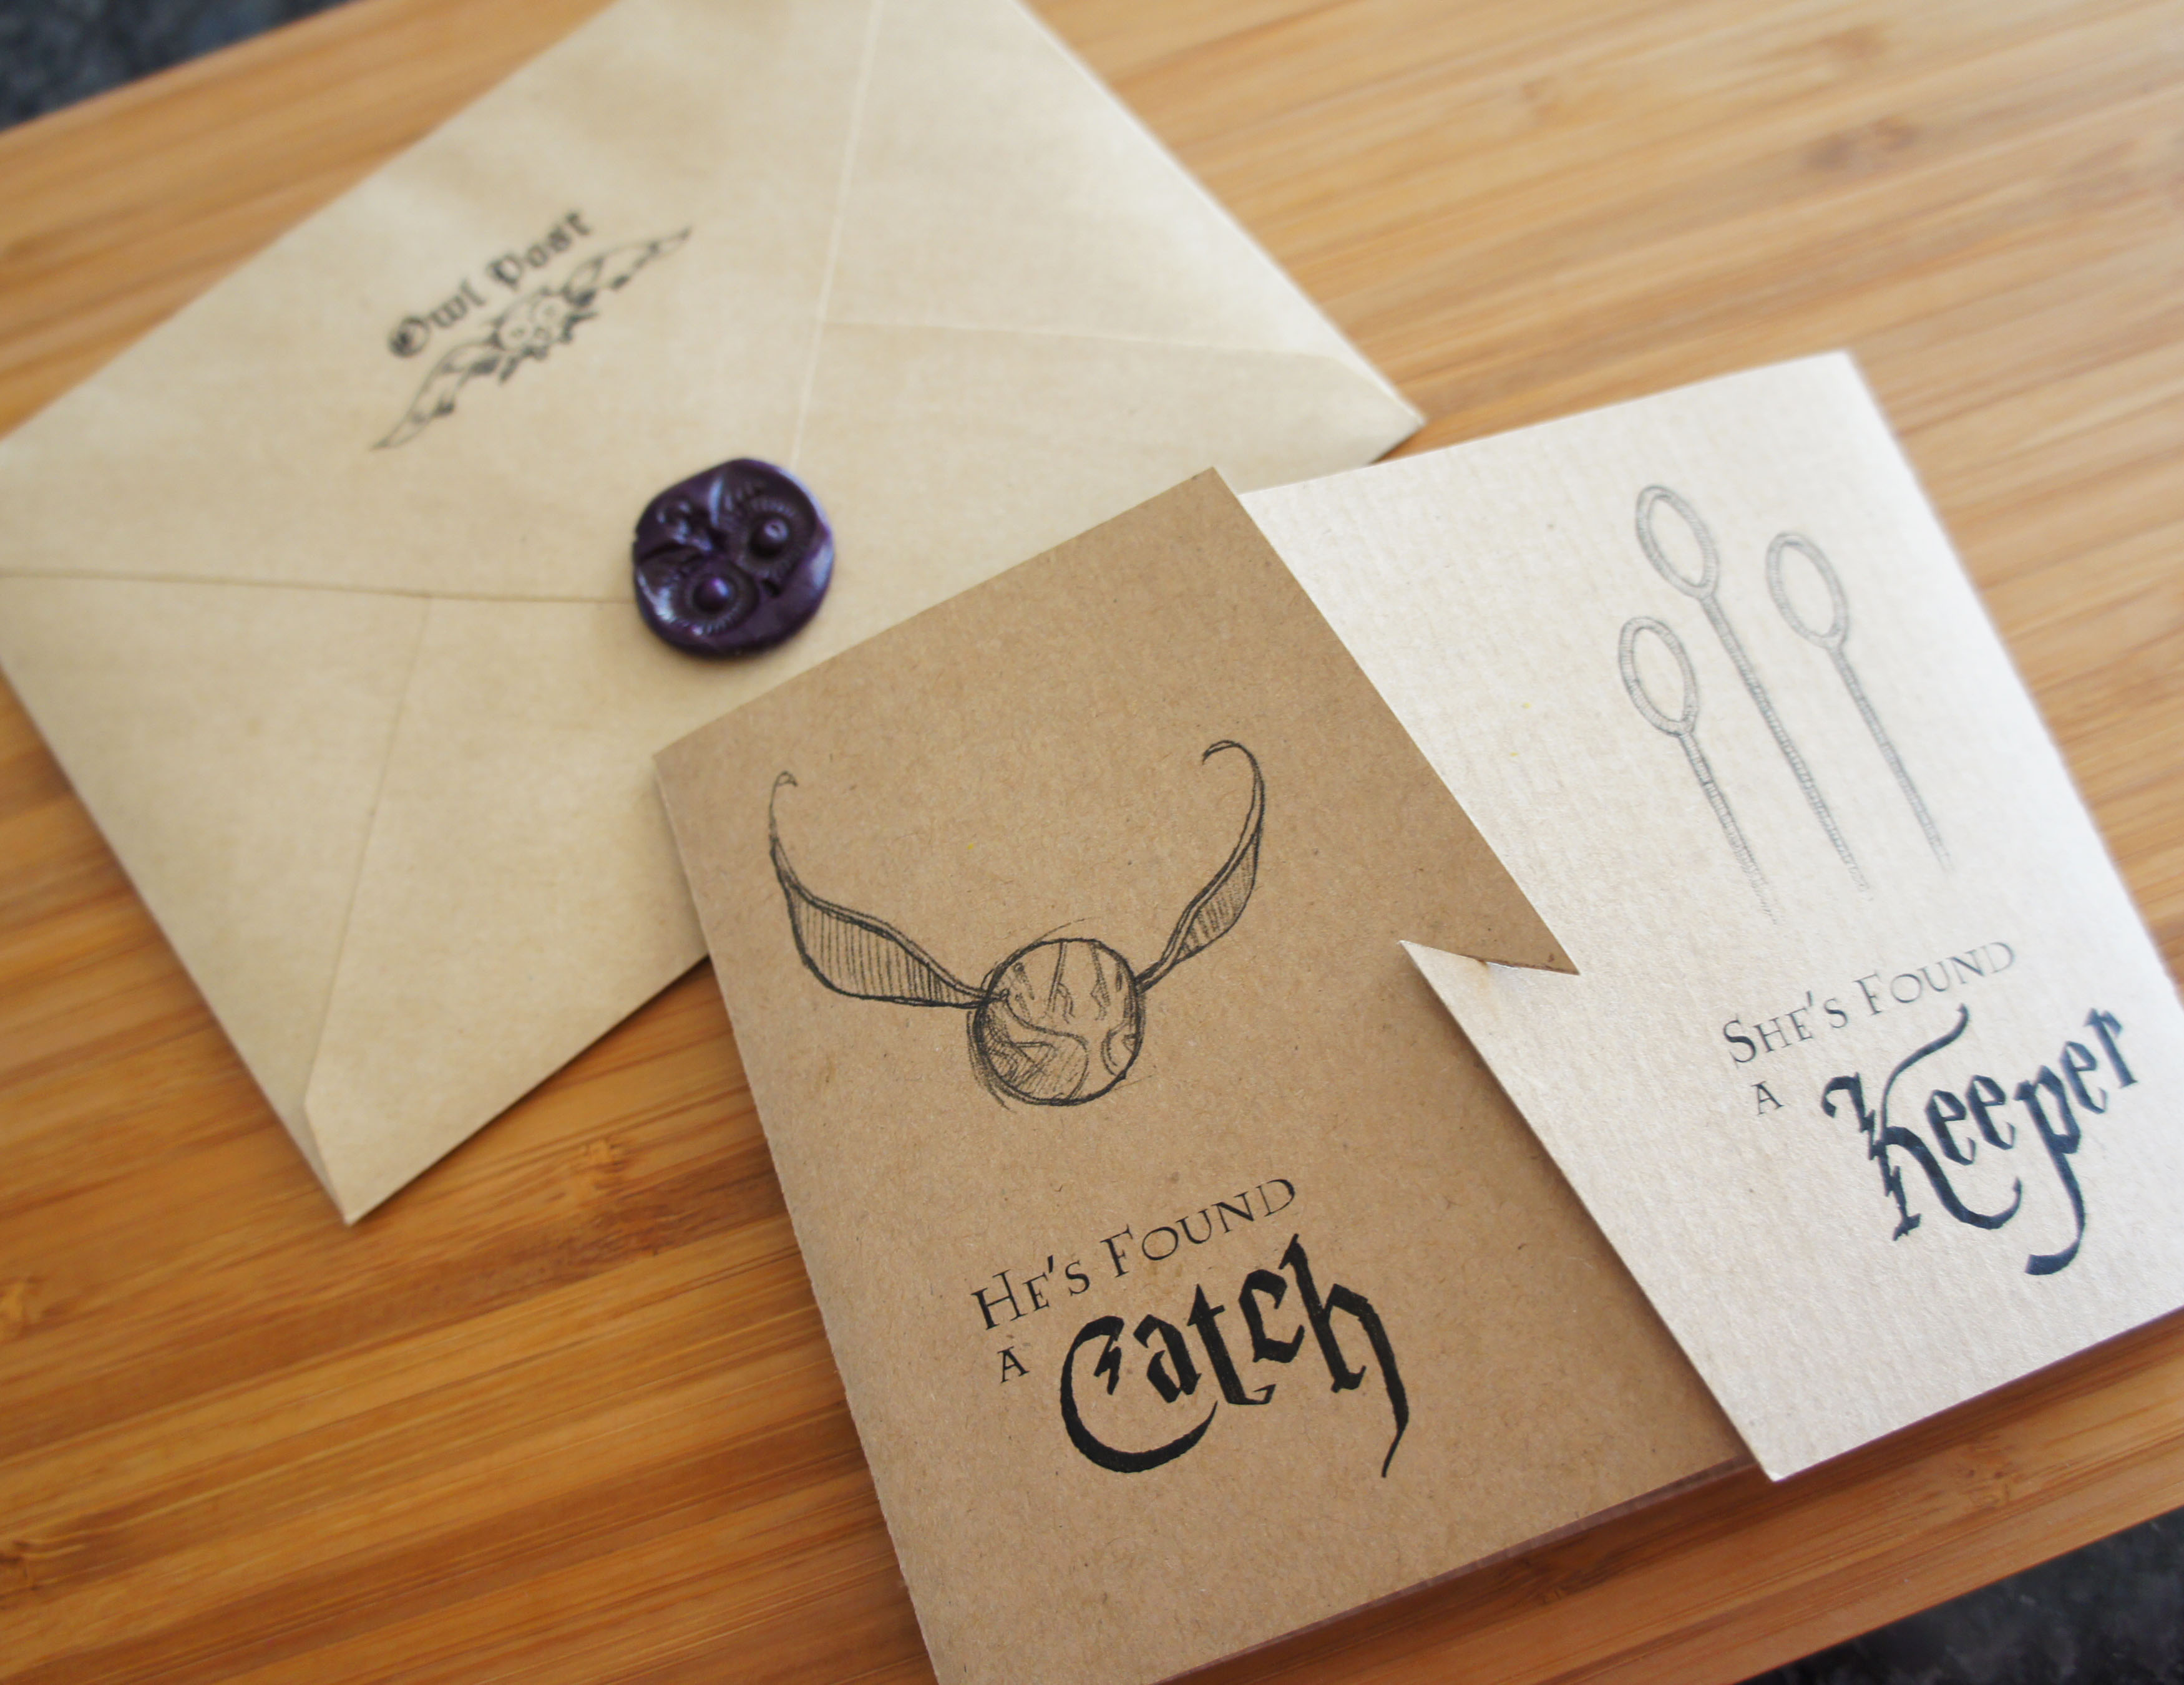
My original thought for the invite was to do something with owls, but in my Pinterest searches I came across these adorable quidditch mugs from TooLegitTooKnit on Etsy and knew right away it would work perfectly for the front of the invite.
Borrowing the idea, I split my invite down the middle and put “He’s Found a Catch” on one side with the complimentary “She’s Found a Keeper” on the other half. To add interest, I incorporated an overlapping lightening bolt down the middle which both mimicked Harry’s birth mark and served as a way to close up the invitations. They was a bit of a pain to individually cut and score with my exacto knife, but luckily I only had 14 of them to make up!
The lightening bolt closure opened up to the party details printed inside on clean white cardstock.
For the envelopes I was able to find some “Owlgram” graphics online that I printed onto the front and backs of the envelopes. I had to print addresses on anyway, so this really didn’t take much extra effort and gave it that special touch. I went with a rustic Kraft type envelope to match the paper of the invite inside.
The maid of honor also suggested we do something with a wax seal and began to hunt high and low for a wax seal kit. I did a quick search and came across Just Another Day in Paradise‘s post for her Harry Potter Birthday invitations and was excited to see she was able to get the wax seal look easily with clay. I ended up finding an owl pendant at Michael’s and used it to imprint into some purple Fimo clay. I ended up baking my clay medallions and then hot gluing onto each envelope to make sure they survived the trip through the mail.
I love the way these turned out and am excited to get going on all the other party details, even if I am a bit of a dummy when it comes to Harry Potter.
I can appreciate the magic and wonder that comes with Harry Potter and I do hope to one day eventually read the books and watch all the movies with my kids. I know many adults love the series so I can imagine it is that much better when experiencing it together through the eyes of a child!
There have been a few requests for the artwork files for these invites so I am providing them here for your use. You can download the main cover artwork pdf here: HP Shower Invite Artwork_DolledUpDesign
I have laid it out on a legal (8.5″x14″) sized piece of paper and it is designed to be folded and fit neatly in a 5.625″ x 4.375″ envelope.
The inside details can be added to this high resolution jpeg:
Final size should be 5″x3.75″ to fit neatly inside the above cover.
And, finally, here are a few owl post seals to use on the envelopes:
I appreciate all the positive feedback on the invitations and I hope this can help some of you create your very own! Don’t forget to check out all my other Harry Potter party posts for other great food and decoration ideas.