

What’s this? An adult birthday party for once?!
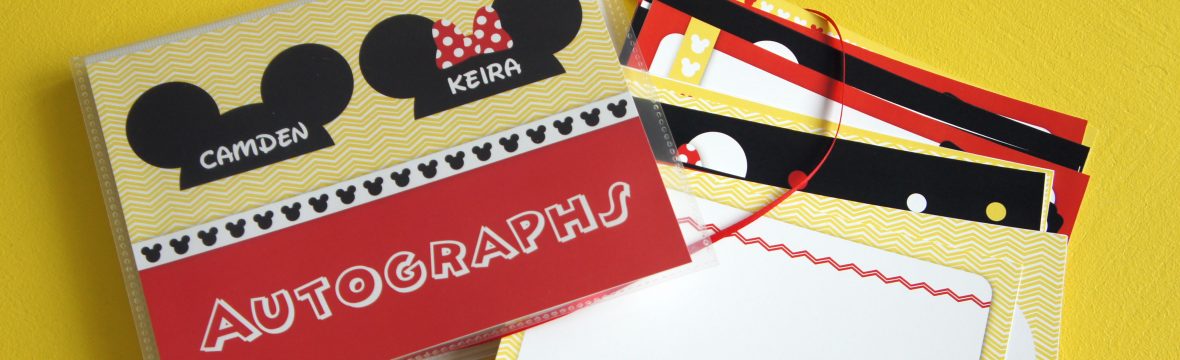

Today marks one year since I decided to start sharing my ideas with the world through Dolled Up Design and what better way to share then in my 100th post!
I started this blog as an outlet for my creative ideas. I love reading other blogs and seeing their great parties, interior decorating and creative food ideas. I waste way too much time on Pinterest and decided I needed to start sharing back some of my own ideas rather then just creating board upon board of other people’s ideas.
This is a creative outlet for me. I enjoyed my previous job as a graphic designer, but when I made the switch to being at home with the kids I felt my skills starting to fall to the wayside. I began this blog as a way to try and establish myself as more then just “Camden and Keira’s mom” and am hoping in the process I might inspire other people to bring out their creative side.
I am surprised to see my post count as high as it is because it honestly doesn’t feel like I am able to spend as much time on my blog as I would like. Between keeping up with the kids and moving this past year, this is definitely an accomplishment for me. I am also proud and excited to have been chosen to join Moms & Munchkins as a Party Tip contributor so hopefully that gives me the push to come up with even more great ideas in the year ahead. I have tons of projects floating around in my head, but it is always a matter of finding the time to execute and document these great ideas!
Like a lot of my projects, my blog is a work in progress. The overall look of the blog still leaves something to be desired and the linking up to all the different avenues of social media makes my head spin! There is definite room for improvement and I hope as I move forward and my blog continues to grow that it only continues to become better.
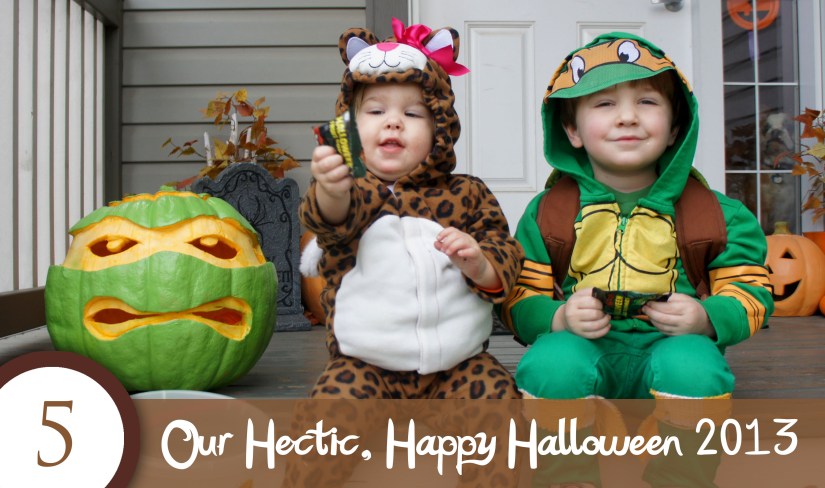
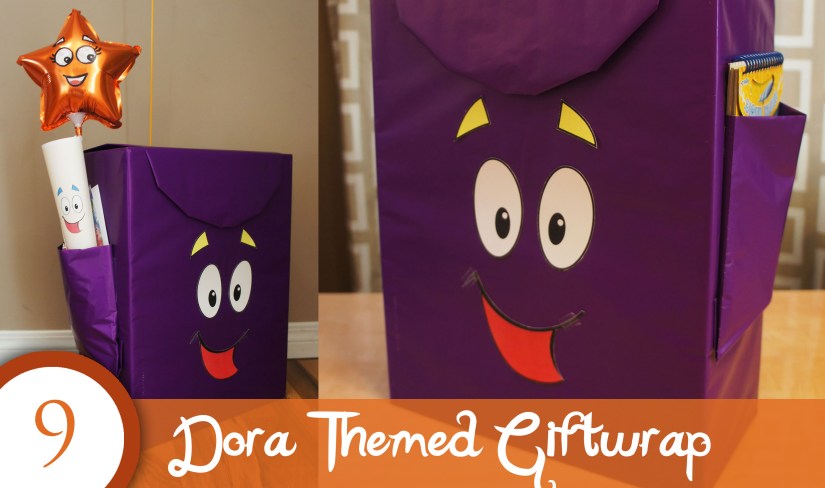
So, in celebration of One year and 100 posts, here are my top 10 favorite Dolled Up projects from the past year. Click on the links to view the full posts!


And, because it is Thursday, it only seems fitting that I throwback and link to my very first blog post – my Love is Sweet personal candy buffet.


I would like to finish this post with a big thank you to all my readers old and new!
You are the main motivation for this blog and I can’t wait to share more projects and ideas with you in the year ahead.


I have already mentioned that I know very little when it comes to Harry Potter. To create a Harry Potter themed couple’s wedding shower required a lot of browsing on pinterest and “borrowing” of other people’s ideas to nail down my theme.
One of the first items I came across in my pinterest searches was the iconic Chocolate Frog and I knew instantly this was something we had to have at the party. As I continued to search ideas, I quickly realized the Chocolate Frogs were just one of the many magical candies in the Harry Potter realm and got excited that it was the perfect opportunity for a candy buffet.
I love candy buffets – the beautifully displayed candy adds a lot of visual appeal to the party and it is hard to find a party guests who doesn’t get just a little bit excited about candy! It also didn’t hurt that after seeing the candy buffet at my son’s third birthday, my brother hinted that he would love his own candy buffet. With him and his wife-to-be as my guests of honor at this party, I decided to seize the opportunity.

My candy stand was put together on a lightweight metal shelf we picked up from Ikea during Black Friday. My husband tried to argue we didn’t need it, but it was on sale and I knew it would come in handy for parties. I then Dolled it up by building a top valence out of dollar store foam core and gluing on some beautiful aqua and white chevron gift wrap. To finish off the look, I printed of a Honeydukes logo I found online, mounted it to foamcore and attached it to my valance with a lot of hot glue and patience. The 3D effect of the sign was partly a design decision, but more so a result of the size restrictions of my home printer and having to print the logo in two parts!

I found most of the candy at our local Bulk Barn and then labelled it with a Harry Potter spin. Gummy Frogs became “Swamp Frogs”, gummy mice were “Ice Mice”, chocolate covered nuts were “Cockroach Clusters” and my rock candy suckers were called “Rock Candy Wands”. We also had Choco Balls, Lemon Drops, Bertie Bott’s Beans, Drooble’s Best Blowing Gum, gummy Slytherin snakes, gummy Butterfly Wings and Chocolate Snitches.

I ended up ordering a frog chocolate mold off ebay and melted my own chocolate down to create the iconic Chocolate Frogs. It was my first time making molded chocolate and I was surprised how easy the process was! I already had the leaf shaped platters from hosting a Gnome themed wedding shower for my sister so those worked well to display the frogs, snakes and snitches.

My sister kindly offered to help with the party so I put her to work making the chocolate snitches. They were simply a Ferrero Rocher chocolate with cut-out wings taped to it. They were displayed alongside gummy “Ice Mice” and gummy “Sugared Butterfly Wings”.
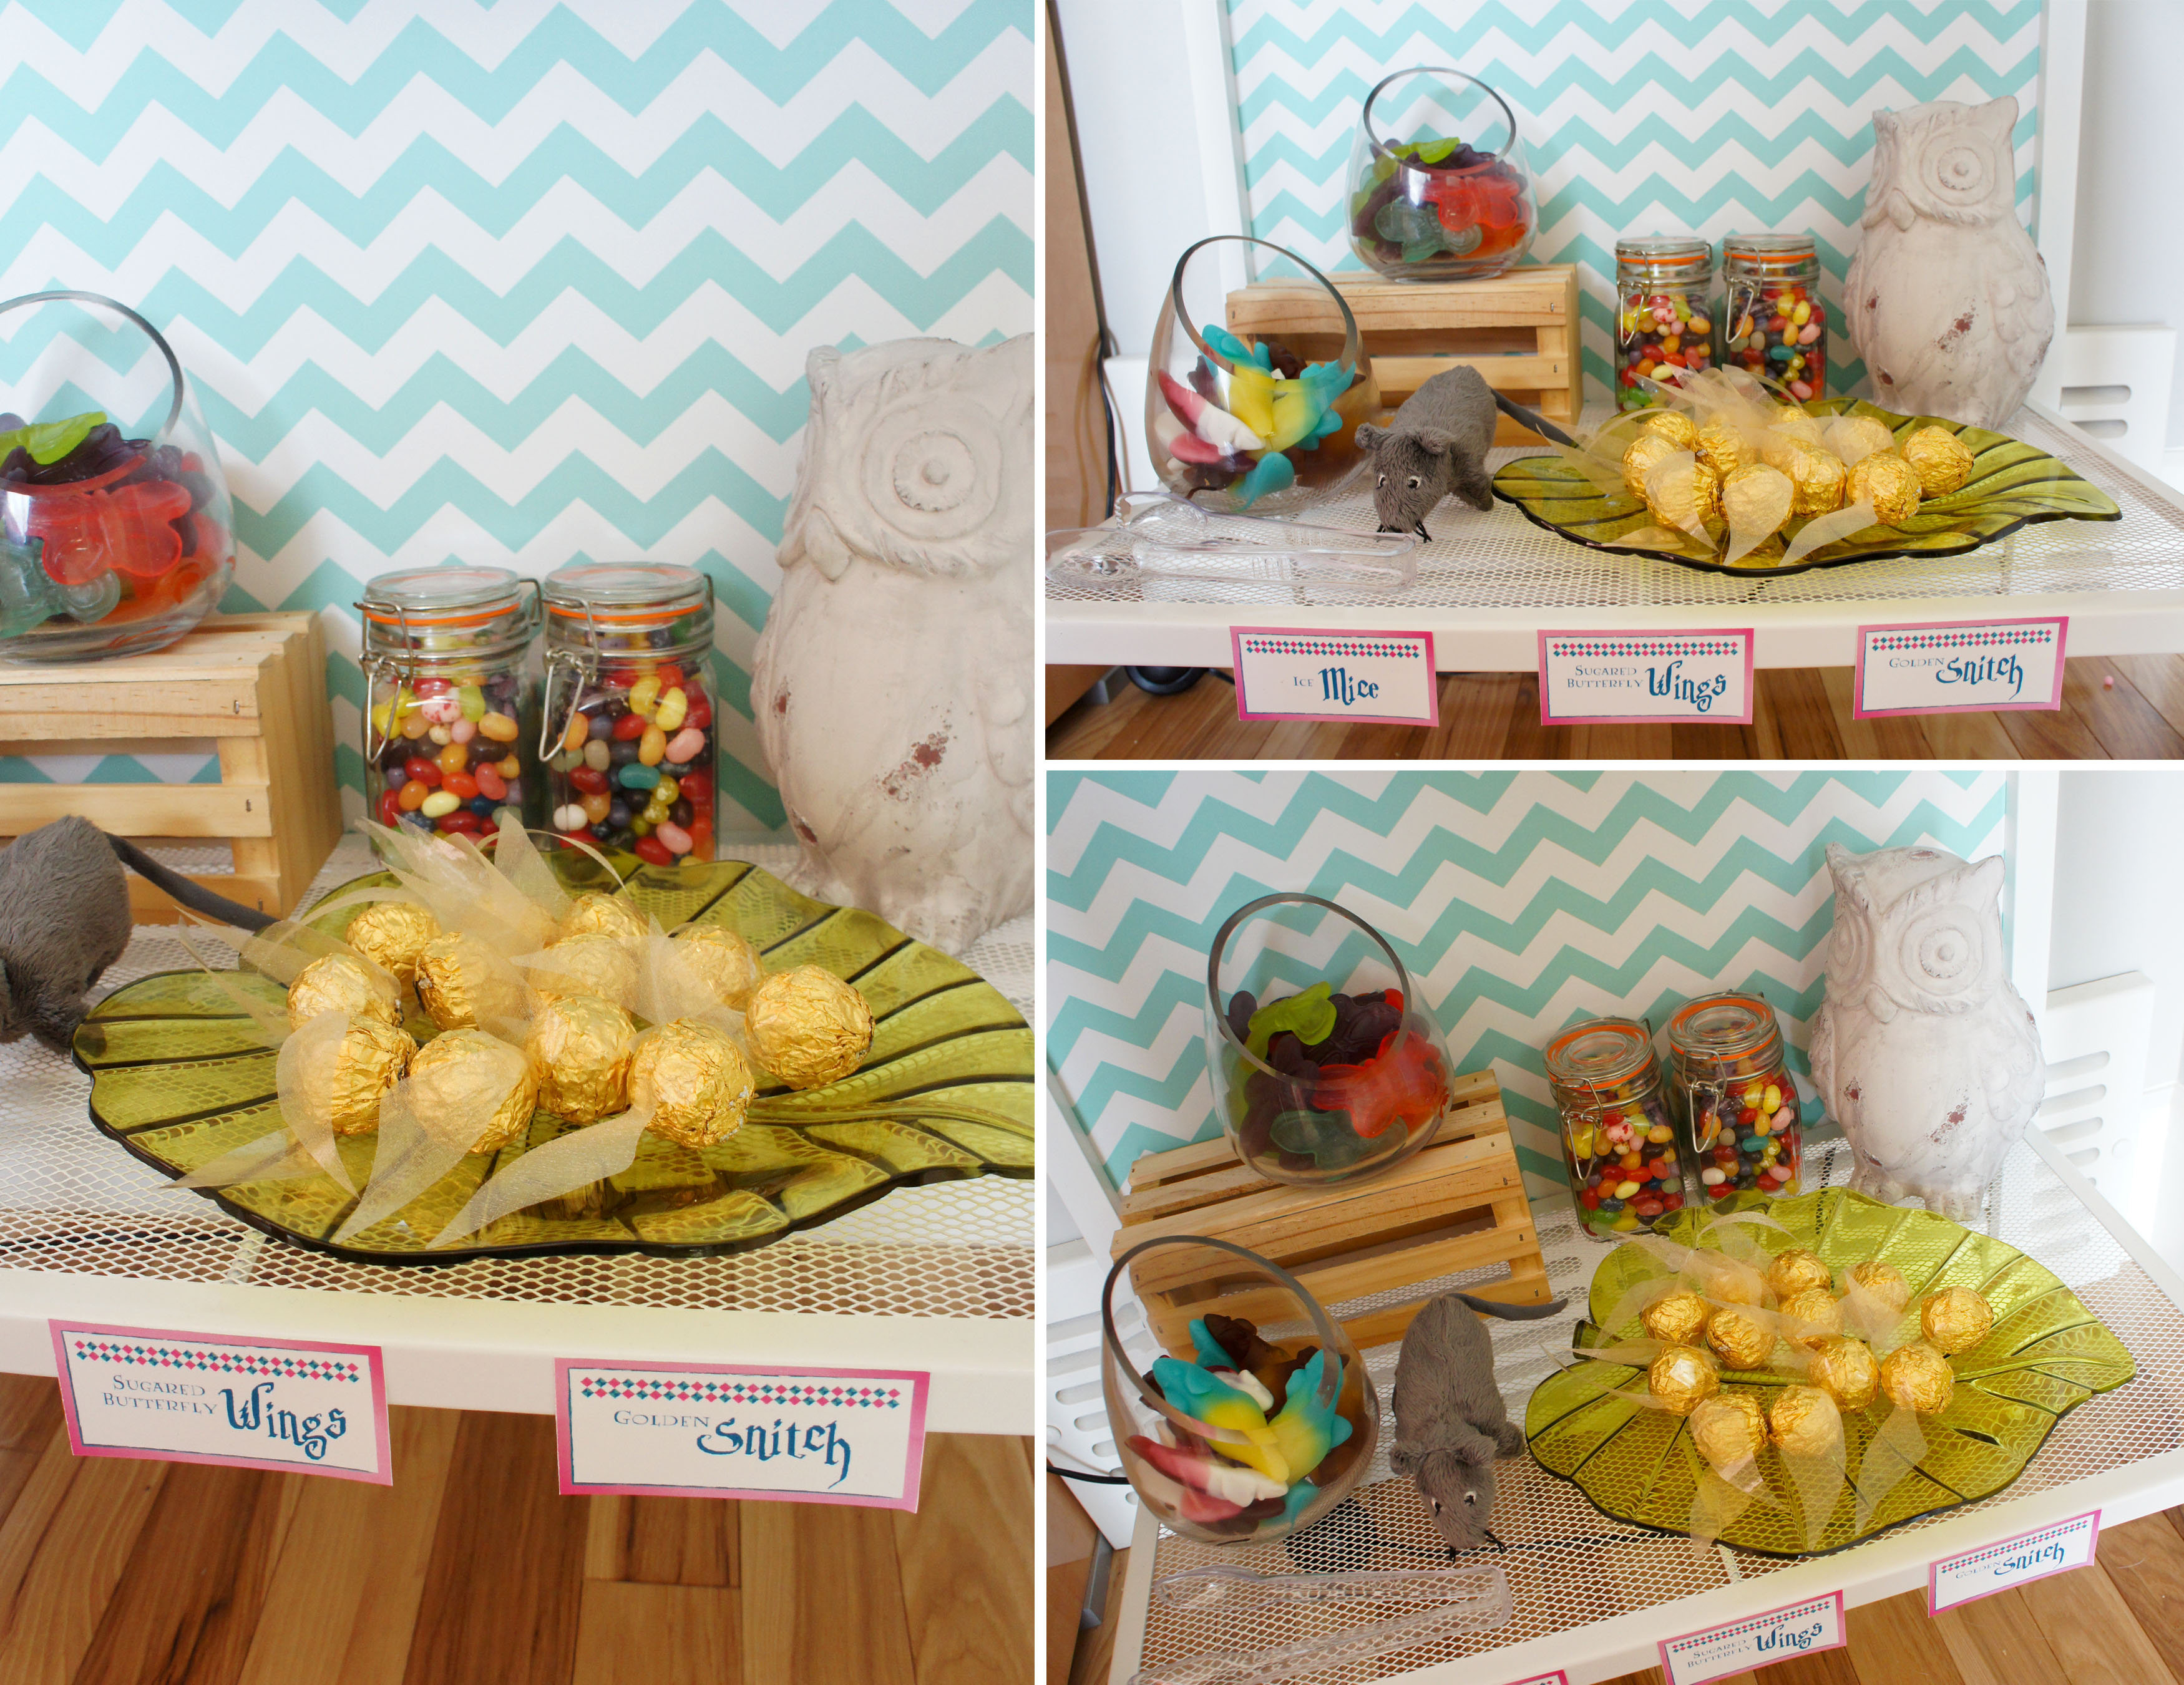
One of the biggest hits was the ridiculously long “Slytherin snakes” I found at the bulk foods store. I had them coiled up in a leaf shaped dish so it was a surprise everytime someone would grab one from the dish only to end up with a massive gummy reptile. My little guy was with me when we picked them up and begged me for two weeks to try one, but they were so big I only ended up buying six or so for the party and needed them all. He finally got one at the party so he was happy little muggle.
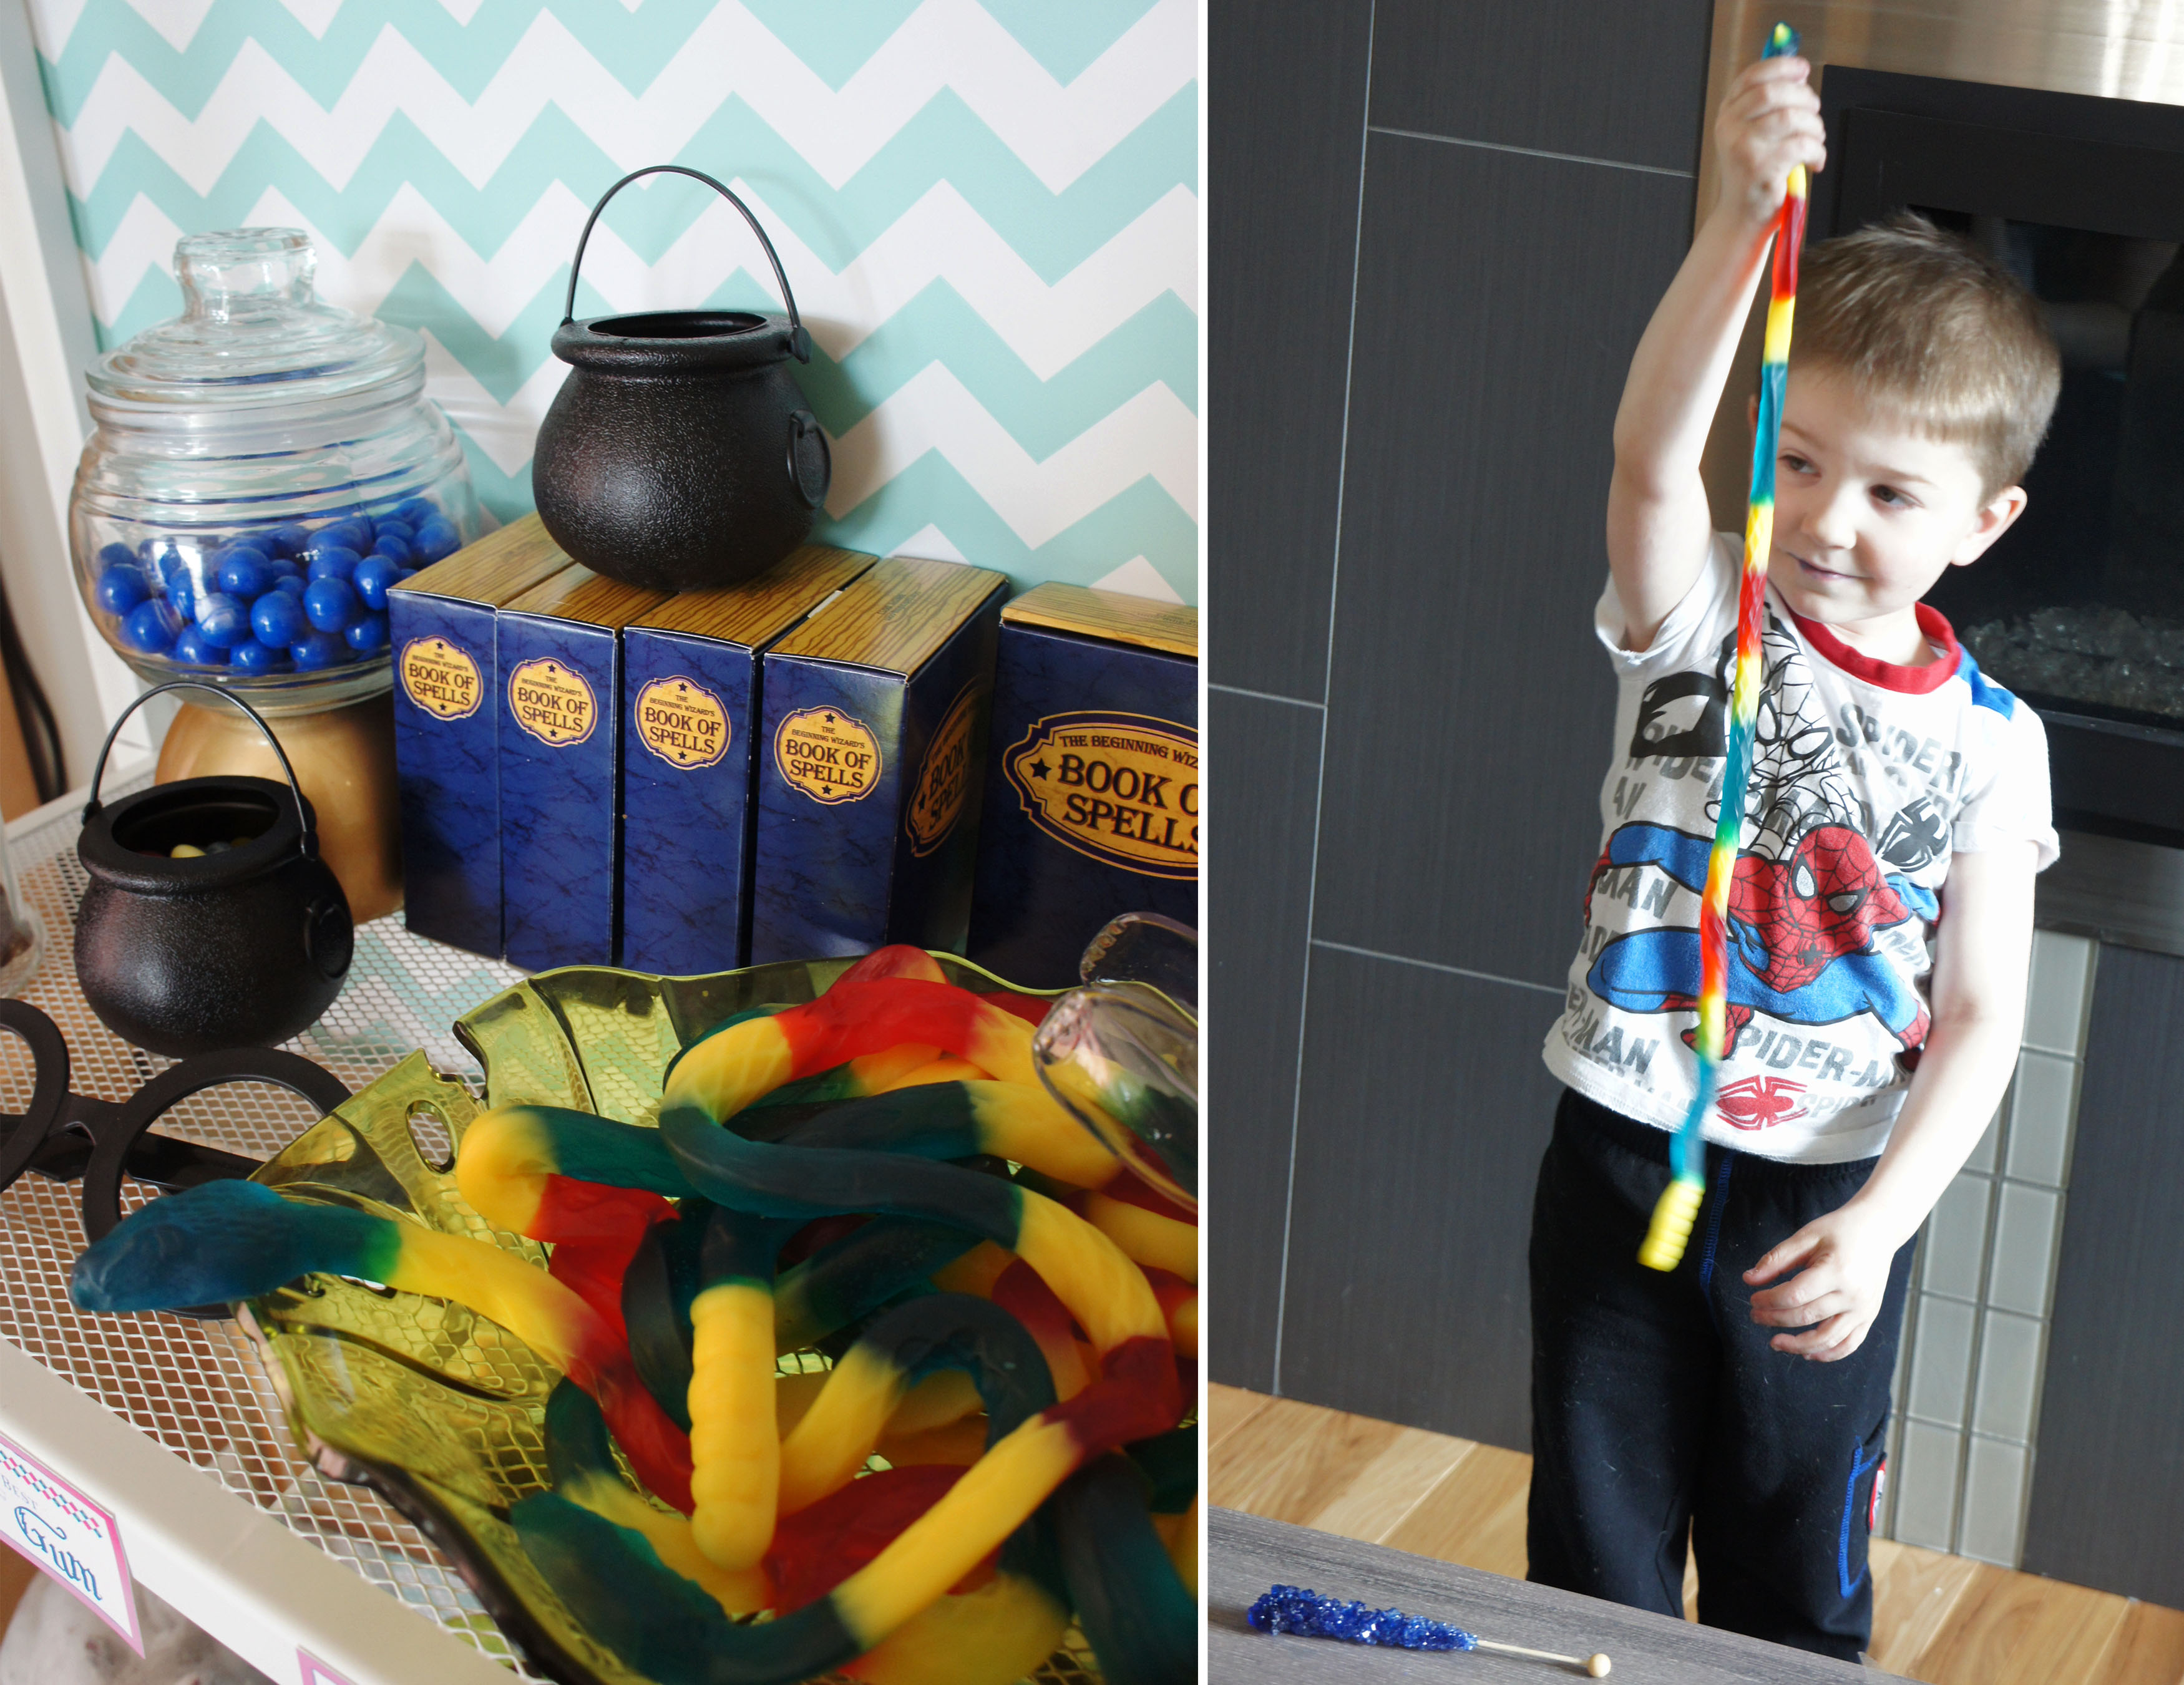
I already had most of the glass containers for my display and the remainder I used were found at Dollar Tree. The plastic cauldrons, cardboard Spell Books and Harry Potter glasses were all from orientaltrading.com and I found the small pink and white chevron bags in the party aisle at Target. The Honeydukes labels on the bags were simply printed onto label paper on my home laser printer and then stuck to the bag.

After the candy was bought, the whole thing came together pretty easily and I couldn’t have been happier with the final look. It looked amazing as part of my Harry Potter Couple’s Wedding Shower, and the guests all seemed happy to go home with bags full of delicious candy.
For other examples of great Honeydukes candy displays, please visit my pinterest board!

I love the idea of a couple’s wedding shower! I’ll admit that I was a bit confused and unsure when my brother first suggested that is what he and his wife-to-be would like, but now that it is done and over with I think it is a wonderful idea. The couple gets to celebrate their upcoming marriage together with family and friends – because isn’t being together really what an engagement is all about? They will each have their separate stag and stagette parties, but I love that this gave them the opportunity to celebrate with their collective friends.
The Harry Potter theme was something the bride-to-be requested and, even though I have never read a Harry Potter book, I was happy to oblige. I love me a good themed party and my lack of Harry Potter knowledge just gave me a little extra challenge in creating the perfect party. There is no shortage of Potter party ideas on pinterest so it proved fairly easy to pull things together and the hardest part became figuring out when to stop!
I, of course, began with the invites. You can see the full details on the invites here.

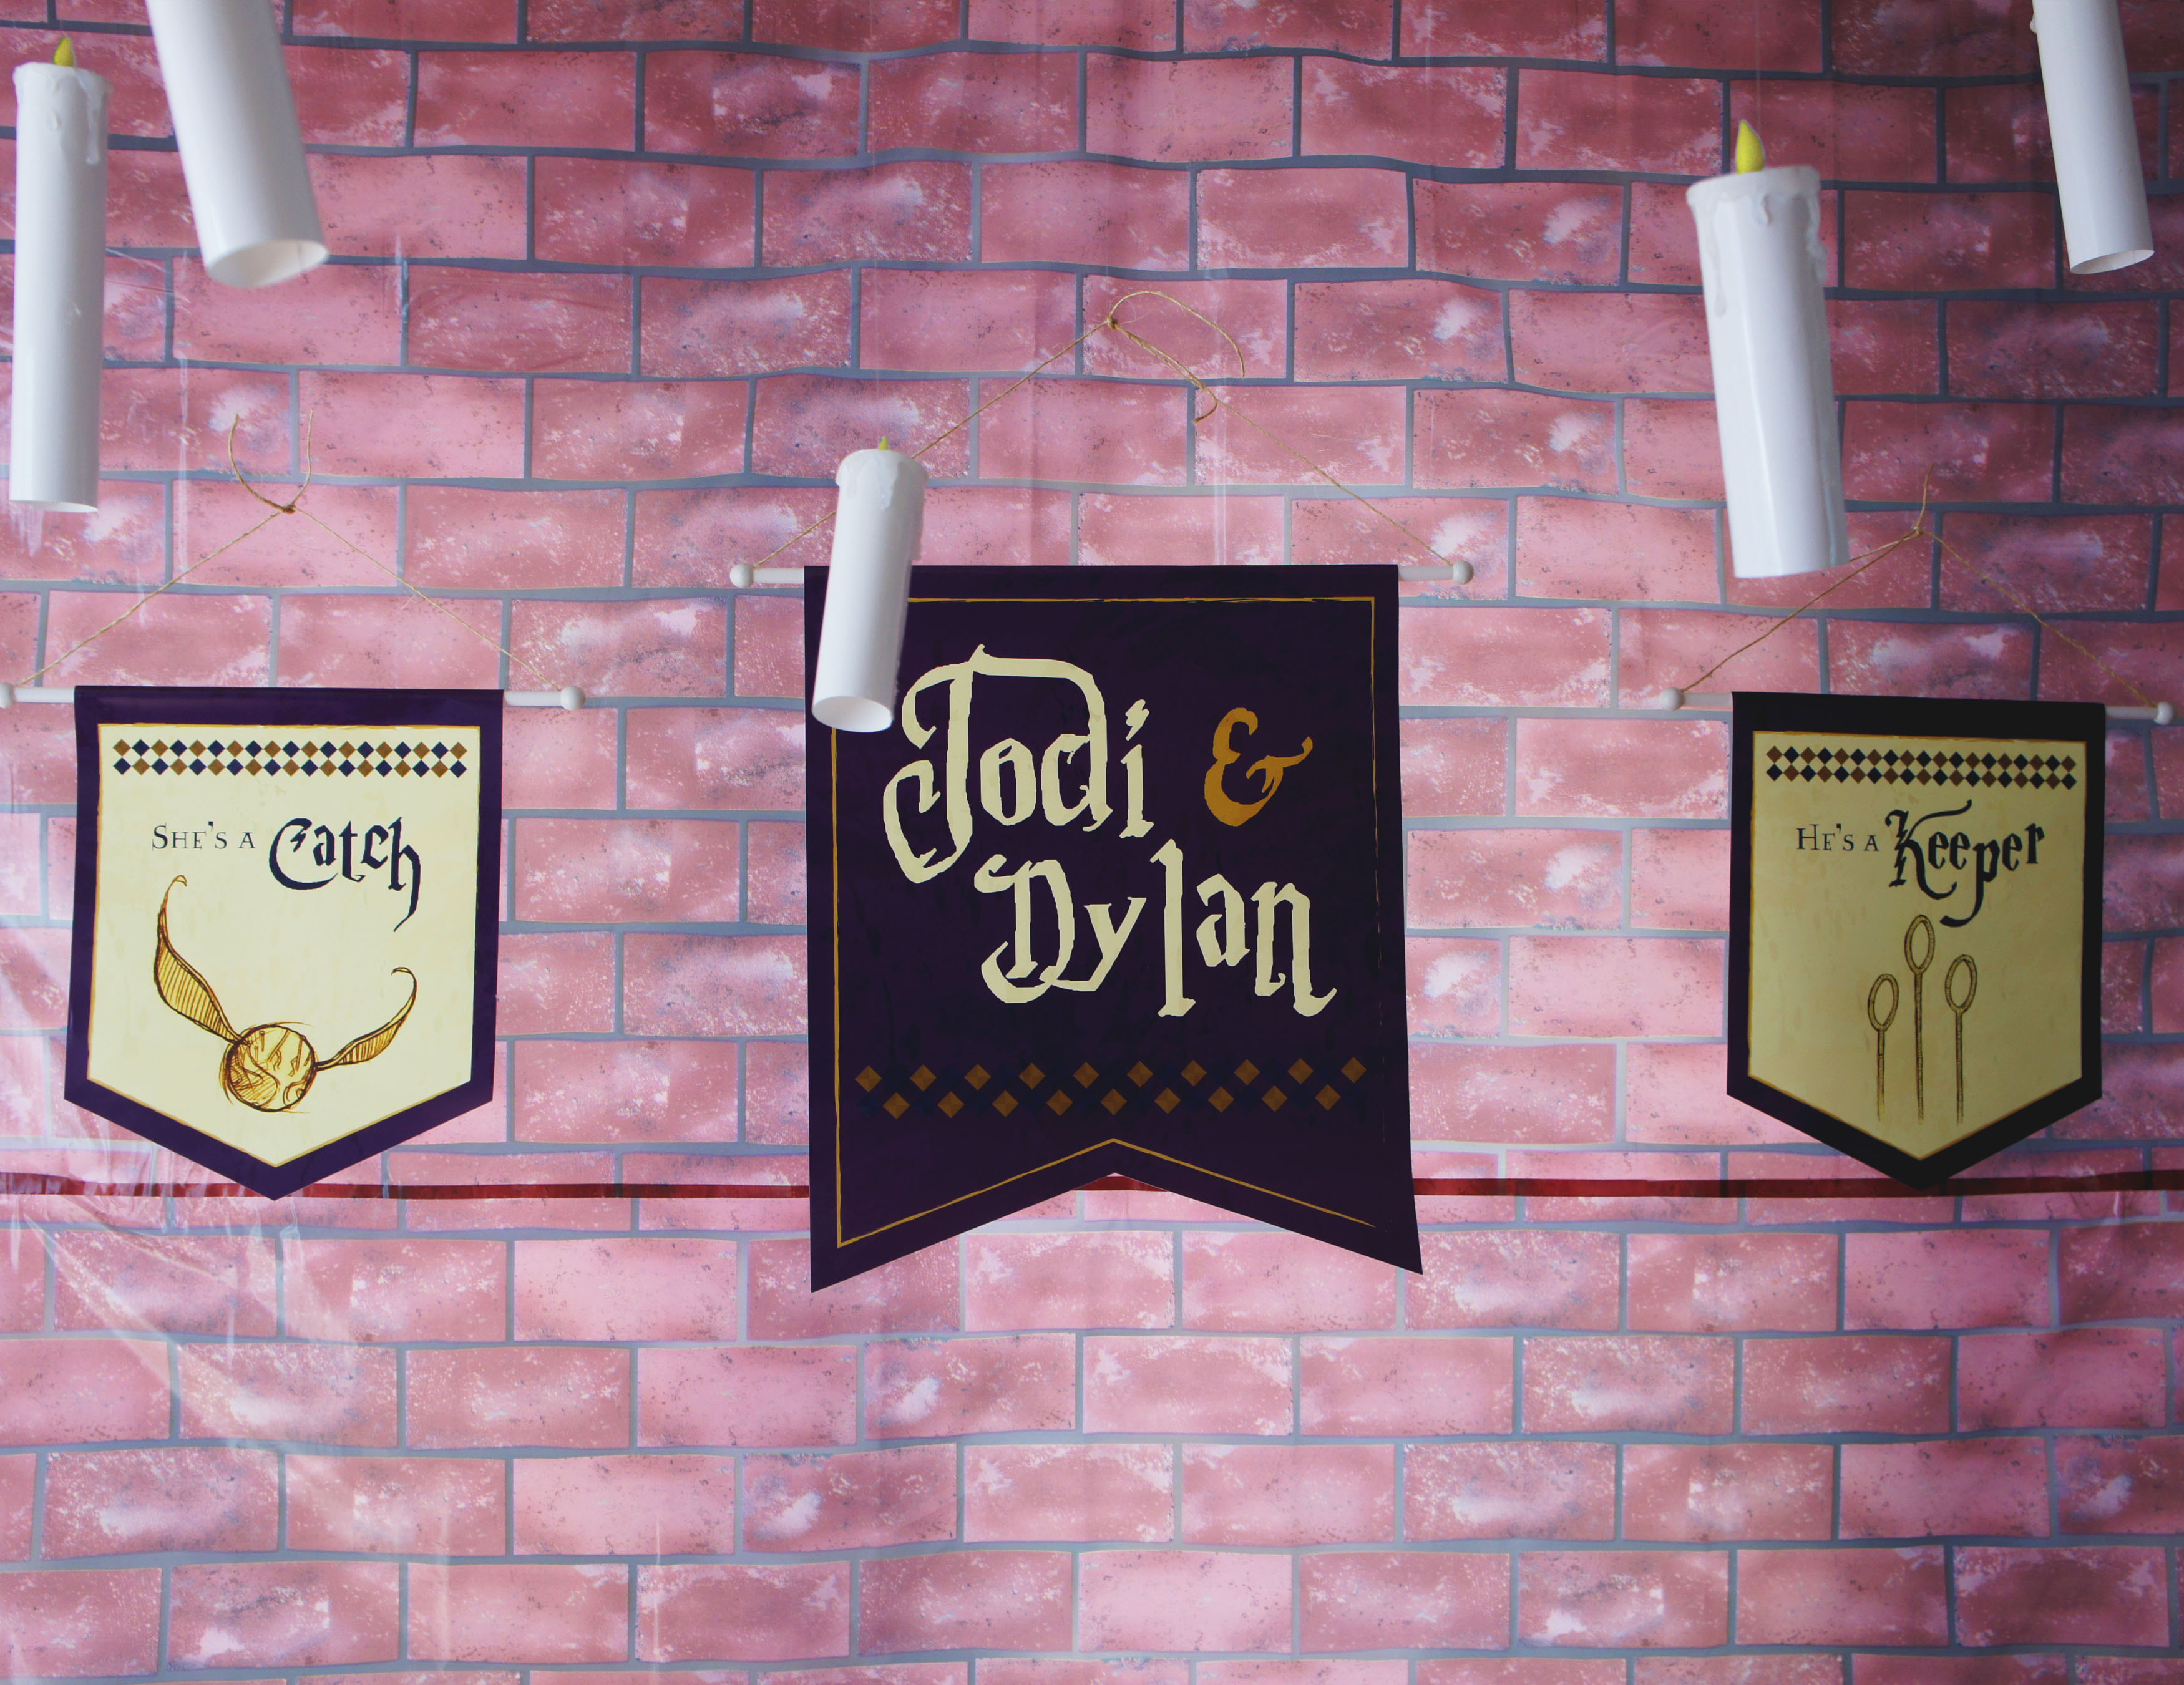
I loved the way the invites turned out, so I decided to carry the imagery across to my party décor and designed these large banners to hang behind the food table.
I used the same graphic style for a sign which greeted guests at the front door. I always dislike not knowing if I am in the location for a party so I like to have some sort of wreath or sign on my front door indicating to people that they are in the right place.

Inside, I transformed my front foyer into Platform 9 3/4 with the help of some wrapped cardboard boxes, a dollar store owl, a Harry Potter Scarf and glasses, a broom and a lovely birdcage borrowed from my sister.

The drink of choice was Butterbeer and it was served out of a barrel my sister crafted from some plastic dollar store plant pots and ribbon. The actual butterbeer was made following this great recipe from Just Sweet & Simple that included a delightful whipped topping.

There were also alcoholic choices at our Three Broomsticks stand including a couple varieties of Elf Made Wine, Ogden’s Old Firewhiskey, and a bottle of Butterscotch Schnapps, which made a delicious addition to the Butterbeer.

Drinks were served out of adorable “Magic Potion” paper cups I found on Oriental Trading. They have a whole line of Wizard Realm products so I ended up ordering the cups along with napkins, paper dessert plates, spellbook treat boxes, mini cauldrons and plastic Harry Potter glasses. They were well suited to the party and I carried their color scheme throughout my labels and pintable’s. It just so happens that the wedding colors are also blue and purple so I don’t think it could have worked out more perfectly!
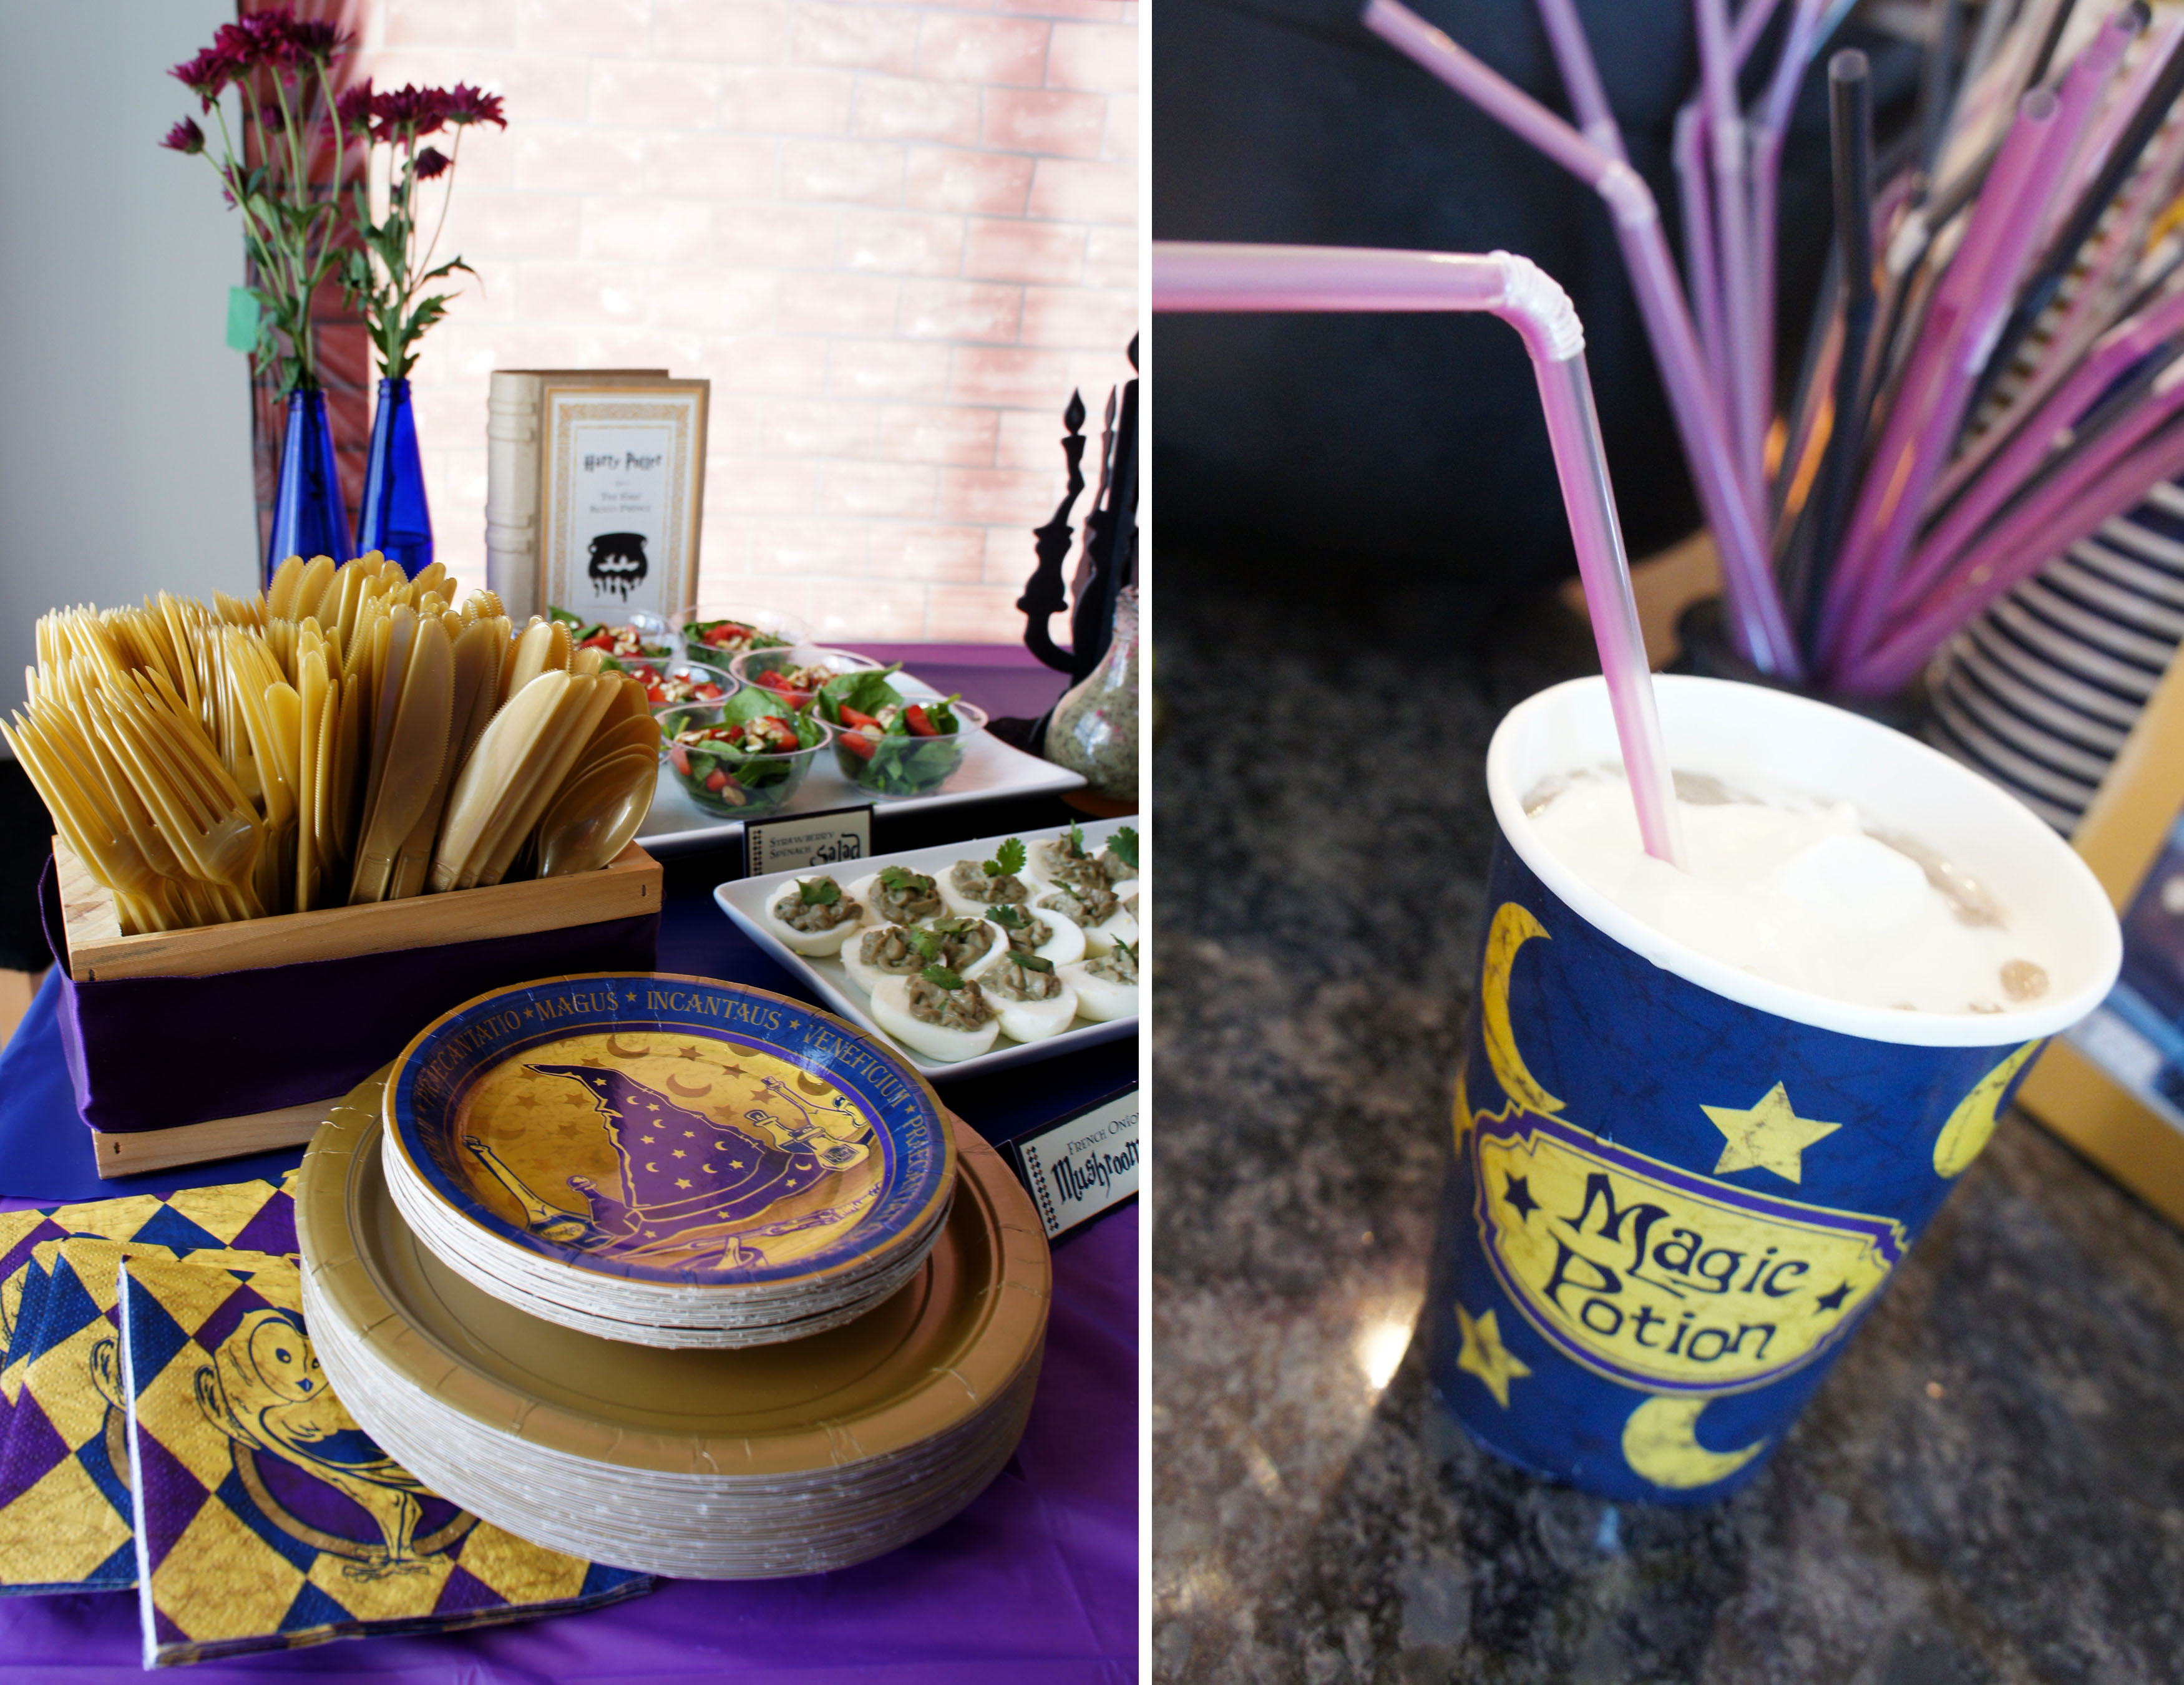
The main food table was layered with purple and blue plastic table cloths and then decorated with candelabras, cardboard books, and fresh cut flowers displayed in upcycled blue glass beer bottles. The brick background was also bought off Oriental Trading and DIY floating candles created from battery operated tealights and paper were hung on fishing line above the table to add the finishing touch to my “great hall”.
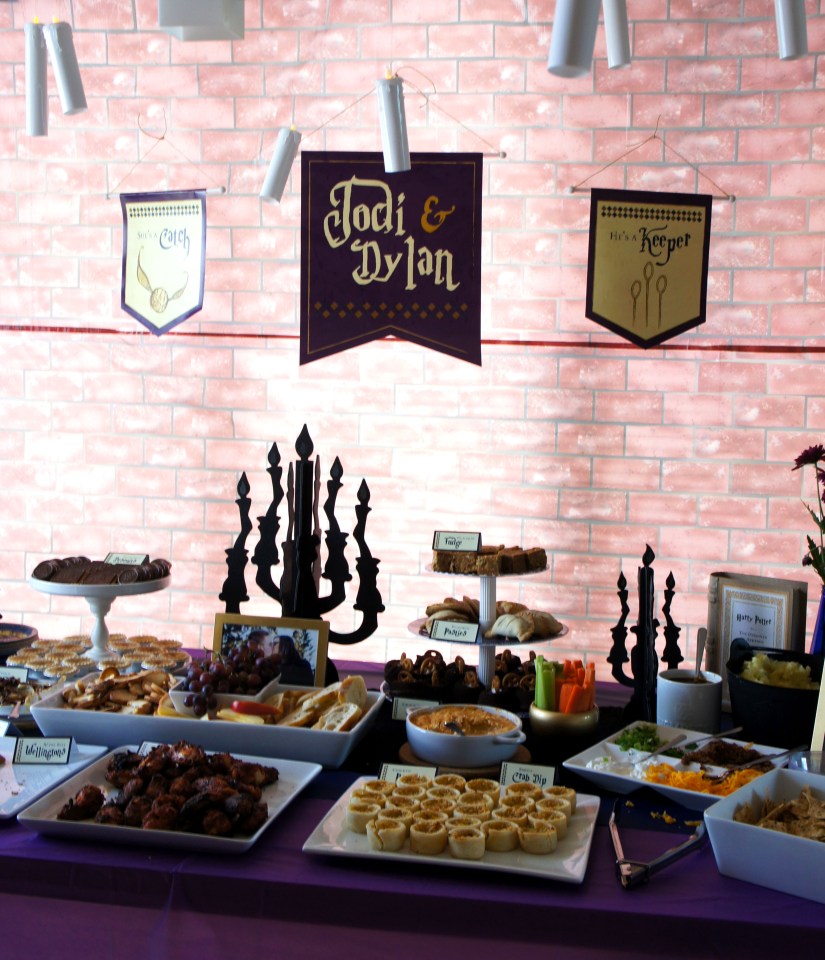
I served a variety of British inspired finger foods, worthy of the finest feast in the Great Hall at Hogwart’s. The food included individual chicken pub pies, mini beef wellington, barbequed chicken wings, spinach salad, guacamole devilled eggs, Kahlua and pecan baked brie, warm crab dip and a mashed potato bar.
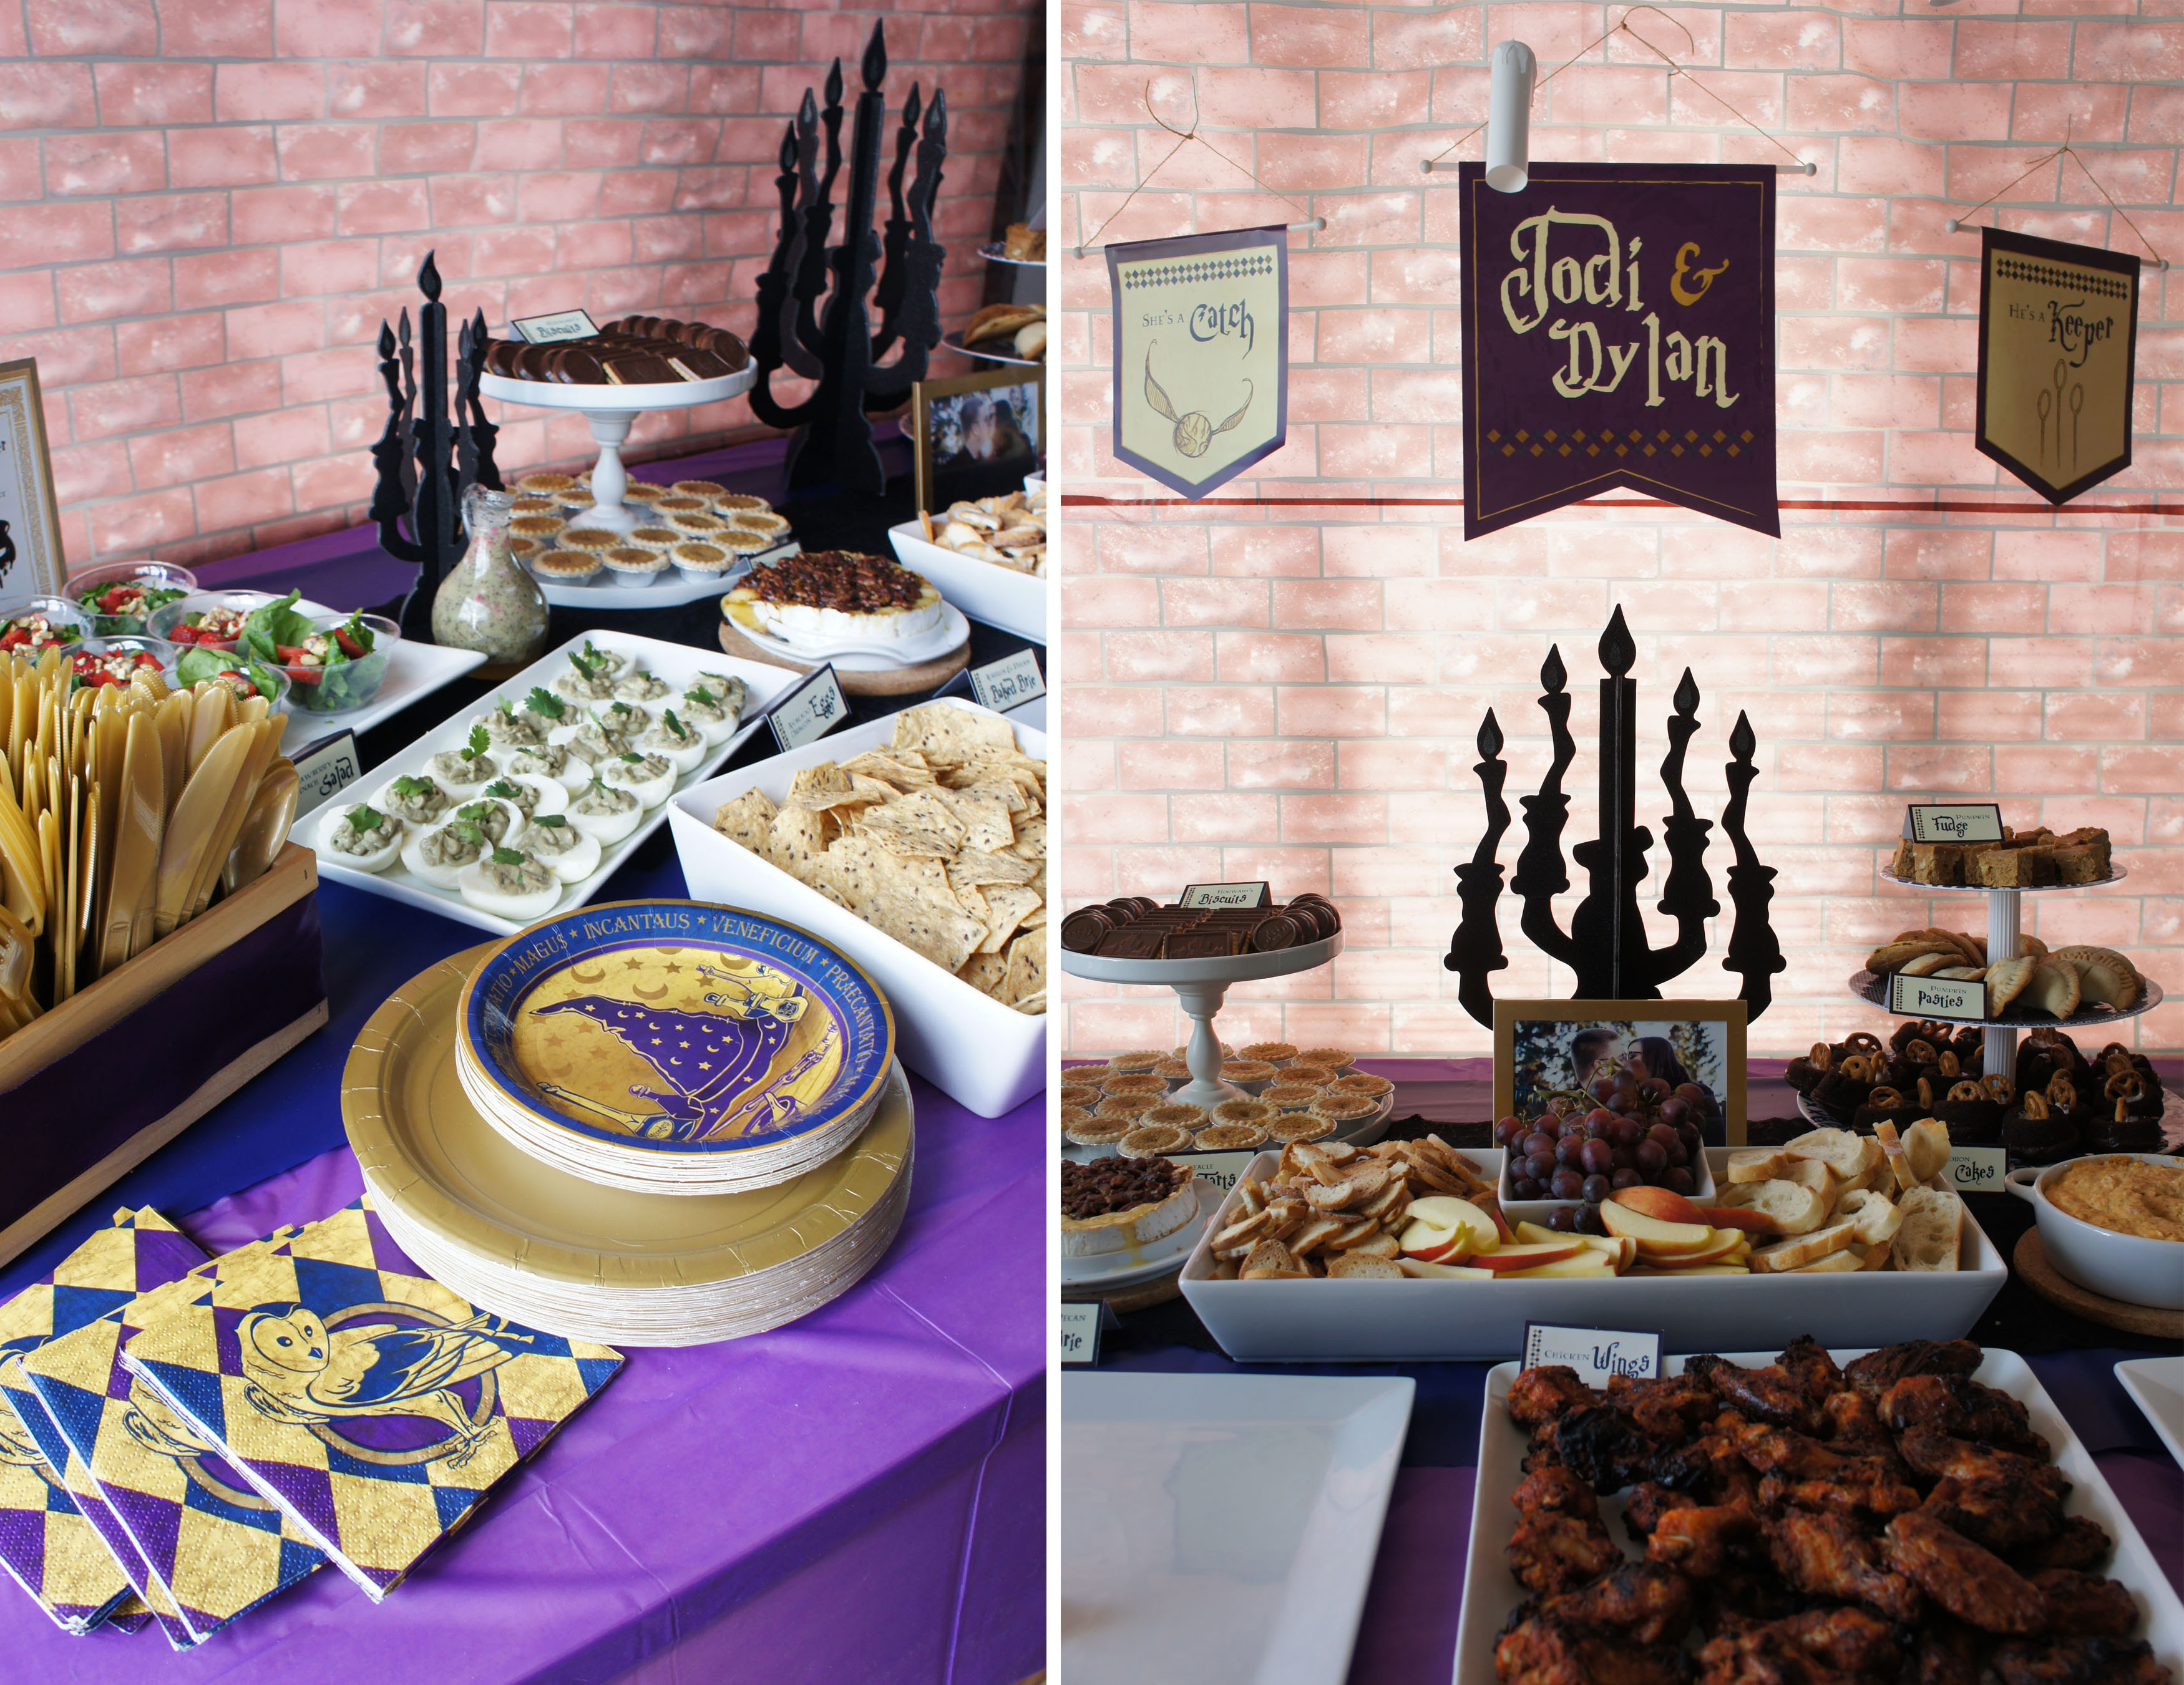

We also couldn’t forget all the great Harry Potter sweets, so platters were filled with treacle tarts, pumpkin fudge, cauldron cakes, pumpkin pasties and Hogwart’s biscuits.

And just in case that wasn’t enough sweets, we had our very own Honeyduke’s stand right off the main food table.
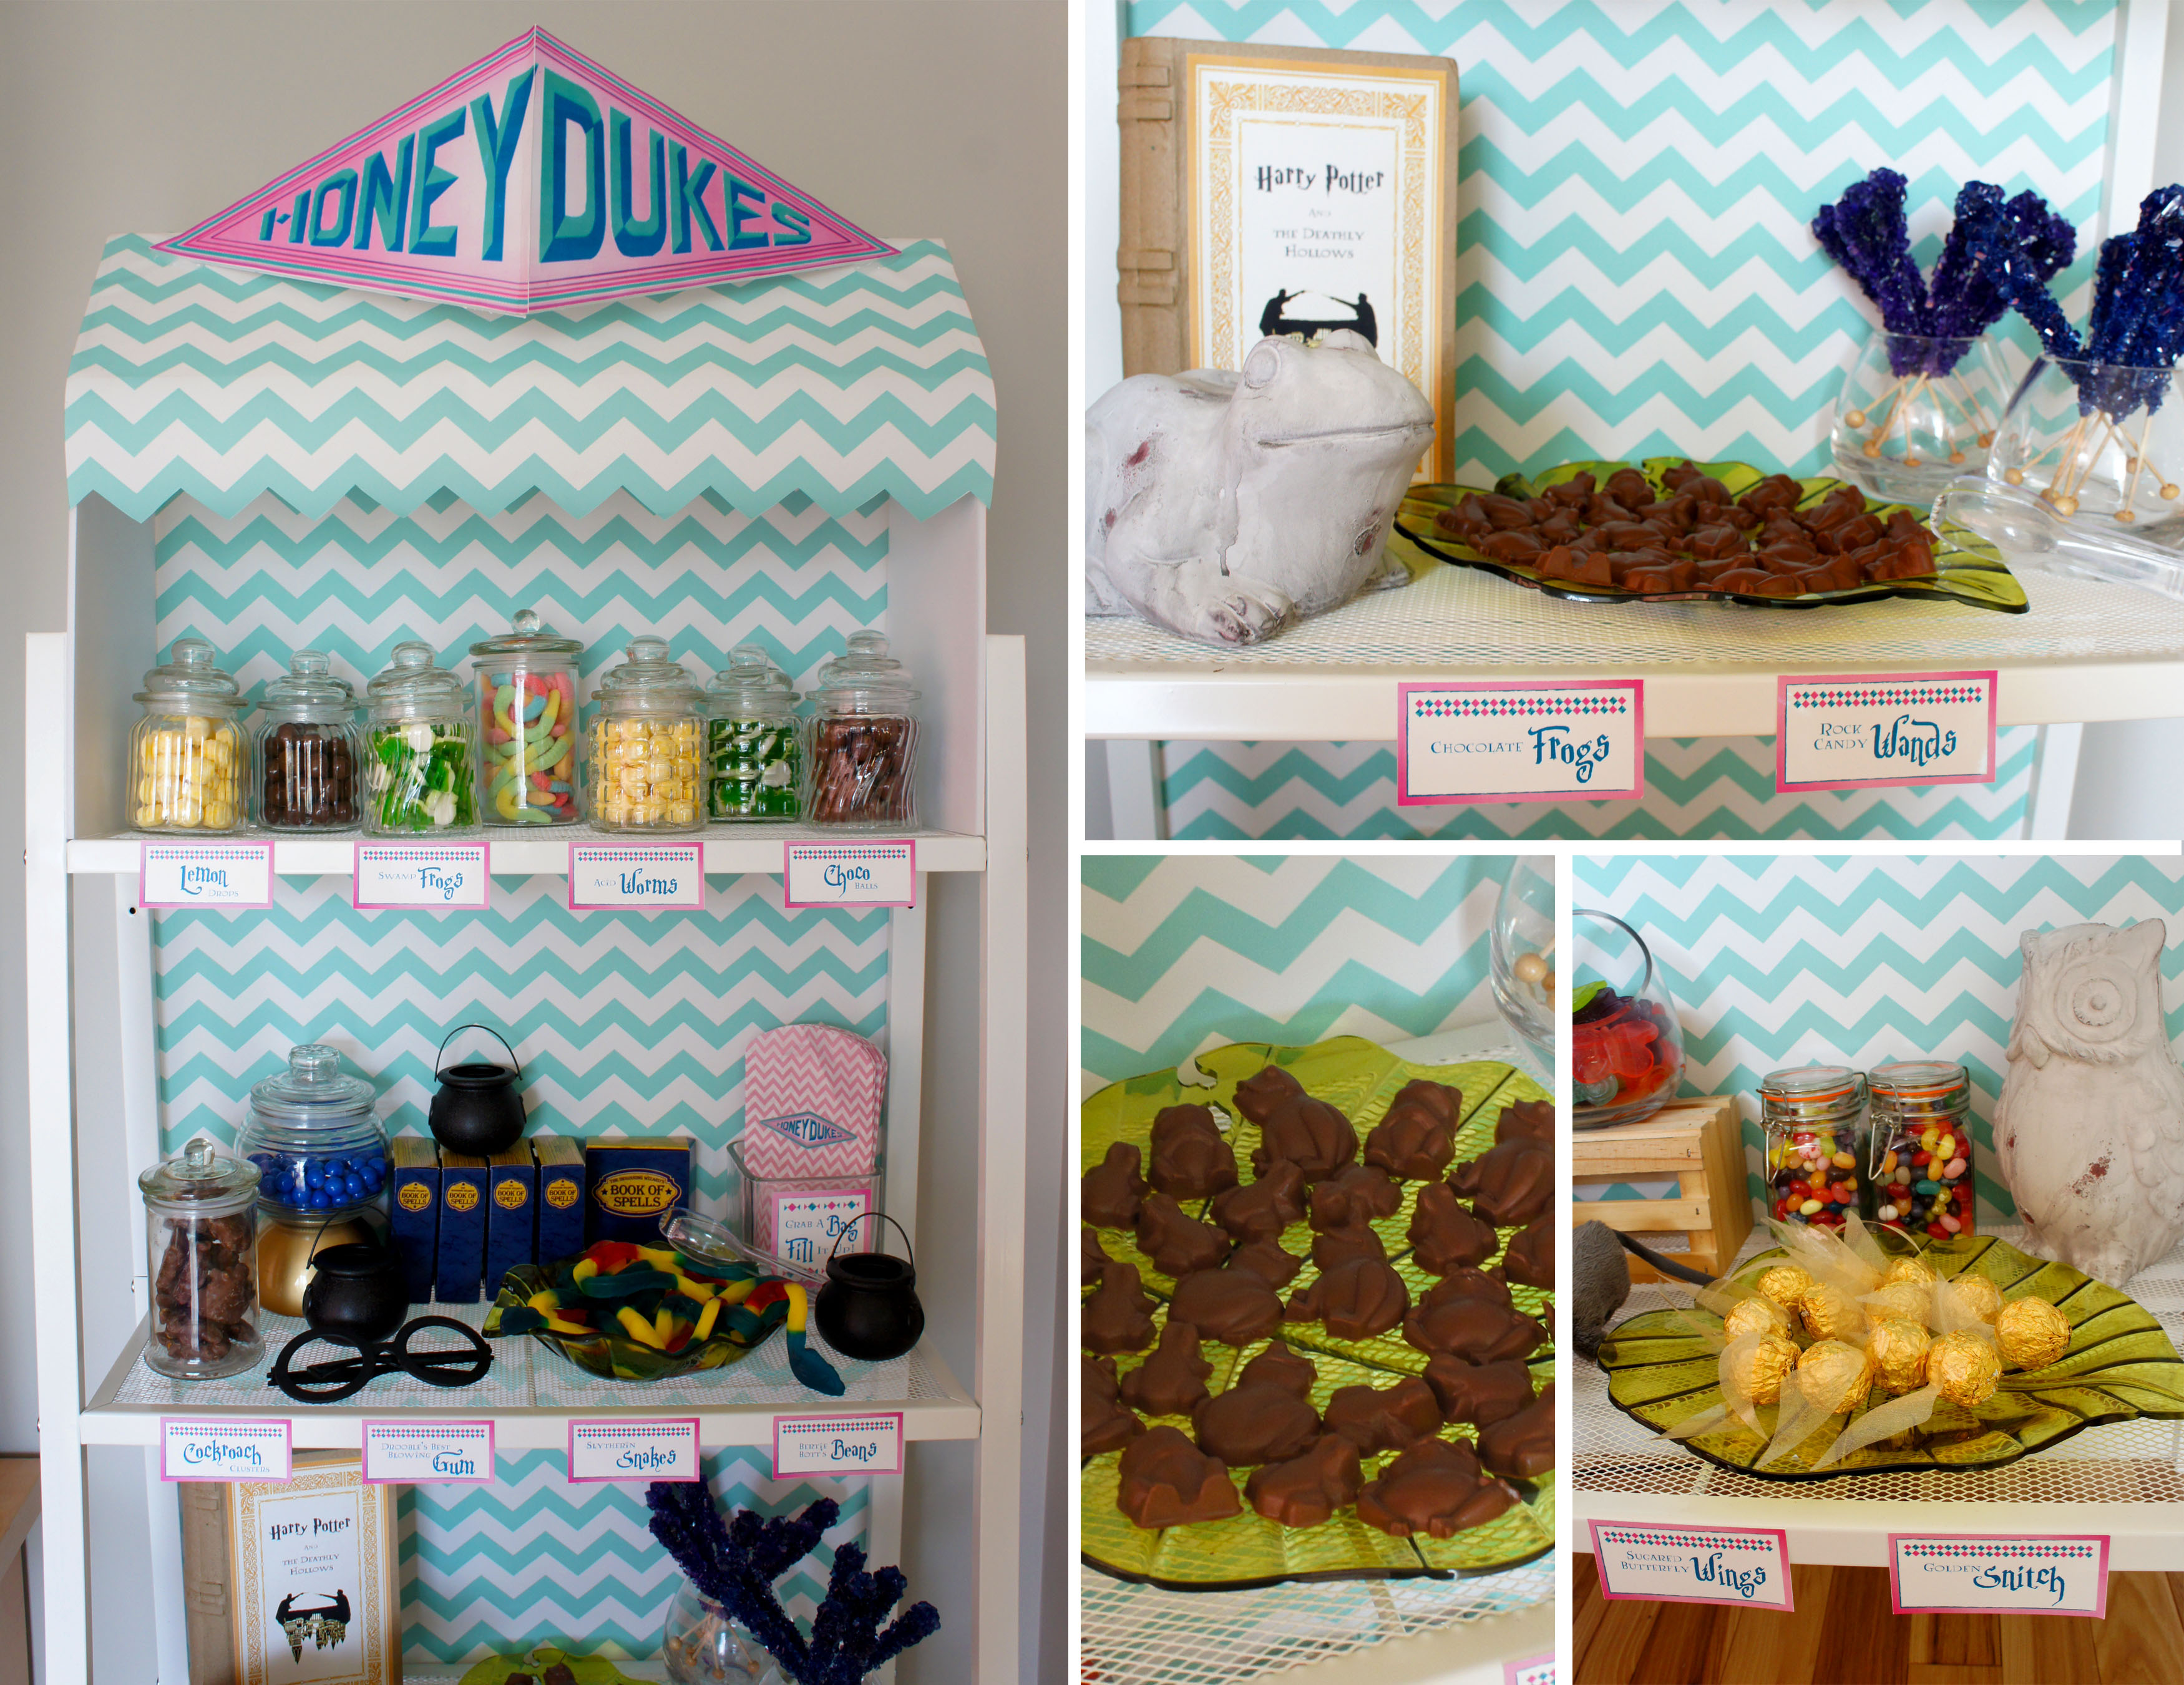
I love creating candy displays so I was very excited to learn about Honeyduke’s in my research and come up with all the different candy I could incorporate into a display. Party guests were invited to fill their small Honeydukes branded paper bags with everything from Bertie Bott’s Beans, Drooble’s best blowing gum and chocolate frogs to long gummy Slytherin snakes, rock candy wands and golden snitches.
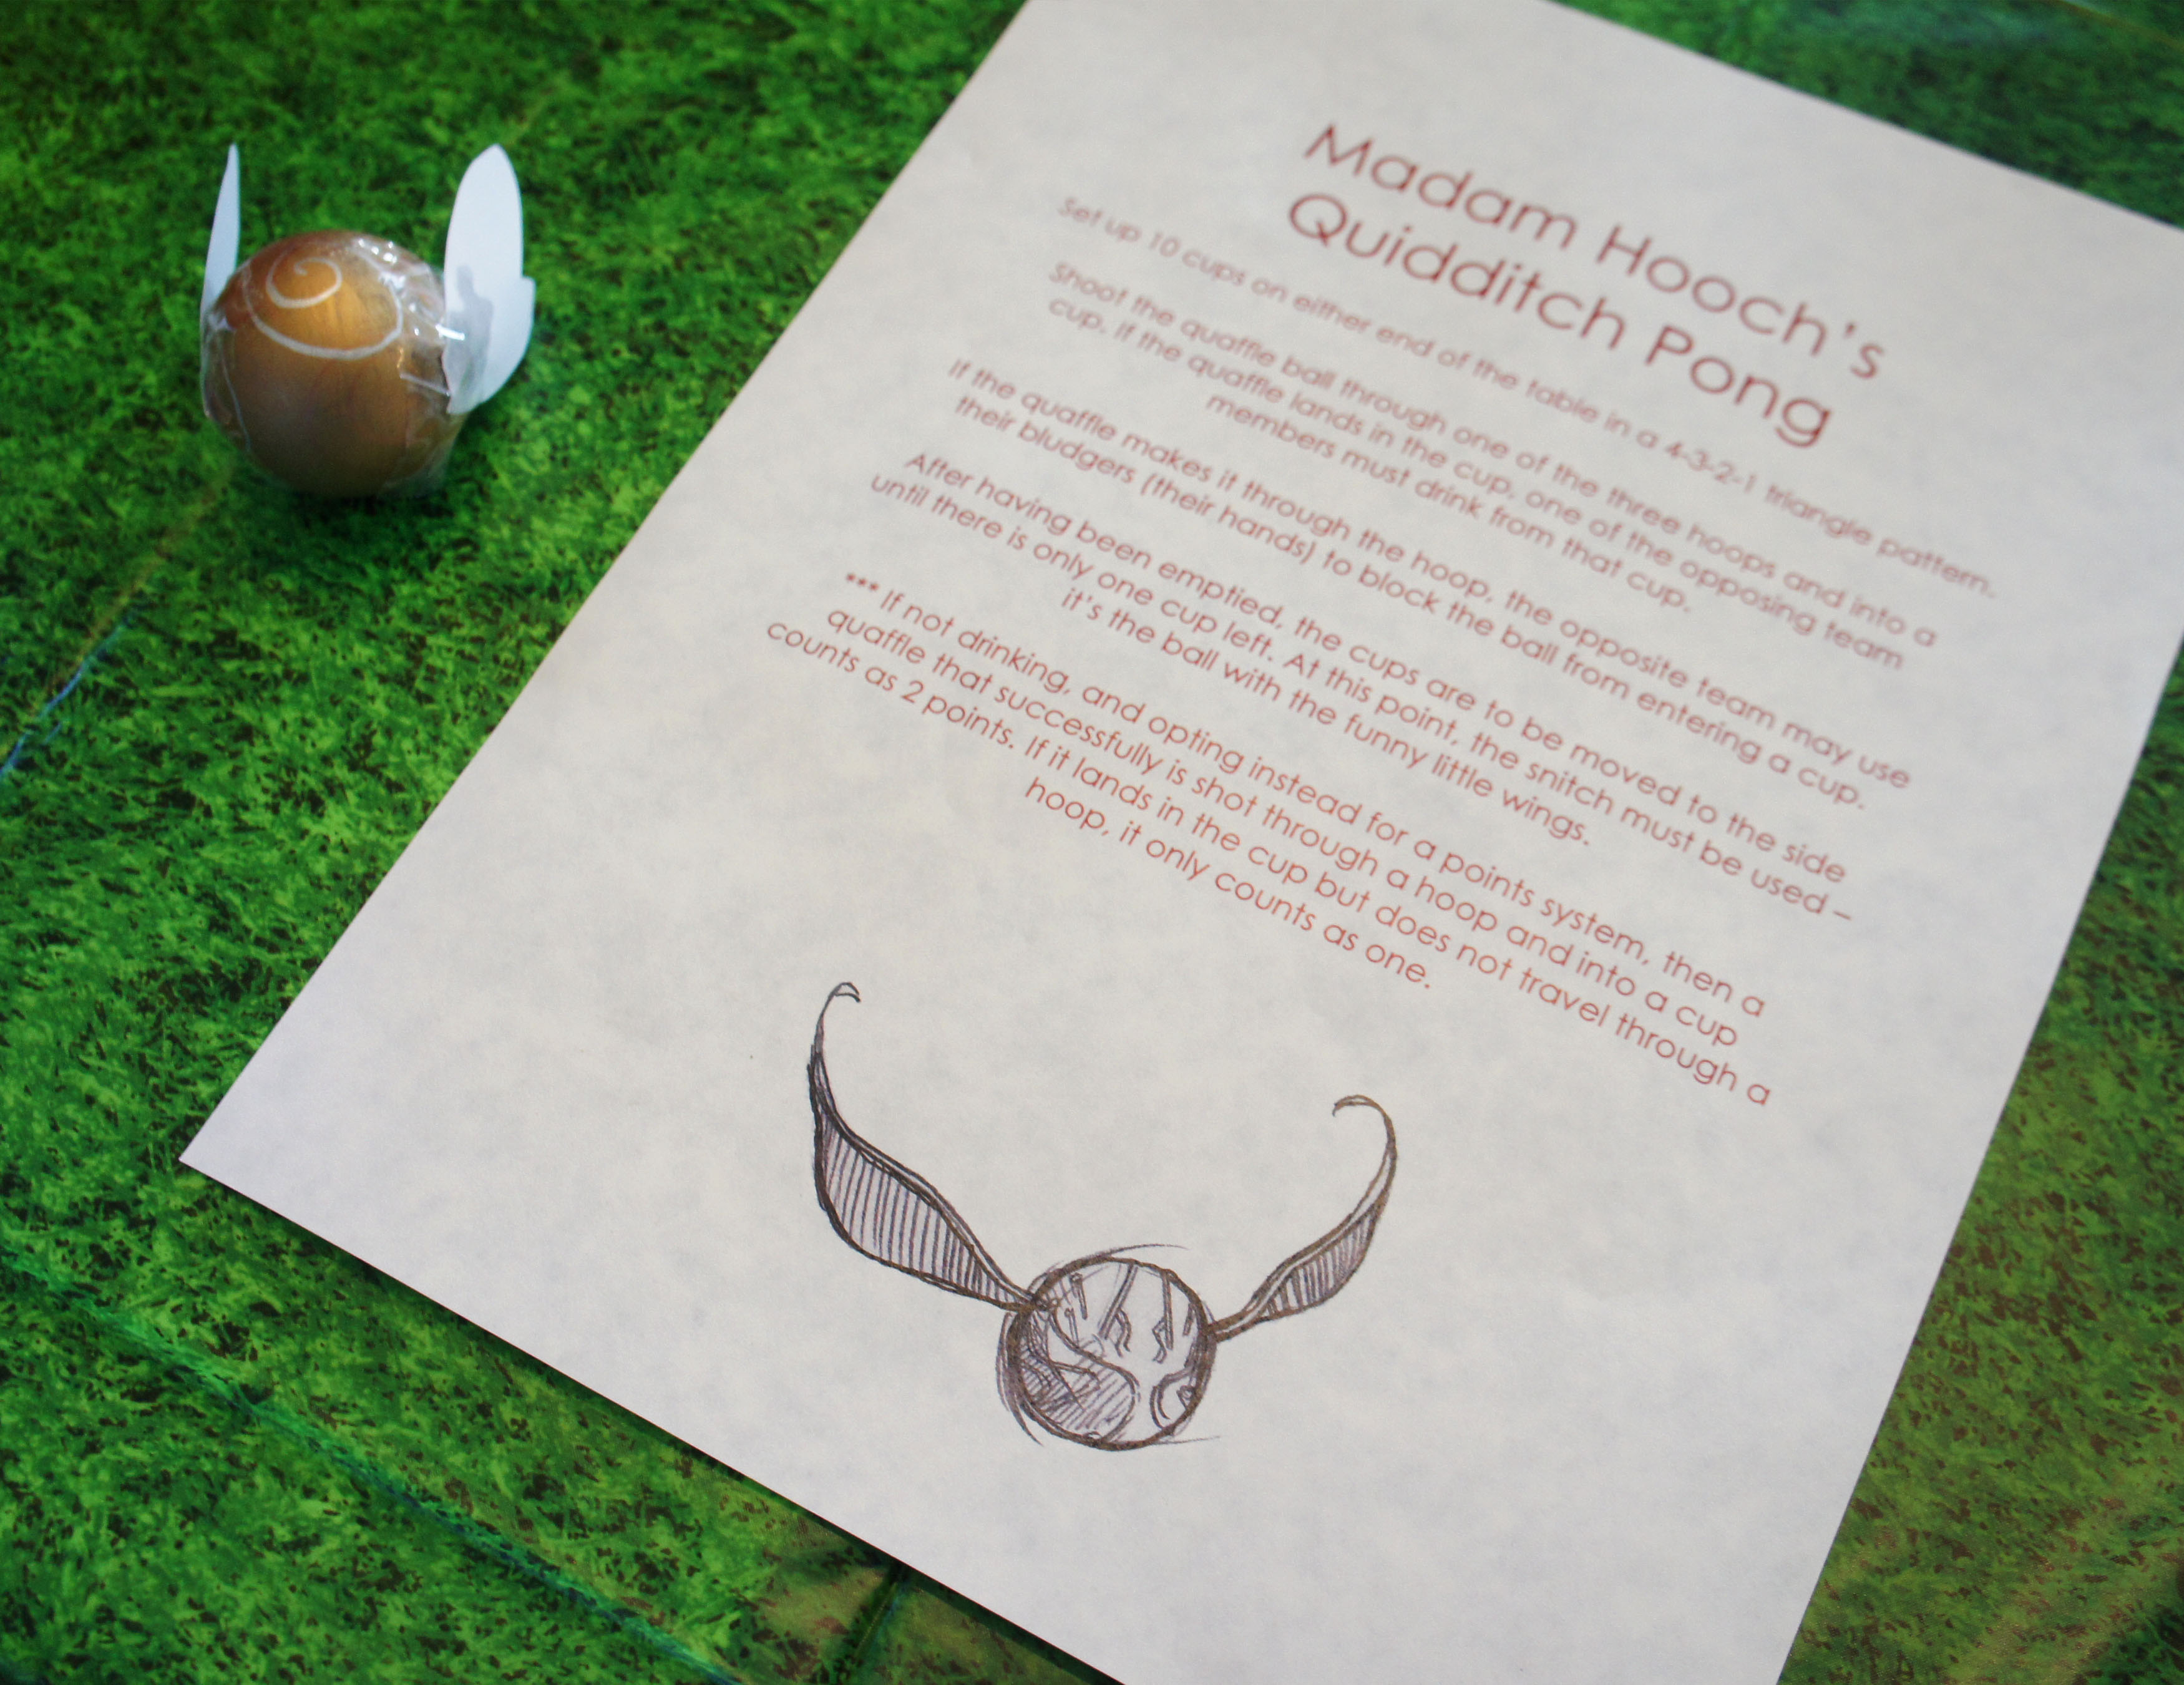
Speaking of snitches, the one shower game we did have was Quidditch Pong. The Maid of Honor did a wonderful job creating the hoops and balls that we displayed on a folding table covered in an artificial turf tablecloth.

Their wasn’t much drinking happening at the shower, but I do know the kids sure had a fun time trying to get the balls in the cups!
It turned out to be an amazing, laid back day celebrating my brother and my soon to be sister-in-law. I got to meet their lovely friends, we all got to eat some great food and I was excited that all my close family members were able to come share in the happy occasion.
I will be sharing more detailed photos of the Honeydukes candy display and a food post with recipes in the upcoming days so please be sure to check back!
And if you’re still looking for more Harry Potter party ideas? Visit my pinterest board to see some other great parties and inspiration.


I can’t begin to tell you how excited I was when my brother in law agreed to let me take over the candy buffet for his wedding! I did a small candy buffet for my son’s 3rd birthday party, but it was small peanuts compared to having to plan something for 250 wedding guests. I was happy to have a creative project this summer, and judging by the happy faces at the wedding I think it was well worth all the effort and planning.
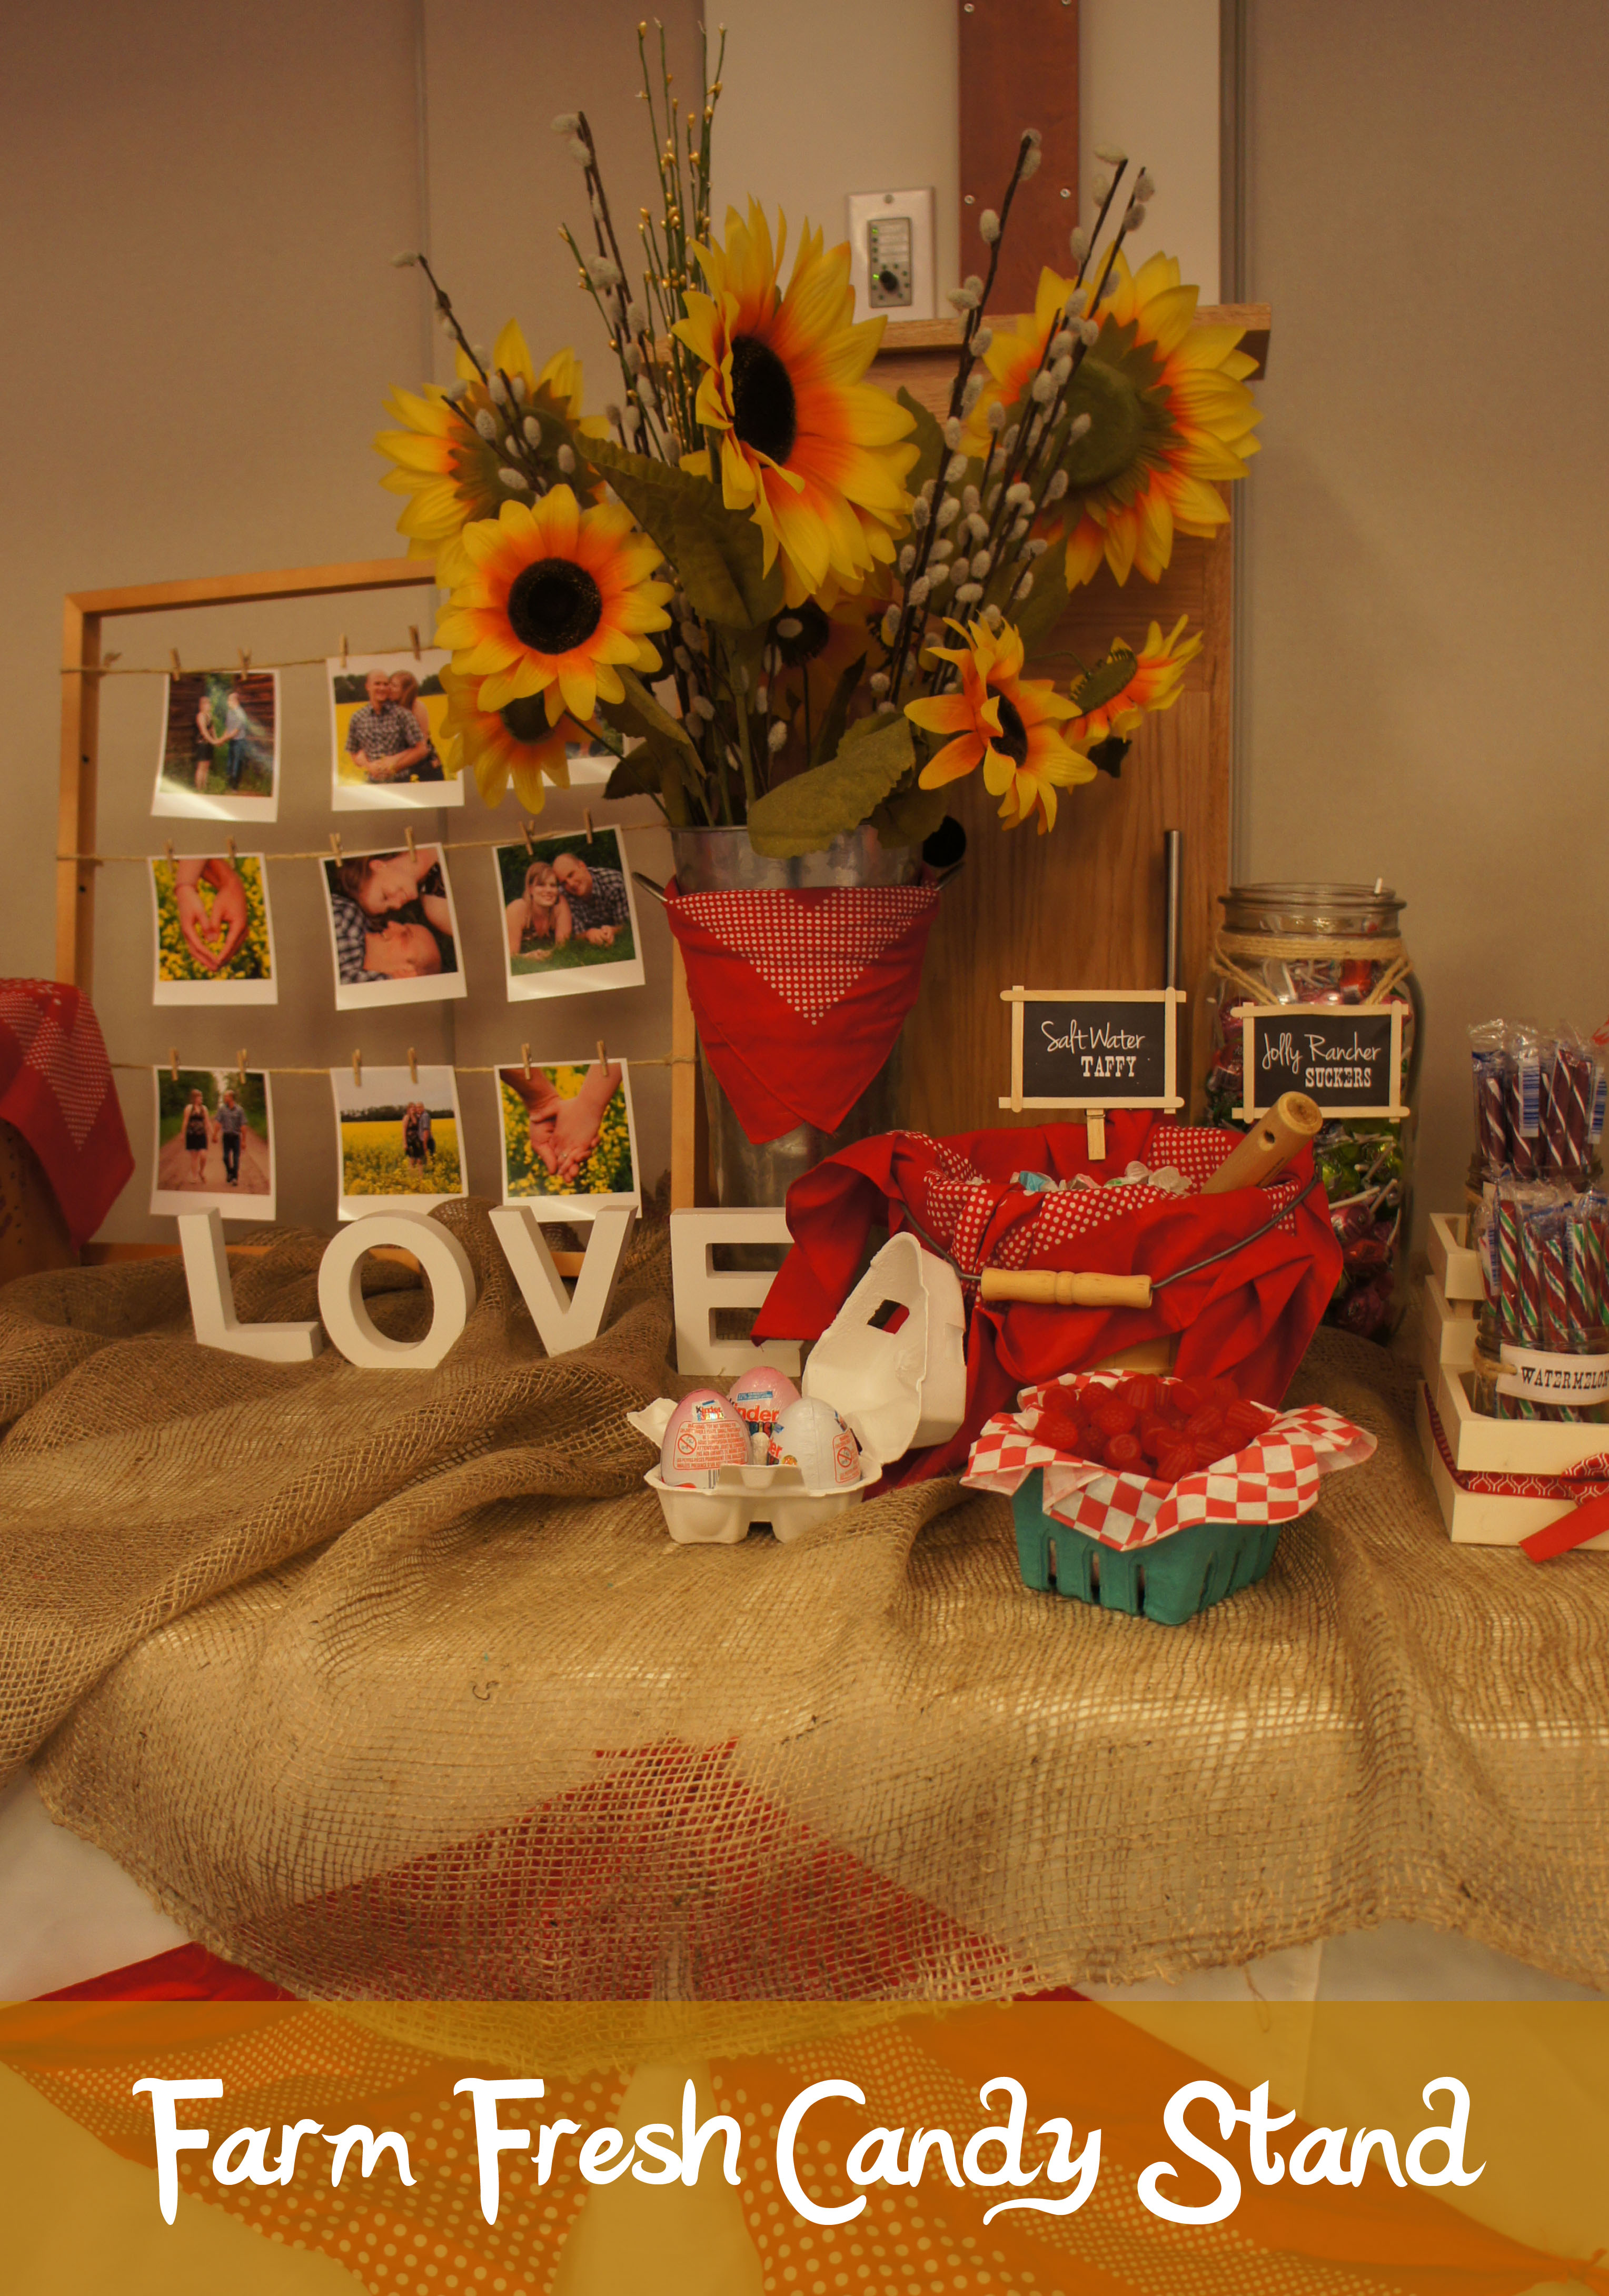
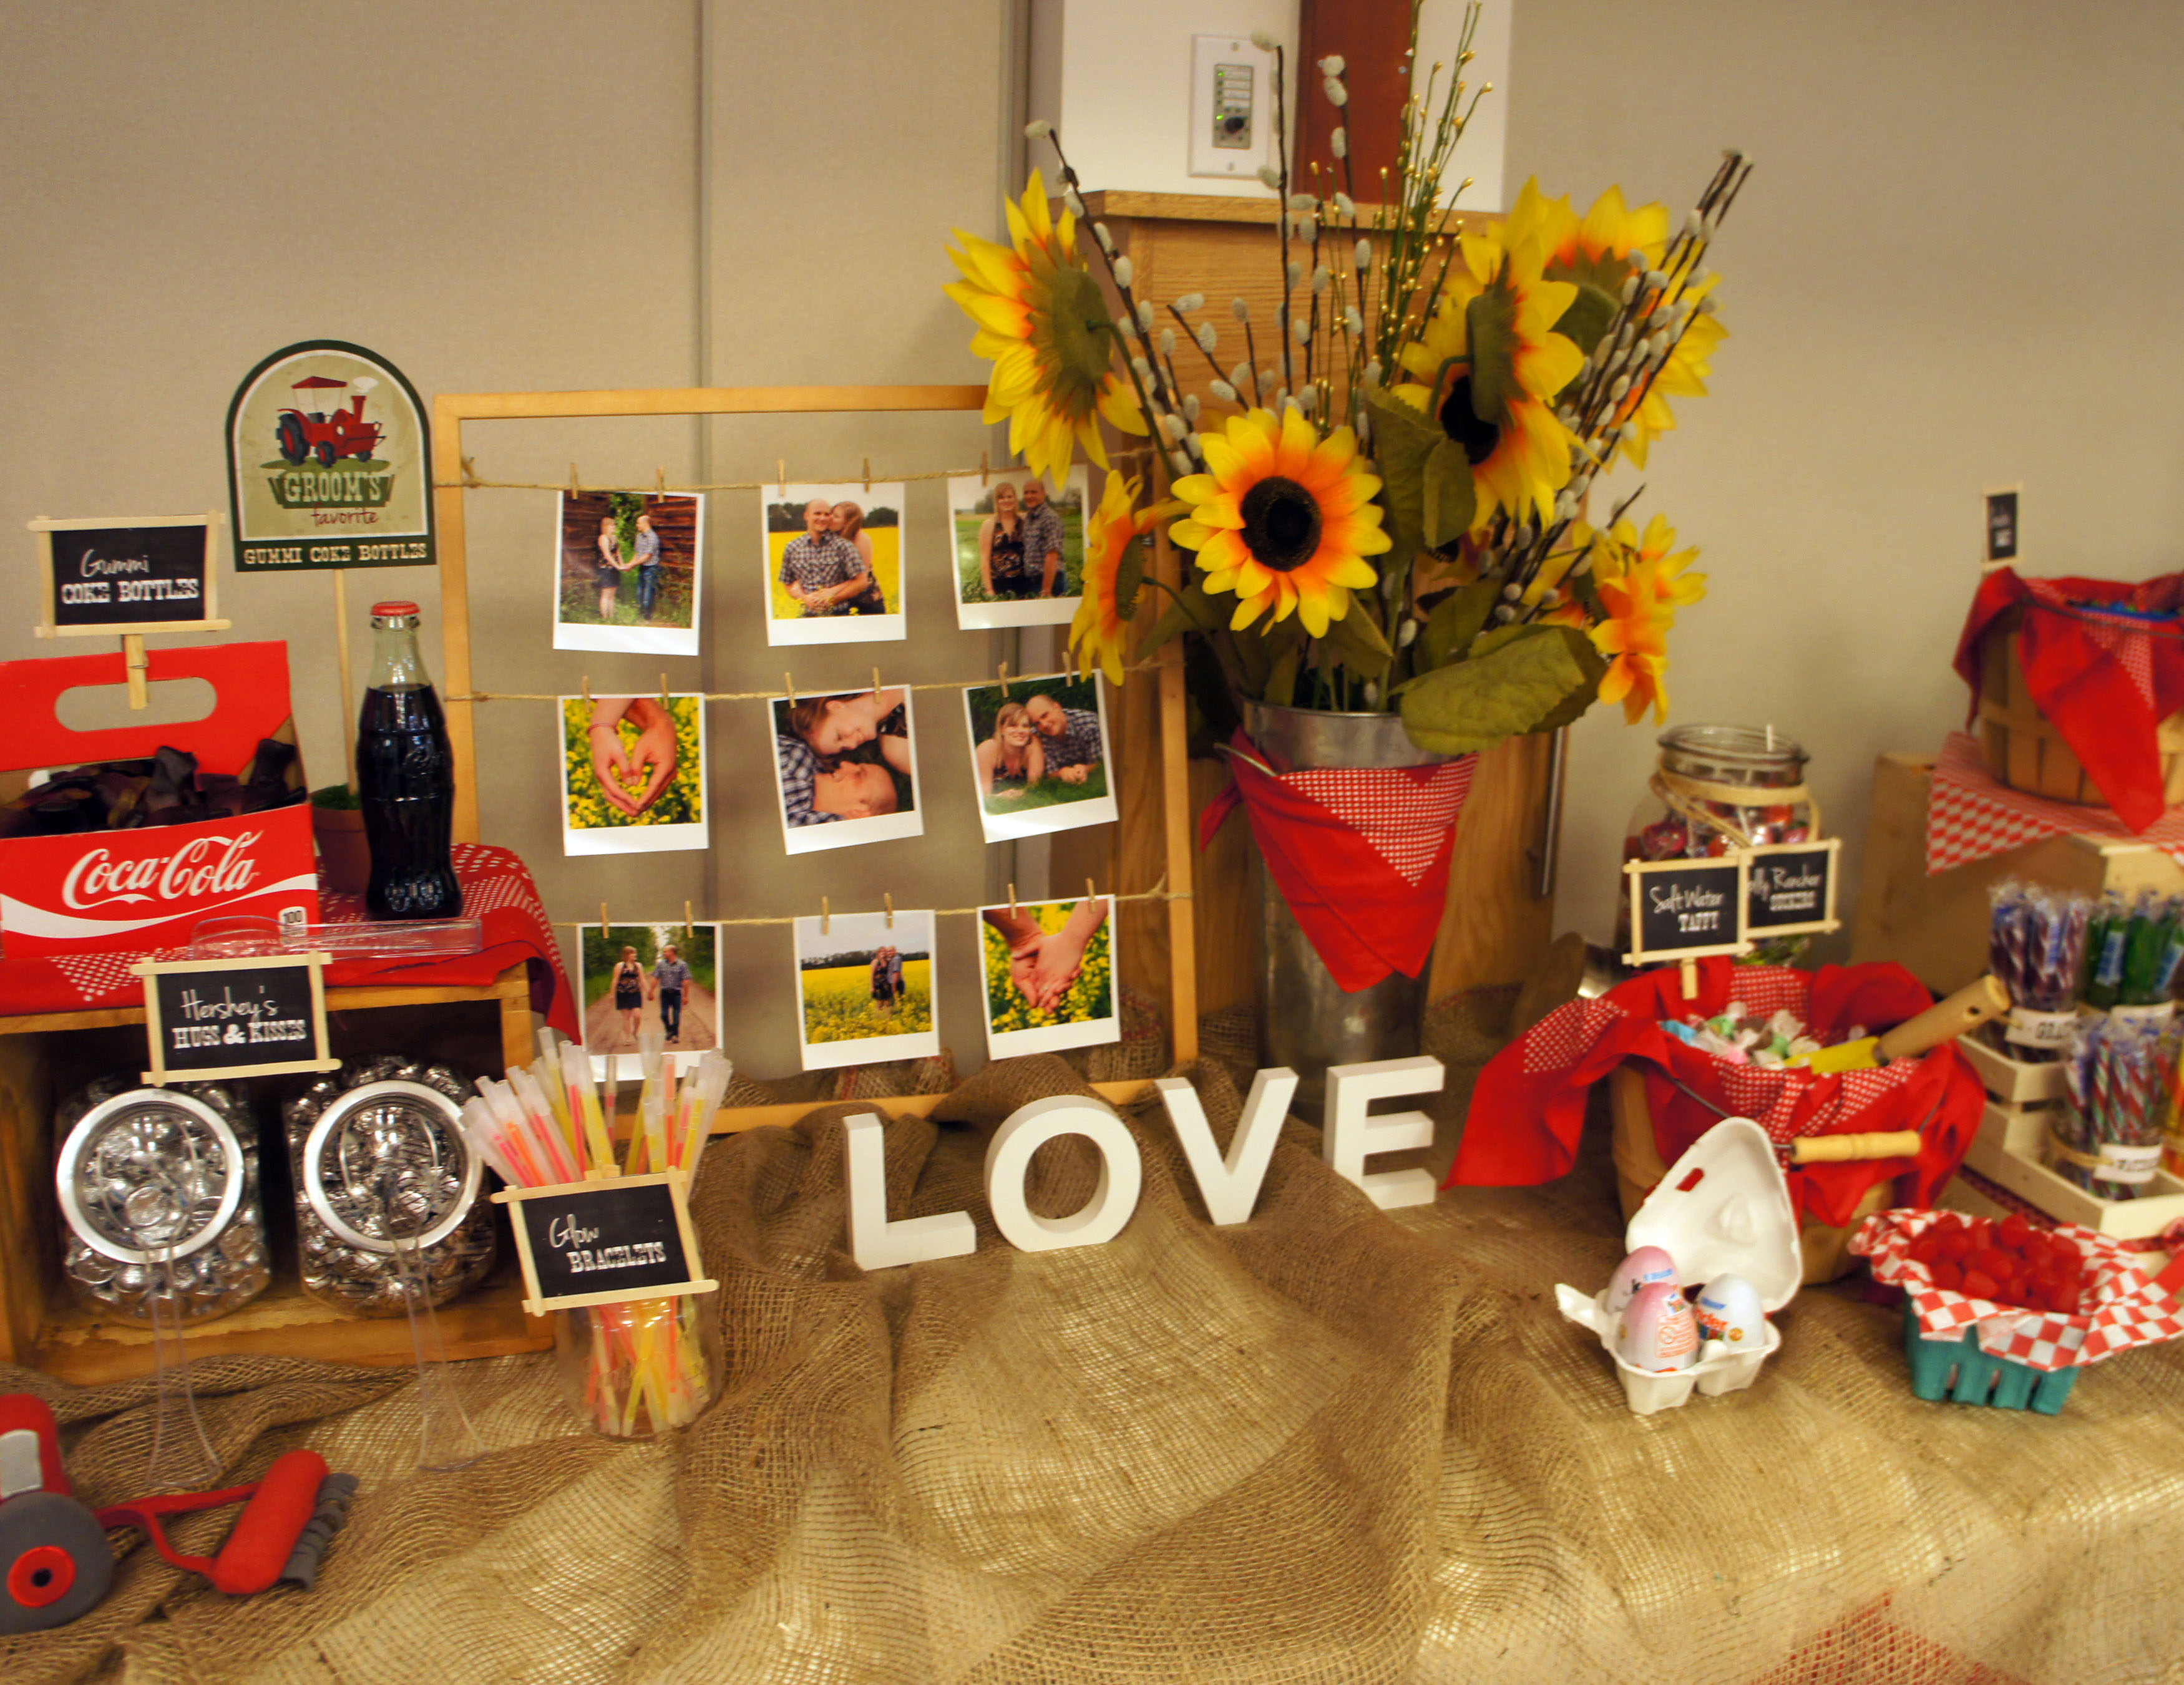
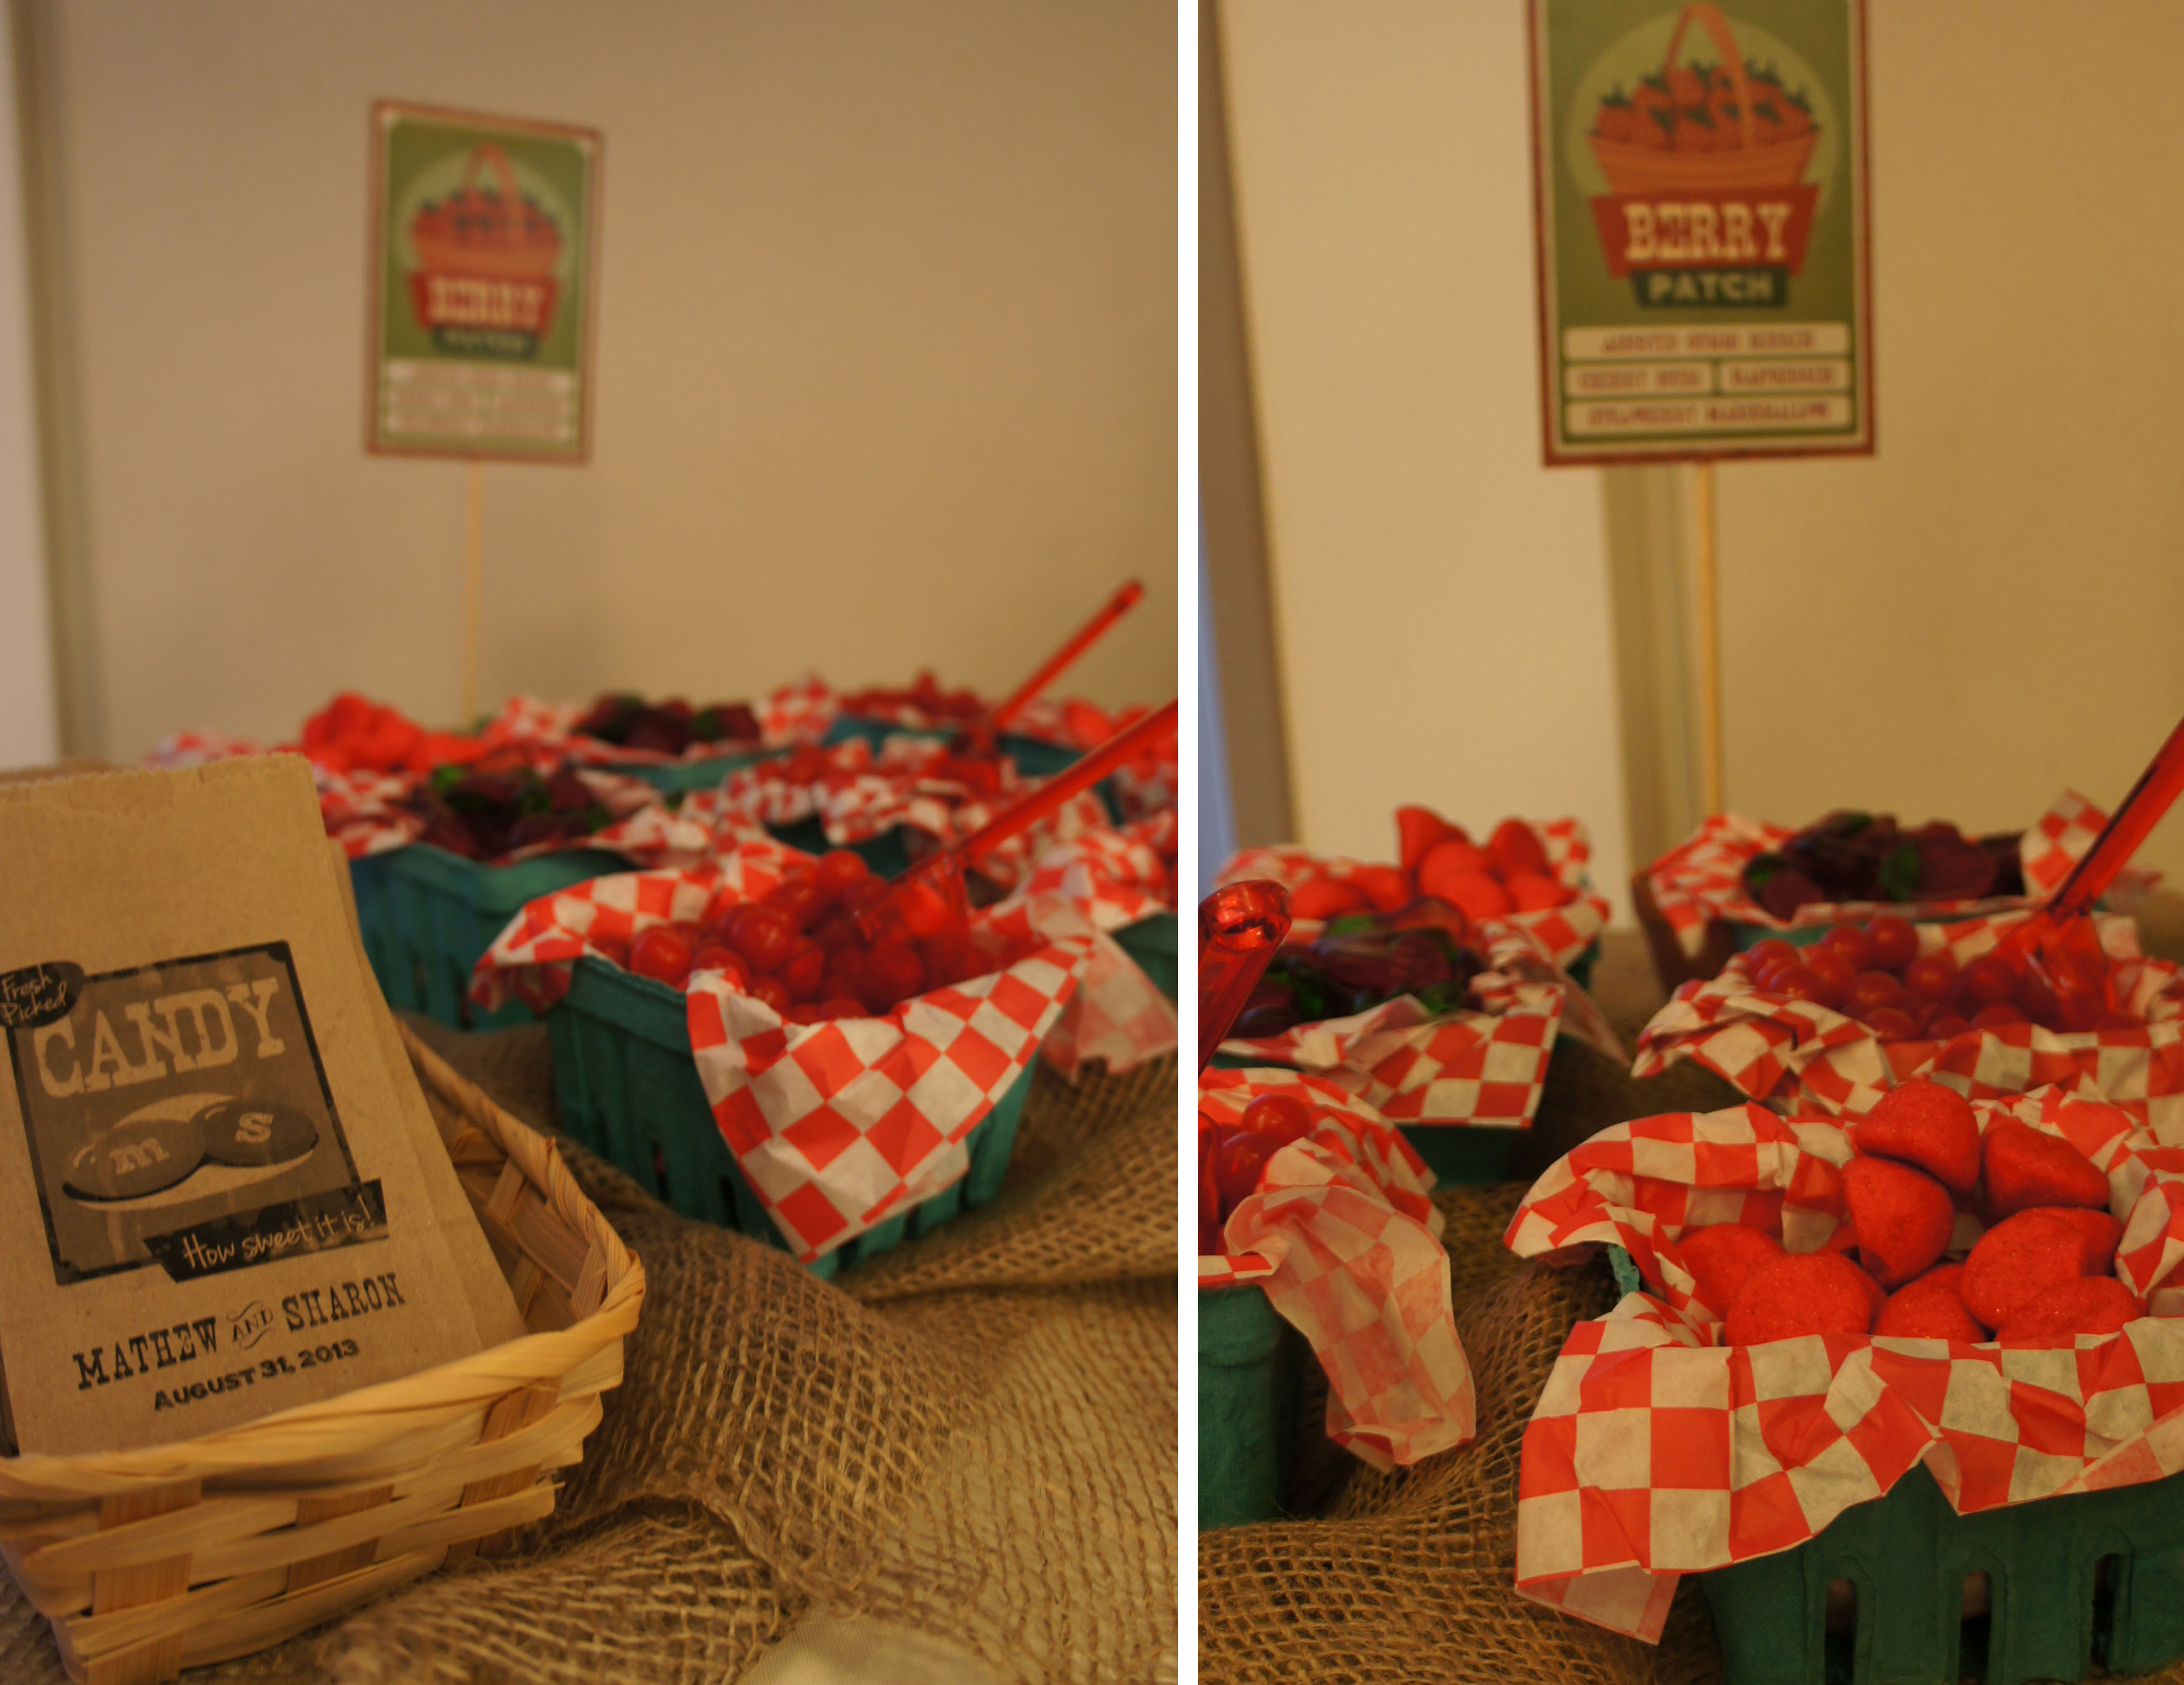
The bride and groom both grew up on farms so there was definite country vibe to their wedding. I originally toyed with doing a bright, colourful candy buffet, but decided on more of a farm stand inspiration because it seemed to suit the couple better. Sunflowers, bright red bandana’s, burlap and mason jars were easy décor choices and fit in with the red, black and white color scheme of the wedding.

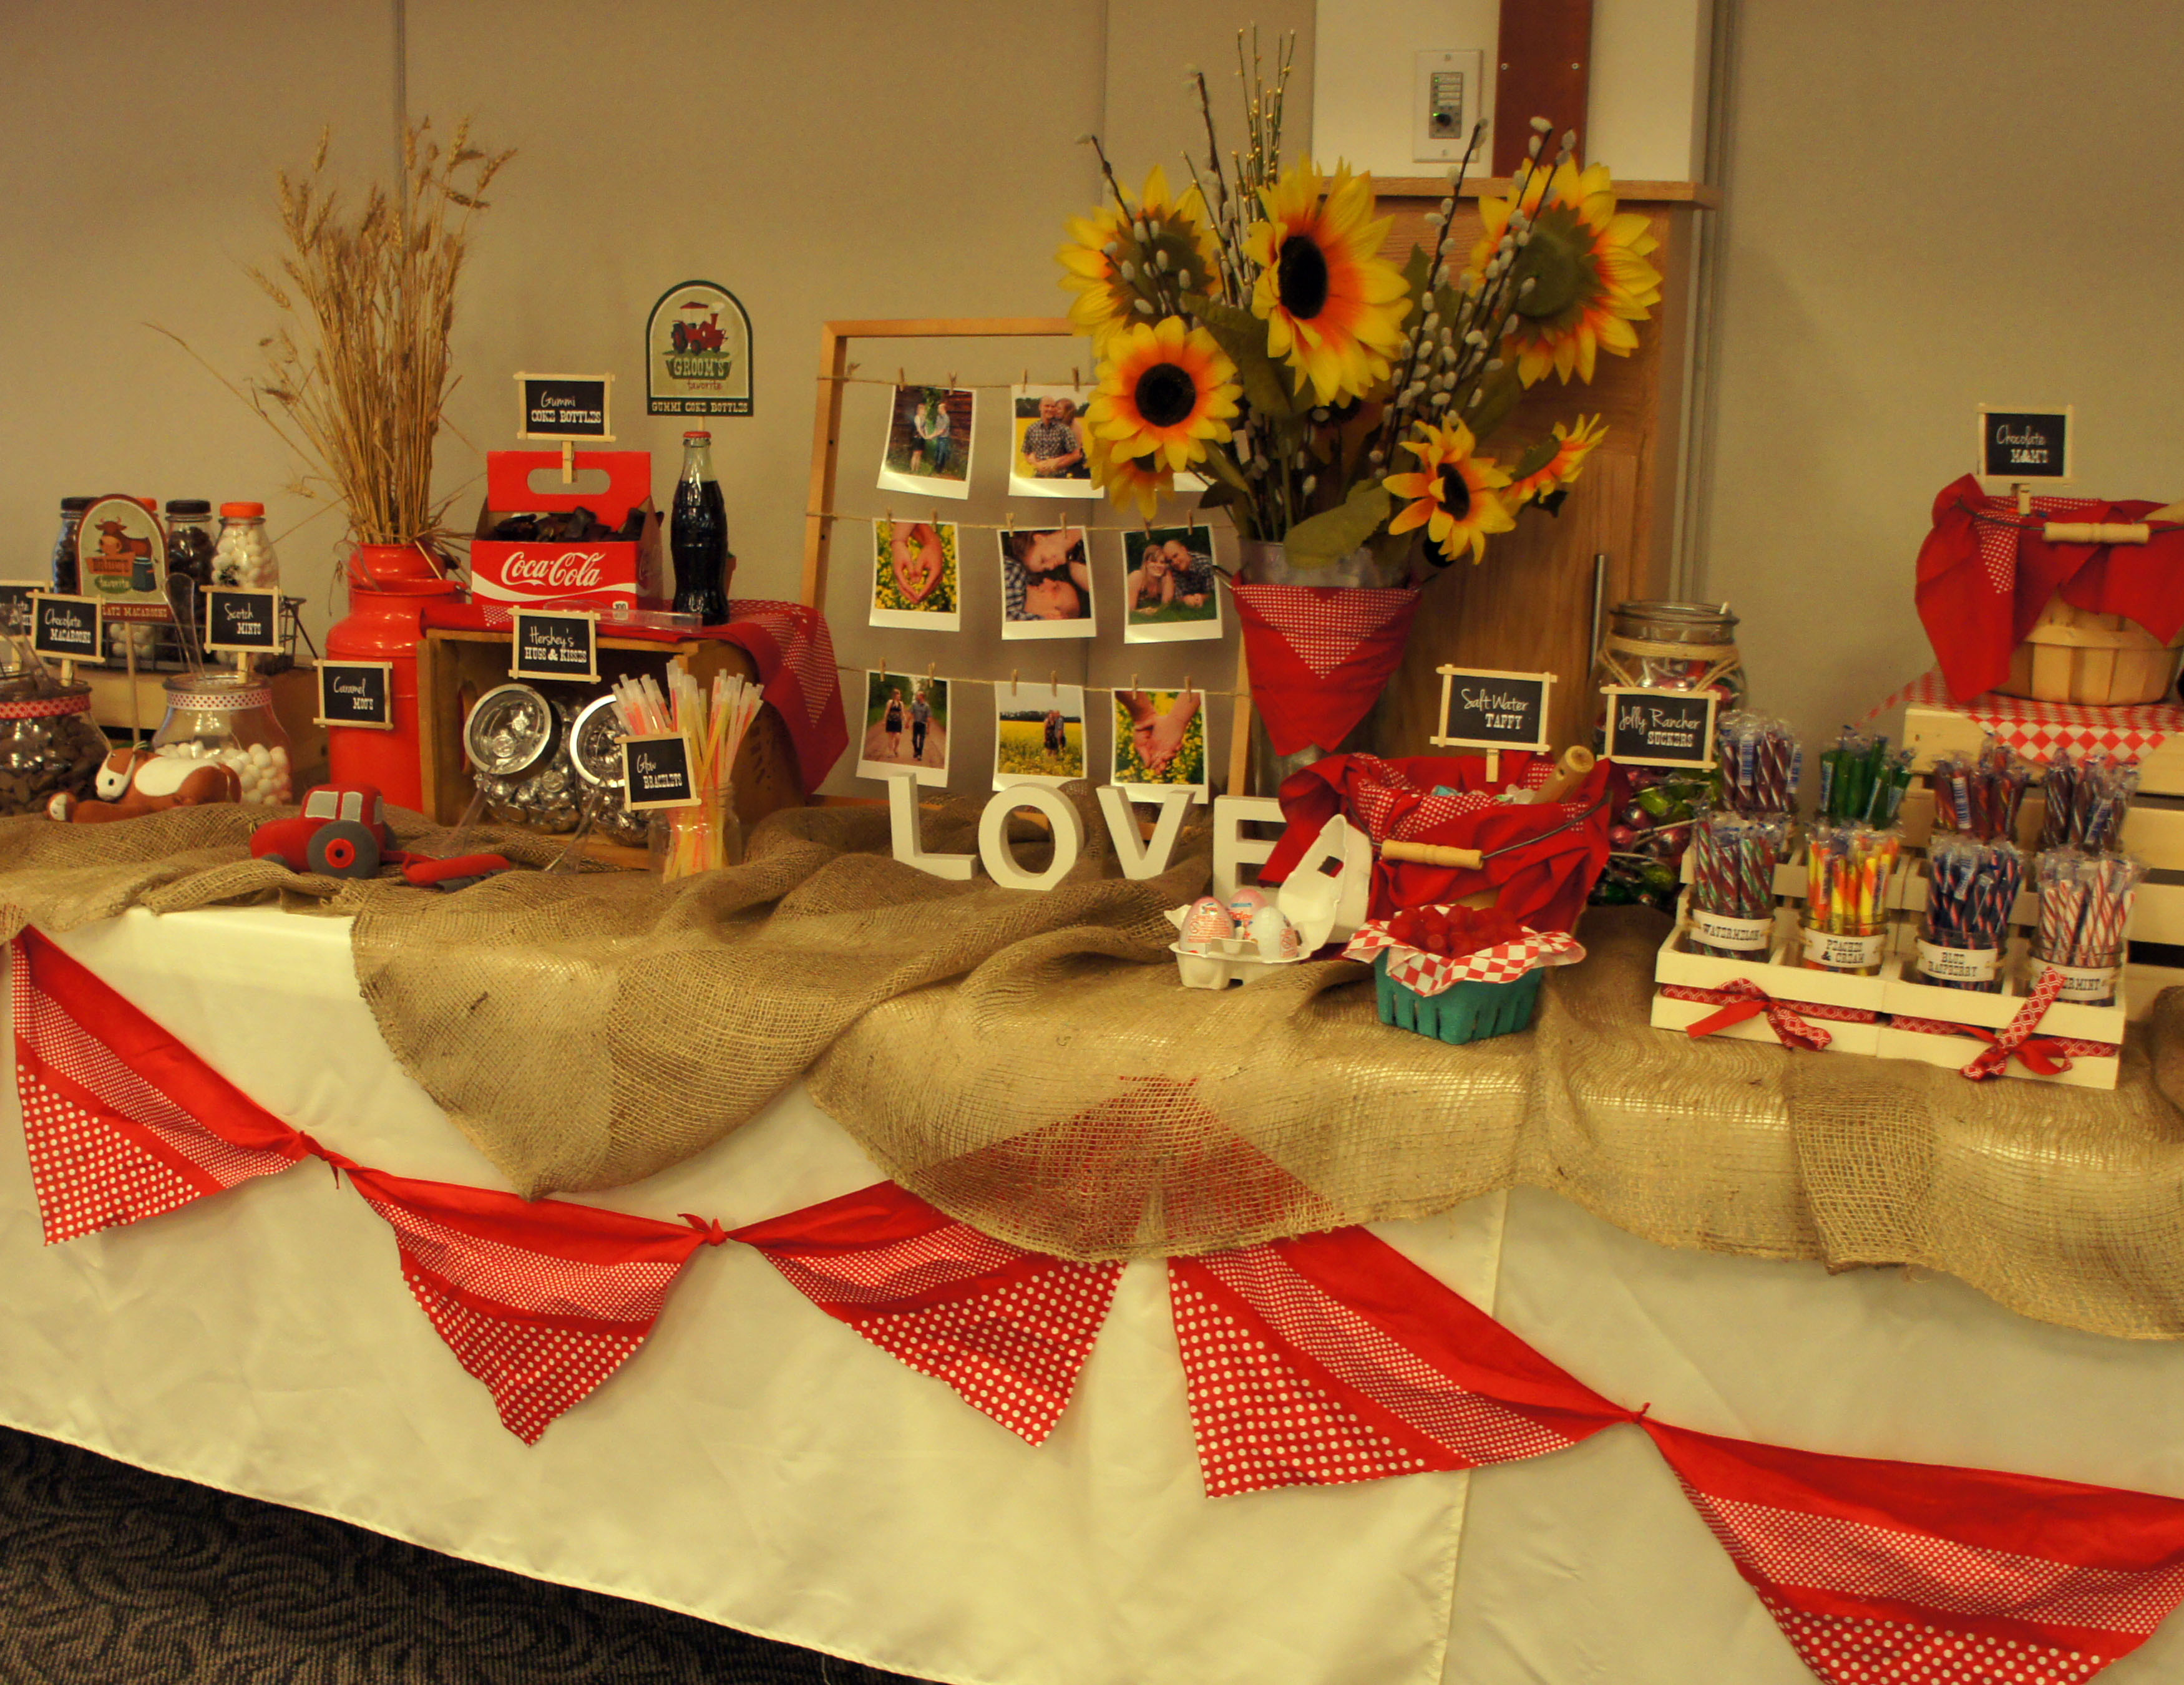
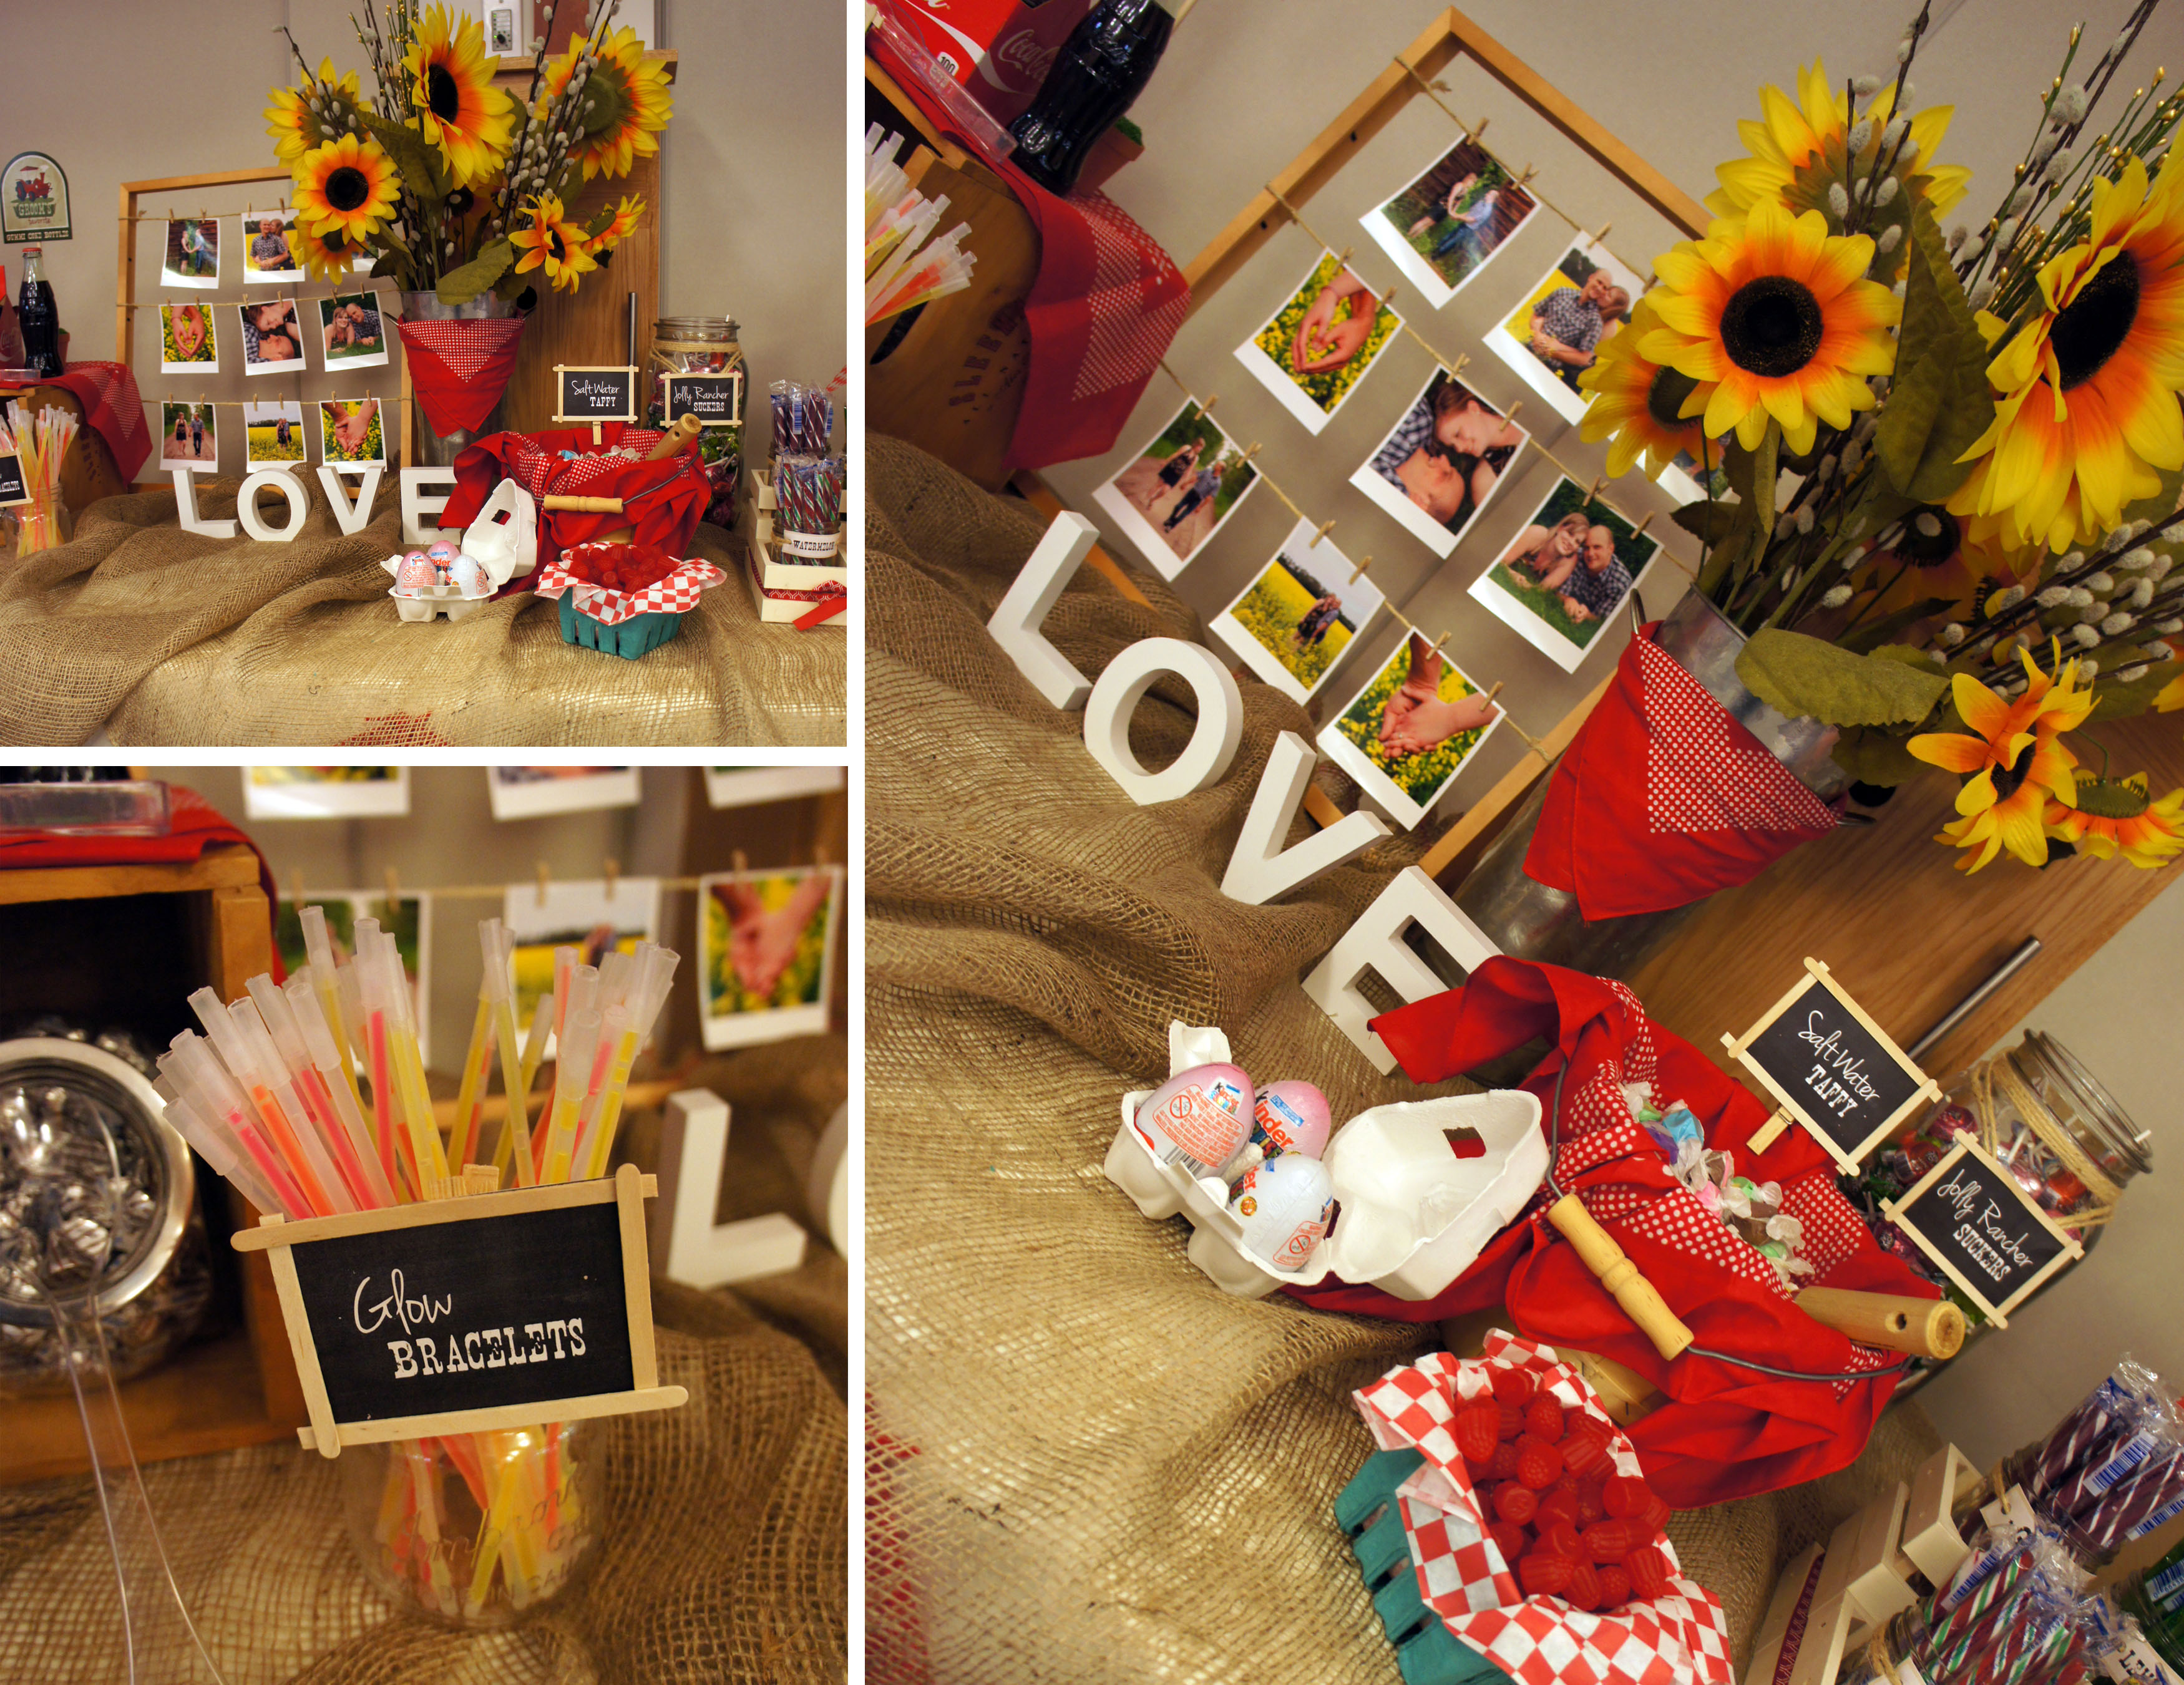
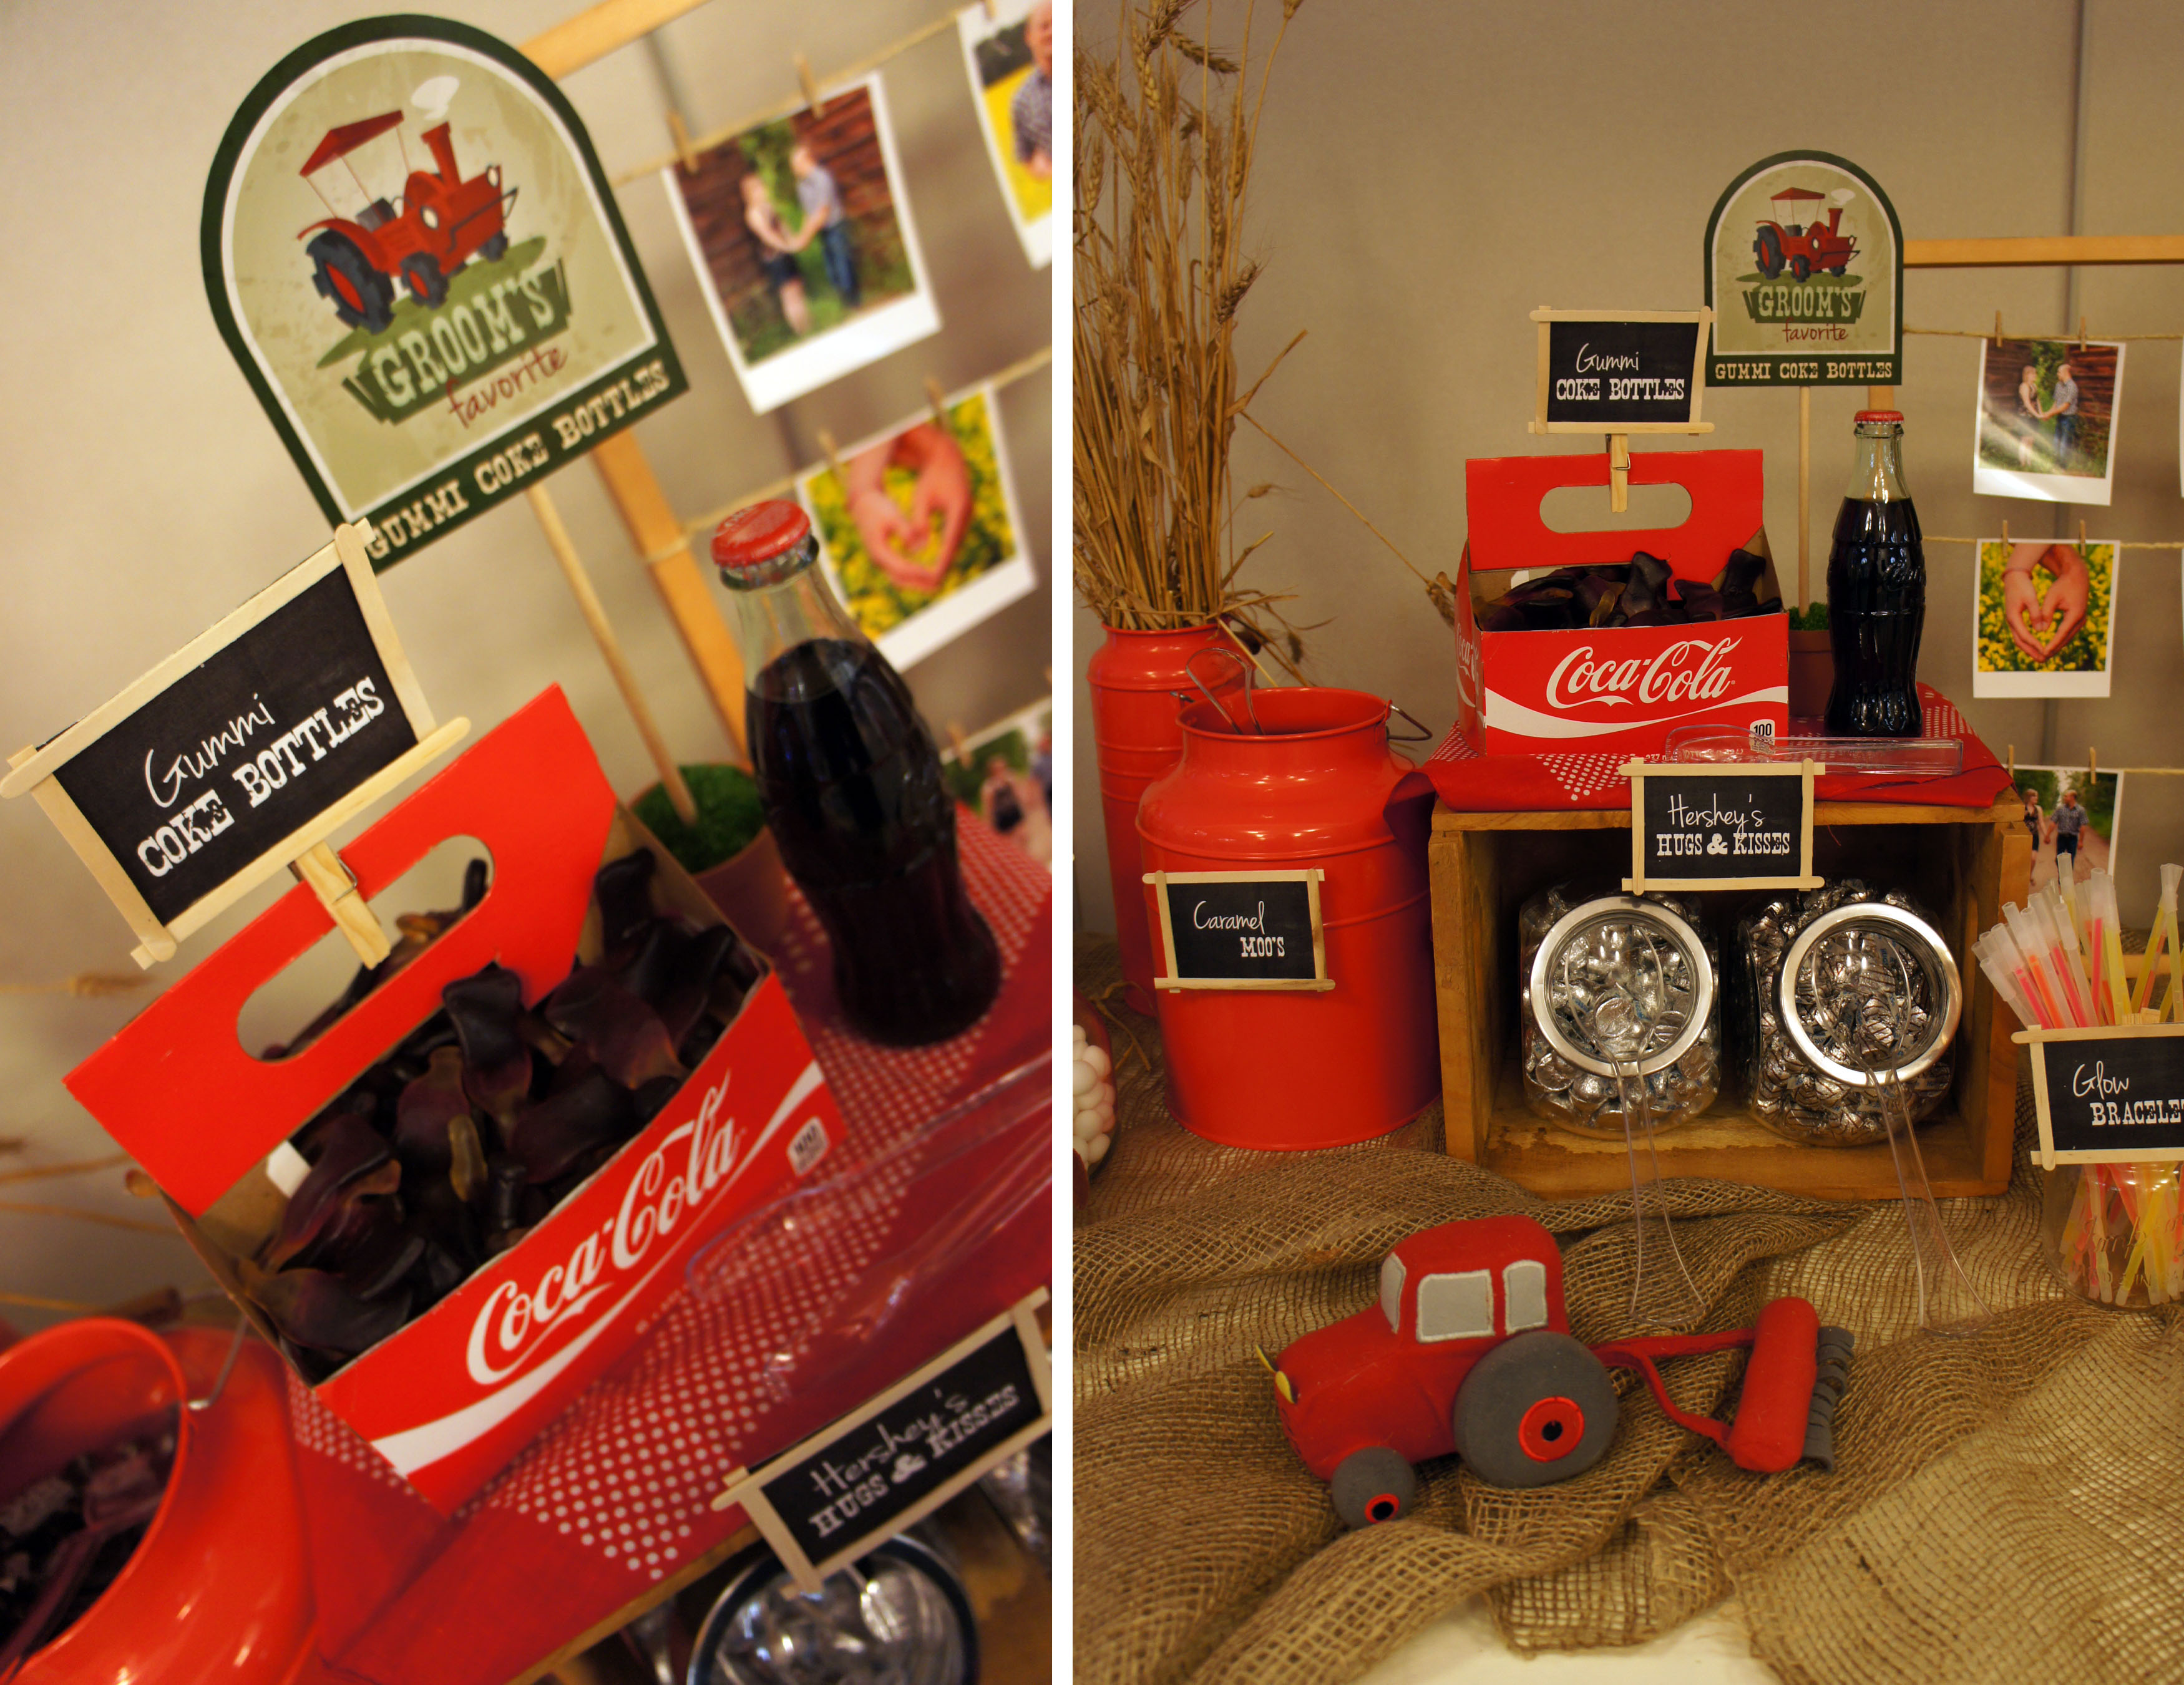
The couple had some fantastic engagement photos that were taken on the farm and I really wanted to find a way to incorporate some of them into the décor. I had a photo frame sitting in my basement so I strung some twine across, printed the photos in Polaroid format and strung them up with mini clothespins. It was an inexpensive element and I love that it added a personal touch for the couple.
Signage for the buffet was designed and assembled by myself. Printed elements included candy bags, chalkboard inspired candy labels, vintage style farm signs with the bride and Groom’s favorites, and a large “Candy Stand” sign.

The same M&M and Skittles inspired logo was printed in black and white on small brown paper candy bags. These were a labour of love and involved a lot of cursing and paper jamming in my home printer.
The basket stand was my big showpiece and a bit of a DIY project. I found inexpensive wicker baskets at the dollar store and was originally going to have my husband build something out of wood to hold them. I ended up coming across a metal shoe rack for $10 and wouldn’t you know, the baskets fit perfect. To make it more rustic, I simply covered the metal rods in brown paper lunch bags and twine. It is not exactly what I envisioned, but I am still very happy with the result.

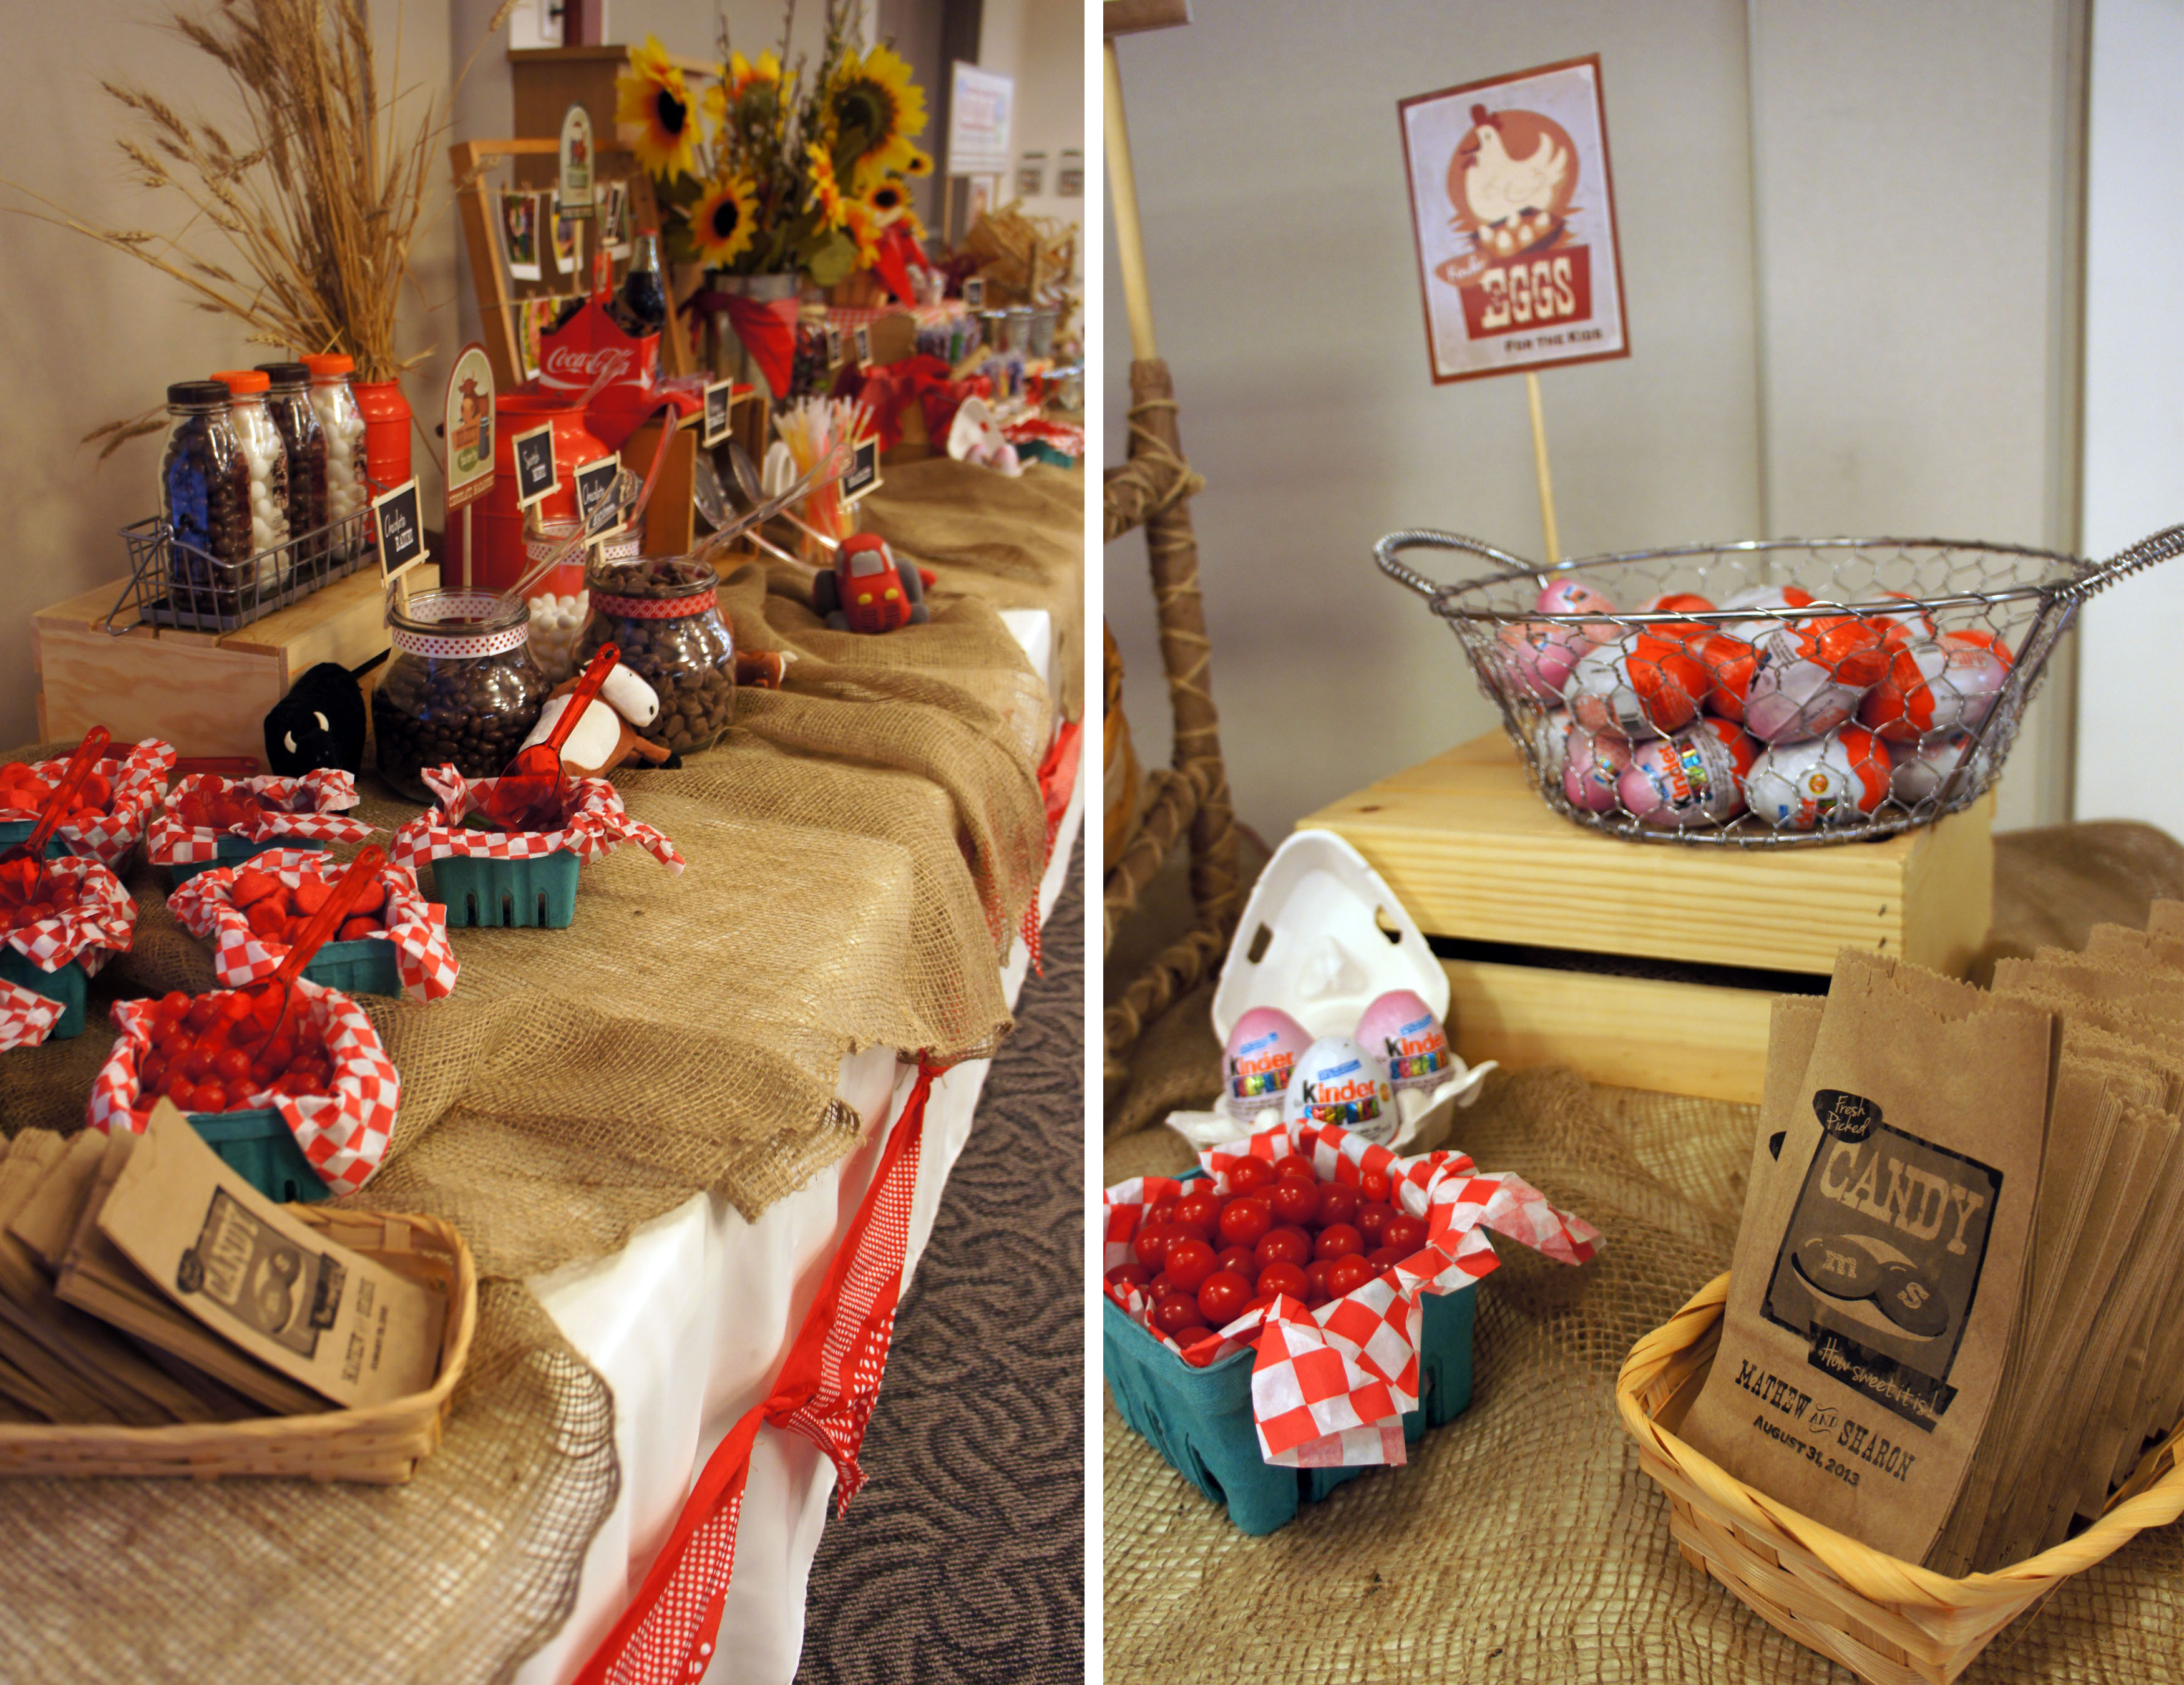
Another fun idea I came across in my pinterest searches was to use berry baskets to hold sweet treats. I was looking for alternative ways to display my candy besides the standard glass bowls and apothecary jars and these ended up being both cheap and unique. My “Berry Patch” was created by displaying various berry candy in the cardboard berry baskets.
The Groom’s favourite candy was gummi coke bottles so I decided the best way to display those would be an actual Coca-Cola bottle case. I trimmed out the bottle dividers and lined it in checkered paper to make it look a bit prettier and then used a coke bottle as decoration.
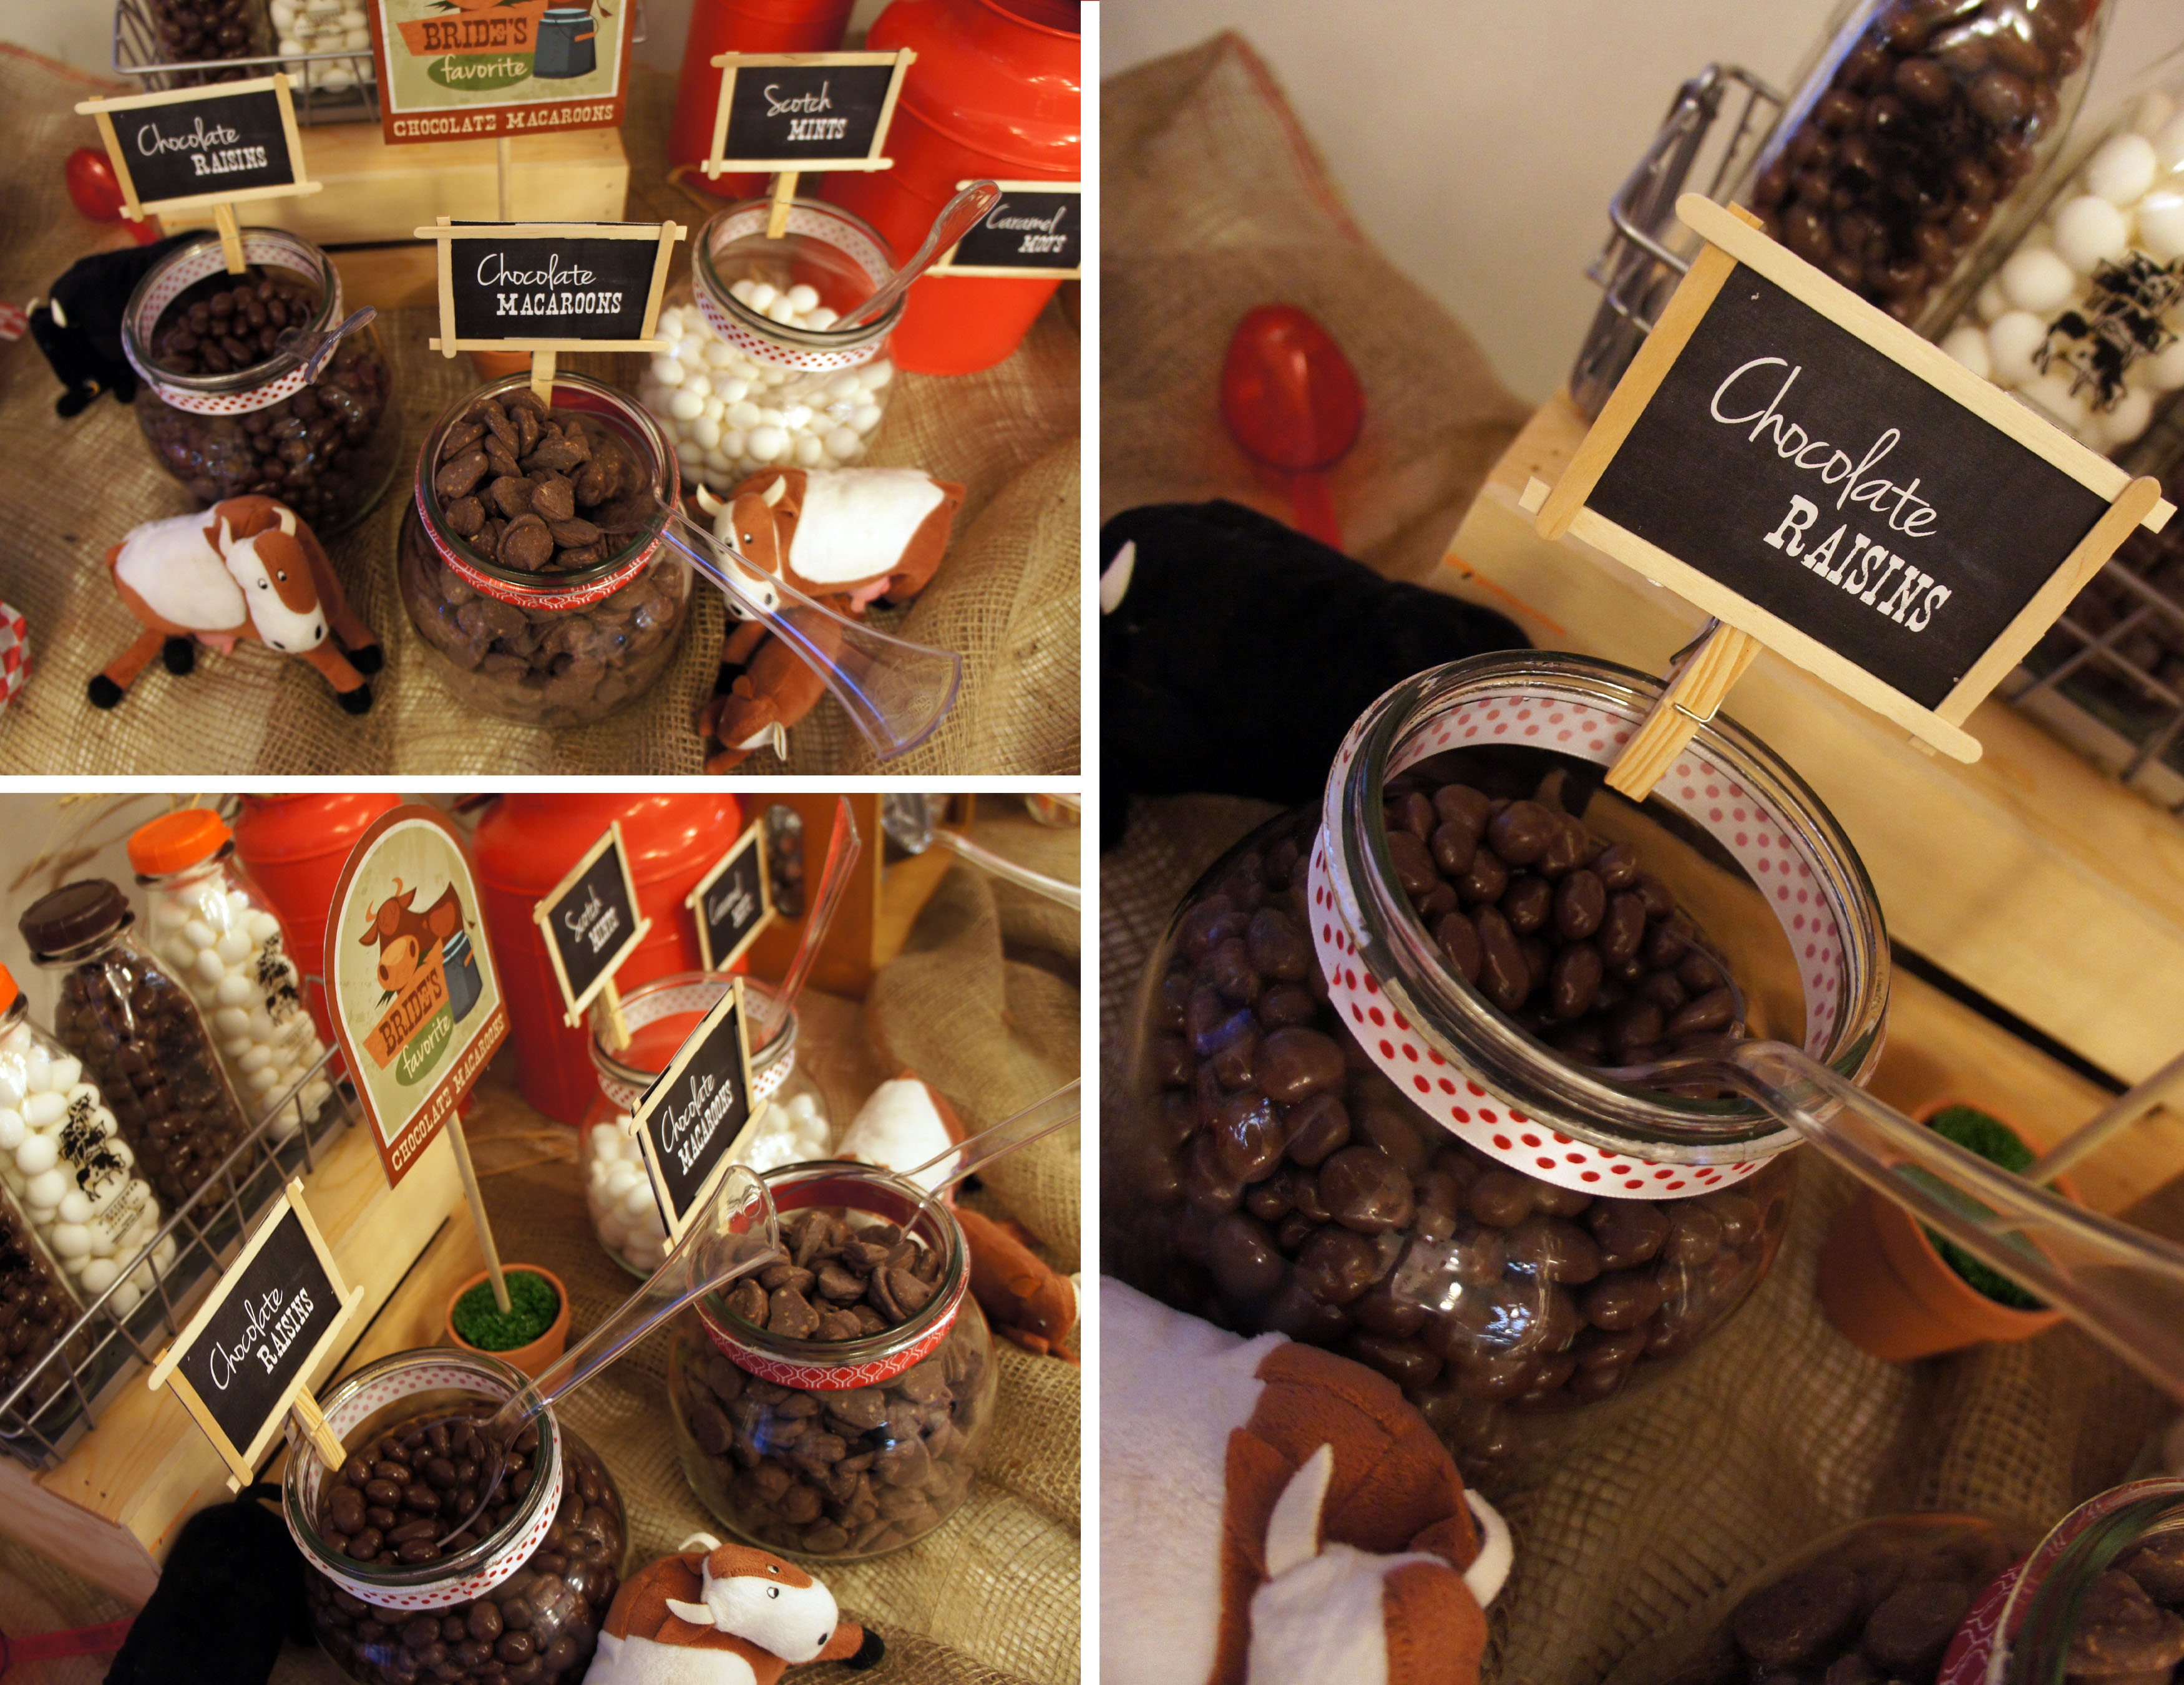
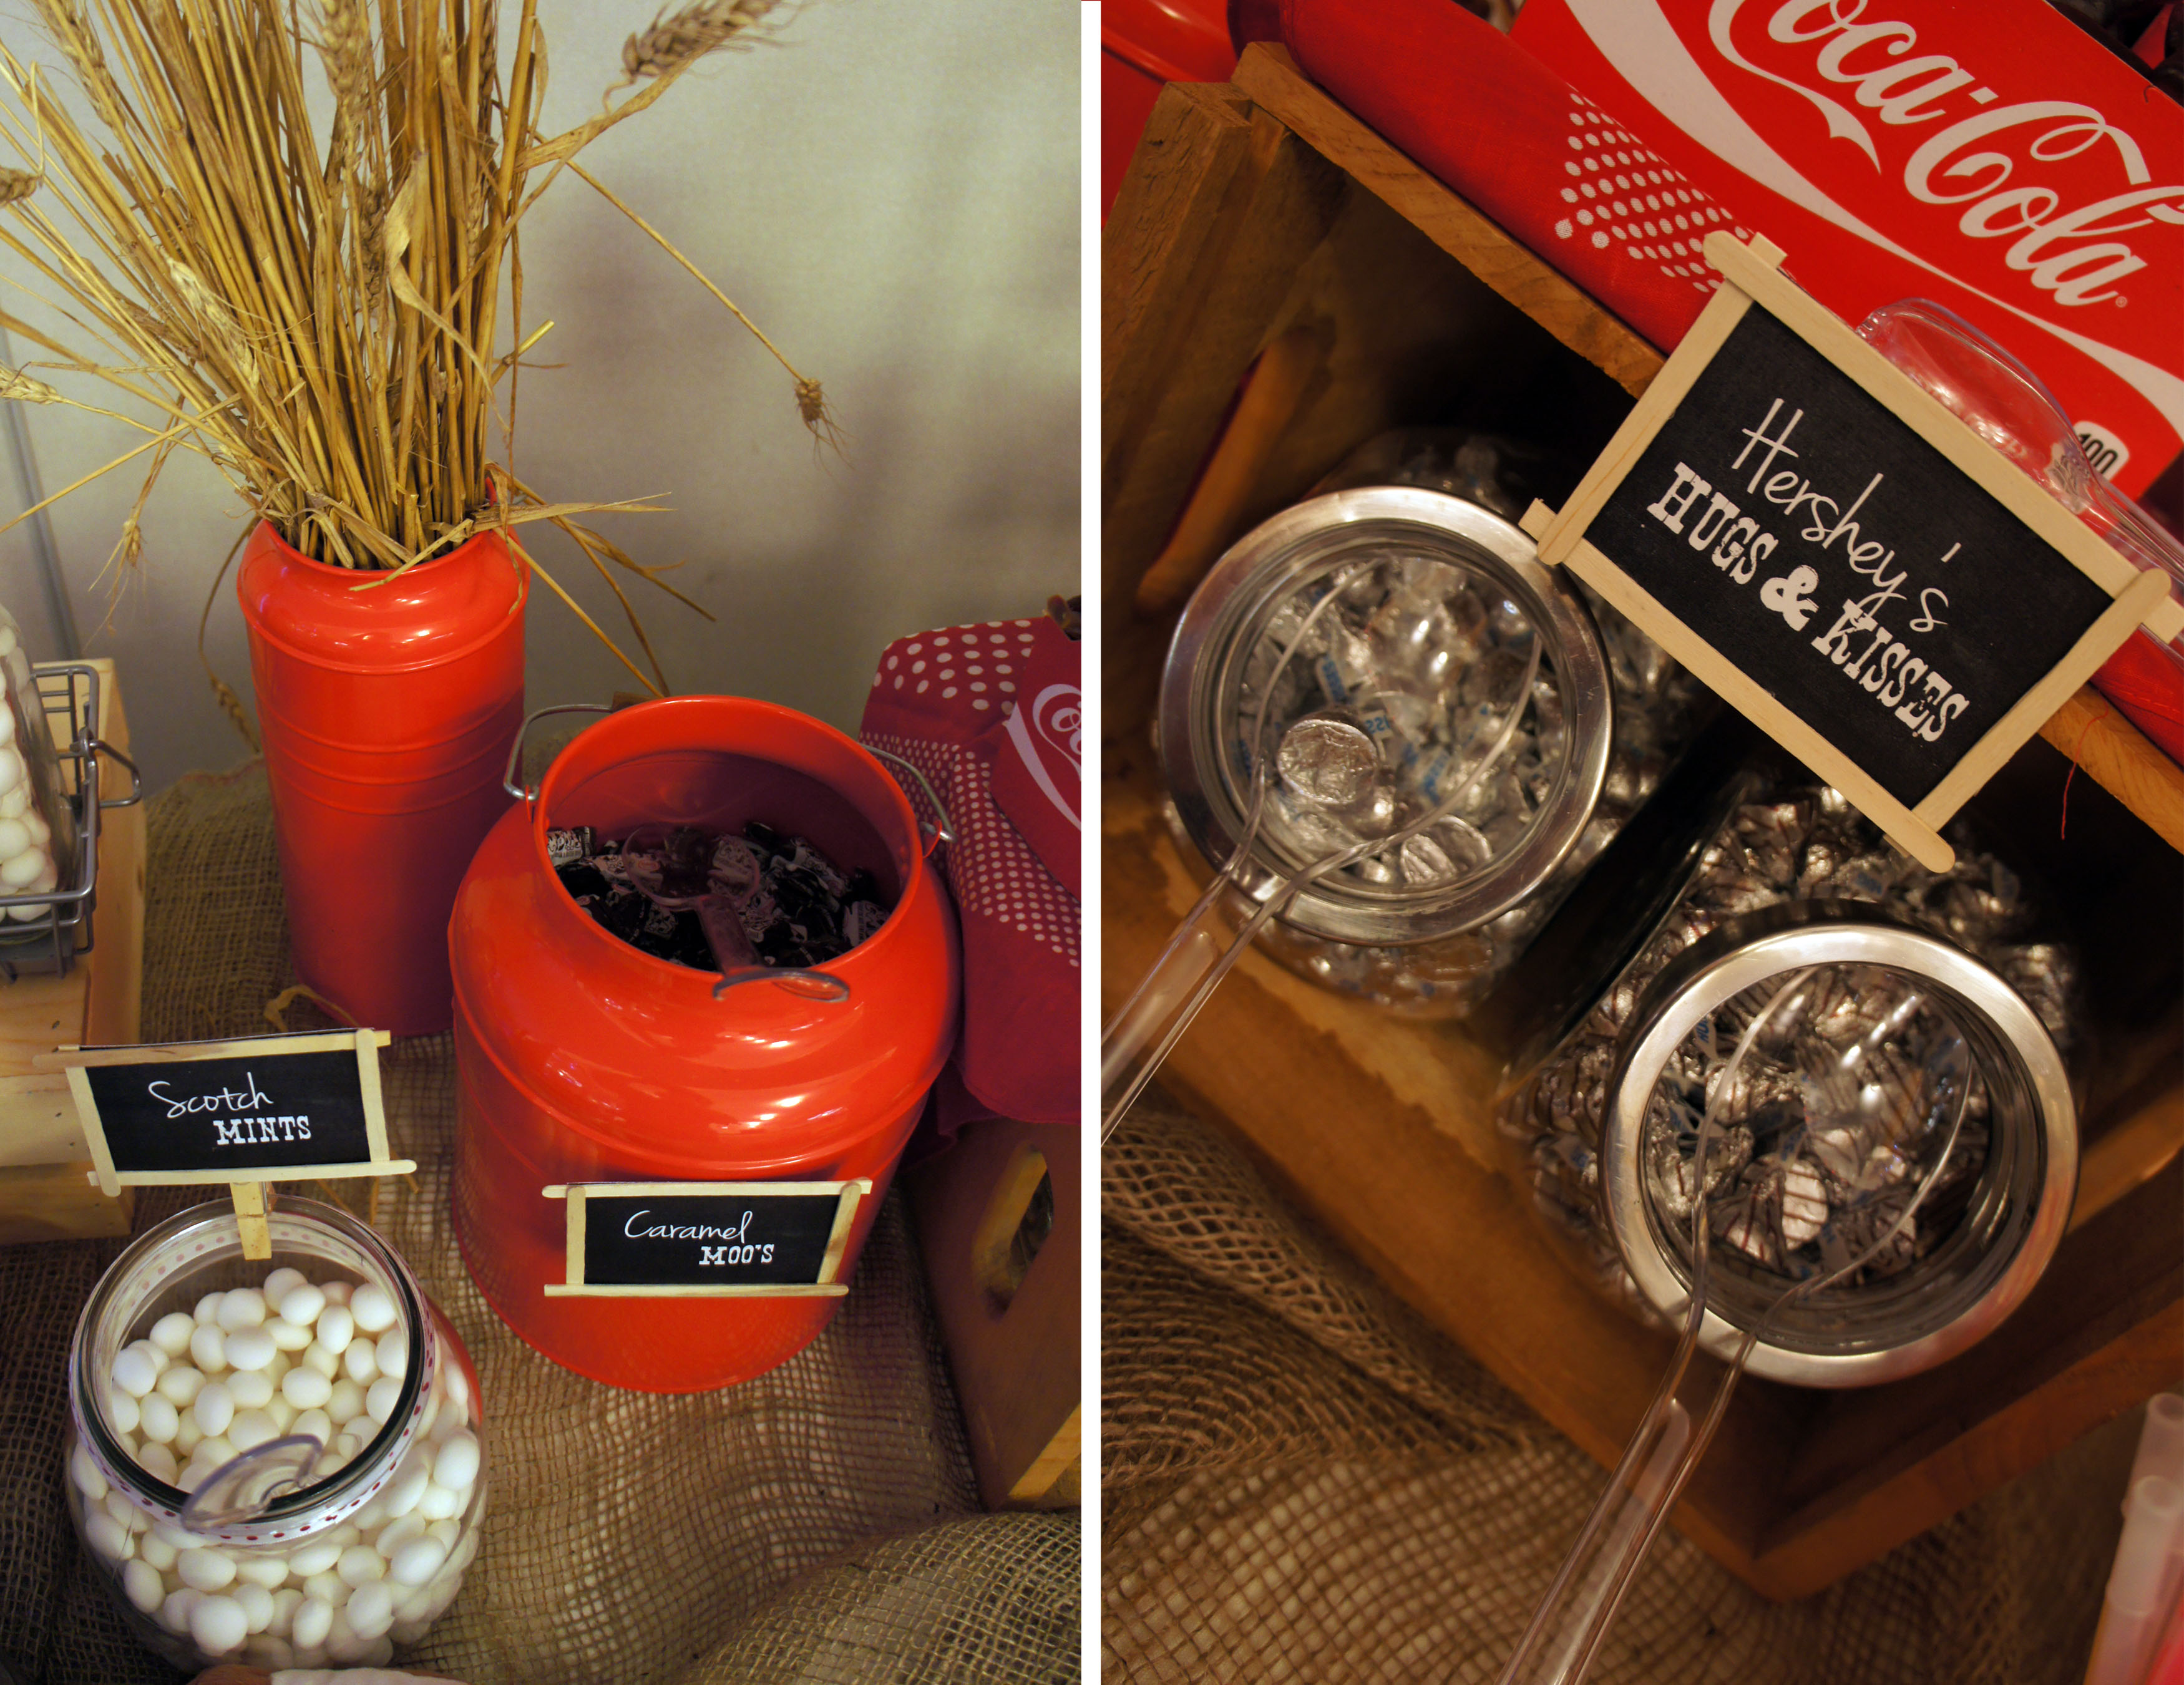
The bride really likes cows so I decided there needed to be a dairy section. I found old fashioned glass milk bottles and filled them with chocolate covered raisins and scotch mints to look like white and chocolate milk. The small glass containers that held the rest of the candies and the bride’s favourite, Chocolate Macaroons, were an IKEA find.

Fresh Eggs are a pretty common product at farm stands, so the natural choice was to include some Kinder Surprise eggs for the kids. I found this great egg basket at a thrift store and also set some out in egg cartons to finish the look.

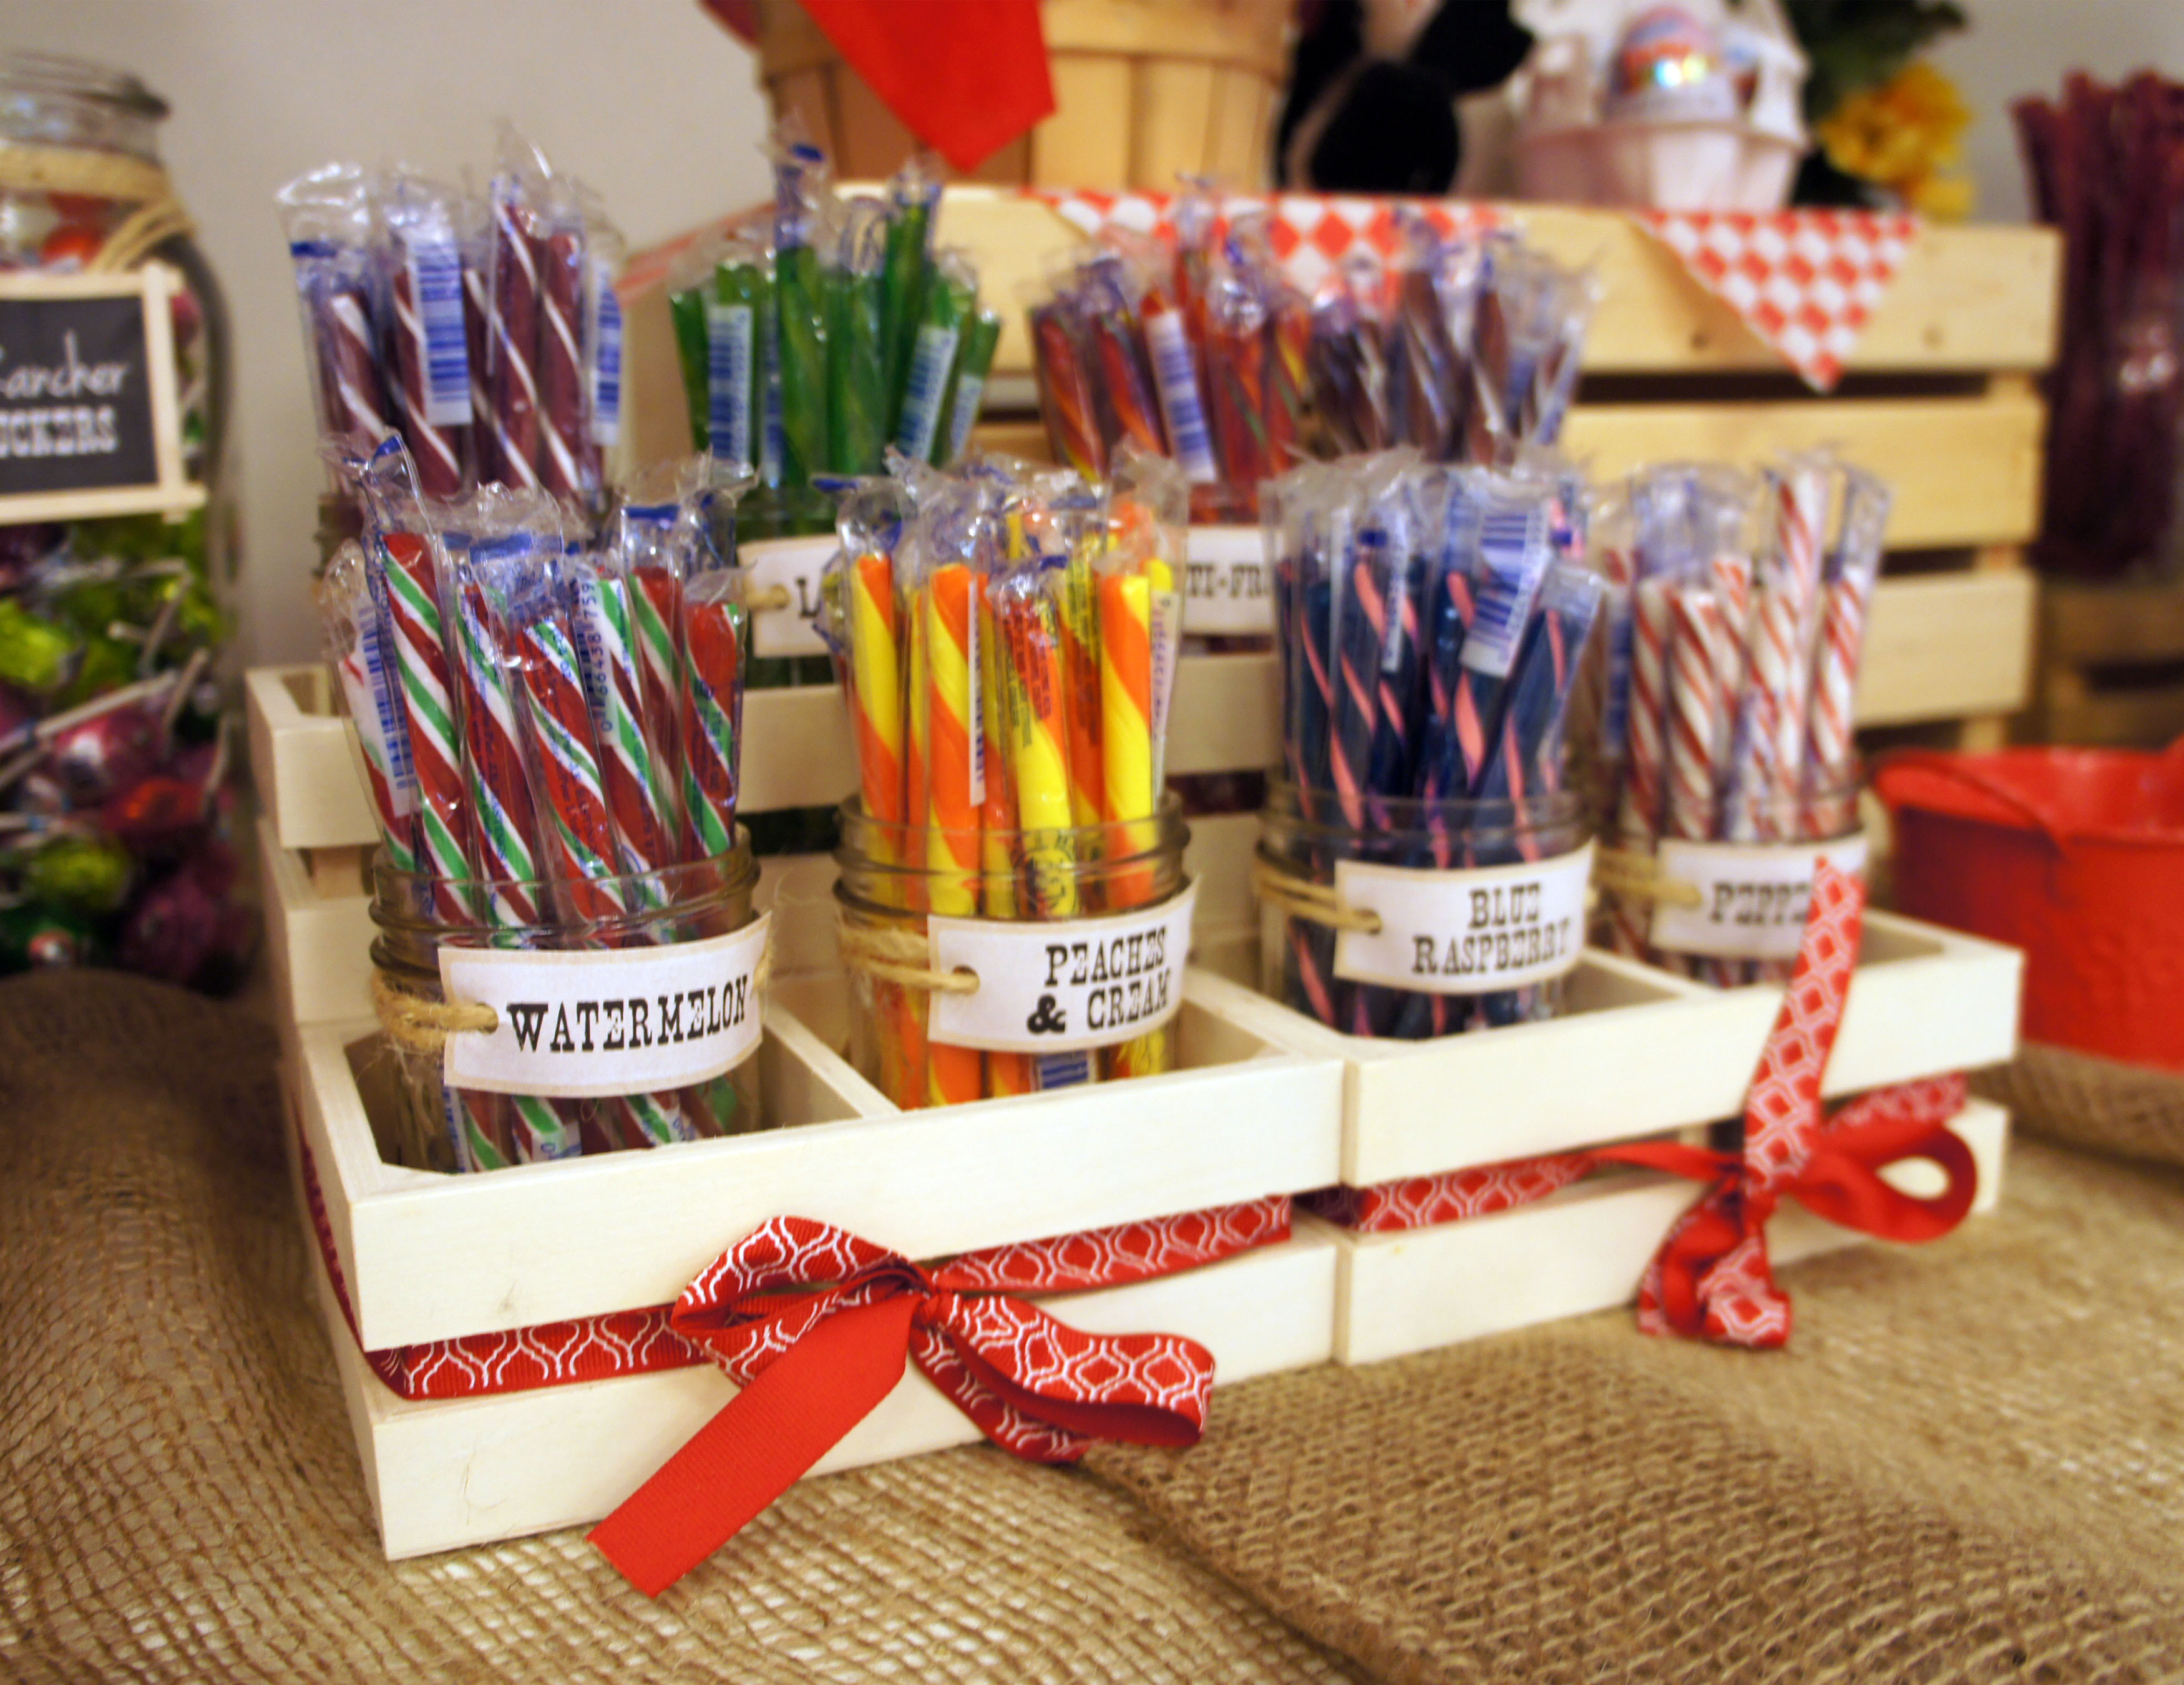
A variety of old fashioned candy sticks were set out in mason jars and displayed in small stands I made out of small dollar store crates I glued together with wood glue. The most difficult part of this project was definitely narrowing down and deciding on only 8 candy stick flavors!
Once the party gets going at a wedding, I always find the reception venue to get so hot. I decided to add small freezies onto my candy buffet as a cool treat for the kids and adults. I provided scissors to cut them open and people were free to take the sealed ones home with them if they so chose.
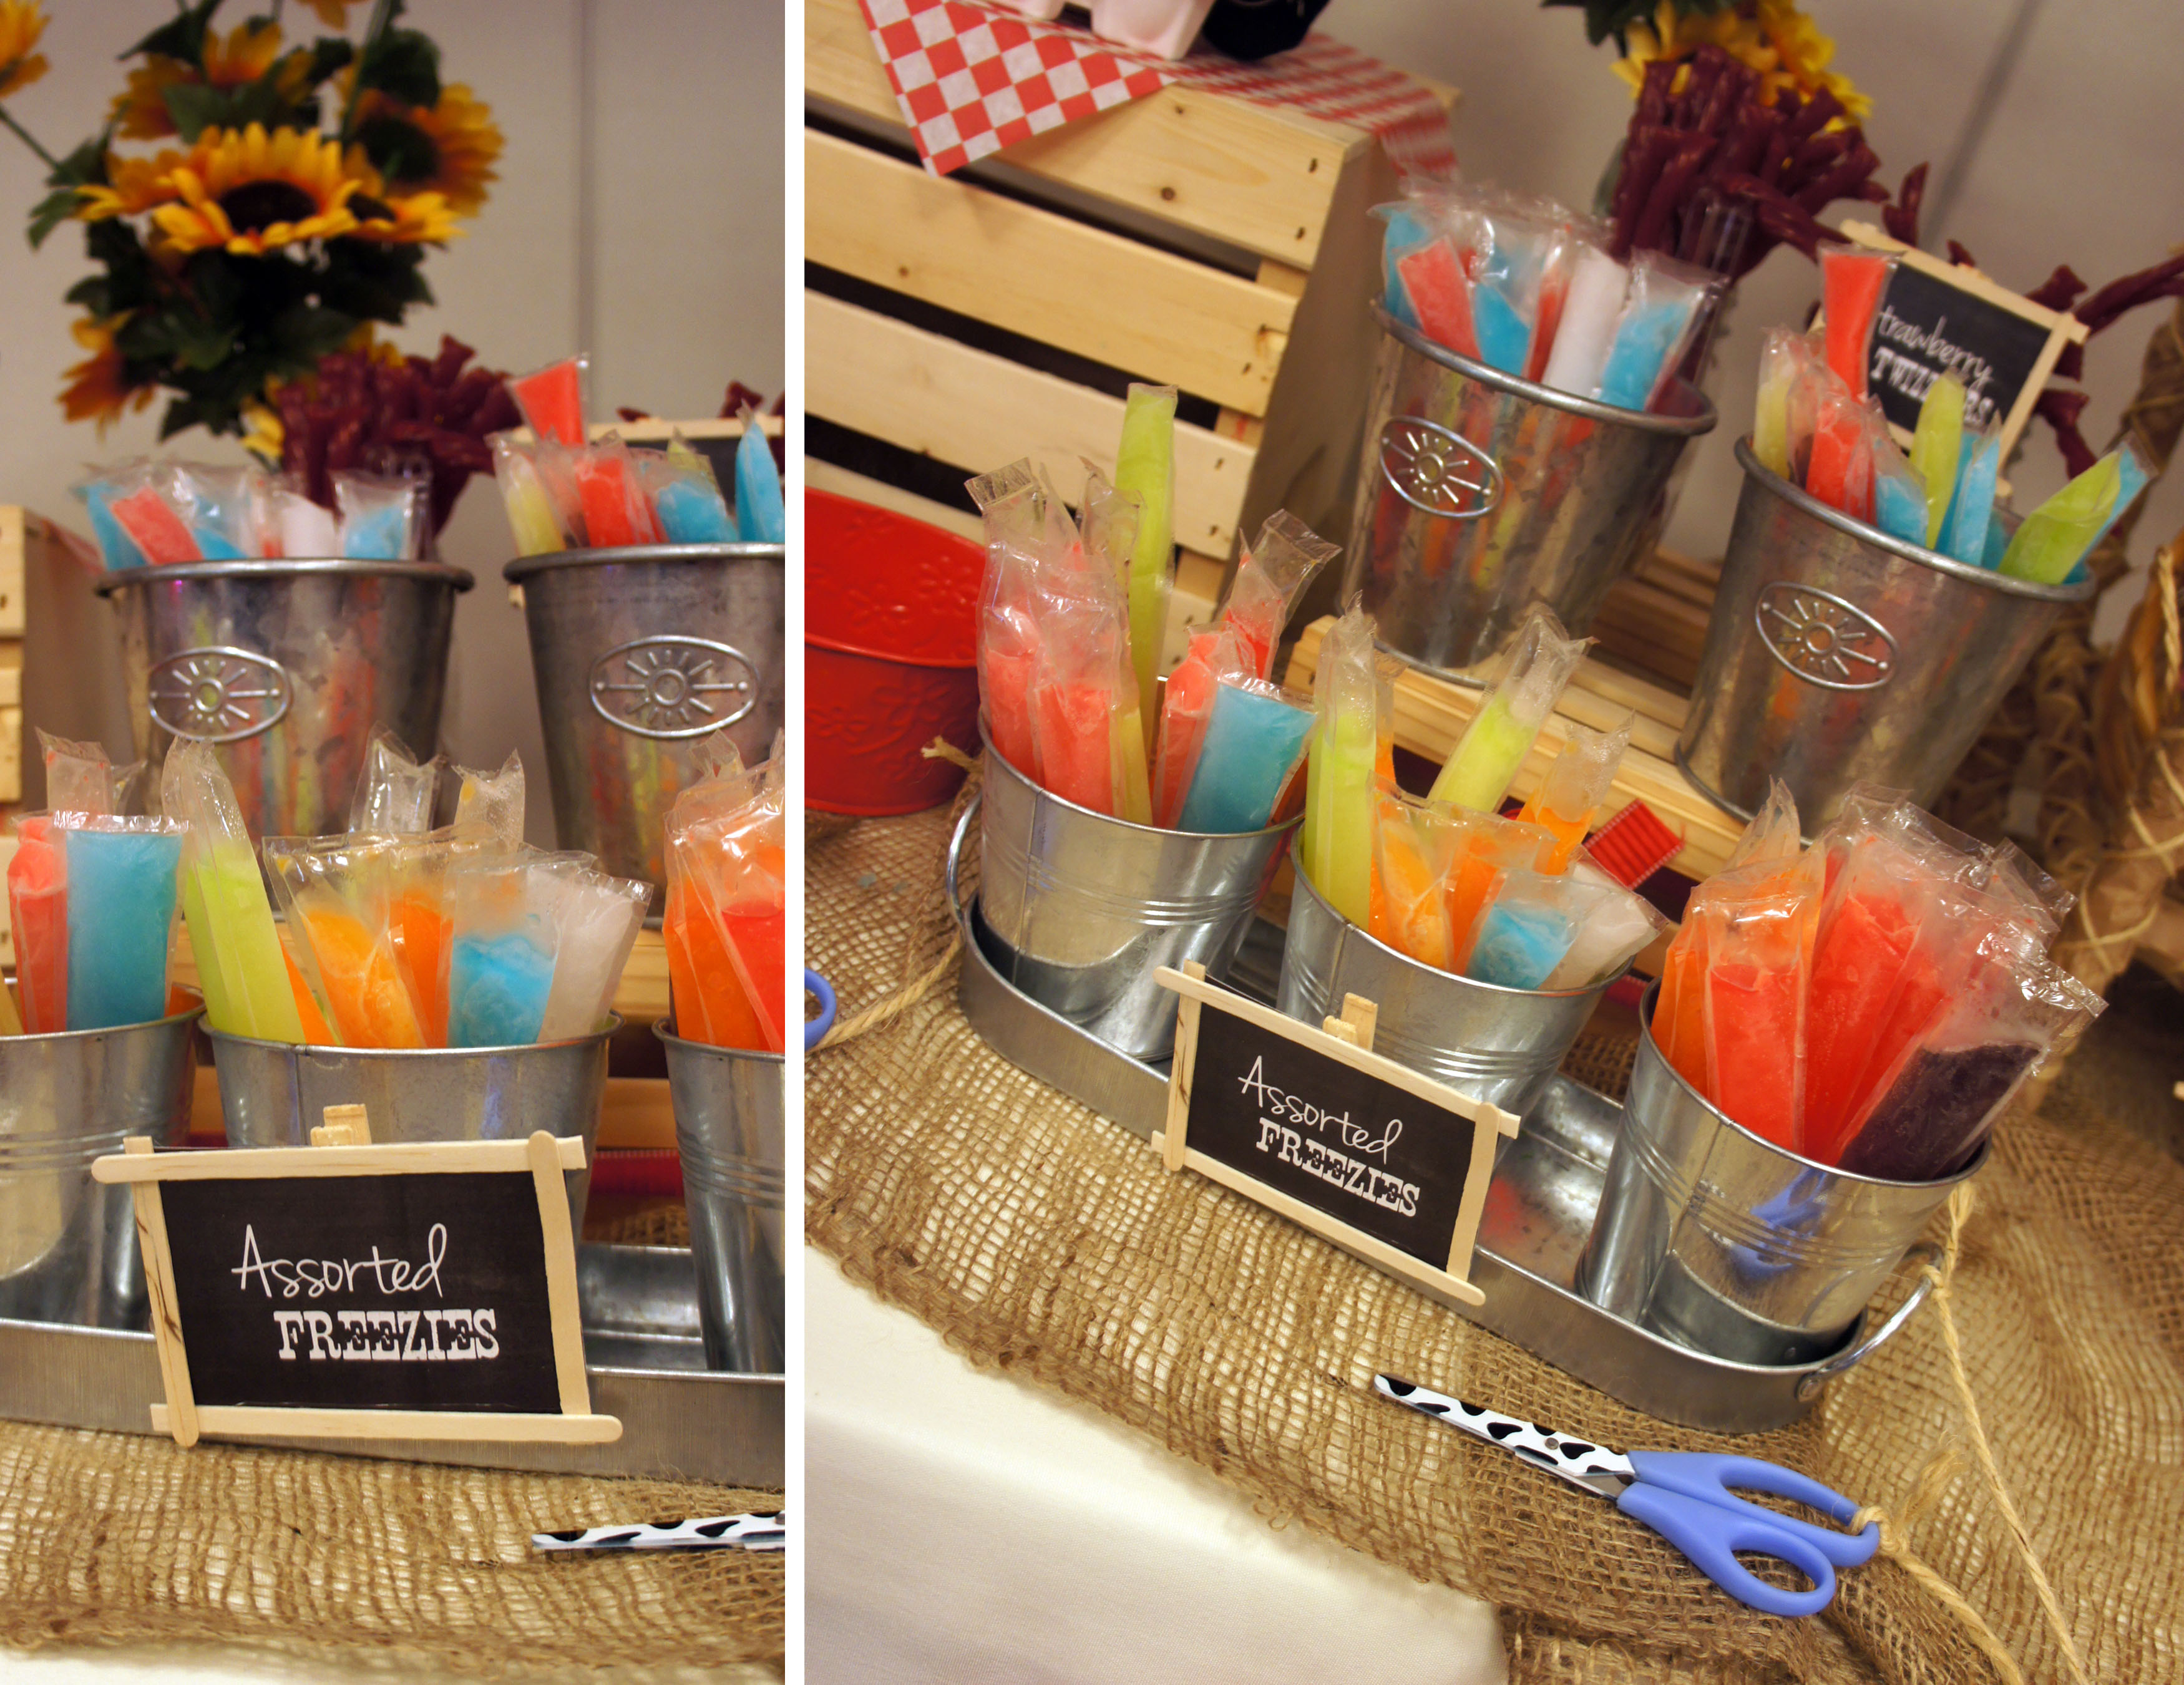
As I’ve gathered the supplies and then slowly started buying the candy over the past couple months, my three year old has grown more and more excited. I am pretty sure he ate his weight in candy at the wedding and he has now been introduced to freezies.
All the elements came together better then I could have expected and I am so happy with the final result. It was a fun project for me to tackle and I am glad I could use my creativity and skills to play a part in the Bride and Groom’s special day.
Congratulations again to one of the sweetest couples I know!


I came across these fantastic chalkboard tags on Etsy when looking for ideas for my country themed candy buffet. I love the chalkboard look, but was not really sold on the idea of messing around with actual sticks of chalk and handwriting each label so I decided to come up with my own solution.

I already had a chalkboard background and several chalk-like fonts on my computer so I decided designing and printing something would be the easiest way to recreate the look. To make the wooden frame, I remembered that I still had a bag of coffee stirrers lying around the house from a previous project. They were easy to cut to length with scissors and I simply attached them to the paper with double sided tape.
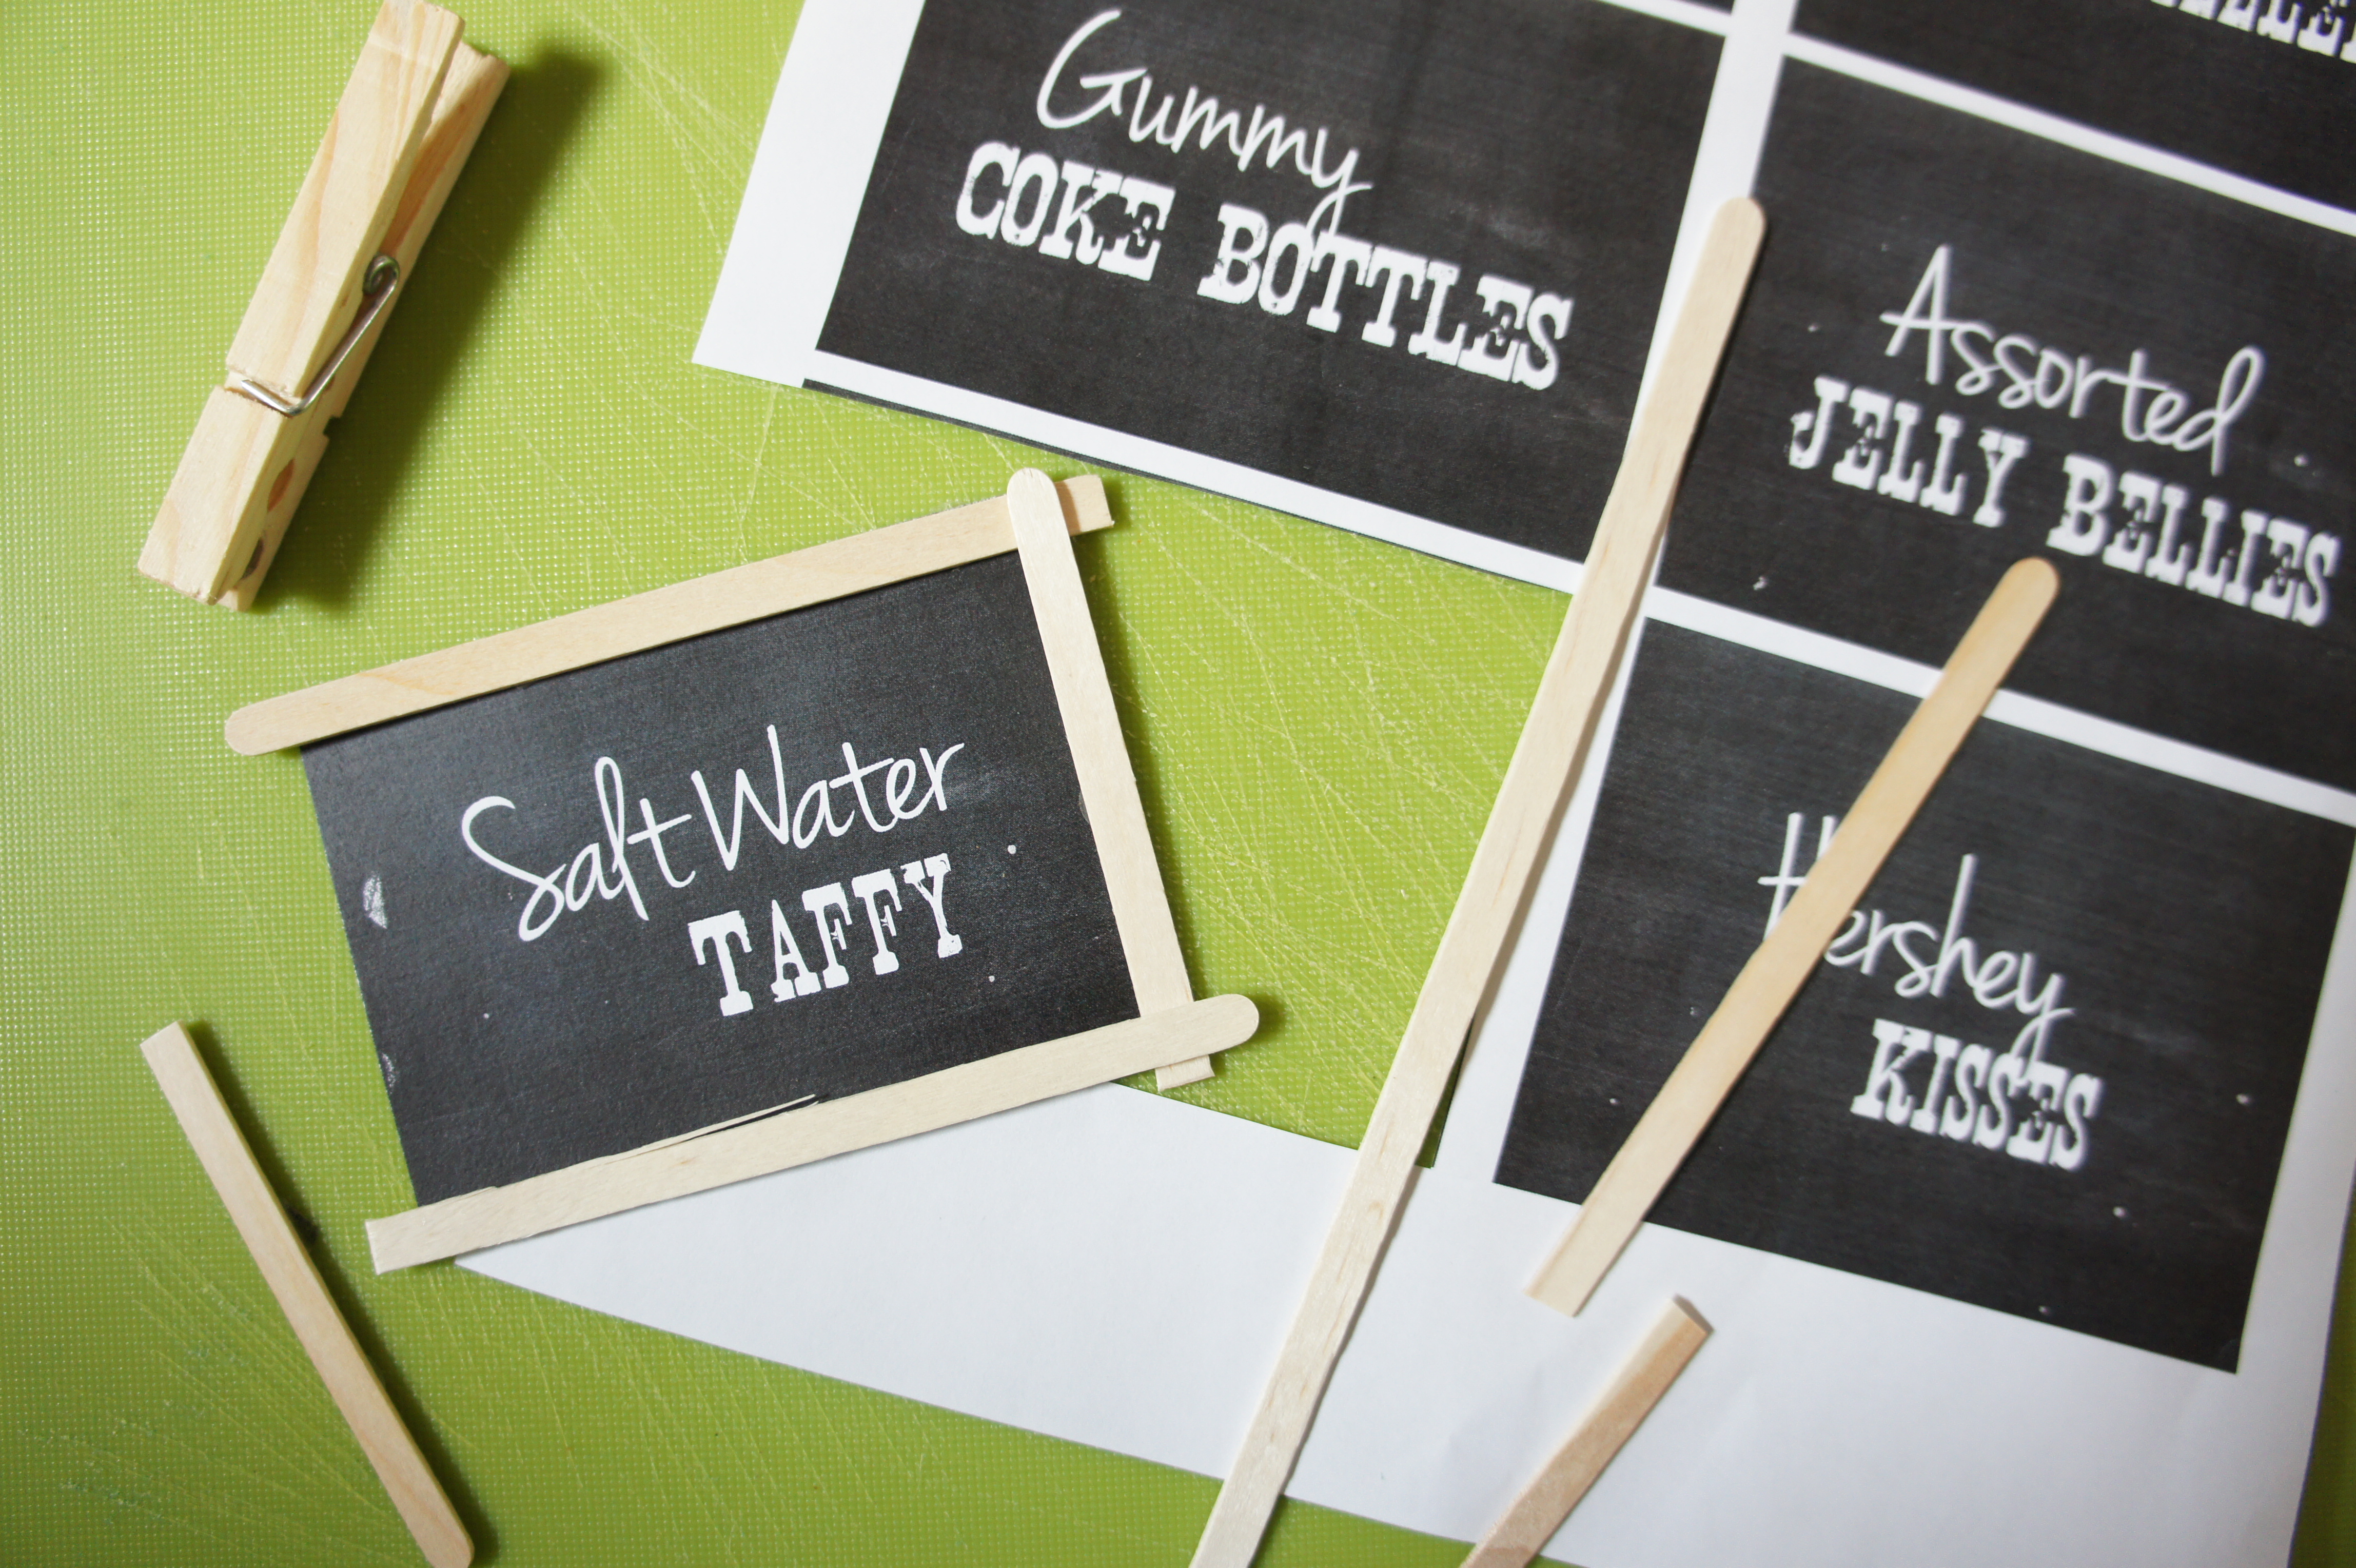
To finish the labels off for the candy buffet, they are either getting a clothespin glued to the back or they will be tied around the candy containers with string.

I am very happy with the final result and love that the fonts give a more consistent look then I could have gotten by handwriting each one.
All in all it was a pretty quick project and cost me very little. If you don’t already have them on hand, the basic supplies like cardstock, coffee stirrers, double sided tape, and clothespins can all be found at the dollar store.

One of my favorite books growing up was Go, Dog. Go! by P.D. Eastman. I was excited when I introduced it to my 2 year old son and he seemed to enjoy it just as much, but after reading it nightly for several months my enthusiasm for the book began to fade. It did, however, make my choice for a third birthday theme quite obvious.
I like to begin planning my parties at least a month in advance to give time to send out invites, order supplies and tackle all my DIY projects. I begin by perusing pinterest and doing a google image search to see if there are any other party ideas I can “borrow”. There is not a lot out there for Go, Dog. Go! parties so it proved to be a bit of a challenge, but ended up being a lot of fun to plan and execute.
Décor
One of my biggest DIY projects for this party was the paper fans and pennant banners. After searching online and not coming up with anything I really liked, I decided to make my own paper fans by folding and gluing scrapbook paper. I finished them off with printed images from the book and the scraps were cut down to make the pennant banners.
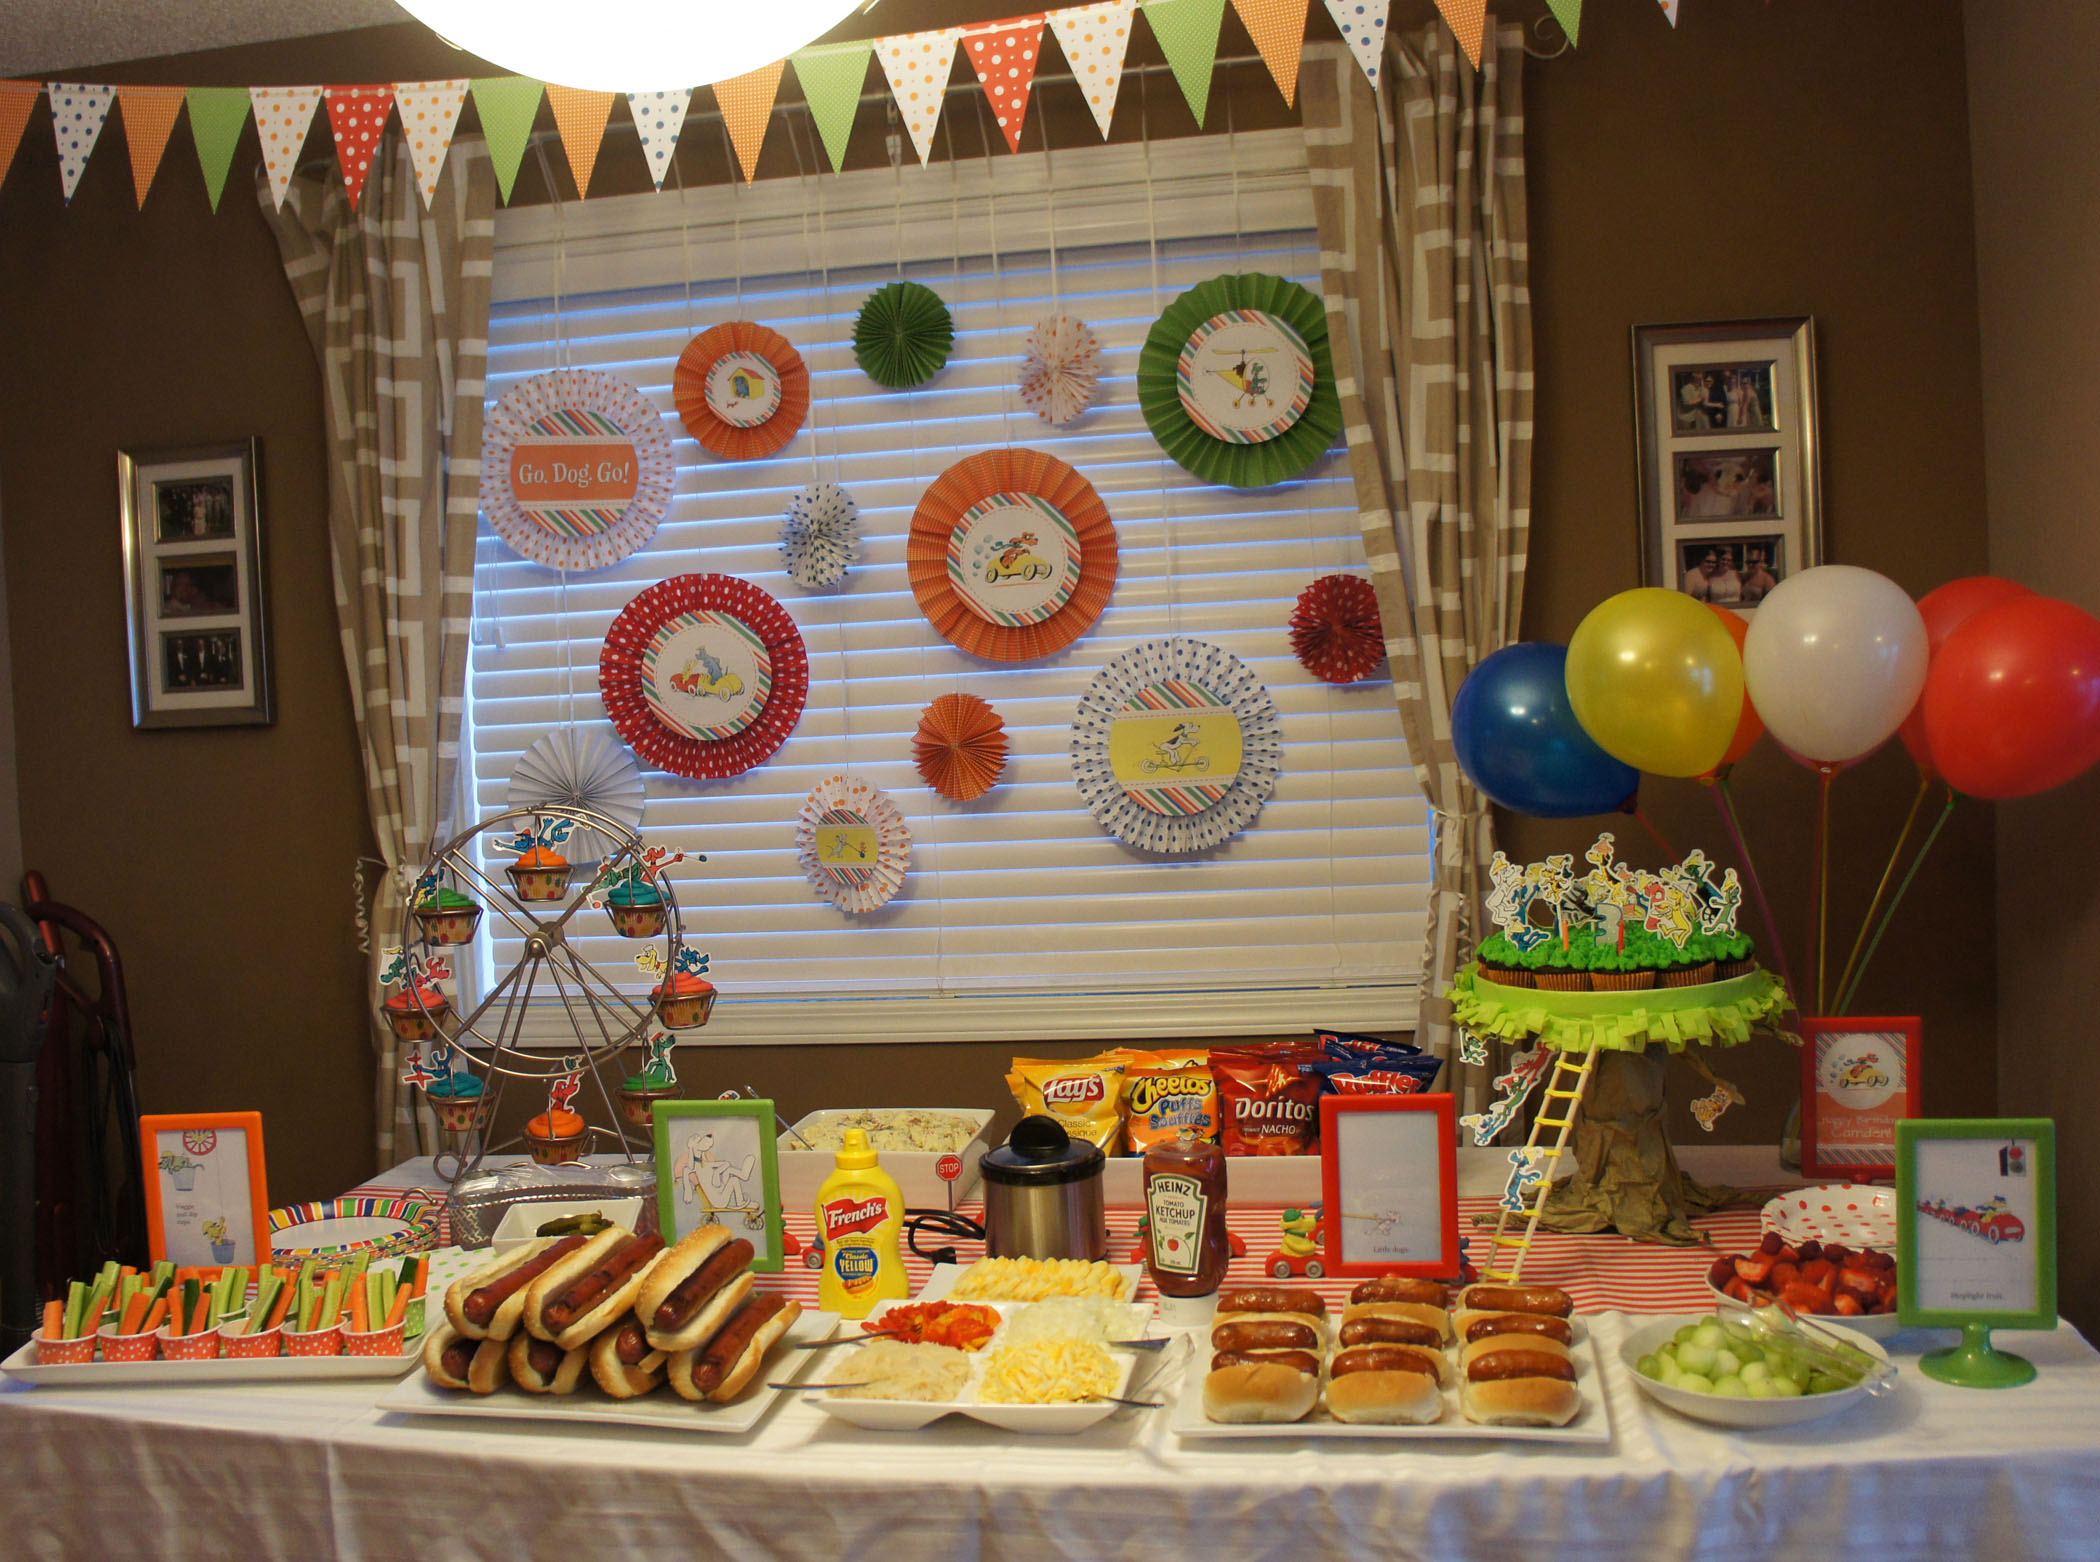
I found small wooden cars on orientaltrading.com that were very close to the cars the dogs ride around in in the book. I sculpted individual dogs onto each of them and used them to decorate the food table. For the door wreath, I simply glued on more images from the book.
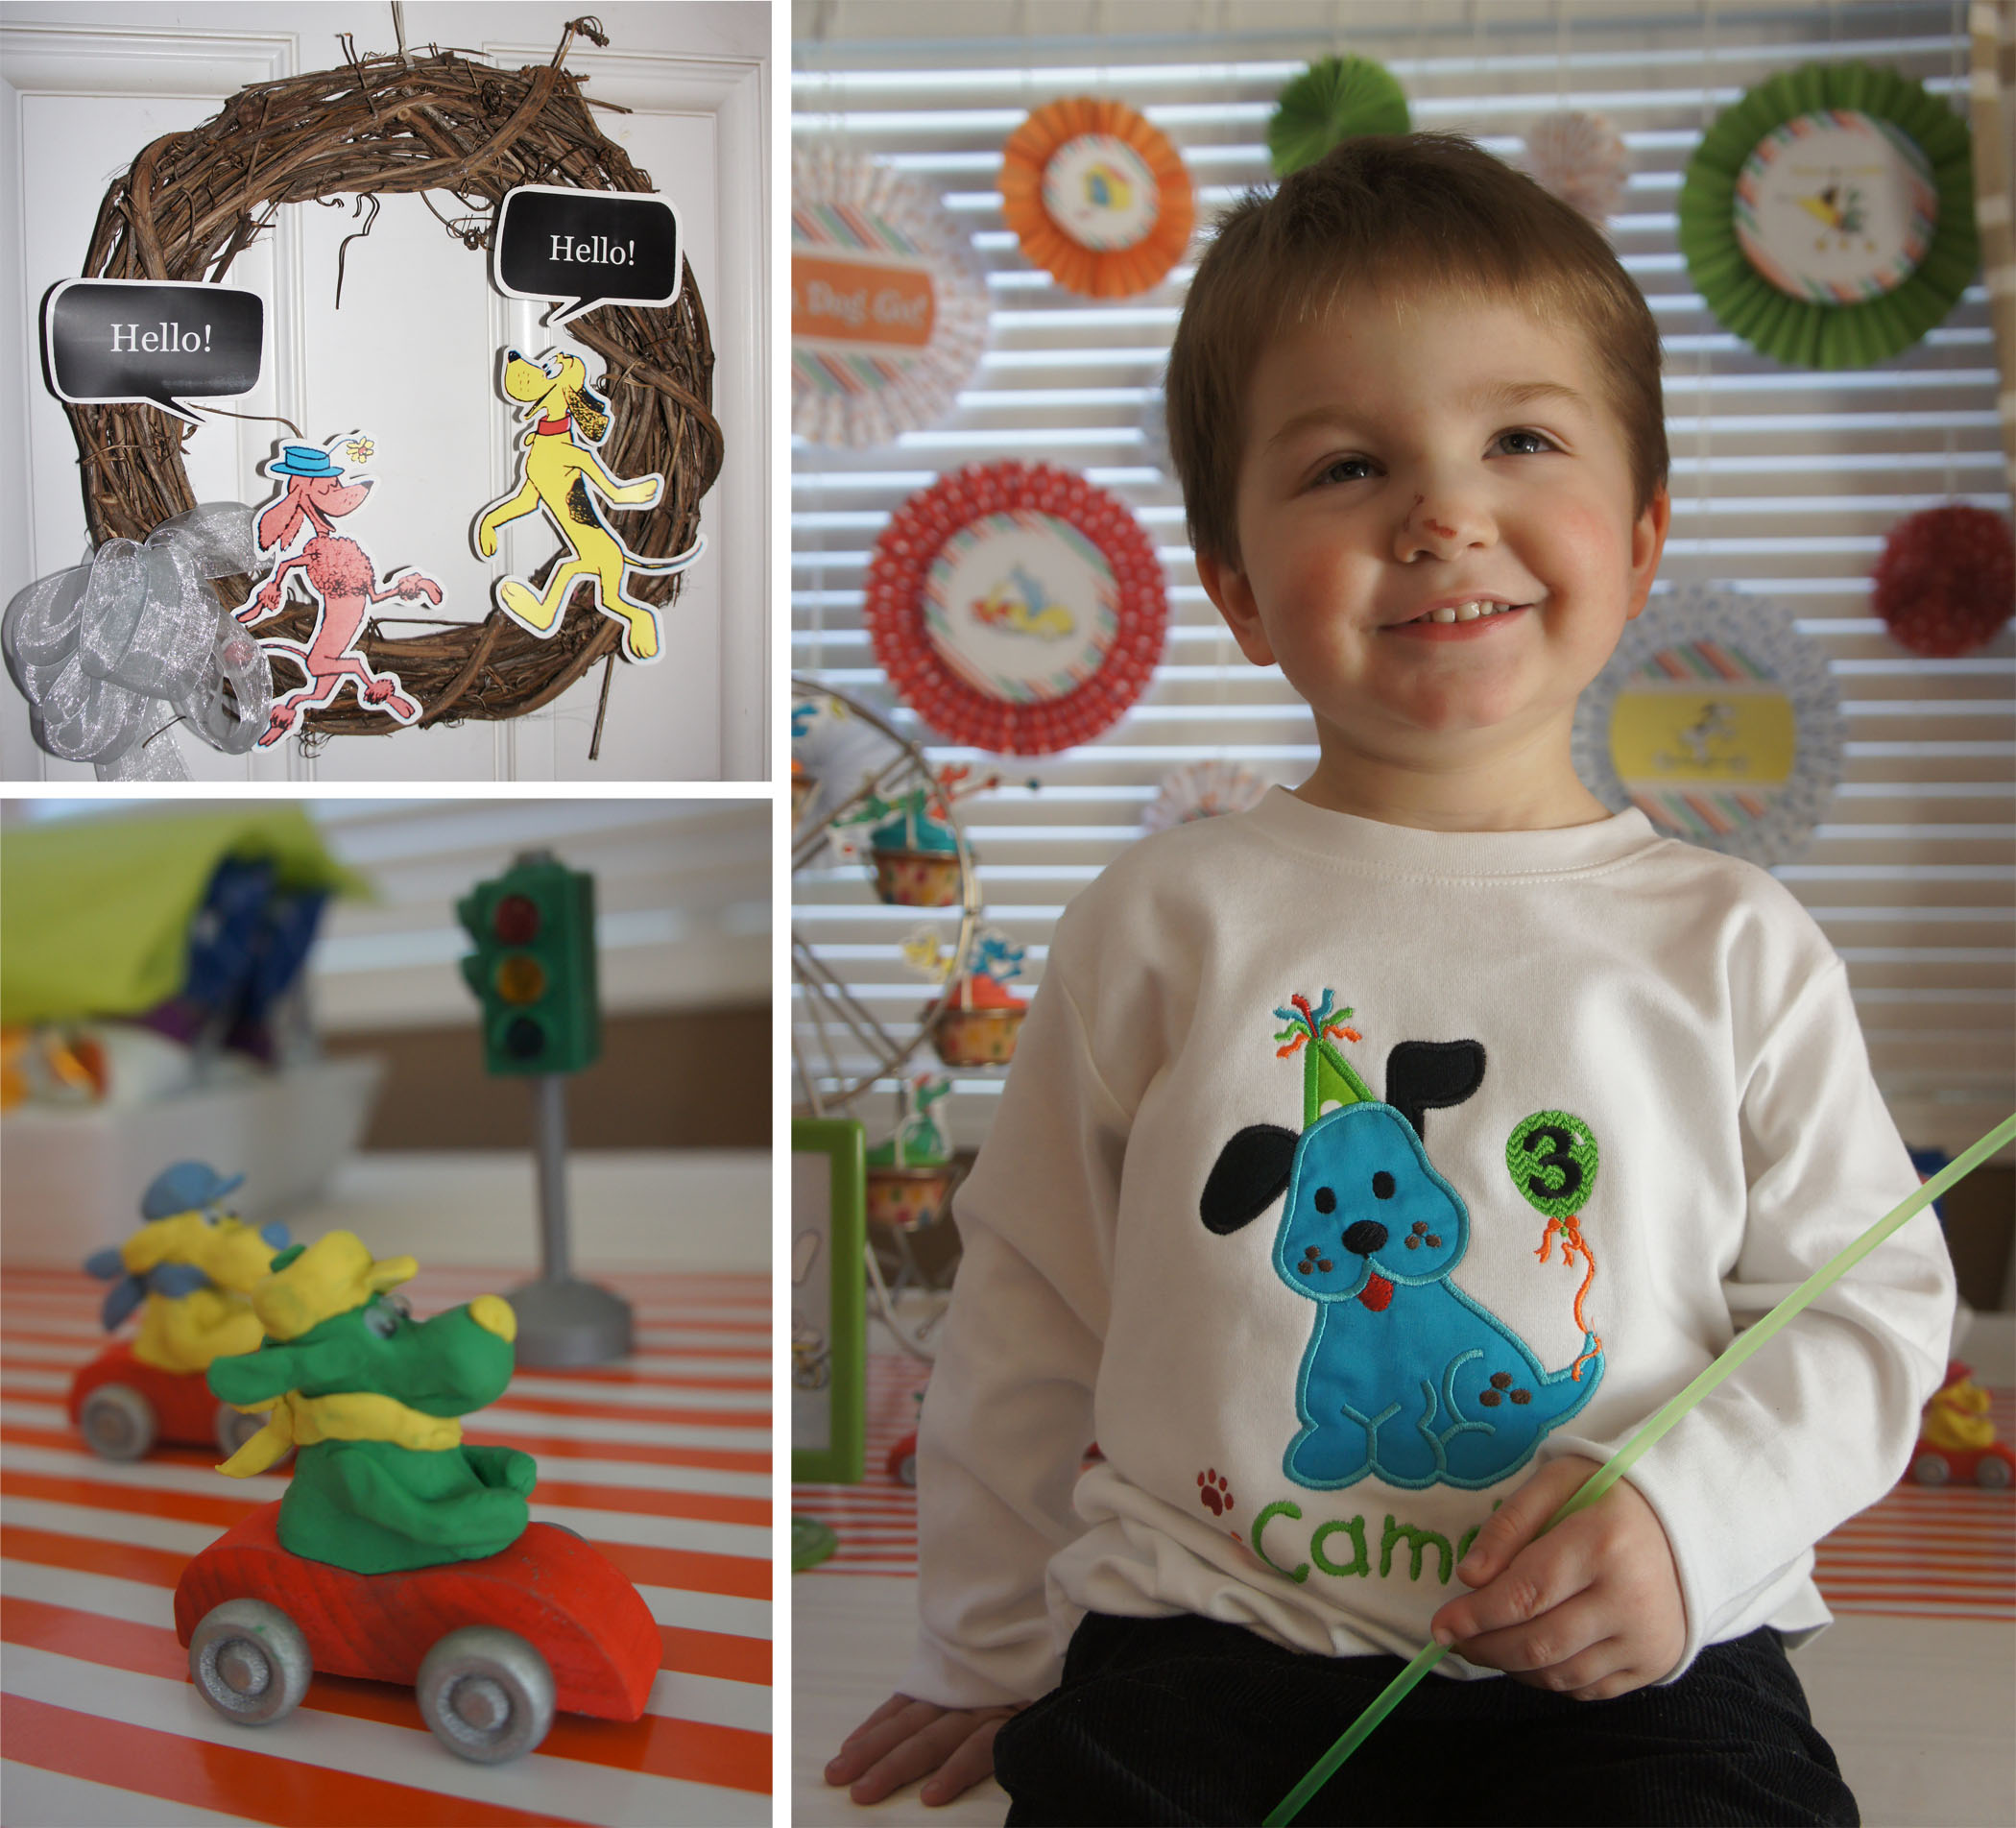
I also had some blank canvases lying around so I decided to enlarge an image from the book and make it look like a giant book open on my fireplace.

Cupcakes
One of the first purchases I made for the party was my cupcake ferris wheel. I have always loved them and it was perfectly suited to one of the scenes in the book. To finish off the look, I scanned in photos of dog images from the book and printed and cut them out for cupcake toppers.
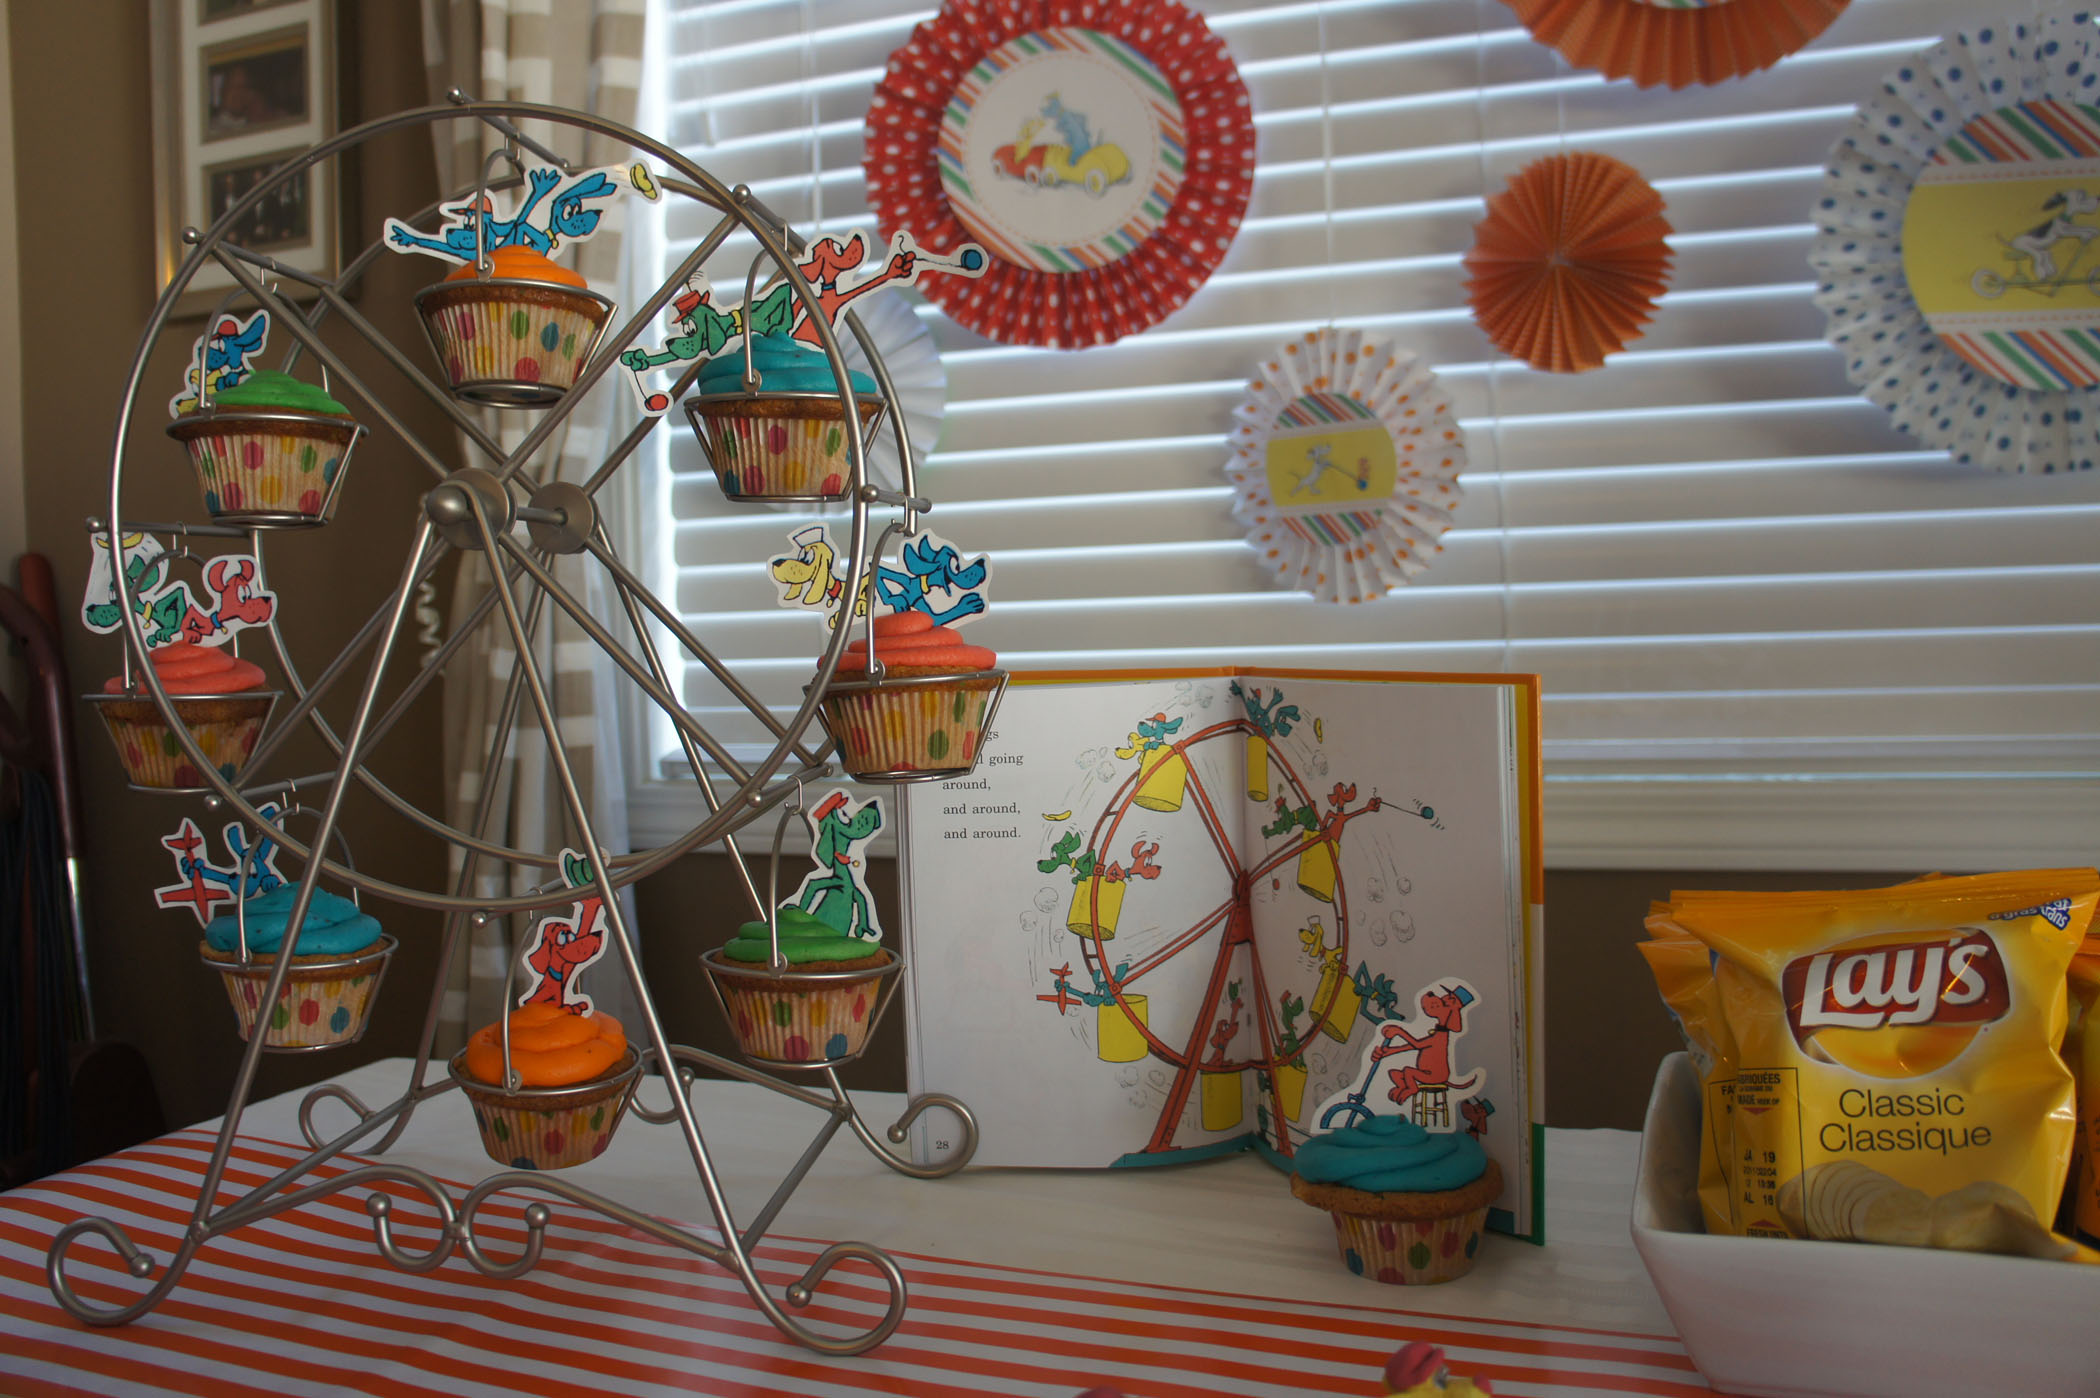
I also baked a second batch of cupcakes and displayed them on a tree stand I constructed from a candle holder covered in tissue paper and one of my round platters. I made dog cupcakes toppers and a ladder to finish it off to look like the big dog party scene from the end of the book.


FREE PRINTABLE
To print off your own cupcake toppers, my files are available here: Go Dog Go Cupcake Toppers Free Printable.
I printed mine on photo paper, but cardstock would work as well. I then taped the cut-out images onto paper lollipop sticks to be inserted into the cupcakes. Cut down straws or coffee stir sticks would also be a good option.
Food

Big dogs and little dogs were served with all the fixings.
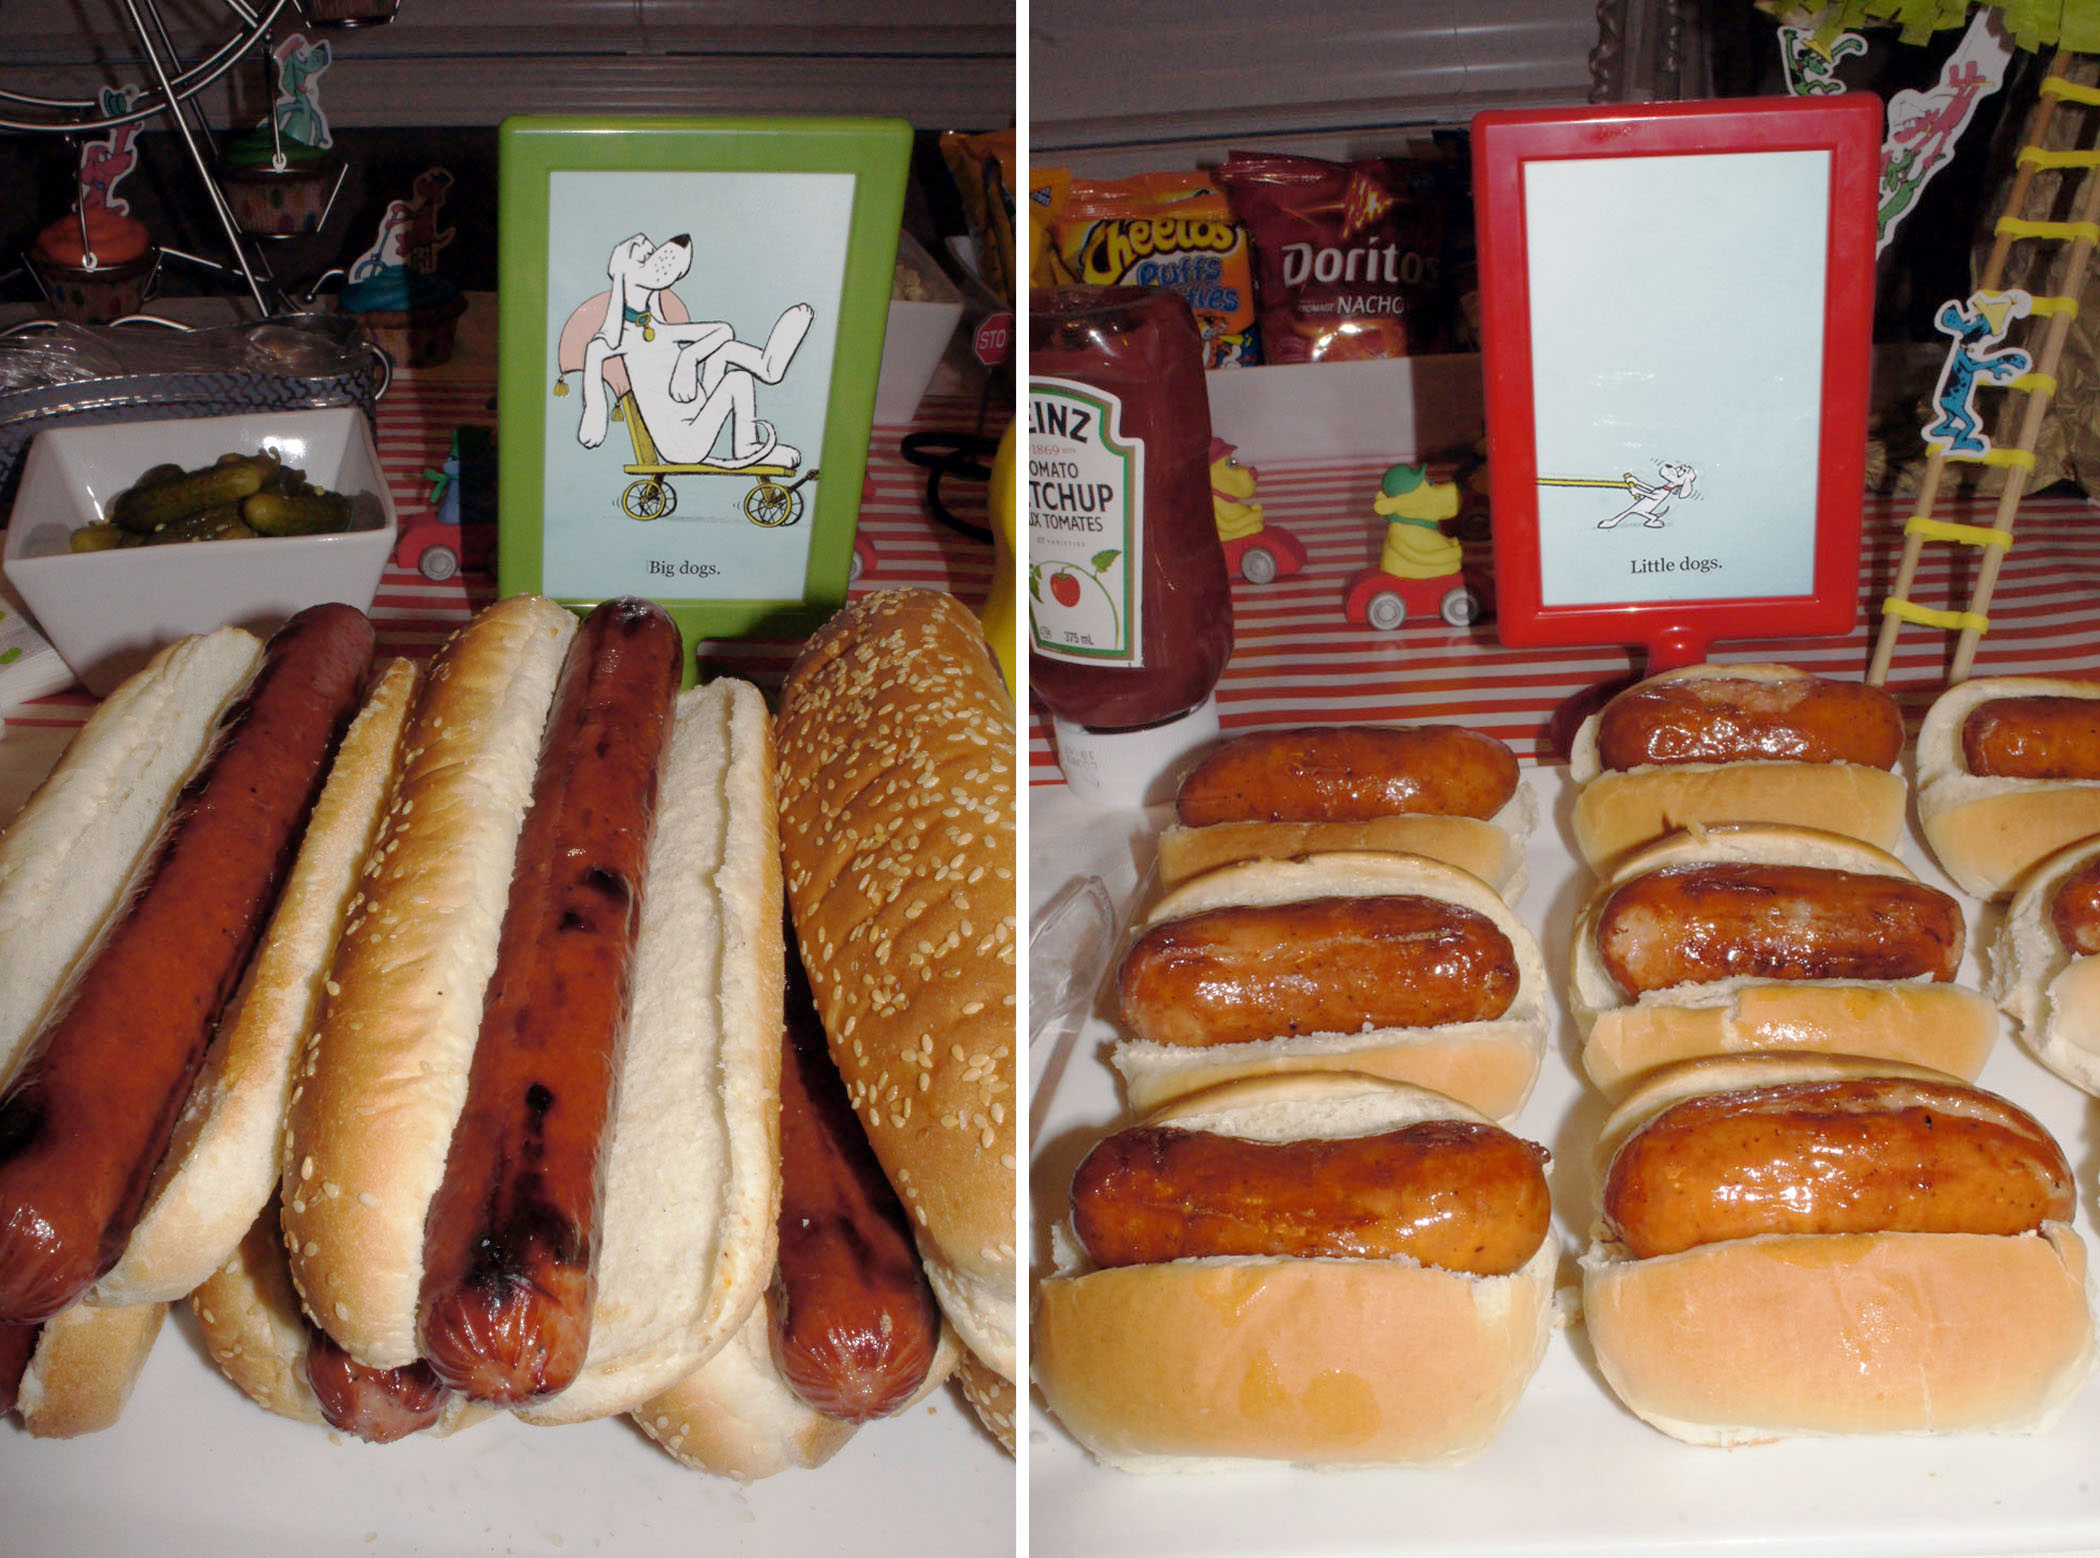
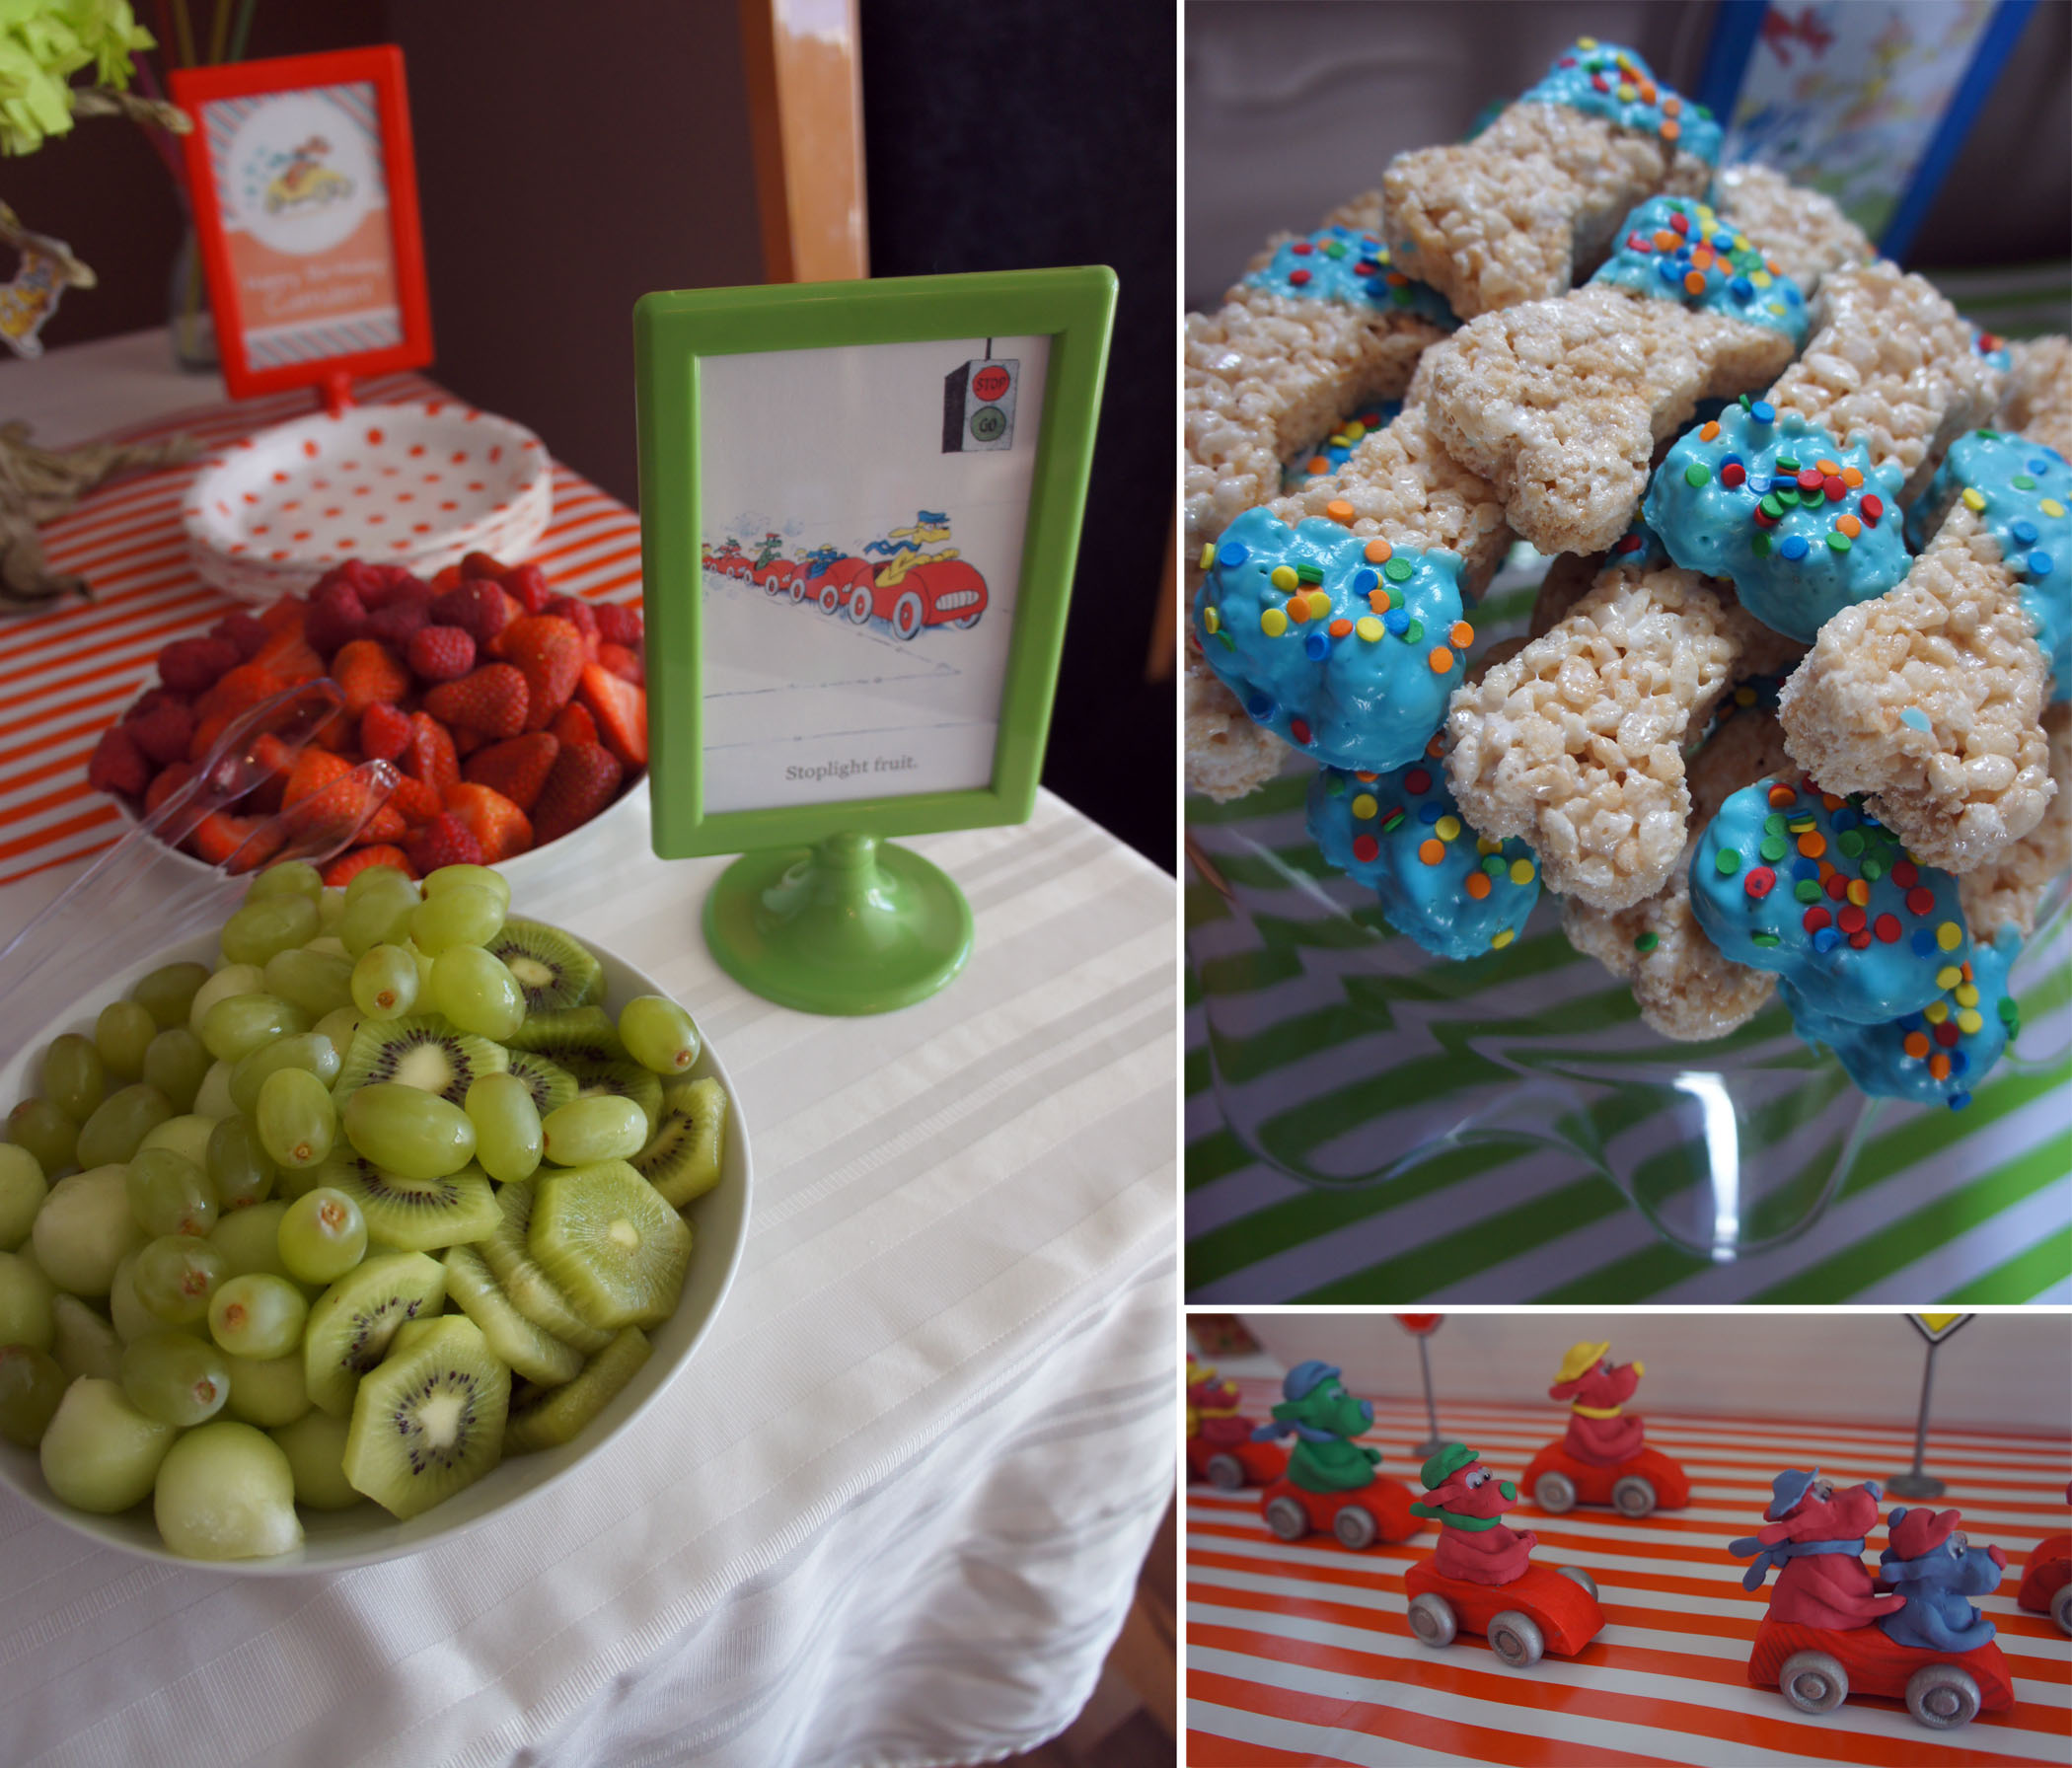
Sides included veggie and dip cups, chips, potato salad, stoplight fruit and chocolate coated rice krispie bones.

Candy Buffet
I decided to attempt a candy buffet with red, blue, orange and green candy to match my theme. I used a lot of glassware I already had around the house so it was fairly cheap and simple. I think the adults enjoyed the candy more then the kids!


Favors
Favors were these cute dog shaped lunch boxes I found at Ikea and filled with a couple of cans of playdoh and a bone and dog shaped cookie cutter.

I think that covers it all – thanks for looking! To see my party planning board on pinterest, please click here.
I have already started pinning for next year’s party and I am hoping the birthday boy with be on board with the Winter Olympic theme I am planning.

