

I just recently took the kids to see the movie Inside Out and we all loved it. With her bobbed hair and glasses, I realized that I kind of resemble the character Sadness and it would be super easy to dress up as her for Halloween.

I just recently took the kids to see the movie Inside Out and we all loved it. With her bobbed hair and glasses, I realized that I kind of resemble the character Sadness and it would be super easy to dress up as her for Halloween.

I love holidays because it gives me an excuse to get creative and come up with fun treats for my kids to share with their classmates and friends.
For Halloween this year, I wanted to do something special for my daughter’s preschool class. I came across this Five Little Pumpkins Sitting On a Gate Halloween Printable from Balancing Home and loved the idea so much I decided to take a shot at designing my own topper featuring the 5 Little Pumpkins poem. Continue reading “5 Little Pumpkins Printable Treat Topper”

For our upcoming trip to Disneyland, I was on the fence about whether or not I wanted to come up with an autograph book. In past trips I have not bothered with any character photos or signatures, but I have also never had young children along. I am still not sure how into it my kids might be, but I know I don’t want to regret not having one in case it is something they are excited by. We do have a character breakfast booked for our first morning in Disneyland Park and I figure at the very least we will be able to get signatures and hopefully a couple photos of the kids with the characters there. Continue reading “Designed to Sign: DIY Disney Autograph Book”

Are you planning a Mario themed party? These adorable treat filled mushroom favors are enough to excite any Nintendo-loving fan.

Check out the full DIY Mario Mushroom Favors tutorial as my guest post over at Moms and Munchkins today.
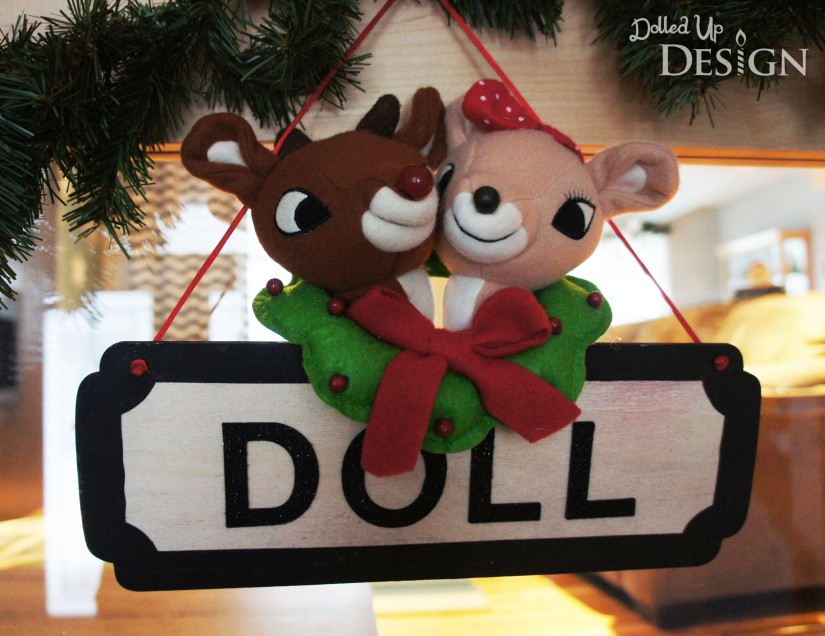
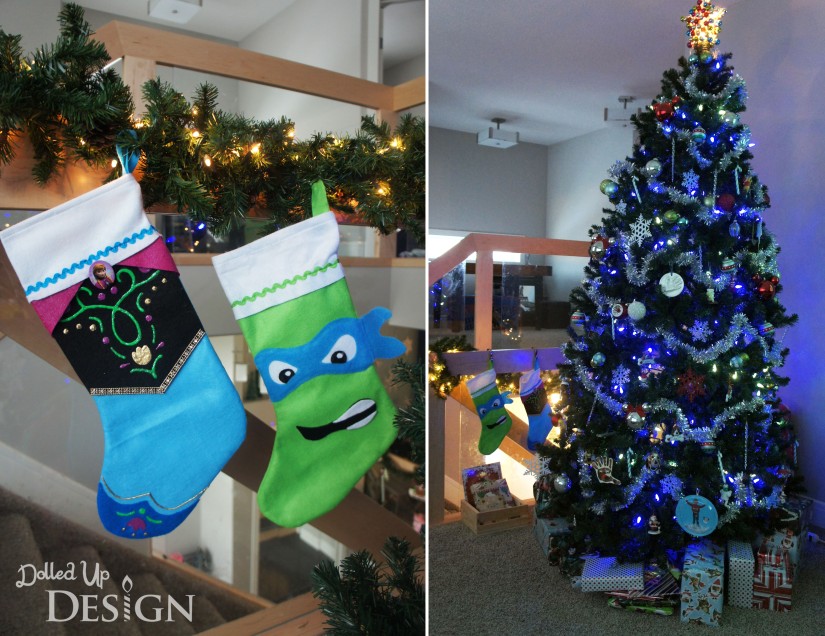
It is our very first Christmas in this house and I am very excited to share with you pictures of how we have decked our house out for the big day!
Outside my husband spent one very long afternoon up a ridiculously large ladder before the snow hit to get our exterior lights up. It makes me happy when I go out at night and come home to the twinkling lights!

We decided to make the switch from a real Christmas trees to an artificial one this year. I miss the piney smell, but it is sure nice having the tree up early to enjoy and not having to vacuum up pine needles. It only took a few days and my two year old was bee-lining to the tree first thing in the morning to make sure it was lit up!
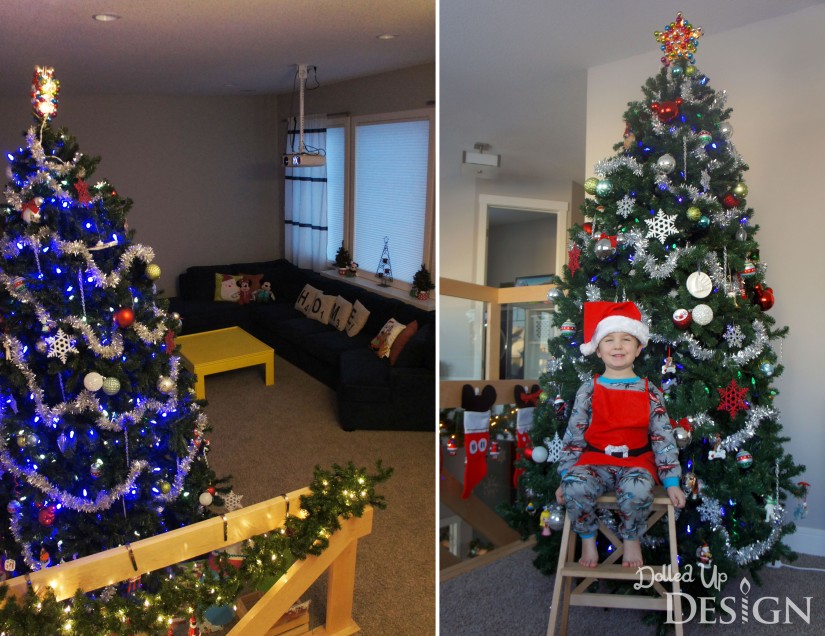
The tree is upstairs in our bonus room so the kids won’t have far to come down and see if Santa has come. There was some debate over where to put it, but I think this works best. There is lots of room for the 9 foot tree and that room has a soft carpeted floor for the kids to open their gifts on and play Christmas morning.
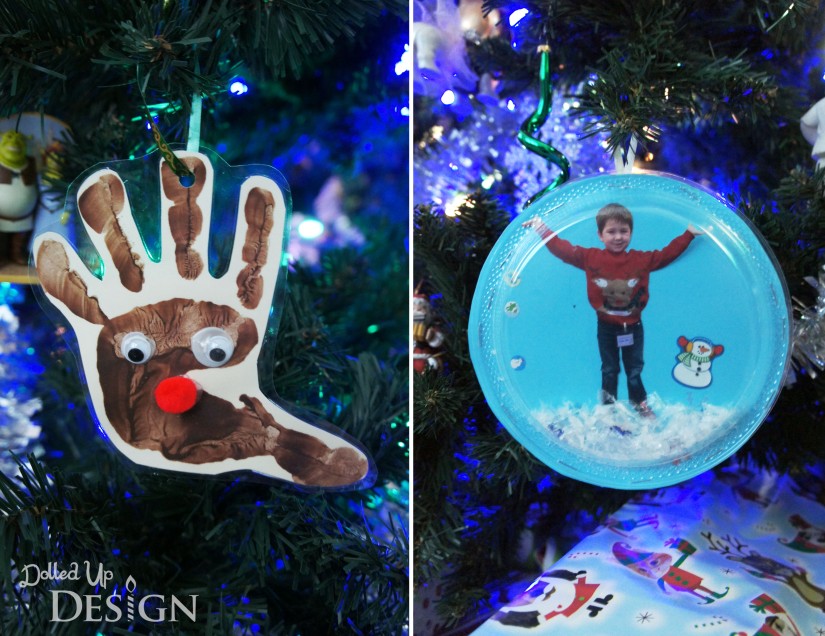
Two of my favorite new ornaments on are tree this year are this handprint reindeer and snowglobe my little guy made at preschool. He is not big on crafting, so I appreciate when he does actually bring home a craft.
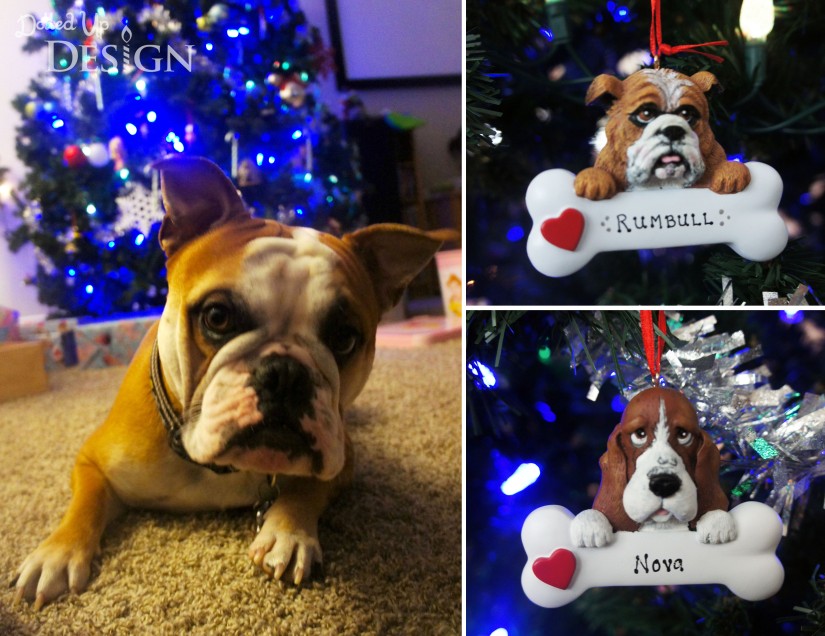
I also was feeling a bit of puppy mommy guilt as we were decorating the tree and I realized Rumbull had no ornaments yet so I got him this one when we were at the mall for our annual visit to Santa. I was very excited to find a personalized one that matches Nova’s!
The kids DIY stocking are new this year and you can read more about how I made them here. They have been hung on the stair railing next to the tree where Santa can easily find them.
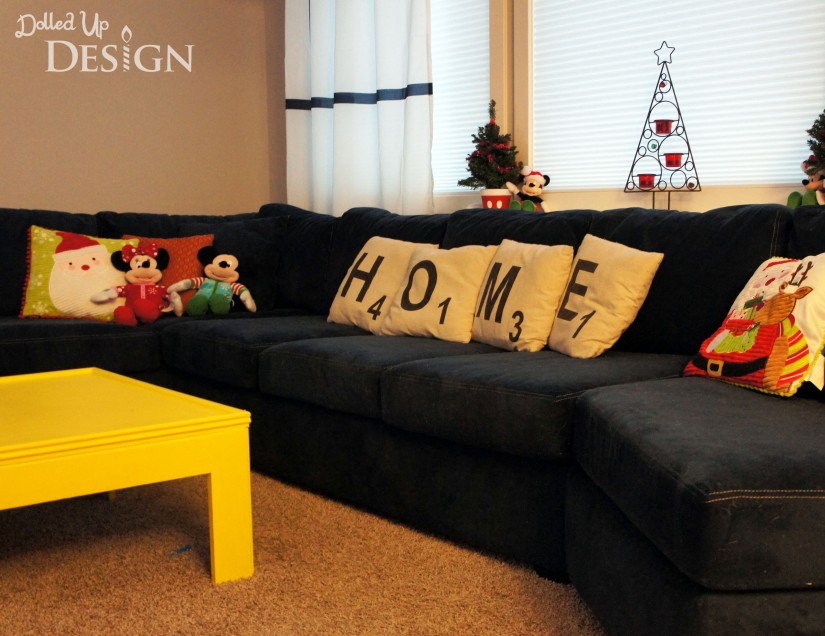
I also found some new throw cushions for the couch and a placed a few small Christmas accessories we already owned throughout the room to make it festive. Dontcha just love our giant couch!? It has been perfect to cuddle up on as a family and watch all those great Holiday specials over the last month!
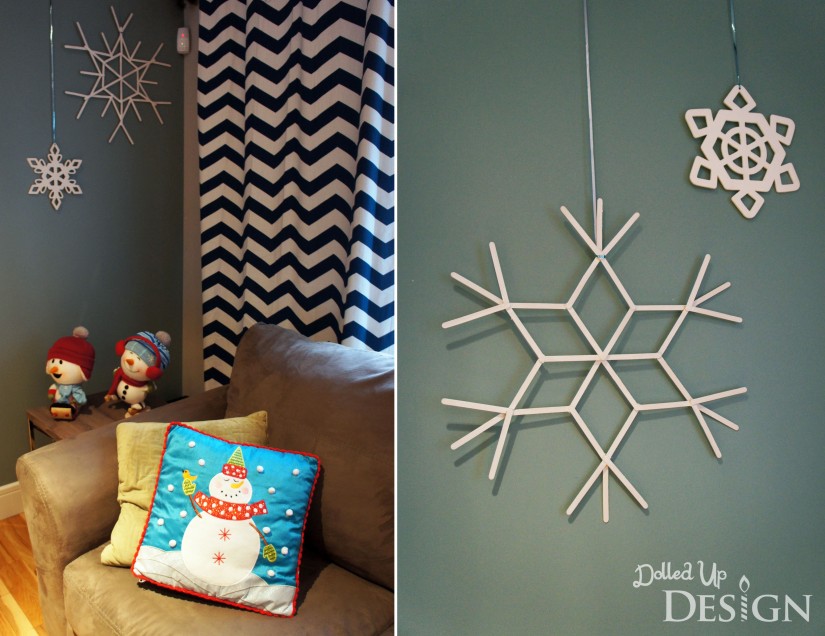
On the main floor, I still haven’t managed to get any pictures hung on the living room walls so I had a blank slate to work with for Christmas decorations. My sister in law pinned these pretty DIY Snowflake Popsicle Ornaments from Fab DIY and when I realized how easy and inexpensive they would be, I decided to make some.
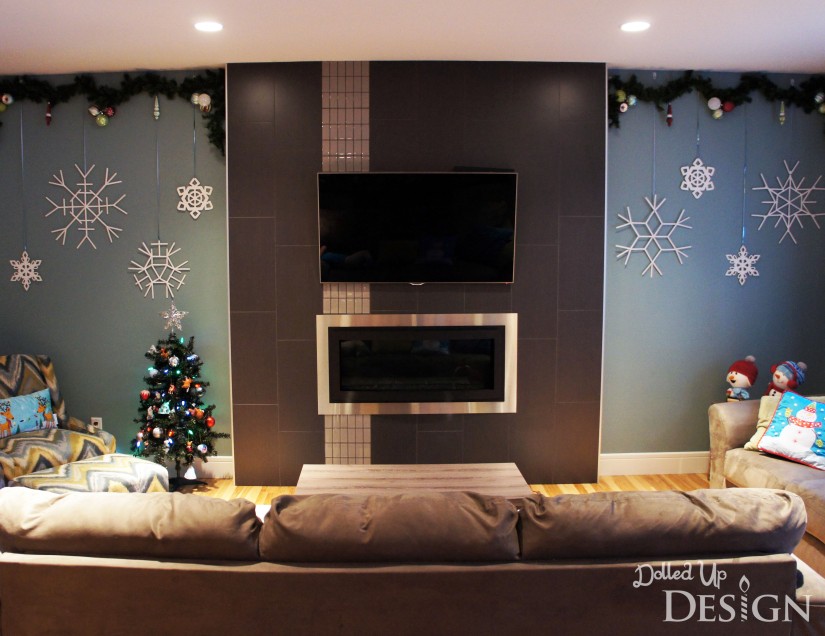
I painted mine white and hung them alongside some wooden snowflakes I found at the Dollar Store. I love the way they pop against the color of our living room wall and the big impact it makes for just the cost of some popsicle sticks and hot glue! And, you can also see my sister in law’s stir stick versions here.
And, of course, I added a couple more Christmassy cushions for the couches in this room!
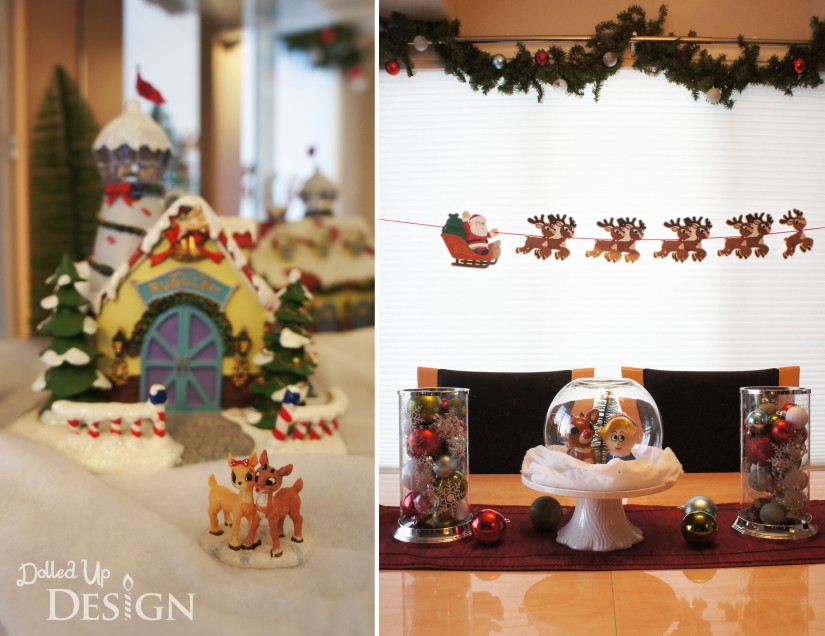
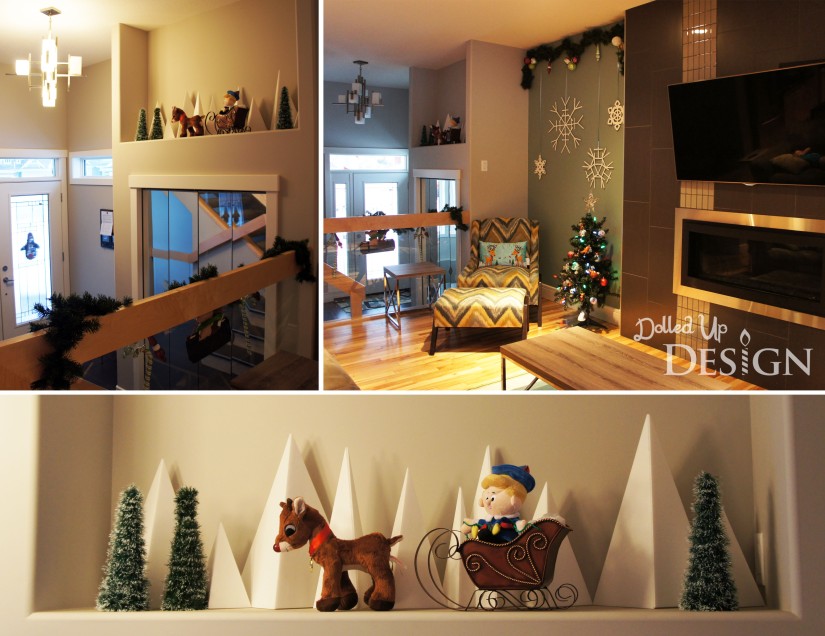
Our fireplace has a clean, modern look that I really like, but I do miss not having a mantle to decorate. In our old house we had a large corner mantle that I would set my Christmas village out on so this year I had to figure out a new solution. I ended up filling my China cabinet with the village and it turned out pretty well.
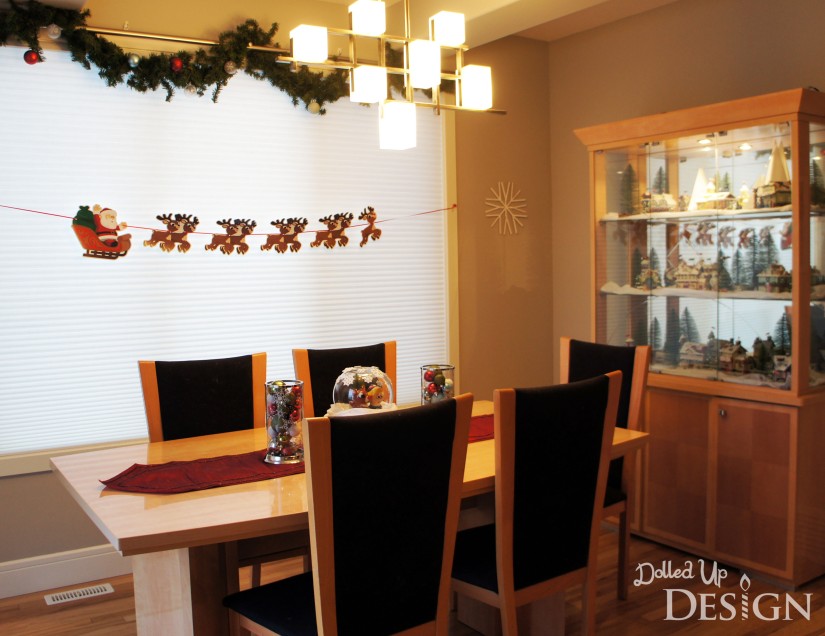
My Christmas village is Rudolph the Red Nosed Reindeer themed so I decided to carry that theme through some of the other decorations on our main floor. My DIY Rudolph banner look great hanging over the dining table, and I love the little snowglobe inspired centerpiece I made using with my new ornaments from Target. Hop on over to Moms and Munchkins to get the free printable file I created to make your own flying Rudolph Banner.
We had considered putting the Christmas village up in the niche over the front closet, but the configuration wouldn’t have worked well. I ended up coming up with this cute Rudolph scene after making some simple mountain shapes from foamcore and hot glue. We already had the sleigh and used it as an excuse to buy the Rudolph and Hermey figures from Walmart.
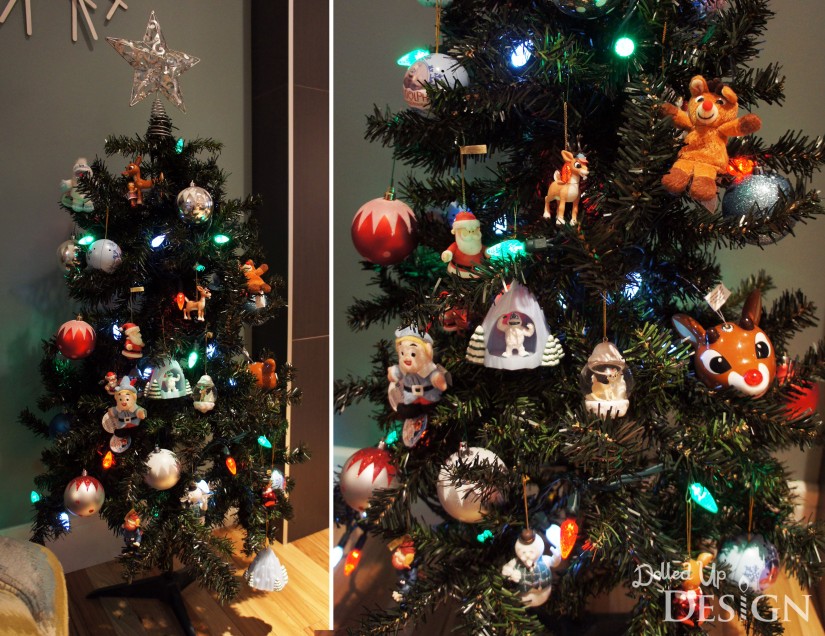
I also put up my small 4′ tree in the living room and put all the Rudolph ornaments I have collected over the last several years on it.
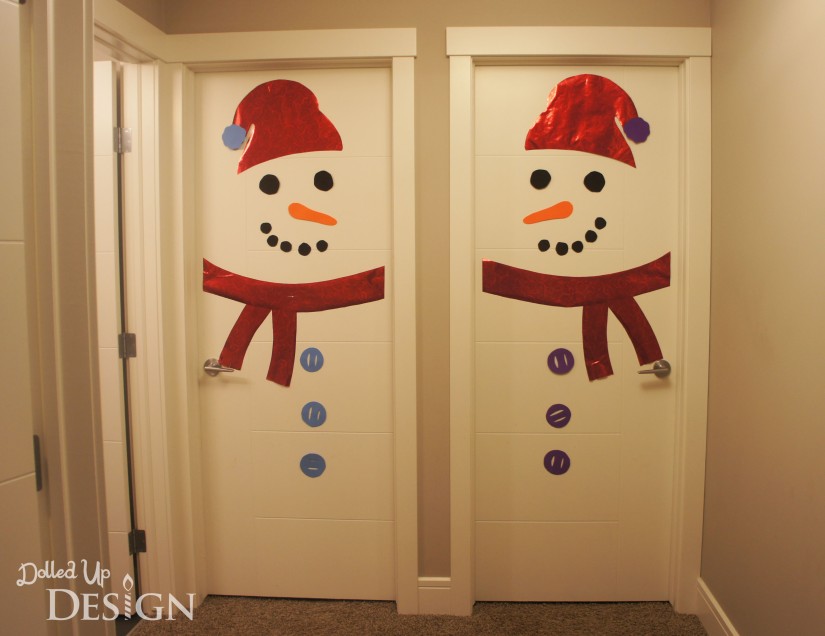
Finally, one simple DIY project I did were these quick snowmen on each of the kids bedroom doors. This is not an original idea, but still one worthy of a share because it is so simple and fun for the little ones. Mine were cut from foam sheets and wrapping paper.
Phew. If you have made it this far I hope you have enjoyed my tour. I think I have made a good start to decorating our new house for the holidays and hopefully I can add to my decorations over the next few years. I would love some Christmas themed accessories and towels for the bathrooms!
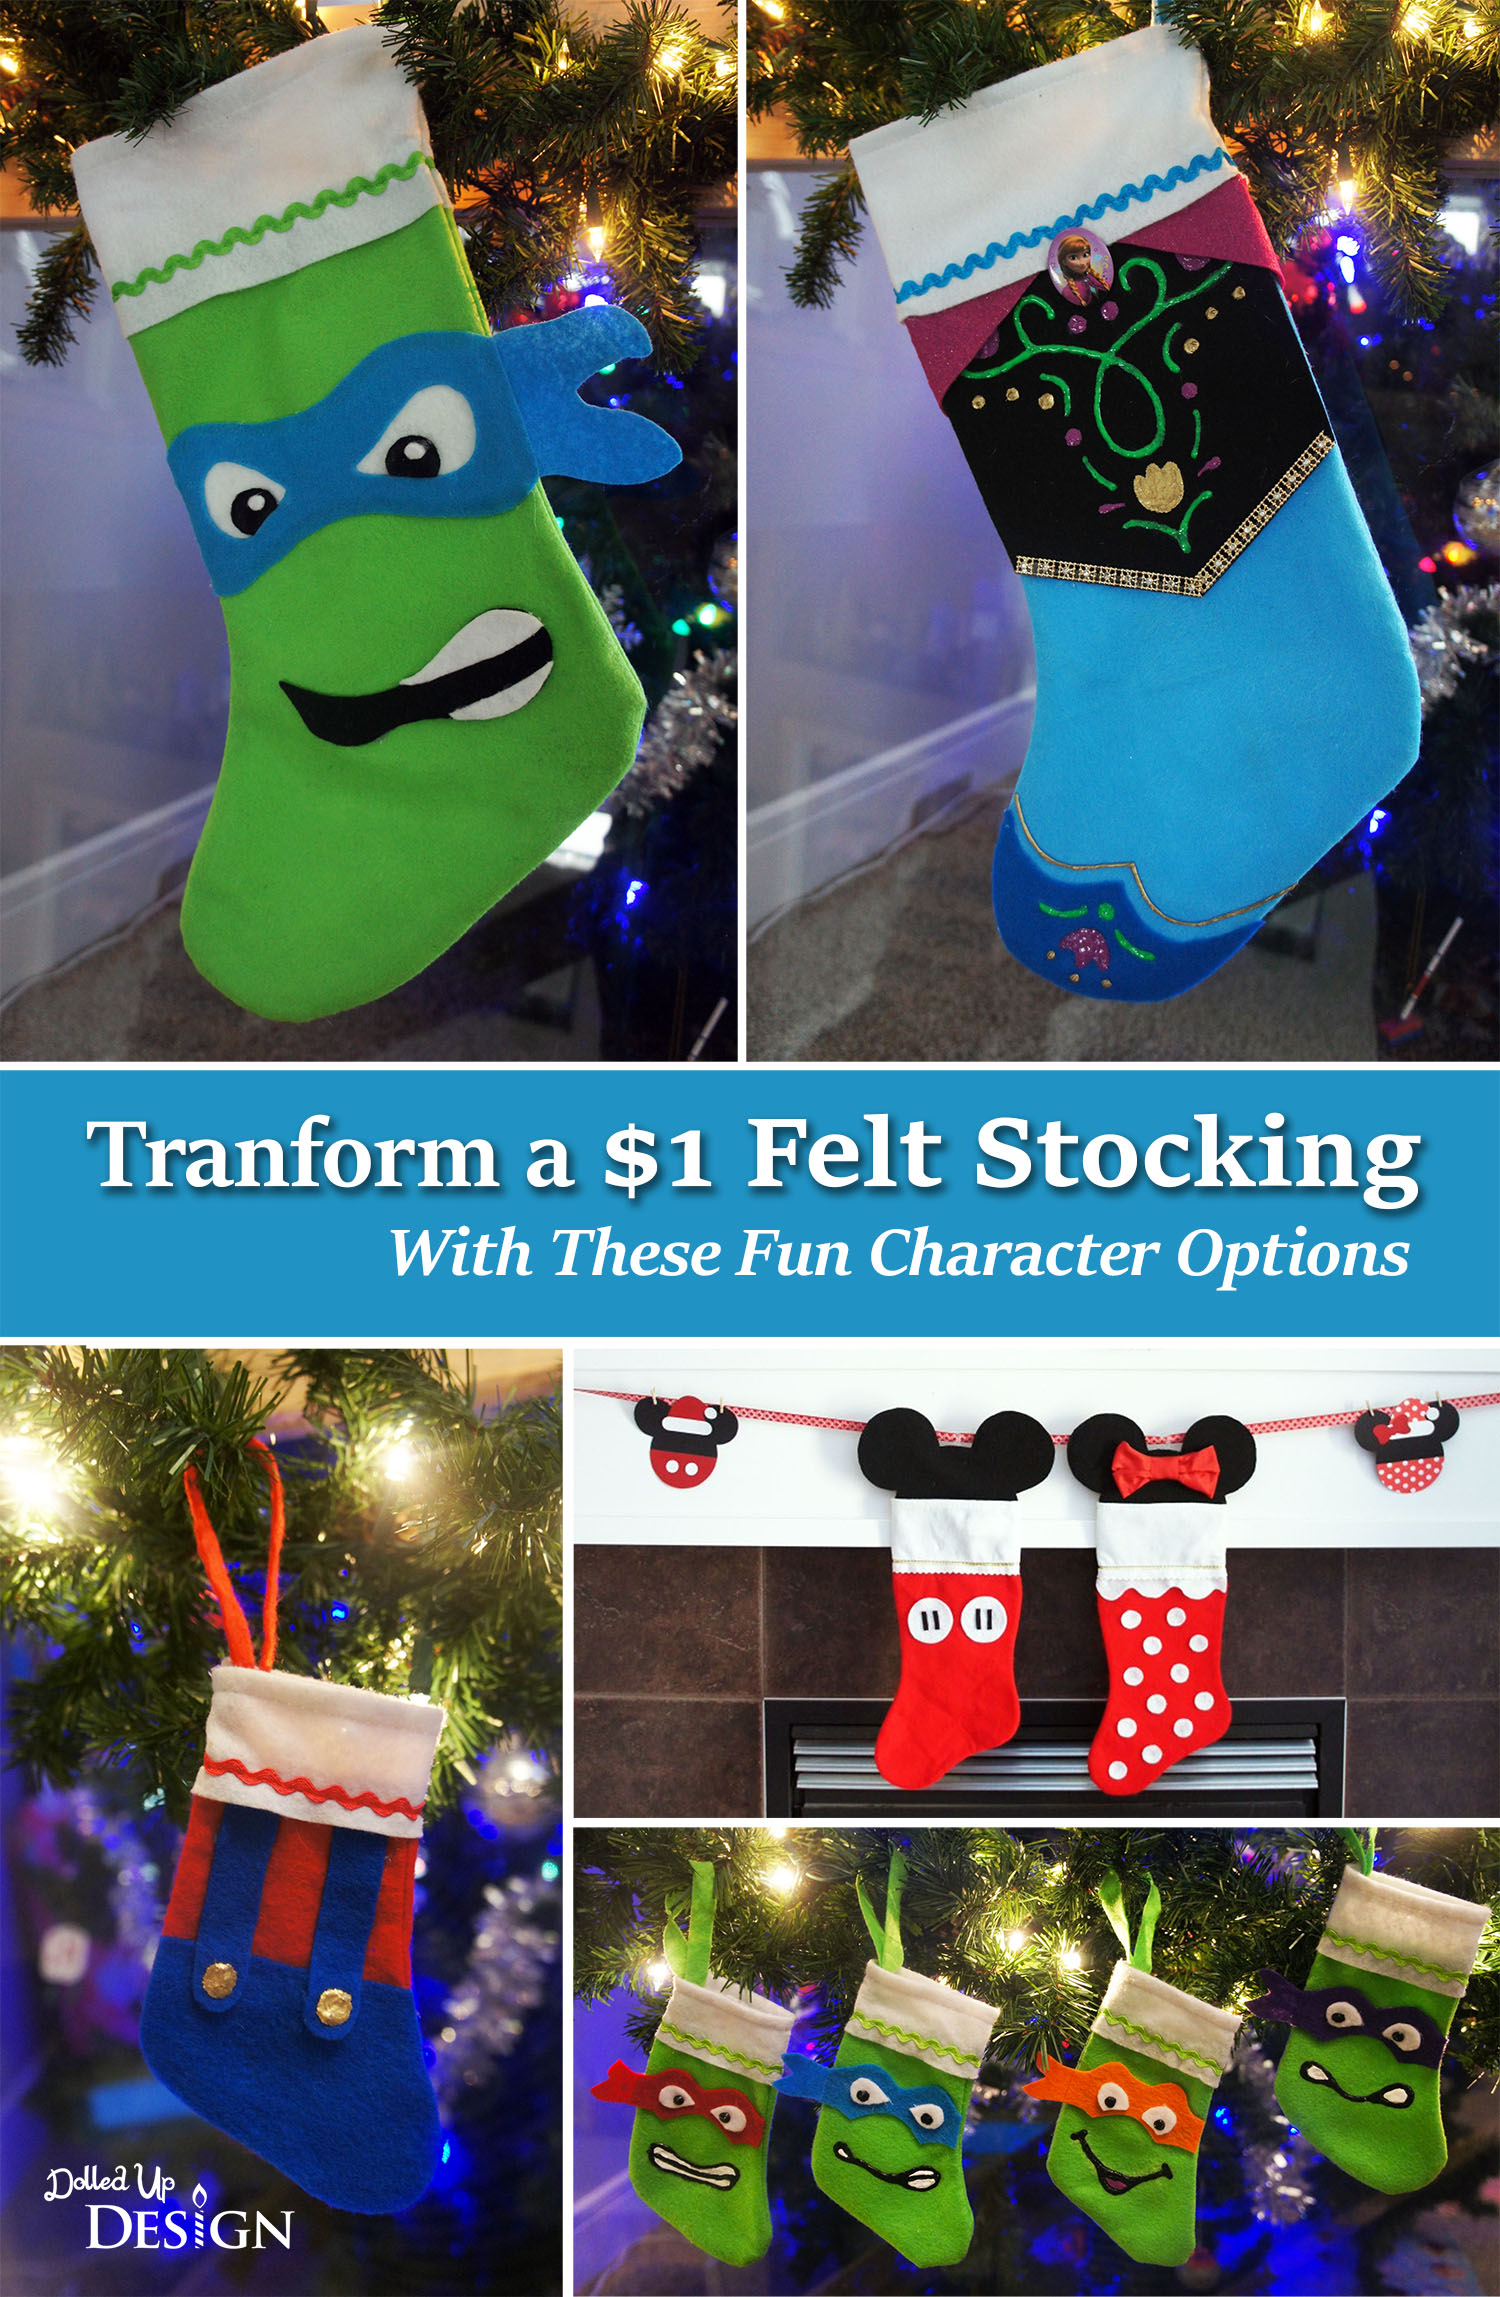
For the past couple Christmases I have been on the hunt for a nice set of matching family stockings. There are a lot of lovely options out there, but so far I haven’t found anything I have absolutely loved enough to pay $20+ per stocking for.
Every time we head to the Christmas aisle to browse the stockings, my son heads straight to the tackiest screen printed or plush character stockings he can find. I normally have nothing against character merchandise, but I just can’t wrap my head around paying $10 for an Optimus Prime or Ninja Turtle stocking that is going to stick out like a sore thumb amongst my other Christmas décor and will likely only be used once as his interests change and he’s begs me for something different next Christmas.
I wasn’t planning to make new stockings for my kids, but as my son reached for one of those tacky stockings next to the plain $1 felt stockings in Target, inspiration hit.
“How would you like mommy to make you a Ninja Turtle stocking instead?”
“Yeah!! That sounds pretty cool.”
“Okay, grab me one of those plain green stockings and I can make it look like a Turtle for you.”

At $1 each, the basic felt stockings seemed like the perfect solution. Typically you can find them in red, but I was excited to see that Target had a few color options I could easily customize to create unique character stockings at a fraction of the cost. One quick (ha!) trip to Michael’s to load up on some sheets of felt, fabric paint and hot glue sticks and I was ready to get to work on my creations.
Leonardo Ninja Turtle Stocking
Using a bit of blue, white and black felt, this Ninja Turtle stocking couldn’t have been much easier. I began by tracing the sides of the stocking on plain white paper to make sure my mask template was the right size, and then sketched out a turtle mask. Once satisfied with my mask design, I used scotch tape to adhere the paper template to the blue felt and then cut around it with a pair of sharp scissors. I repeated the same process to draw and cut out the mouth pieces and eyes.

Once all my pieces were cut, I simply hot glued them all onto the felt stocking.

Michelangelo is my son’s favorite turtle so I am still not sure why he chose Leonardo for his stocking, but I was happy to oblige since he worked best with the red, blue and green color scheme I have been going for.
Mini Turtle Stockings
Once I had the idea to do the big Leonardo stocking for my son, I also spotted the mini version stockings on the store racks. They came in packs of 2 red and 2 green for $2.00 so I decided to grab two packs and attempt a full set of Turtle’s as part of a gift for my husband’s coworker.
They were actually a bit harder to make because of all the tiny felt pieces to cut, but overall I am happy with the final set. The stockings are a great size to fill with chocolates, gift cards and other small treats.
Mini Mario Stocking
Since I already had the small red stockings that came with those I used for the Ninja Turtle set, I decided to make one into a Mario themed stocking for my son. This was the quickest of the stockings I made and would be cute for any Nintendo lover. You could even make one of the small green stockings into an accompanying “Luigi”.

I think I have way too many stocking stuffers for my as it is, so Santa may use this one as overflow and put some of the tiny Mario figures into it come Christmas Eve.
Frozen Anna Inspired Stocking
I picked up both a pink and blue stocking for my daughter because I still wasn’t sure what I was making for her when we were in the store. Like every other little girl, she is into Frozen this year and the majority of gifts going under the tree and into her stocking will be Frozen merchandise. The light blue stocking would have worked well with an Elsa twist, but I know her favorite character is Anna so I decided to use her dress as the inspiration for my stocking.

This stocking was a bit more complex then the Ninja Turtle one because it required fabric paint and a very steady hand to put the floral patterns on the dress. I used plain white chalk to draw the patterns on before tracing them out using Neon Green, Gold and Grape Tulip brand fabric paint. After letting the paint set fully overnight, I was able to easily wipe off the remaining chalk lines with a damp cloth.

I hot glued the bodice and toe portion onto the stocking, and then embellished it with some gold beaded trim at the end of the bodice and wrapped a bit of sparkly pink felt around the top of the stocking to represent Anna’s trademark cape. The finishing touch was an Anna pin that I borrowed from one of the dress-up costumes Santa will be bringing her Christmas morning. The stocking is a little more figurative, but I think my Frozen fan is still very happy with the end result. Just wait until she sees what it will be filled with Christmas morning!
Mickey and Minnie Stockings
And just in case you missed the Mickey and Minnie stockings I made up last year, I am sharing them again as more inspiration for transforming cheap felt stockings. I actually made these using old red felt stockings I already had hanging around my house so all they cost me was the price of the sheets of felt!

You can read about how I created my Mickey and Minnie stockings here. I had actually already hung them up and was happy to use them again this year, but I am glad the kids convinced me to make new ones.
All in all my custom stocking took far less time then I was expecting and the end result was two very excited little kids. My head is already spinning with ideas for future stockings and I still have that pink one I might just try to turn into something Sleeping Beauty or Princess Peach inspired.
These would be cheap and easy gifts to make and fill for the favorite people in your life, and I love that the stockings come in both small and large versions depending on your gift giving needs. My stockings are just a small glimpse at the infinite possibilities out there if you are creative and willing to do a little cutting and gluing.

Happy Crafting!

Last Halloween my son was heavily into Ninja Turtles so he wore a Michelangelo costume and I spray painted and carved our pumpkin to match. My husband’s co-worker saw the pumpkin and thought it was pretty great so he asked me to re-create one for him this year.


I decided to go with a foam pumpkin instead of a real pumpkin just to allow me more carving time before the pumpkin started to go bad, and to give him something he could reuse in future Halloween’s. This posed a slight challenge because I no longer had the layers of pumpkin to shave down like I did in Michelangelo’s mask last Halloween but I managed to find a way to make it all work.
After a few coats of green paint and some finishing details in black and white, I think the final result looks pretty good. Hopefully he is happy with his pumpkin!

And the best part? He can change up his turtle just by changing the color of glowstick in his pumpkin.

And I can’t wait to show you what I have planned for our own pumpkin this year.
Hint: It is Super Mario themed!
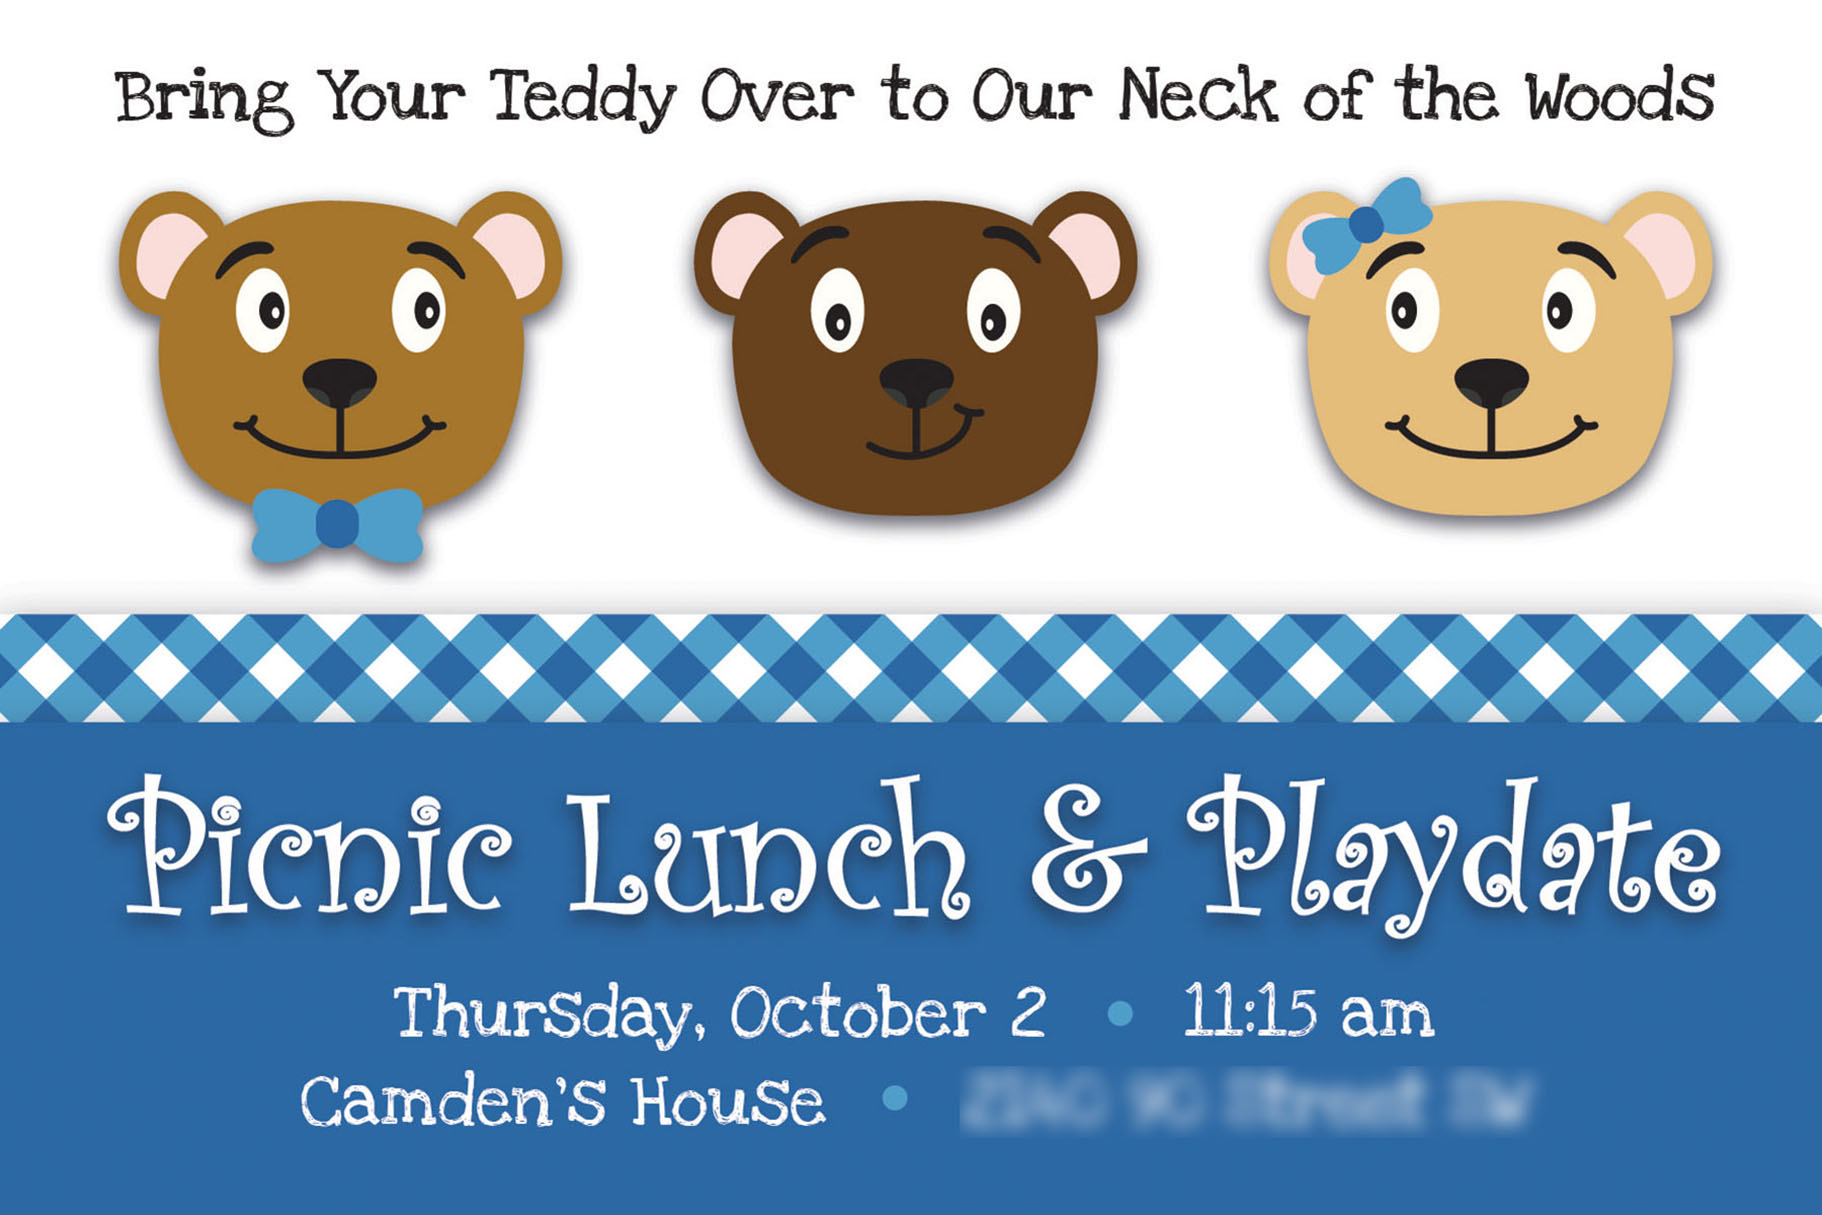
It is Teddy Bear week in our neck of the woods!
My son has started preschool this fall and Thursday is their first themed day – a Teddy Bear Picnic. Plus, on Tuesdays, my little girl and I attend a Salsa Tots class and it just so happened that their theme for this weeks class is also a Teddy Bears Picnic.
Because of this happy coincidence, I decided to take the theme a bit further and am hosting a Teddy Bear Picnic lunch and playdate at our house on Thursday after preschool.
A handful of my son’s class are all friends he has known from attending playgroup for the past two years and there are also a couple younger siblings Keira’s age. Because of scheduling we decided against joining playgroup again this year, so I am hoping to plan a few playdates at our house to keep connected to this wonderful group of ladies and their kids throughout the fall and winter.
I am trying to keep things simple for the playdate, but that is hard when there are so many cute teddy bear themed decoration and food ideas out there! Luckily I have a big party supply closet to draw on to create my tablescape, plus a few simple DIY projects I have come up with.

These foam ball teddies occurred to me when I was in the craft aisle of the Dollar store and saw the bags of various sized small foam balls. At first I thought two small balls glued onto a bigger ball would make a cute teddy head. Then, I decided to buy a couple more different sizes to see if I could somehow make a body and full teddy bear.

For this project you will need 4 different sizes of foam balls, hot glue, acrylic paint and any embellishments you might want for your bears. To create my bears, I used for of the smallest sized balls for the ears and arms, the next size up for the two legs, then a slightly larger head and the biggest ball for the body. For the nose, I cut the smallest sized ball in half with a serrated kitchen knife to attach onto the head ball.

To connect the balls, I used hot glue, but toothpicks would also be a good method since the Styrofoam makes it easy to stick them into. The glue did require some holding as it set and my final bears were a bit messier then I would have liked.
Once assembled, I simply painted my bears with a couple coats of acrylic paint and added on small bows I made from blue ribbon.

I chose to keep my bears pretty minimalist, but you could definitely draw on a face with a permanent marker and personalize yours as you see fit.
If you are hosting you own teddy themed party, these could be a cute, inexpensive craft to do with the kids. As mentioned, toothpicks could be used to attach the bears together and then you could have the kids decorate the bears however they wanted using paint, markers, googly eyes, pompoms, pipecleaners and ribbon.
My kids enjoyed playing with the balls as I was working, and my son decided they make a great snowman so that will be one of our crafts to do together come winter. We may even make more of these bears and just leave them white to be polar bears!
I can’t wait to show you what other Teddy Bear themed ideas I have come up with later this week!

If you have kids, it would be a pretty safe assumption that you have seen the Disney movie Frozen. Several times. Maybe several dozen times.
I took my son to see it in theater back in December, and while he and I both enjoyed it, I didn’t think it would be the massive hit it has turned out to be. When the movie came out on DVD and my Facebook feed exploded with mentions of everyone’s children singing adorable renditions of “Let It Go”, I admit I got kind of annoyed and refused to buy the DVD. It took a couple months, but I did finally give in and both kids and I have enjoyed sitting down to watch Frozen half a dozen times or so now.
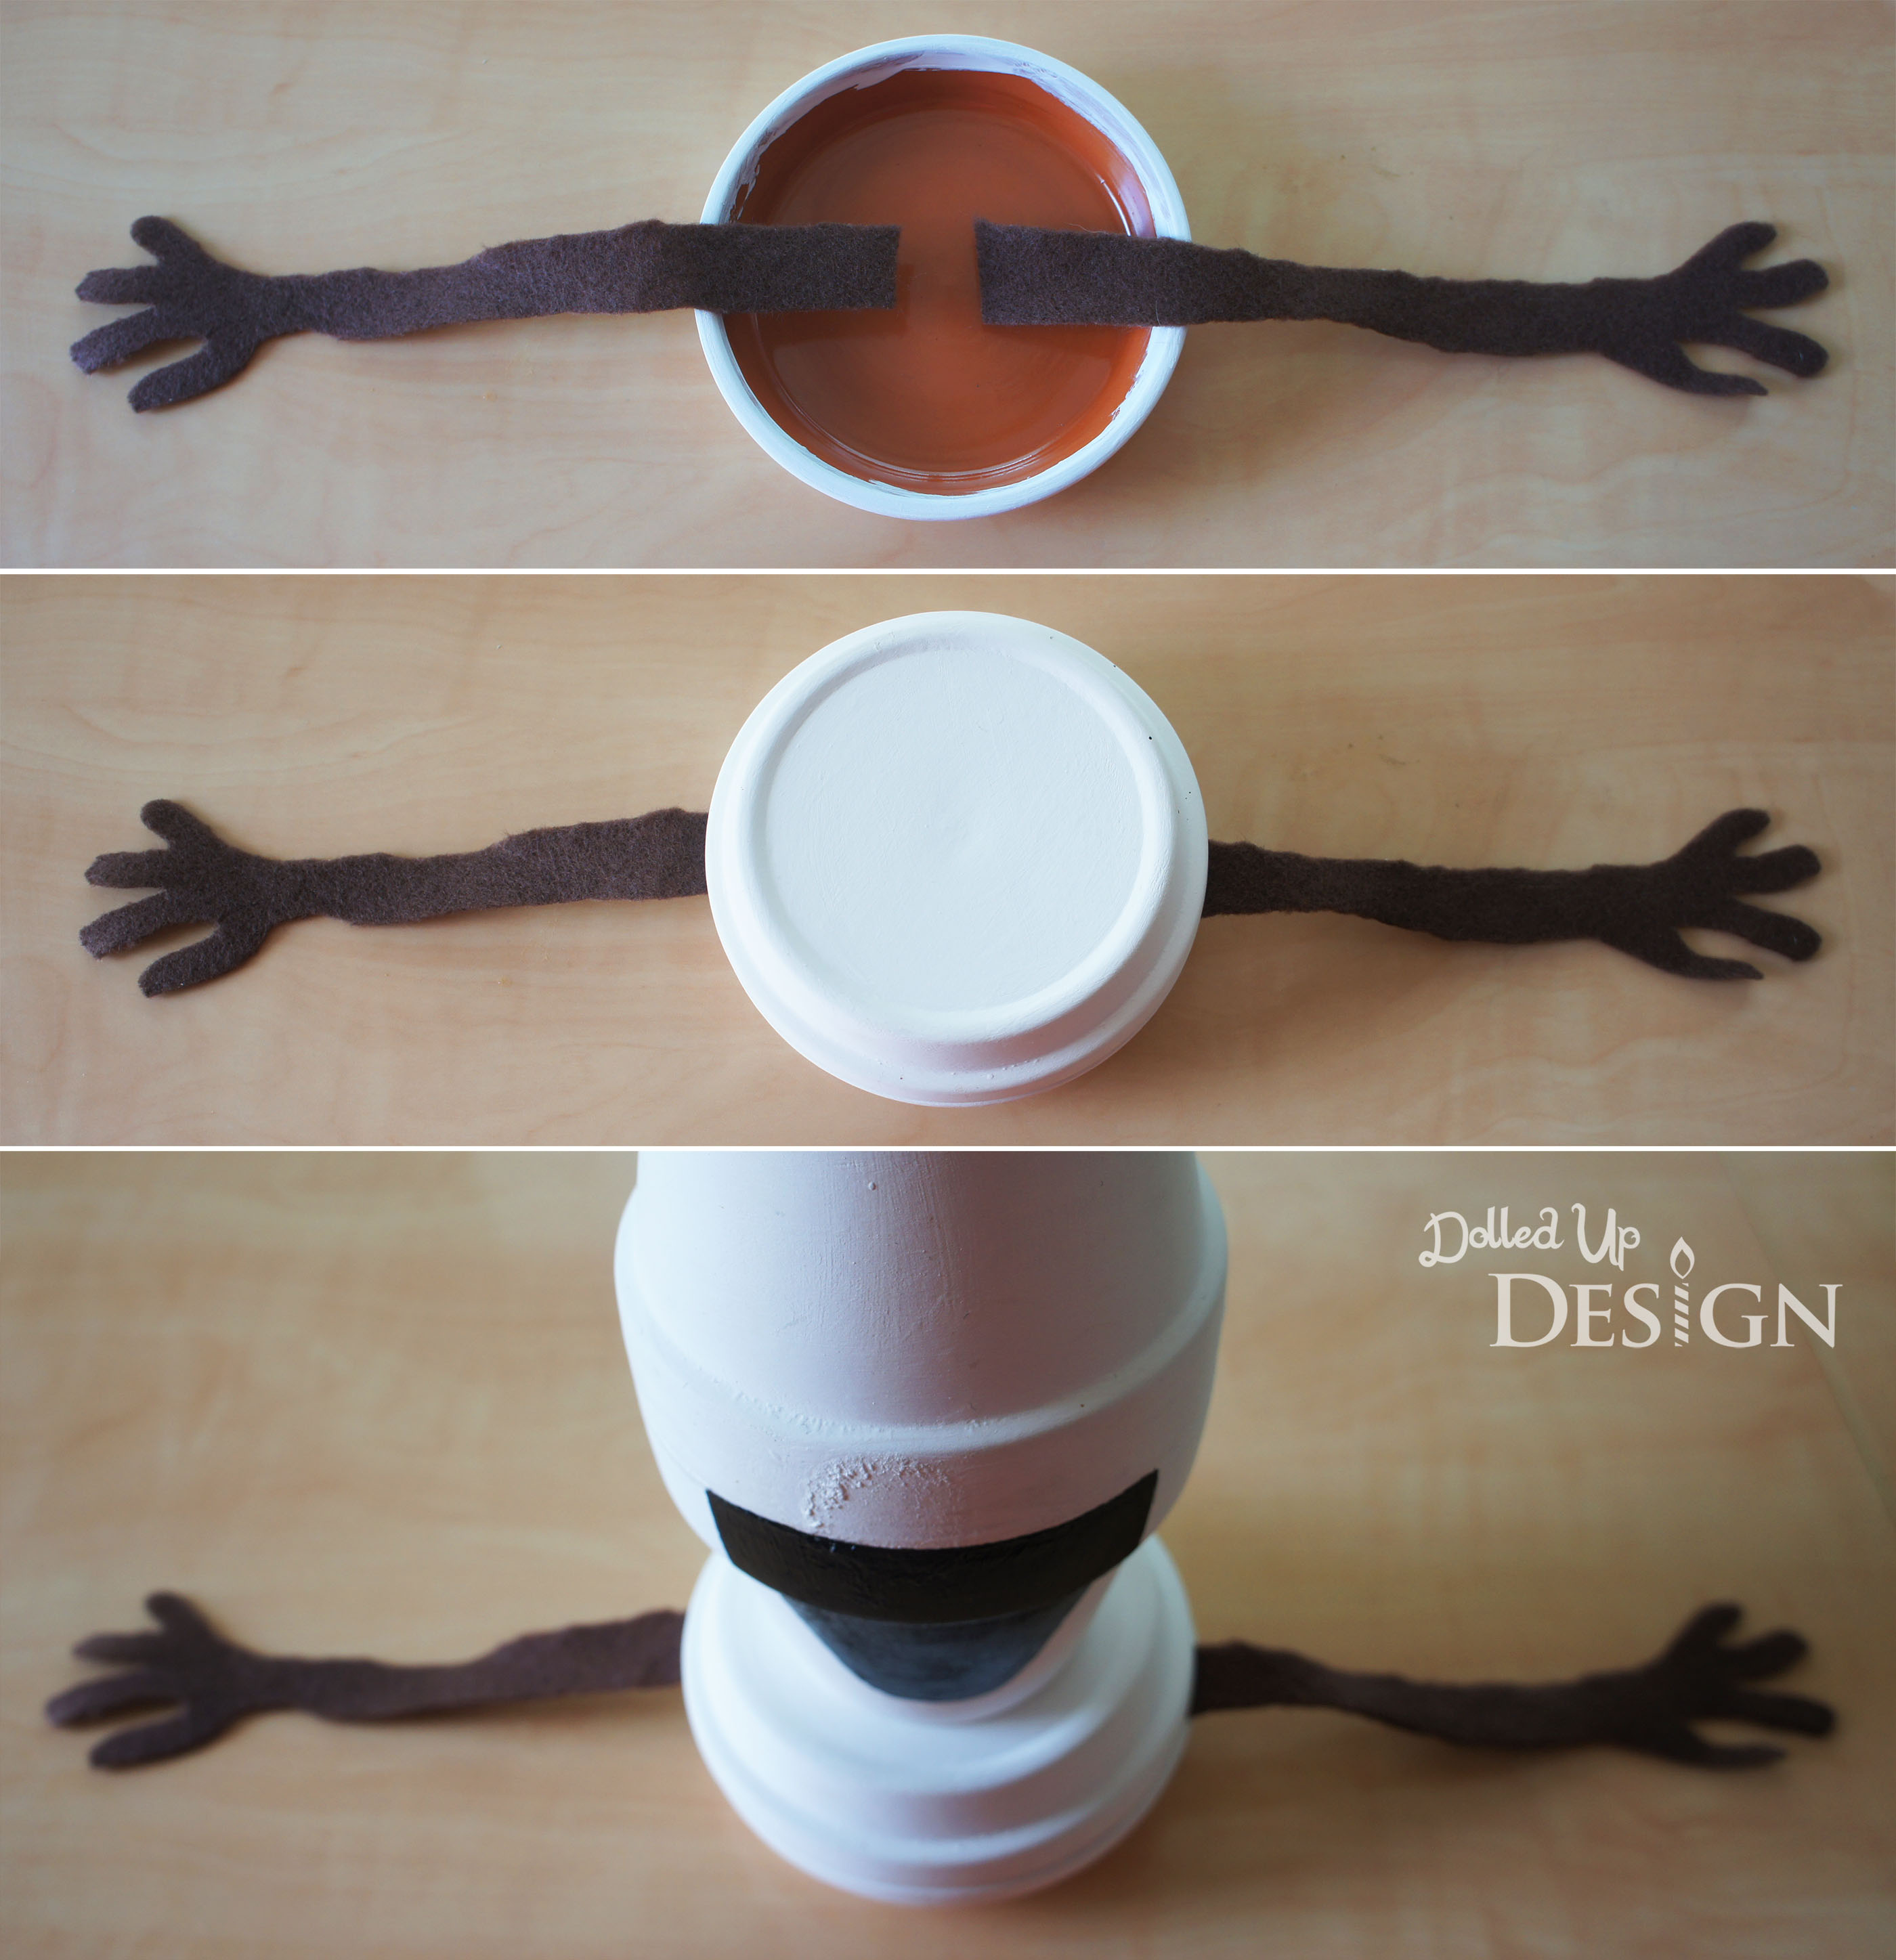
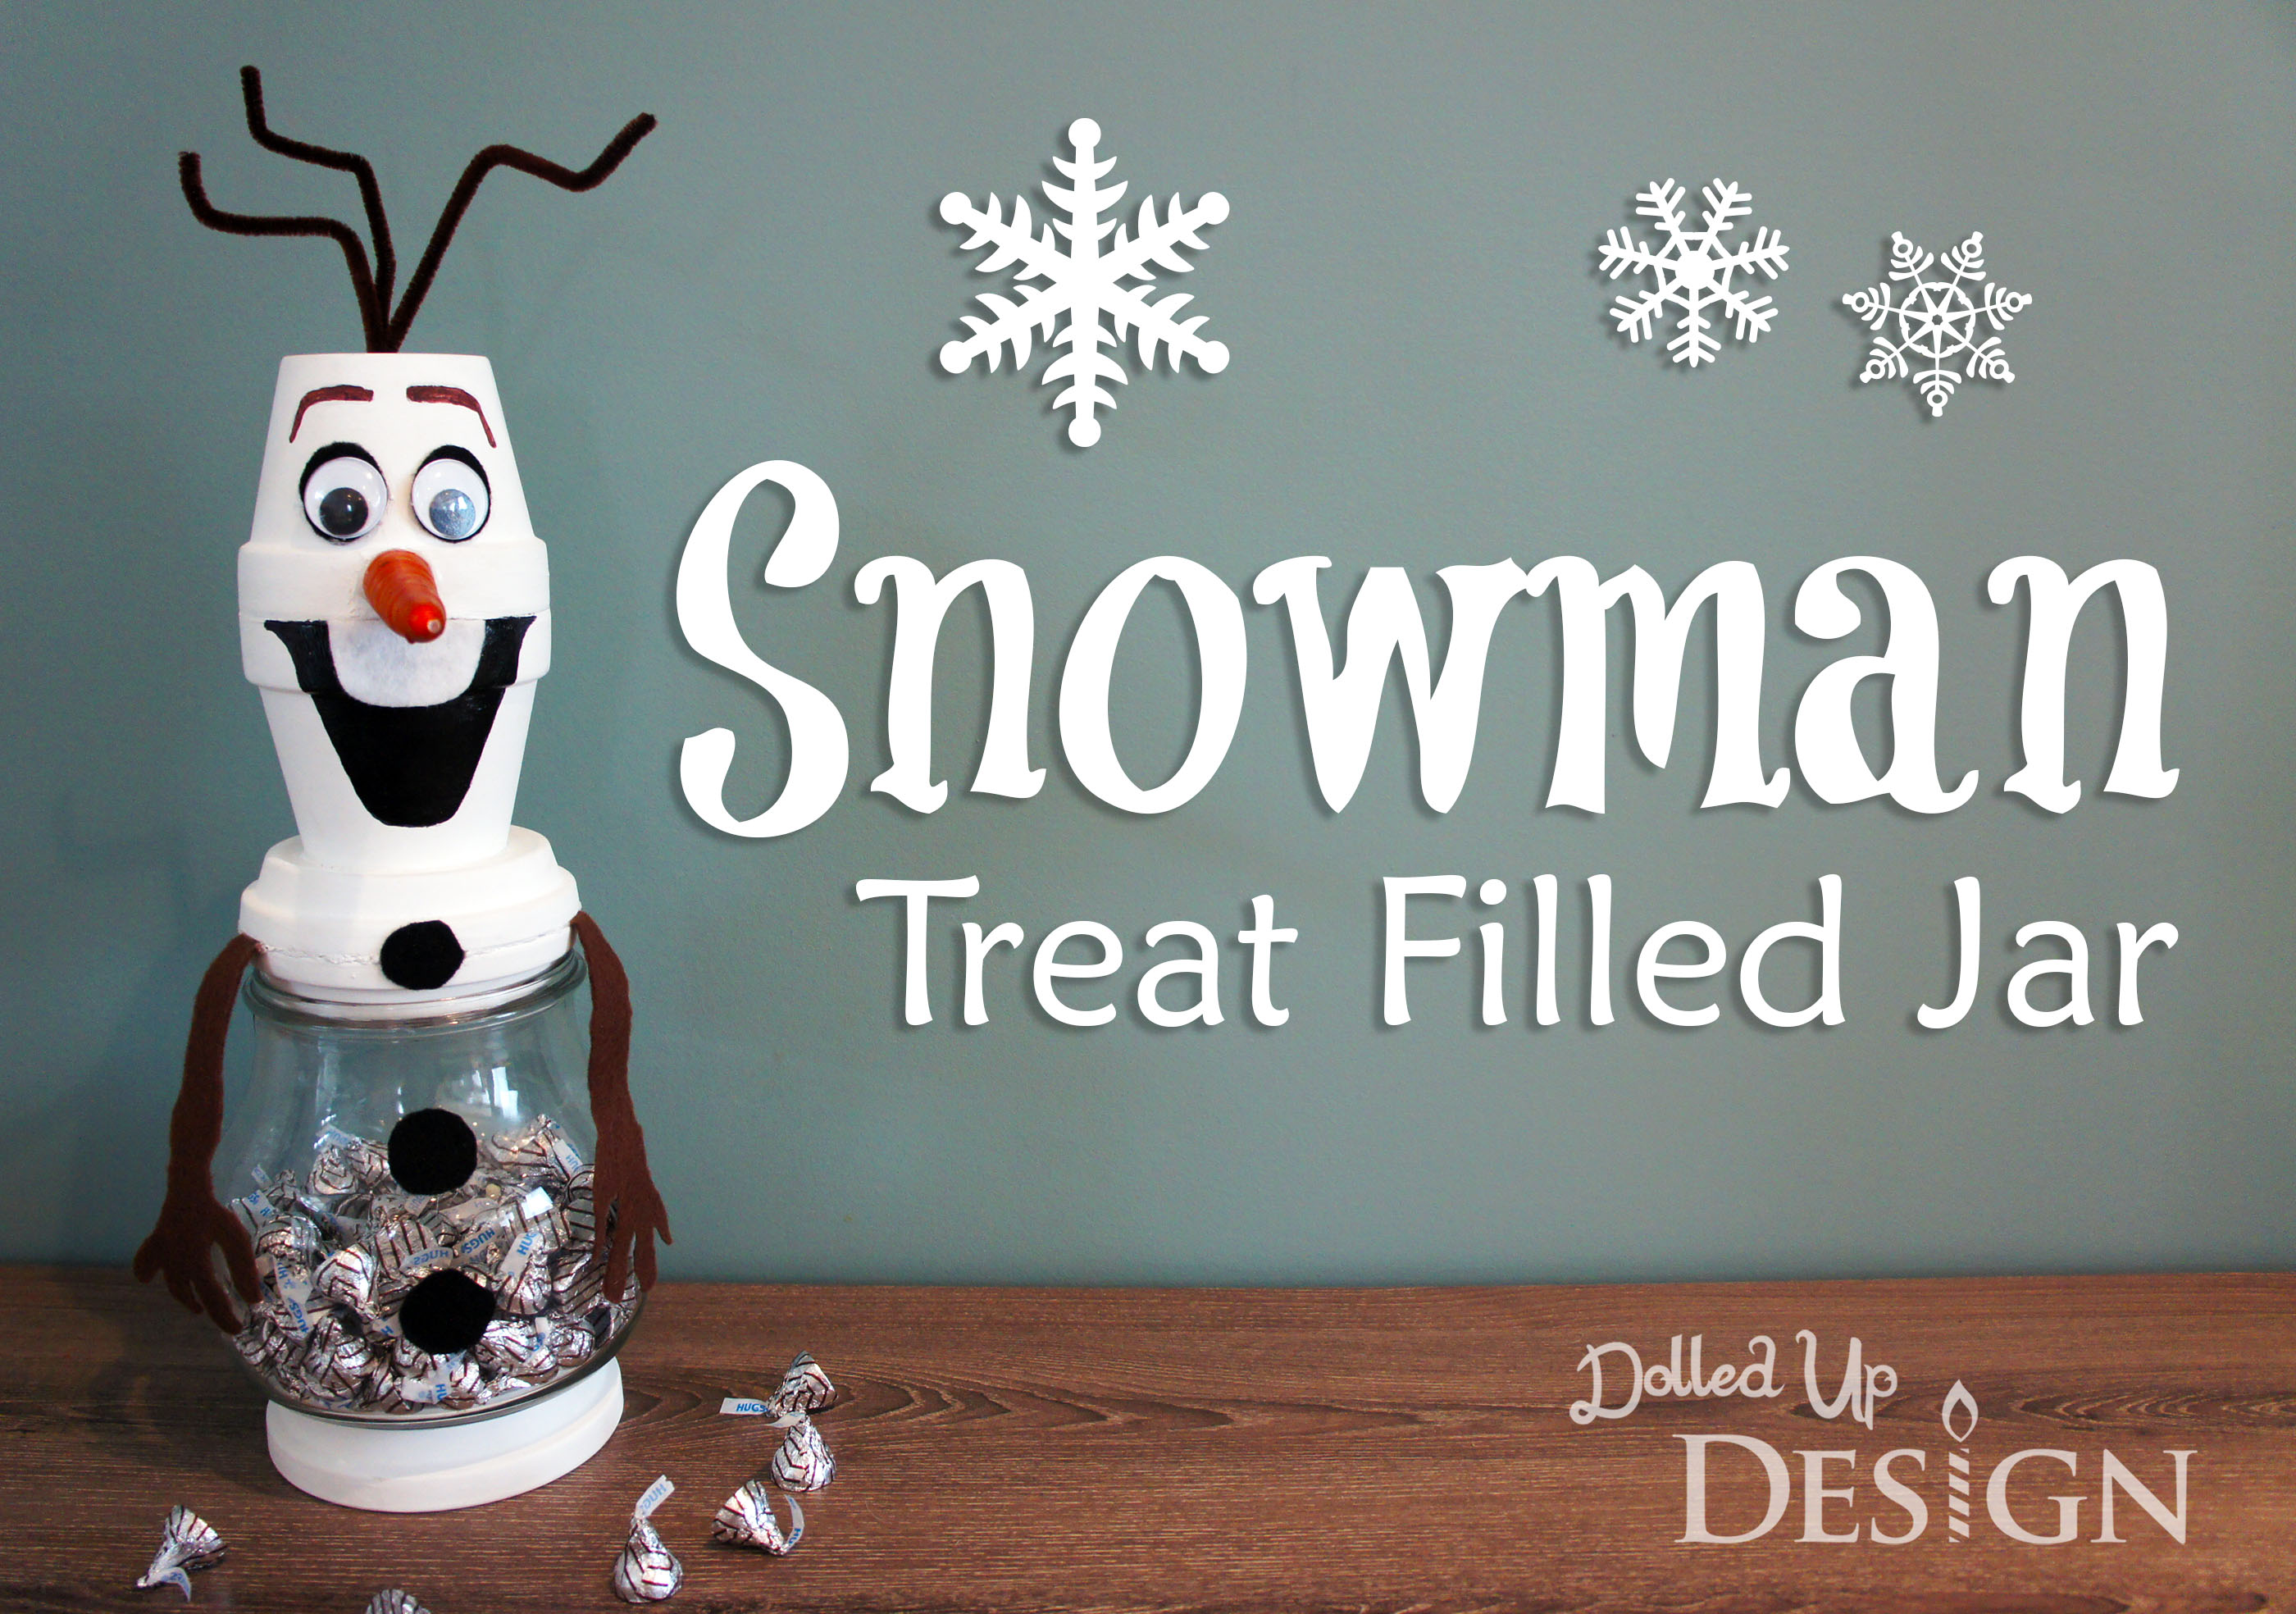
The craze hasn’t seemed to really die down on social media and my Facebook and Pinterest feeds are still full of Frozen mentions. If you can’t beat ’em, join ’em so I decided to fully embrace the madness and came up with this adorable Olaf inspired treat jar to share as my first contributor post on Moms & Munchkins.
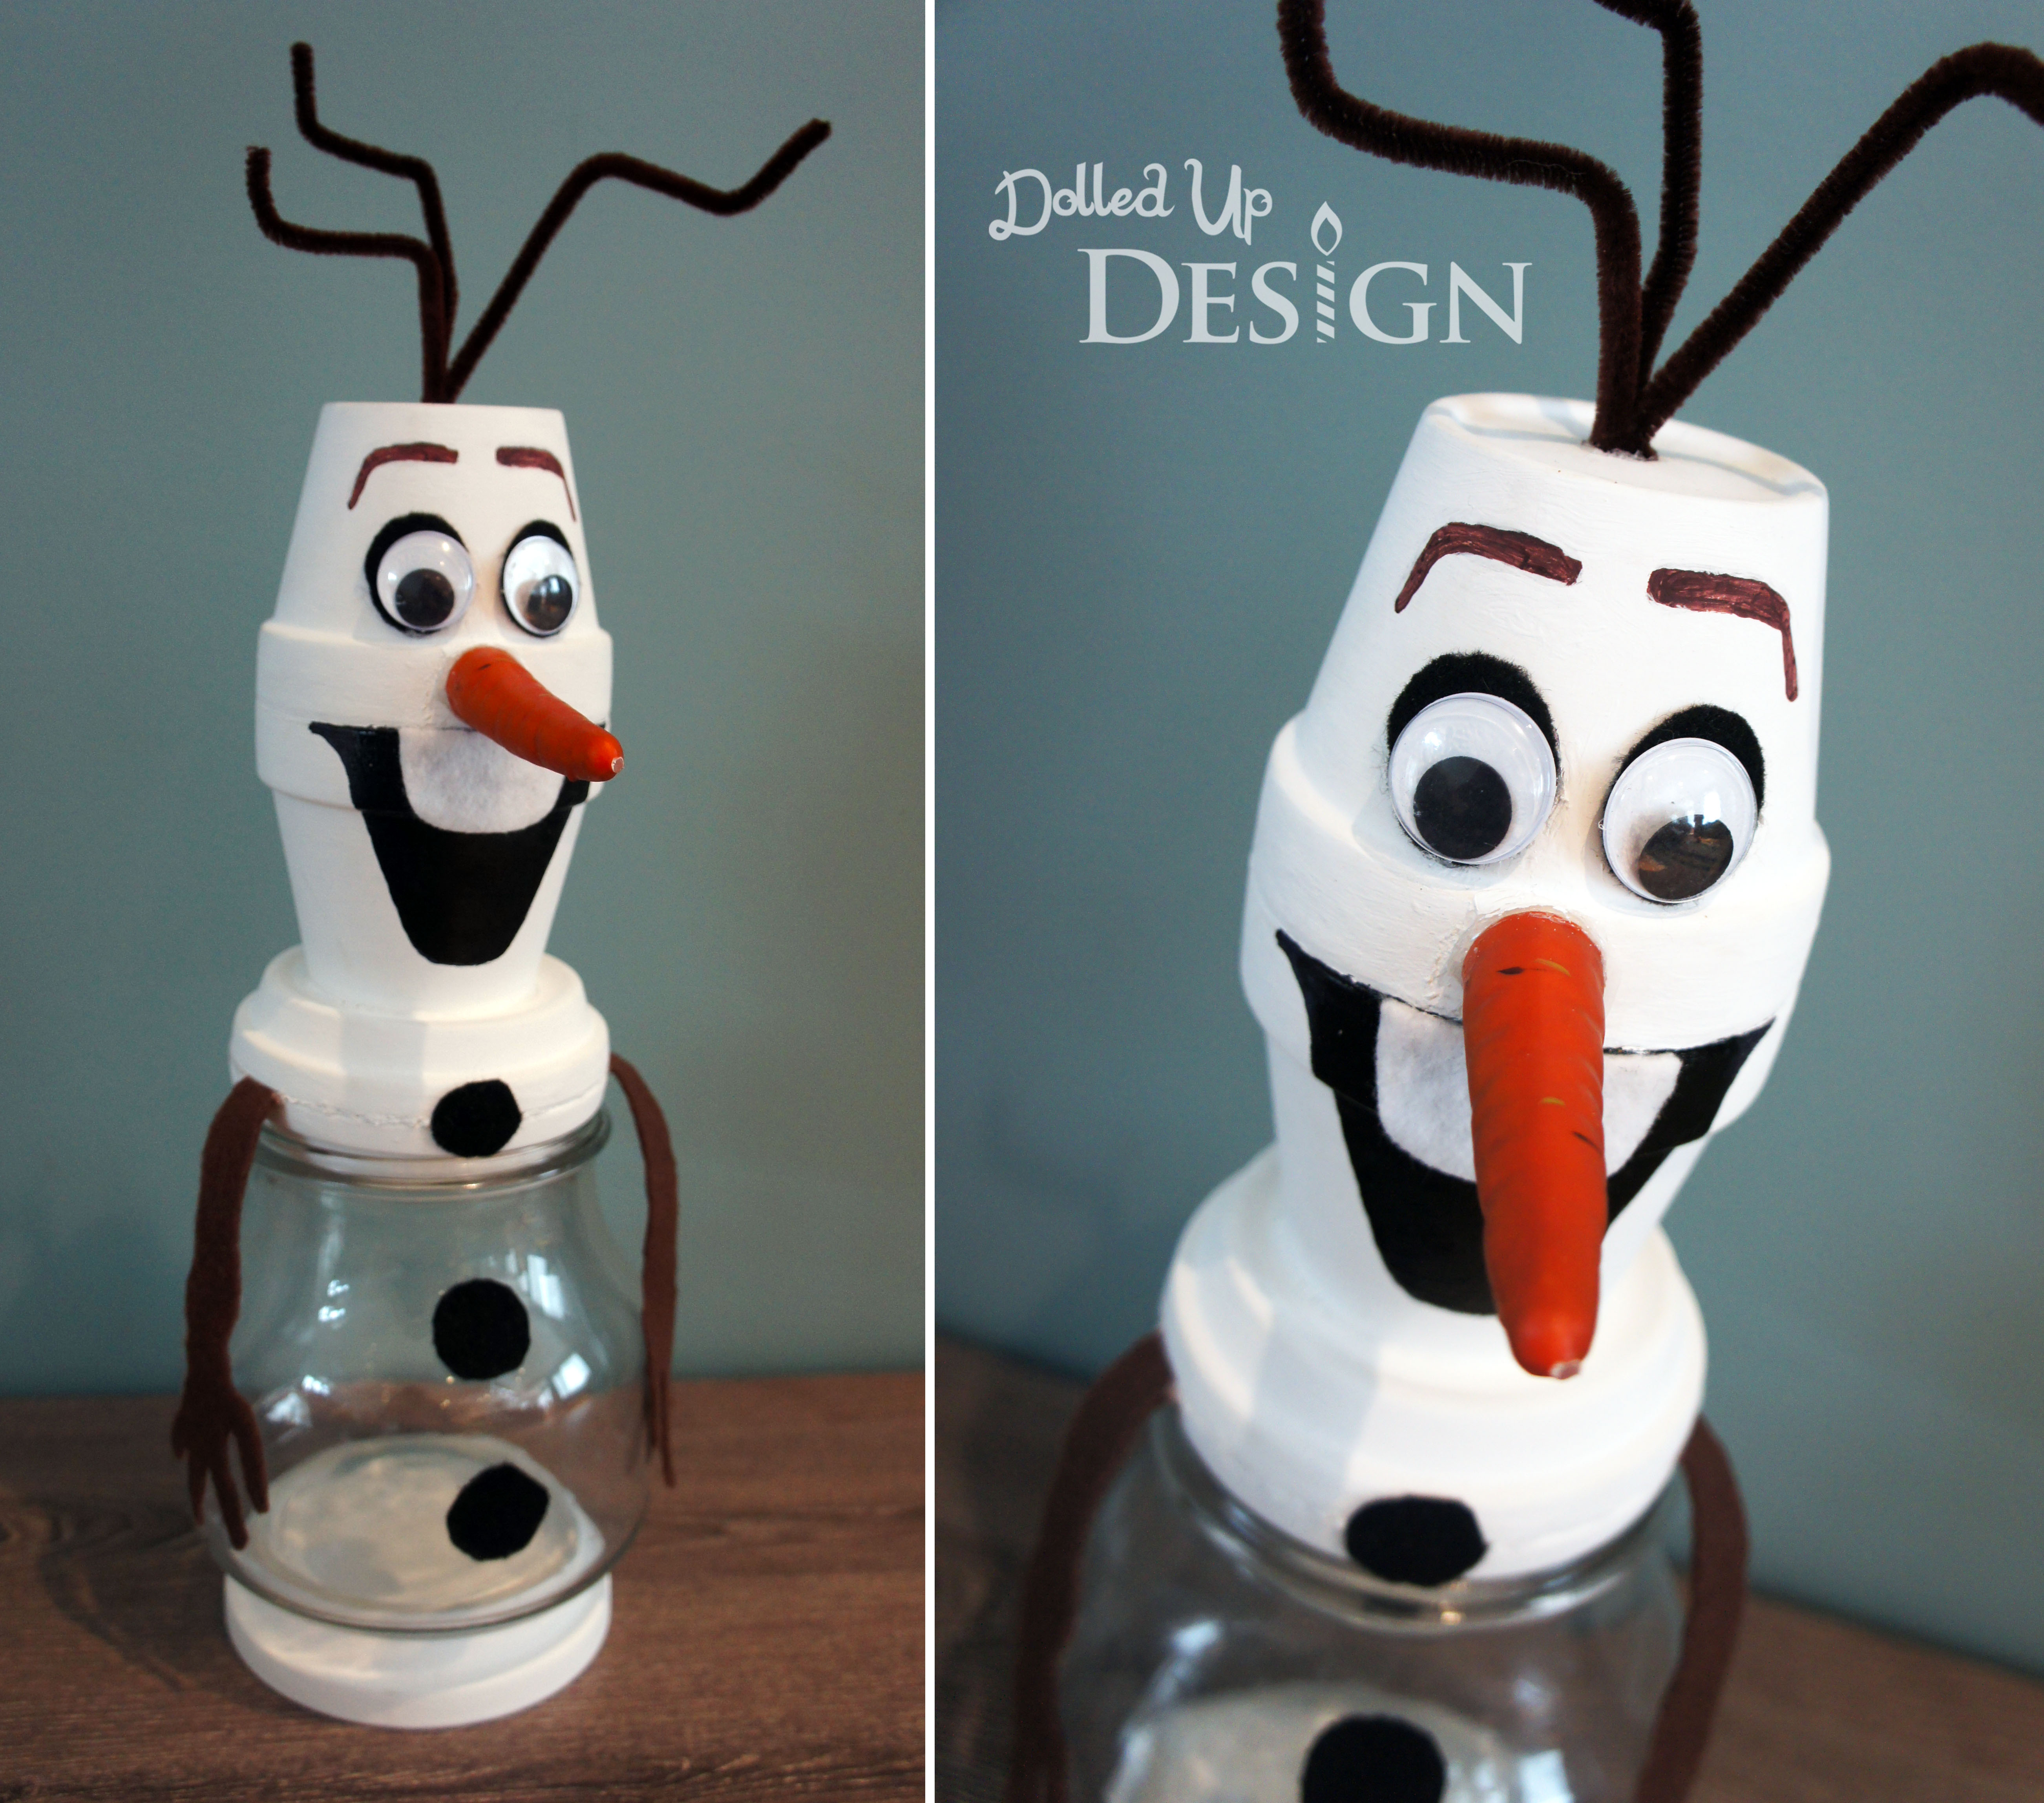
This craft is a fairly simple DIY and was easy to pull together with easy-to-find materials including terra cotta pots and saucers, acrylic paints, felt, google eyes, a fake carrot nose, pipe cleaners and a hot glue gun. The most expensive item for the project actually ended up being the chocolates to fill it!

To see full written, step-by-step directions, please visit my contributor post on Moms & Munchkins.


To complete my finished snowman, I filled it with Hershey’s Hugs. If you have seen the movie, you’ll understand why this seemed fitting!

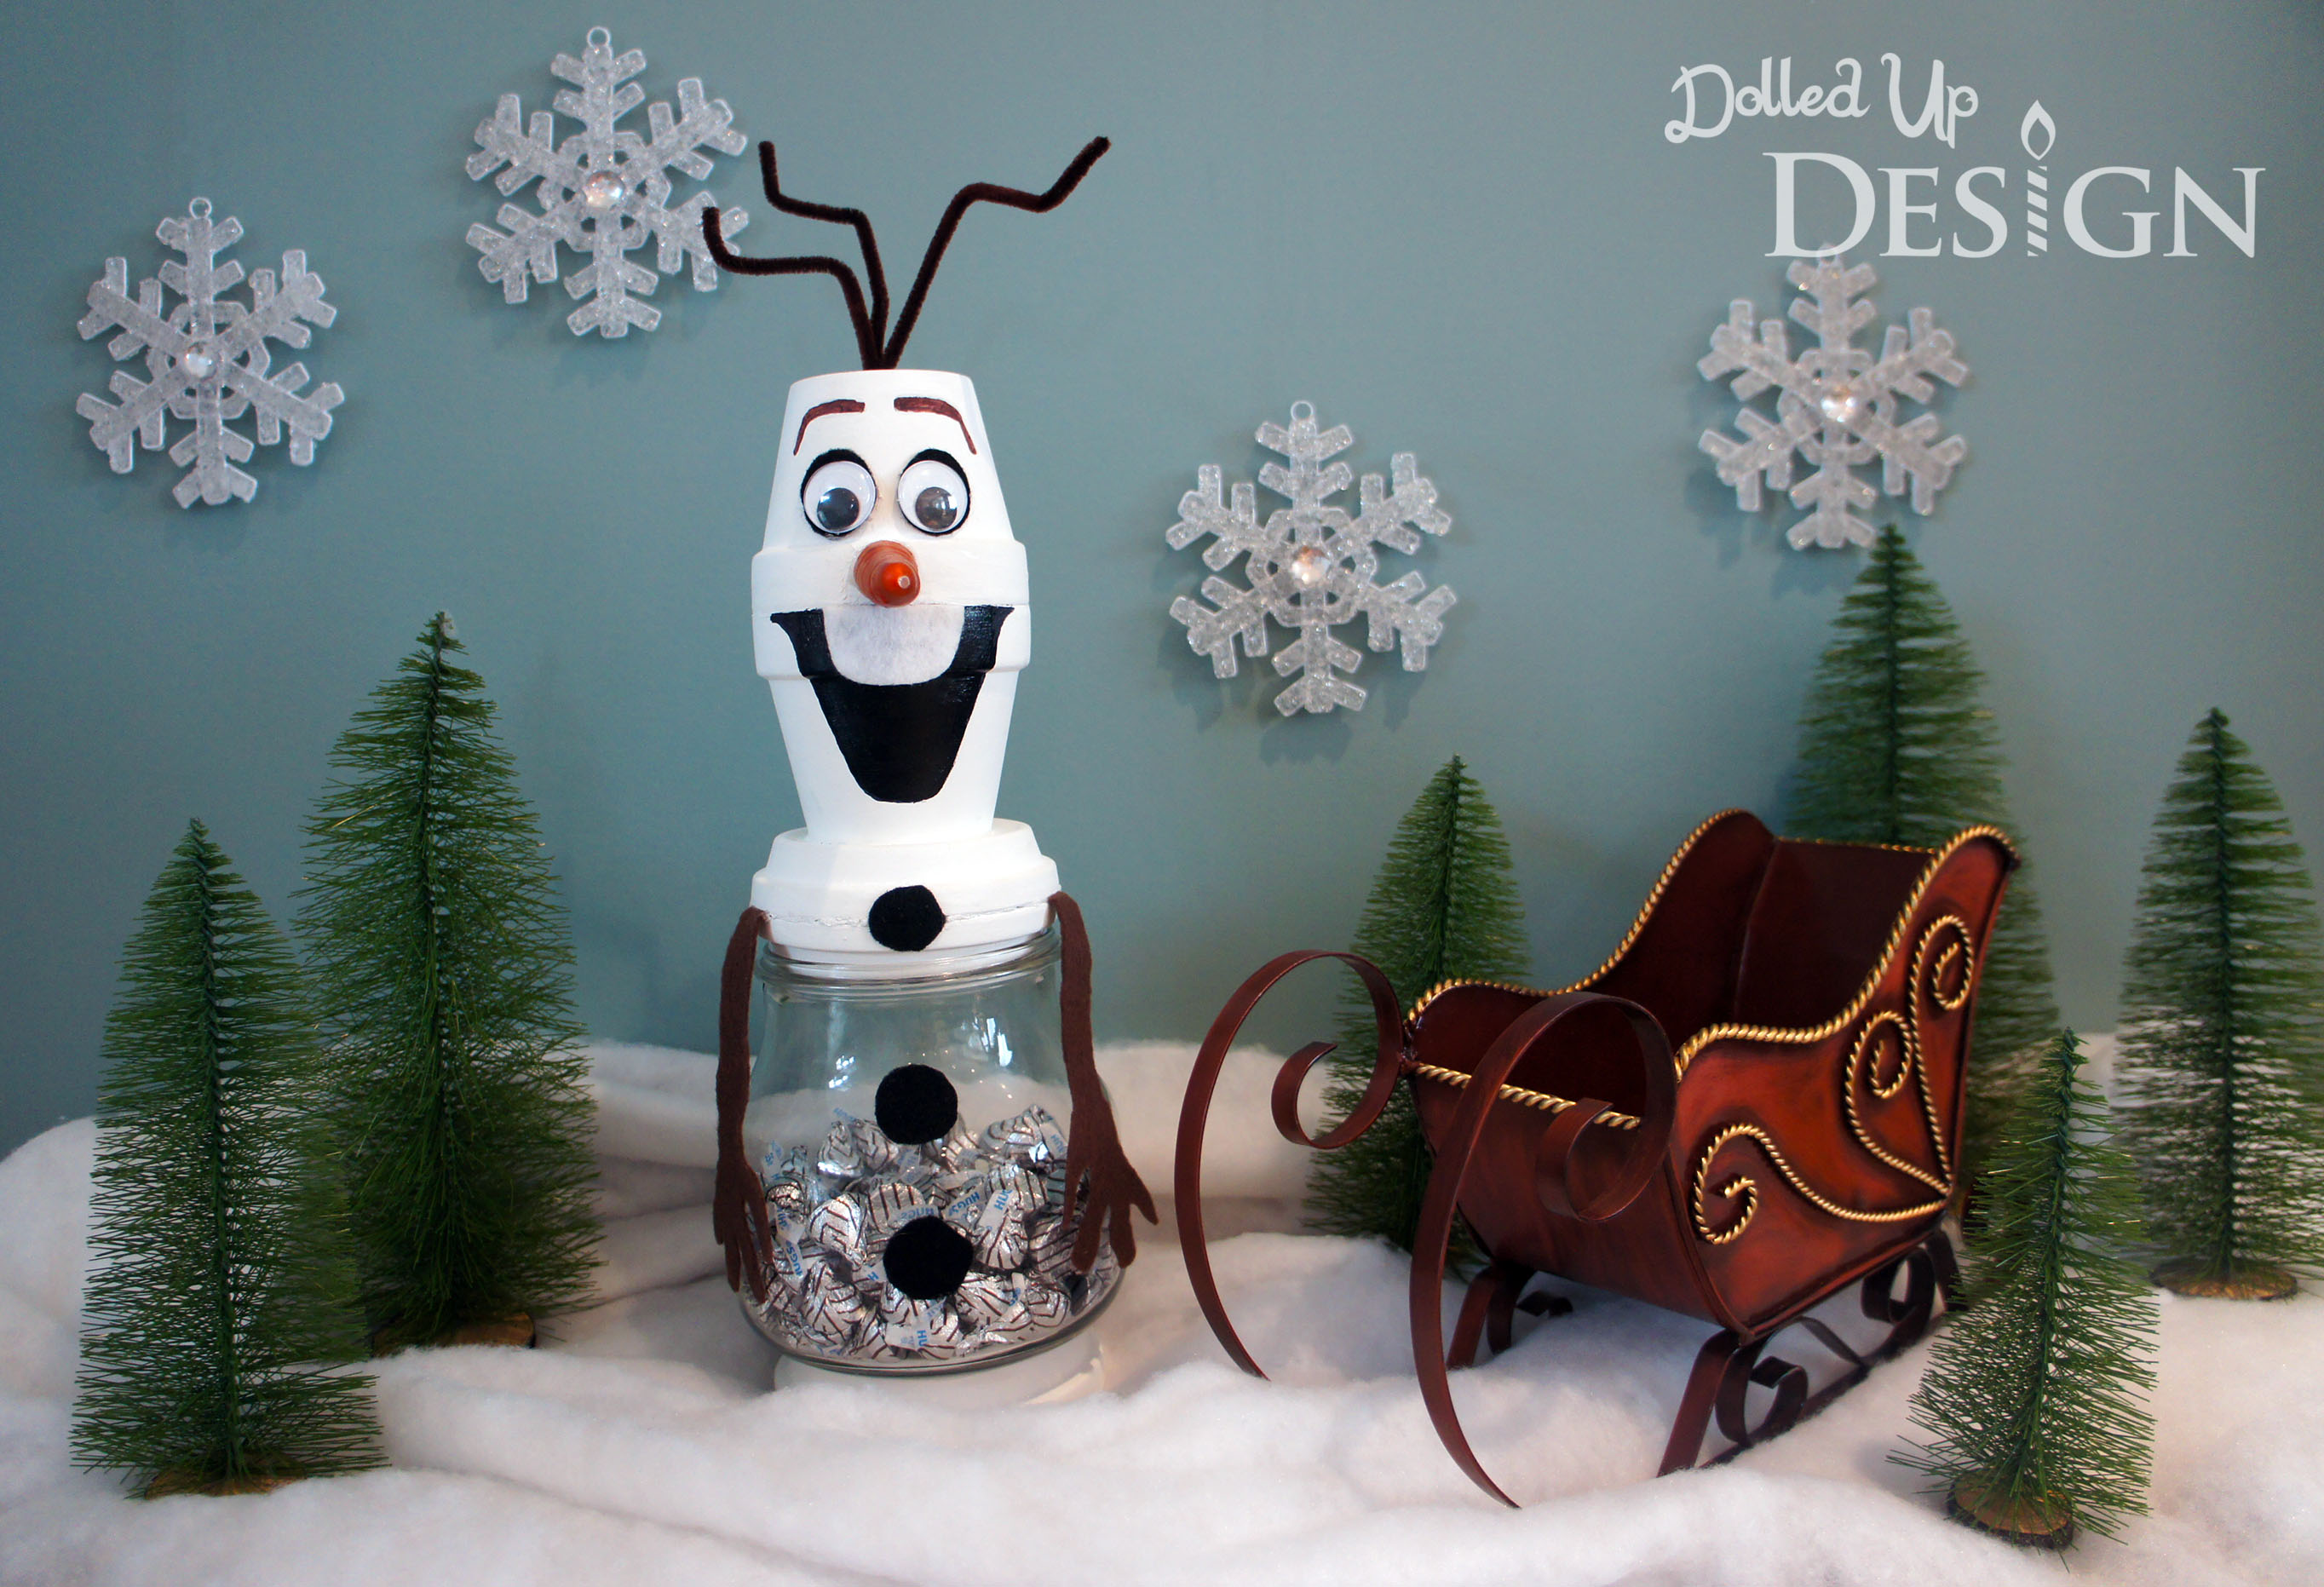
Right now our Olaf is just sitting out on our kitchen counter, but I can’t wait to incorporate him into our decorating come Christmas time. If you have a Frozen lover in your life, this would make a wonderful Christmas gift or look great as part of a Frozen party table or display.

My daughter’s stocking last year was a small pink “Baby’s First Christmas” stocking with a teddy bear on it. It is cute, but no longer appropriate. I am on the hunt for a set of matching family stockings, but since I still haven’t found anything I love I needed a solution for a stocking for Keira to use this Christmas. I have seen a few different styles of Disney themed stockings in stores and cute versions on Etsy, but decided I could come up with something I liked better and would probably cost less.
I think these may be my favorite thing I have created for our Mickey and Minnie themed Christmas. They turned out a lot nicer then I expected and total cost to me was less then $3 for the black and white felt I bought to cut out the embellishments. I was lucky and already had the stockings from a Christmas advertisement I had created for work several years ago, but you can buy these basic felt stockings for around $1 at any Dollar Store or Department store such as Walmart. Continue reading “And the Mickey and Minnie Stockings were hung by the chimney with care…”

