Doll House, Our Forever Home

We’ll be home for Christmas…

In our current home, that is.

I haven’t updated on the progress of our new house in a while because there hasn’t been too much exciting happening for the past couple months.  The finisher has just finished installing baseboards, interior doors and closet shelving and the glass panels have been installed in the railing.  There is progress being made, but it is a bit slower then we had hoped and it is looking like we will get possession mid January.

I was REALLY hoping to be in before Christmas.  We packed up all the Christmas stuff nicely last year to have it ready to move.  I had visions of Christmas in the new house and having my little guy write a letter to Santa telling him the new address to bring his toys to.  I was planning to buy the kids a play kitchen because we’d now have room for it, but I think it might wait now since it will just be one more big item to move.

Now I am faced with the dilemma as to whether or not it is worth the effort to haul out all the Christmas stuff and then repack it all again to be moved a few weeks after.  I am sure we’ll be busy with all kinds of other packing and preparing for the move over Christmas so I really think the best solution will be to keep Christmas pretty low key in our house this year.  This will be a challenge for me.

I can’t say that I am not disappointed, but I do know this really isn’t a big deal in the grand scheme of things.  We still have a roof over our heads. We will still have Christmas.  And most important we will all be together as a family.  Plus this just means I will have plenty of time to prepare for next year and go all out for our first Christmas at the new house.


Advertisement
Big Hands, Crafts, Doll House, Our Forever Home

DIY Scrabble Tile Pillows

SONY DSC

I have had this Scrabble tile pillow idea pinned on my pinterest boards forever – since before we even started thinking of buying a new house.  My husband and I both enjoy playing Scrabble so I instantly fell in love with the idea and have been waiting for just the right time/place to use the idea.  After weeks of furniture shopping, we finally just ordered a large custom sectional for the bonus room of our new house and I knew it would be the perfect spot to incorporate the pillows.  I struggled choosing between the words “HOME” or “COZY”, but decided HOME worked best as the décor in our new forever home.

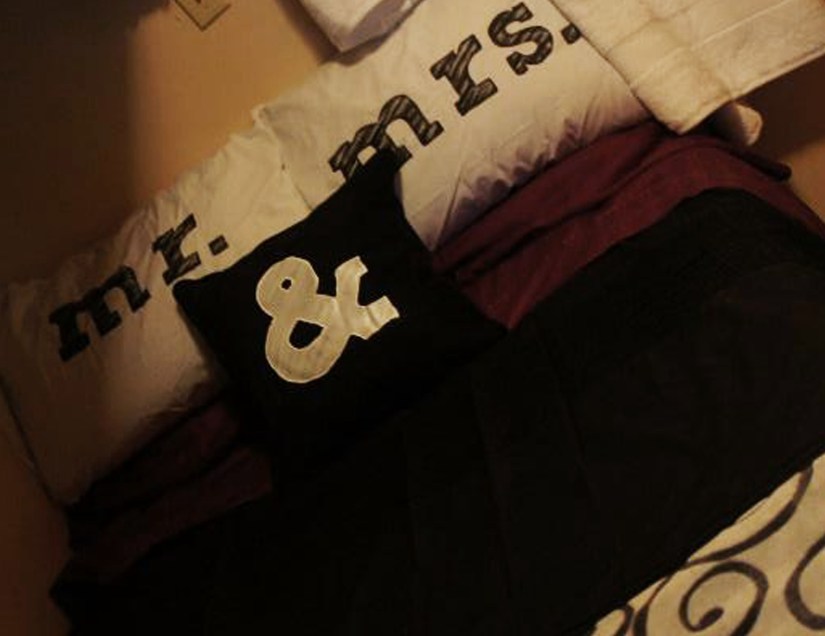
The method I used to create my pillows requires you to cut a stencil out of contact paper.  I had used this method previously to create pillowcases as part of my sister’s wedding gift (below), so I was fairly confident it would work for this project too.

SONY DSC

For the actual pillows, I found these 15×15″ pillows at Jysk.  The cover came off easily, they were a good match to the Scrabble tile colors and at only $3 per pillow I didn’t have to worry too much in case the project was an epic fail.  I am so happy to say it wasn’t and I am able to share this project with you.

Materials Required:

– Pillow covers (1 per letter in your word)

– Home Printer

– Contact Paper (I got mine at Michael’s)

– Exacto Knife (tools section of the dollar store)

– Scotch tape

– Paintbrush

– Black fabric paint

I began the project by laying out the letters and numbers in Adobe Illustrator using the font Arial Narrow Bold.  For my 15×15″ pillows, I ended up doing the letter in 700pt type and the smaller numbers in 365pt.  Once laid out, I printed the letters off on my home computer to use as my template to cut out my stencils from contact paper.

SONY DSC

If you are lucky enough to have a light table, that can be used to overlay the contact paper on the printed letters on cut them out.  I improvised by taping my letters and contact paper up on my patio door so the sunlight acted as a light table.  I then used my exacto knife and carefully cut out each letter/number.  TIP: When placing the contact paper, ensure the side that you peel off is facing down or your letters will be backwards.  For letters/numbers with centers such as the O or 4, you will need to keep the middle sections as part of your stencil.

From there, I placed the contact paper template on my pillowcases to determine exact alignment.  I begin by placing it with the backing still on and marking along the edges with scotch tape.  The tape then gives me a guide once I peel off the backing paper and go to stick it down.  It is a bit of a tricky process, but the contact paper is pretty easy to pull apart if it does stick on itself.  Just don’t try to reposition too much once stuck down because it results in a less clean edge.  Once stuck down, push along all edges to ensure there is a good bond and the paint won’t leak under the stencil.

SONY DSC

The final step is to begin painting.  Place a piece of cardboard inside the pillow so the paint does not leak through to the other side and just begin filling in the open areas with the paintbrush and fabric paint.  For clean edges, always start on the outside of the contact paper and brush in towards the open area.  It is a bit tedious, but it makes for sharper edges.  Once dry, just stuff the pillow back into the case and you are done!

SONY DSC

This method can be used for any type of image or lettering you want to put onto a pillow.  Using the Scrabble tile idea, the possibilities are endless – you could do your child’s name or initial, or spell out “LOVE” or “NAP” for your own bed.  It was a quick and easy project and I am very  happy with the final results.  Now to wait to get into our new house so I can see these on our pretty new sofa.

Doll House, Our Forever Home

Finally, We’re Getting an Ensuite!

We were out to the house again last night and I am excited to finally have a pretty decent exterior shot to share!  The siding has been slow, but it is just about done now and it looks beautiful.  I can’t wait to see the finished product with the stonework around the base of the garage.

1238346_10153177819310497_2058828230_n

Our current house has what is called a “cheater ensuite”.  We have access to it from our master bedroom, but there is also a door into it from the hallway and it serves as the main bathroom for everyone.  It has been working fine since the kids are still small, but as they grow it is going to be nice to have our own separate bathroom spaces and a bit more privacy.  A true ensuite is one of the few things I feel is really lacking from our current house and I am very excited to be getting an incredible ensuite with a jetted soaker tub and multi-jet shower just for us adults to use.

941269_10153033365450497_238264367_n

1236987_10153177817720497_1340849888_n

I absolutely love the steps up to our ensuite and the built in shelves we added beside the soaker tub.  The shower will be on the other wall, but I will get to that once tile is started.

1001559_10153138306135497_835176547_n (2)

Our new house has three full bathrooms vs. the one and a half bath we currently have.  We made the decision to add a tub to the main floor bathroom to have a space for overnight guests and, more importantly, a place to bath dirty dogs.  We currently have to pack our 70lb and 40lb dogs all the way upstairs when they are muddy and need a bath.  It will save a lot of backache to have the bath/shower unit on the main floor.  The kids are also still young so I foresee them bathing their in the evenings when I have work to do in the kitchen or if it is a messy spaghetti night where they need to go straight from table to tub.

The actual tub we chose for the kids and main floor bathroom is a little larger then your standard tub.  I have had to give up a bit of counter space, but I think the nice, round tub will be great for bathing kids and dogs in.

936528_10153138306015497_1511936597_n

The bathrooms cabinets are the same natural maple we have gone with in the kitchen.  There is a bank of drawers for each kid in their bathroom and the open shelf on the bottom will hold extra towels.

525749_10153177818070497_473466173_n

I was also excited to see the bathroom cabinets had the drawer hardware already on.  They are clean and simple, just the way we like it!

1185904_10153177817370497_1703533177_n

And finally, a picture to show the progress happening in the kitchen.  They seem to have been working at a pretty good pace and have already gotten one wall of upper cabinets installed.

1185738_10153177818720497_2113090079_n

Doll House, Our Forever Home

The start of my new kitchen!

Our latest visit to the new house was pretty exciting.  The railings are now up and our cabinets have been delivered.

1229831_10153158727305497_2005671996_n

We wanted to keep things light and bright in the kitchen so we opted for natural maple cabinets.  They were roughly laid out when we visited and it was nice to get a better feel for the space.

602740_10153158727880497_1436517181_n

It is significantly more cabinet space then our current house so I should never have a reason to complain about a lack of space.  It will be so nice to have the extra working space on the island and I am looking forward to using it when hosting parties.

972336_10153158727750497_958164366_n

The wood portion of the railings are also a natural maple.  There will be glass panels coming for the open spaces and it still needs varnished, but they look beautiful so far.

1233510_10153158727675497_273711356_n1234959_10153158727610497_1357430951_n

Doll House, Our Forever Home

Covering up the walls – siding and paint

At this point, I was really hoping to have a picture of the front of our house all sided and looking pretty.  We visited Friday and the back and sides were done, but the front was still yet to be touched.

1185432_10153138305595497_821239687_n

I don’t know why I am so anxious to see the siding all done.  I think it is because we chose the colors over a year ago so I don’t really remember what we went with and I am very curious to see what it all looks like.  I also think the house just looks so much more complete with the siding on.

The disappointment I felt over not having the exterior done was made up when we went inside to see the ceilings had been textured and the first coat of paint was on the walls.  We went with a neutral gray paint for the entire house so the paint in itself is not all that exciting, but it is good to see progress.

971940_10153138306420497_1628041408_n

We also noticed the pile of wood in the living room and figured out it was our stair railings.  We have opted for a wood railing with glass inserts to keep things open and airy.  We love the look and I really hope I am not going to completely regret the choice with two young kids and dogs.  I think we may be going to Costco to stock up on Windex!

1150124_10153138306265497_896906822_n

And, so far, my favourite room in the house is our master bedroom.  That may change once my kitchen cabinets and granite are in, but for now I am in love with the vaulted ceilings and the sunken tub in the ensuite.

1001559_10153138306135497_835176547_n

It’s slowly coming together and I am beginning to get stressed at the thought of having to pack and move.  The cabinets and railings are set to be installed by the end of the month and once those are in I think my panic will really set in.

Doll House, Our Forever Home

Starting From the Ground Up

483887_10152643190870497_730754228_n

It is hard to believe it has already been an entire year since we began the process of finding financing and starting the paperwork on our new custom home.  The decision making has been overwhelming at times, but it is exciting as we’ve been able to watch our dreams go from paper into an actual house.

At this point, the shell of our home is finished and we have a good idea what the spaces feel like.  Drywall has just finished and we are reaching the finishing stage for the house which means I am growing more anxious to see the more cosmetic things like paint, flooring, faucets and lights go in.

The selections process was several weeks of driving around to different suppliers and doing our best to come to stay within our budget and reach a quick agreement.   All in all we did pretty good and I think our final choices are something we will both be happy with for a long time to come.

One of the first selections appointments we had was for the plumbing fixtures.  We both tend towards a more modern design, so it was fairly easy to narrow the selections down to those items with a square, geometric look.

17671_10152596616715497_1939167721_n (2)

733800_10152596616495497_928336670_n (2)

Next up was lighting and we continued with the square theme.

735157_10152664715445497_1972845001_n (2)

We did splurge a bit on the fixture for the front foyer and in the dining area.  I first showed these to my husband as a bit of a joke, but apparently I know him better then I thought because he instantly loved them.

42940clp

For the kids rooms, I chose to do something a little different and am hoping my little guy likes this adorable plane fixture as much as I do.

486501_10152664715945497_966001548_n

Our kitchen and bathroom cabinets will be a natural maple and the bathroom countertops are the laminate sample shown below.  The counters in the kitchen will be Steel Grey granite.

72636_10152605788910497_558715798_n (2)

The kitchen backsplash will be the light grey tile below with a strip of the mosaic tile throughout as an accent.  Between the grey’s and stainless steel I think my kitchen is going to end up looking fairly masculine so hopefully I can add a feminine touch with accessories.

67071_10152652925770497_1111920079_n (2)

Finally, the flooring we have chosen is a natural hickory hardwood on the main floor.  We both love wood with a bit of variation and are hoping the lighter color choice might be a bit more dog friendly.

Hickory (2)

So there you have a quick glimpse of our new home.  I can’t wait to share the final product, but we are still a few months away from that.  It has been a long wait, but it will all be worth it in the end.