For our upcoming trip to Disneyland, I was on the fence about whether or not I wanted to come up with an autograph book. In past trips I have not bothered with any character photos or signatures, but I have also never had young children along. I am still not sure how into it my kids might be, but I know I don’t want to regret not having one in case it is something they are excited by. We do have a character breakfast booked for our first morning in Disneyland Park and I figure at the very least we will be able to get signatures and hopefully a couple photos of the kids with the characters there. Continue reading “Designed to Sign: DIY Disney Autograph Book”
DIY Printable Disney Countdown
Today I am sharing a simple DIY printable I designed to count down to our Disneyland trip next month.
To make this countdown, all you need is an empty 4X6″ photo frame with a glass or plastic insert, a printed copy of my attached printable, scissors and a dry erase marker. (I found my dry erase marker as part of a cute Frozen themed set from Dollar Tree.)
Easy Mario Mushroom Favors
Are you planning a Mario themed party? These adorable treat filled mushroom favors are enough to excite any Nintendo-loving fan.
Check out the full DIY Mario Mushroom Favors tutorial as my guest post over at Moms and Munchkins today.
Rudolph Holiday Party
I am so excited to share my all the details from my Rudolph party with you today! I love bringing my ideas to life and seeing a party vision come together.
For this party, I had hoped to do something in the weeks leading up to Christmas but found it incredibly hard to plan something with all the other parties and obligations people have at this time of year. As Christmas day approached, I still really wanted to execute some of the ideas I had come up with in my Rudolph Treats inspiration post and decided to put some snacks and treats together to enjoy with my family on Christmas Day. My niece had also just turned one just a few days before Christmas, so I thought it was the perfect excuse to subject my family members to my party planning craziness.
For Christmas day, I had already planned to put out some light snacks to munch on in the afternoon and tide everyone over until it was time for turkey dinner. Putting a Rudolph spin on everything wasn’t that much extra effort and the little details really helped add to the excitement of the day.
The turkey pinwheels were made the day before and simply had to be sliced and arranged on the plate. Using green tortilla’s and finishing the stack off with a star cut from a yellow bell pepper made for a cute little Christmas tree next to my stuffed abominable toy.
Then, with the help of some pre-made tart shells, my Bumble-Berry Tarts were another clever tribute to everyone’s favorite abominable monster.
We also enjoyed a variety of sliced cheese, meat and Christmas shaped crackers to snack on. The Santa belts around the Babybel cheese were a little over the top, but they were a huge hit with the kids.
My maraschino cherry “dirt covered red noses” and reindeer hooves went over well, but one of the most popular items was the cranberry baked brie. You can’t go wrong with melted, gooey cheese and the touch of cranberry and pecans gave it that festive touch.
My fruit and vegetable platters got a holiday spin by arranging them into a Christmas tree and a wreath. The tree shaped pan for the fruit was a foil cake pan I came across at the Dollar Store and filled with red and green fruits.
These meringue hats were my second attempt at meringue cookies and they are surprisingly easy thanks to the help of my KitchenAid stand mixer to effortlessly whip the egg whites. My first batch were labelled as dwarf hats for my Snow White Picnic Party and these ones were layered in red and blue as an ode to Hermey the elf’s iconic hat.
I had planned to bake and decorate a cake, but ended up cutting it out for the sake of my own sanity. Between everything shown here, and an entire turkey dinner to cook Christmas day, it just ended up being too much.
Since we were celebrating my niece’s birthday I still wanted some type of cake, which luckily cake in the form of the Rudolph themed cupcake decorating kit I had tucked away after getting it on clearance after last Christmas.
My punch ended up a lot less white/clear then I was hoping, but it still worked as Sam the Snowman. My original plan was to use a plain round glass vase, but I found this great glass cookie jar that couldn’t have been more perfect to add the mustached face to – the lid even works as his hat!
I also was happy with the way my tissue paper wrapped glass vase turned out looking like a Santa sack to hold Yukon Cornelius’ silver and gold wrapped chocolates.
And, if all this wasn’t enough of my favorite red-nosed Reindeer for one day, I also had the joy of unwrapping a Build-A-Bear Rudolph from my son and a stuffed Clarice from my daughter on Christmas morning. My son was so excited to give the gift to me and I love that my husband took the effort to go to the mall with the kids and have them each build a reindeer for me. |He let them pick out the clothing and I think they really show each of the kids personalities. I look forward to having these guys out on all our Christmases to come.
I hoped you have enjoyed looking! This food table was a lot of fun to plan and hopefully I have given you some easy ideas for your party planning next holiday season.
And, to host your own Rudolph the Red Nosed themed Christmas or Holiday party, I have made things easy by providing all the free printables. Just click on the link below to take you to the goodies!
Planning a Disneyland Surprise
Christmas is over. The kids passports have just arrived. It is time to start planning my Disneyland surprise!
So far we have managed to keep it quiet from the kids and I am hoping to surprise them with the news just a few days before we leave. There were some questions when we had to order passports, but my 4 year old doesn’t actually know that anything has been booked and confirmed.
When I saw this new Little People Magic of Disney Day at Disney set by Fisher Price I instantly knew it had to be part of my Disneyland surprise. We love Little People in our house and this set couldn’t be more perfect for the Disney lover in me. It even has a fireworks show and music!
At 2 and 4 I think my kids are still a bit young to read a t-shirt or understand a packed suitcase, but I know new toys are something they can get excited about. I have also bought the Little People Lil’ Movers Airplane and my hope is to make it into a bit of a scavenger hunt in the house where they first find the plane and then need to follow the clues to fly their Little People to the Disneyland set. I am hoping this action will help them make the connection that we will be flying to Disneyland.
I haven’t worked the plan all out, but there will be balloons and other mickey themed decorations involved, and I will likely break out the Mickey waffle maker afterwards! We will also watch the Disney Vacation Planning DVD so we all have a better idea of what to expect in the parks. I think I am more excited about planning this then I was for Christmas.
Have you ever surprised your kids with a Disney vacation? How did you break the news?
A Basket of Christmas Cheer
I know it is past Christmas at this point, but I still wanted to share the cute Christmas themed gift baskets I came up with as gifts for my sister and her husband and for my husband’s brother and his wife. They are always wonderful about getting birthday and Christmas gifts for our children, so I wanted to make sure we had a little something for them to enjoy at Christmas.
My idea originated with these cute Christmas themed lidded mason jar drinking mugs I found at Dollarama. I decided to add on the round shaped bottles of Coca-Cola you can find around Christmas time and then selected a couple small bottles of their favorite alcohol to enjoy with it – whiskey for the men and Bailey’s Irish cream for the ladies!
From there, I decided to add a few treats and snacks to enjoy with their holiday drinks. I looked up popular Christmas song lyrics that made mention of food and used these to select and label my basket contents. Inside I included “Some Corn for Popping”, gingerbread flavored Marchmallow Peeps labelled “It’s A Marshmallow World in the Winter” and a few adorable Kinder Happy Hippo’s that read “I Want A Hippopotamus for Christmas”.
I was also excited to find cans of nuts and snacks I found at our grocery store with fun Christmas themed labels such as the chocolate macaroon “Reindeer Droppings” show in the basket below.
The labels looked great printed and attached to the different items in the basket. I just wish I would have made an additional one that read “Making SPIRITS Bright” for the bottles of alcohol.
To finish the baskets off, I arranged everything neatly in plastic Dollar Store baskets, wrapped them up in cellophane and added my large “A Basket of Christmas Cheer” label.
Do you like this idea? It is never too early to start planning for next Christmas! This would be a great contribution to a gift exchange or for the hard to buy for.
Deck the Halls!
It is our very first Christmas in this house and I am very excited to share with you pictures of how we have decked our house out for the big day!
Outside my husband spent one very long afternoon up a ridiculously large ladder before the snow hit to get our exterior lights up. It makes me happy when I go out at night and come home to the twinkling lights!
We decided to make the switch from a real Christmas trees to an artificial one this year. I miss the piney smell, but it is sure nice having the tree up early to enjoy and not having to vacuum up pine needles. It only took a few days and my two year old was bee-lining to the tree first thing in the morning to make sure it was lit up!
The tree is upstairs in our bonus room so the kids won’t have far to come down and see if Santa has come. There was some debate over where to put it, but I think this works best. There is lots of room for the 9 foot tree and that room has a soft carpeted floor for the kids to open their gifts on and play Christmas morning.
Two of my favorite new ornaments on are tree this year are this handprint reindeer and snowglobe my little guy made at preschool. He is not big on crafting, so I appreciate when he does actually bring home a craft.
I also was feeling a bit of puppy mommy guilt as we were decorating the tree and I realized Rumbull had no ornaments yet so I got him this one when we were at the mall for our annual visit to Santa. I was very excited to find a personalized one that matches Nova’s!
The kids DIY stocking are new this year and you can read more about how I made them here. They have been hung on the stair railing next to the tree where Santa can easily find them.
I also found some new throw cushions for the couch and a placed a few small Christmas accessories we already owned throughout the room to make it festive. Dontcha just love our giant couch!? It has been perfect to cuddle up on as a family and watch all those great Holiday specials over the last month!
On the main floor, I still haven’t managed to get any pictures hung on the living room walls so I had a blank slate to work with for Christmas decorations. My sister in law pinned these pretty DIY Snowflake Popsicle Ornaments from Fab DIY and when I realized how easy and inexpensive they would be, I decided to make some.
I painted mine white and hung them alongside some wooden snowflakes I found at the Dollar Store. I love the way they pop against the color of our living room wall and the big impact it makes for just the cost of some popsicle sticks and hot glue! And, you can also see my sister in law’s stir stick versions here.
And, of course, I added a couple more Christmassy cushions for the couches in this room!
Our fireplace has a clean, modern look that I really like, but I do miss not having a mantle to decorate. In our old house we had a large corner mantle that I would set my Christmas village out on so this year I had to figure out a new solution. I ended up filling my China cabinet with the village and it turned out pretty well.
My Christmas village is Rudolph the Red Nosed Reindeer themed so I decided to carry that theme through some of the other decorations on our main floor. My DIY Rudolph banner look great hanging over the dining table, and I love the little snowglobe inspired centerpiece I made using with my new ornaments from Target. Hop on over to Moms and Munchkins to get the free printable file I created to make your own flying Rudolph Banner.
We had considered putting the Christmas village up in the niche over the front closet, but the configuration wouldn’t have worked well. I ended up coming up with this cute Rudolph scene after making some simple mountain shapes from foamcore and hot glue. We already had the sleigh and used it as an excuse to buy the Rudolph and Hermey figures from Walmart.
I also put up my small 4′ tree in the living room and put all the Rudolph ornaments I have collected over the last several years on it.
Finally, one simple DIY project I did were these quick snowmen on each of the kids bedroom doors. This is not an original idea, but still one worthy of a share because it is so simple and fun for the little ones. Mine were cut from foam sheets and wrapping paper.
Phew. If you have made it this far I hope you have enjoyed my tour. I think I have made a good start to decorating our new house for the holidays and hopefully I can add to my decorations over the next few years. I would love some Christmas themed accessories and towels for the bathrooms!
Waiting for Jesus “Good Deeds” Manger
I am very excited to share my first guest post today! And it is written by none other then my lovely mom, Christine Wolzl. She brings a wealth of knowledge in kids activities and education after spending a good part of her life in the classroom teaching grade one. She is now retired, which means we get to benefit from all the lovely cards and paper creations she enjoys crafting in her spare time. I can’t wait to see what she has come up with for our Christmas cards this year!
We are one week away from Christmas! The week before Christmas can be a tough time for little ones, often leading to tears and other less desirable behavior. It is also a tough time for moms, busy getting ready for the big day, and needing help from their children, or time to do the extra things needed to prepare for Christmas. It becomes the perfect time to make the “Good Deeds” Manger! This project was inspired by the Straw For the Manger Christmas Story and Activity found on the blog small fine print.
The creation of the manger brings children back to the main reason for Christmas – the birth of Christ and focuses on what each child can do to welcome Jesus to the world. With every good deed the child does, they place a piece of straw (yarn) in the manger. They can see the fruits of all their good deeds in the growing soft straw placed in the manger. The manger filled with soft straw becomes their gift to the Christ child. A good place for the manger could be under the Christmas tree, easy for them to add their good deeds into!
The supplies needed are very simple and economical – a ball of yellow (or straw coloured) yarn and 1/2 of a sheet of brown card stock, construction paper or thin cardboard.

Use the link for the pdf pattern to make the manger: StrawMangerActivity_PrintableTemplate

The bed of the manger is 5 1/2 inches (the width of 1/2 sheet of the card stock) by 5 inches. Score at 2 1/2 inches and fold.
With the manger bed folded, cut a slit 1 3/4 inches long, 1 inch in from the edges – on both sides.
Cut out the two manger supports.
Slide the supports into the manger bed and open the bed wide.
Snip little pieces of the yarn (about 2 inches long) for the straw.
Take time to share the story of the birth of Jesus and teach your children how their good deeds – helping others, being kind, sharing etc – are the gifts they can give. For a super poem (and printout!) and a story that tells about the Good Deeds Manger go to: http://smallfineprint.com/straw-for-the-manger/
I wish you a peaceful week leading up to Christmas, and a joyous Christmas Day!
Thank you again for sharing, mom!
Infinity Scarf Teacher’s Gift
My little guy is in preschool this year so we have entered the world of teacher gifts.
It seems like gift giving has become a lot more complicated nowadays. People seem to have a lot more dietary restrictions and allergies which makes it hard to give food gifts. Mugs and ornaments make for a nice teacher gift, but you know they already have an overabundance of those items and I hate to add clutter to their lives just for the sake of giving a gift. Pinterest has some great ideas, but it can get confusing with all the lists of what and what NOT to gift. It is hard not to second guess your purchases on the quest for the perfect gift or to just give up by this stage in the Christmas shopping game and resort to boxed chocolates.
Either way, I did want to give Camden’s teachers a small Christmas gift and I didn’t want it to be boxed chocolates. I know his main teacher does not drink tea or coffee of any sort so the standard coffee shop gift card was out and I really didn’t want to give a food item of any sort. So, I came across these soft infinity scarves and decided to go with a neutral color for each of the teachers.
Wrapped up with a cute personalized tag that reads “I’m so lucky to get to HANG AROUND with you!”, I hope they will like them. I have been wearing a lot of scarves lately and really love the ease of the infinity scarf. The teachers spend time out in the cold with the kids so hopefully they can use them then.
And, after reading one of those dreaded lists that suggested teachers like receiving books as a gift, I also decided to add on a storybook version of The Christmas Sweater by Glenn Beck. I know each teacher has their own children so hopefully the book can be enjoyed at home or in the classroom. It is a great Christmas story with a sweet message and lucky for me I was able to grab them for just $3 each at the Dollar Store!
I packaged my items up in a cute Santa box for the main teacher and an Elf themed box for the assistant teacher. I am hoping the gifts are well received and I haven’t broken any of the rules of what not to gift to teachers.
Transform a $1 Felt Stocking With These Fun Character Options
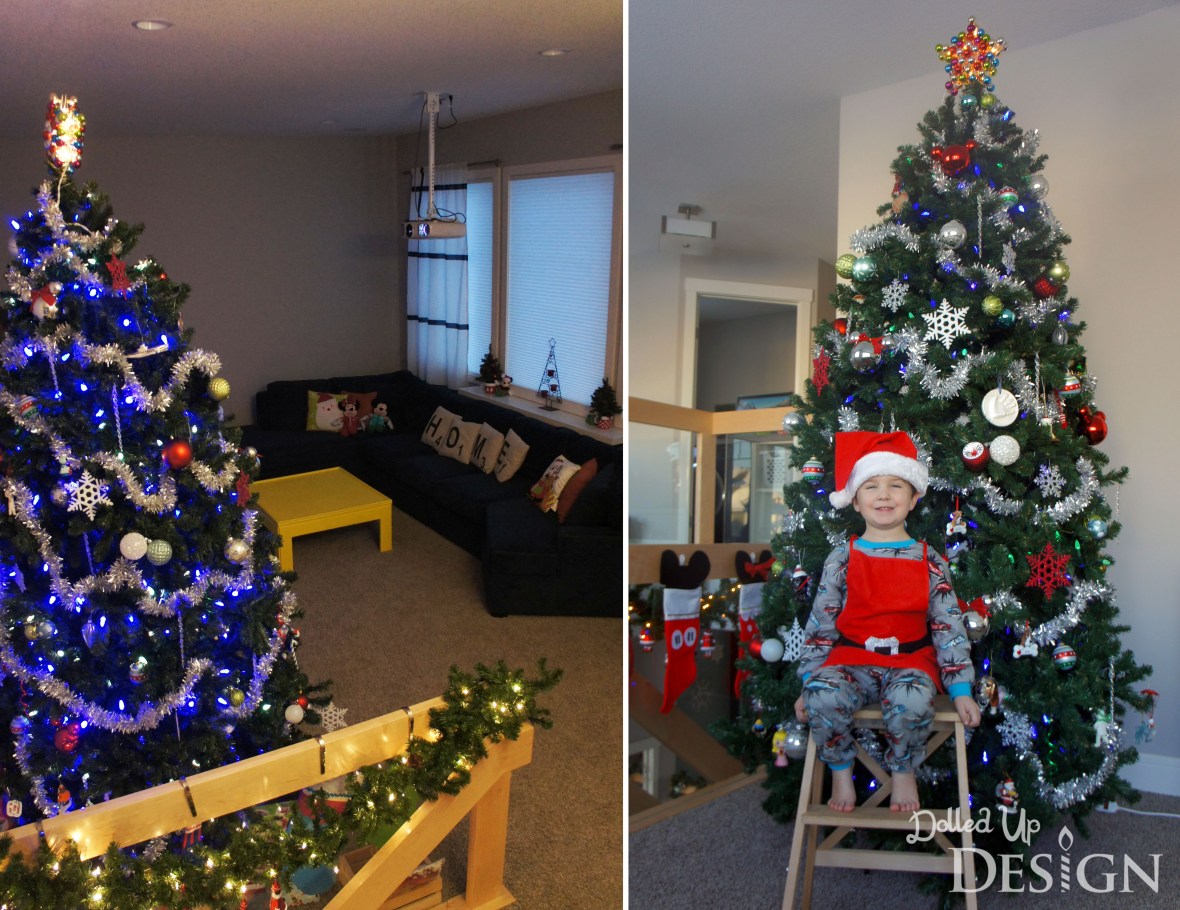
For the past couple Christmases I have been on the hunt for a nice set of matching family stockings. There are a lot of lovely options out there, but so far I haven’t found anything I have absolutely loved enough to pay $20+ per stocking for.
Every time we head to the Christmas aisle to browse the stockings, my son heads straight to the tackiest screen printed or plush character stockings he can find. I normally have nothing against character merchandise, but I just can’t wrap my head around paying $10 for an Optimus Prime or Ninja Turtle stocking that is going to stick out like a sore thumb amongst my other Christmas décor and will likely only be used once as his interests change and he’s begs me for something different next Christmas.
I wasn’t planning to make new stockings for my kids, but as my son reached for one of those tacky stockings next to the plain $1 felt stockings in Target, inspiration hit.
“How would you like mommy to make you a Ninja Turtle stocking instead?”
“Yeah!! That sounds pretty cool.”
“Okay, grab me one of those plain green stockings and I can make it look like a Turtle for you.”
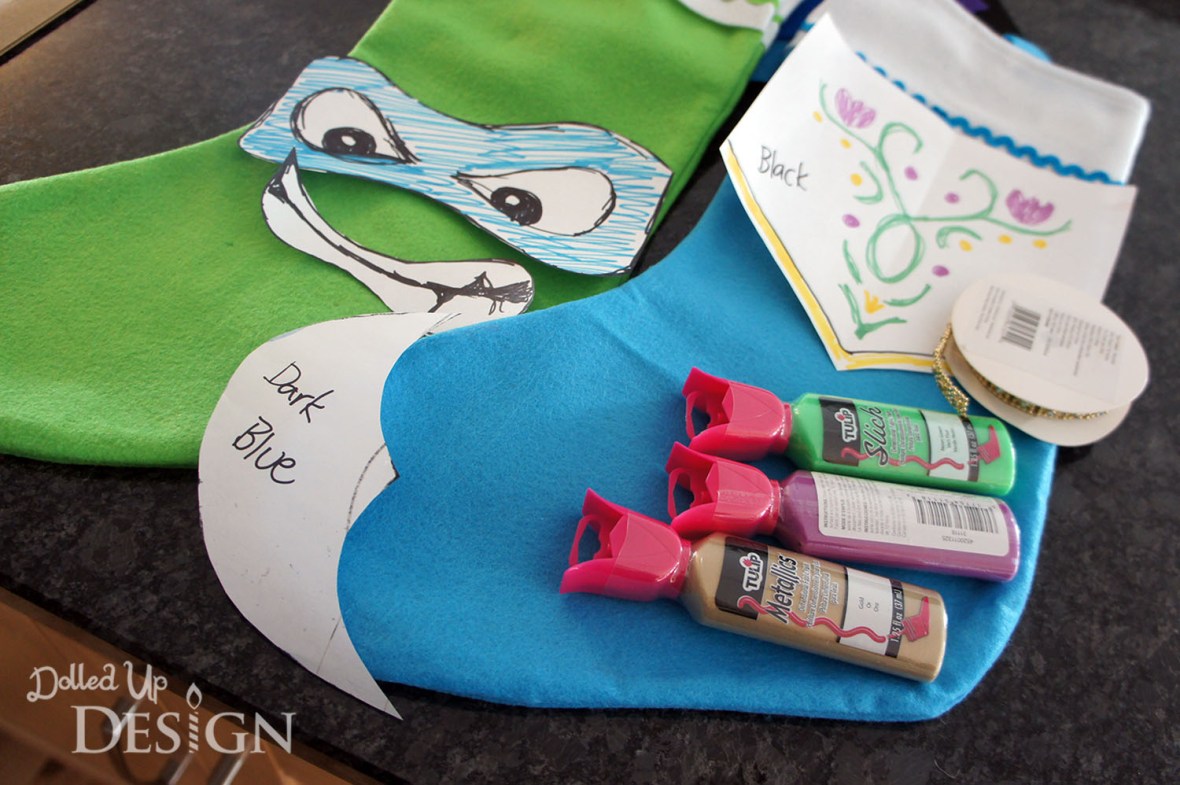
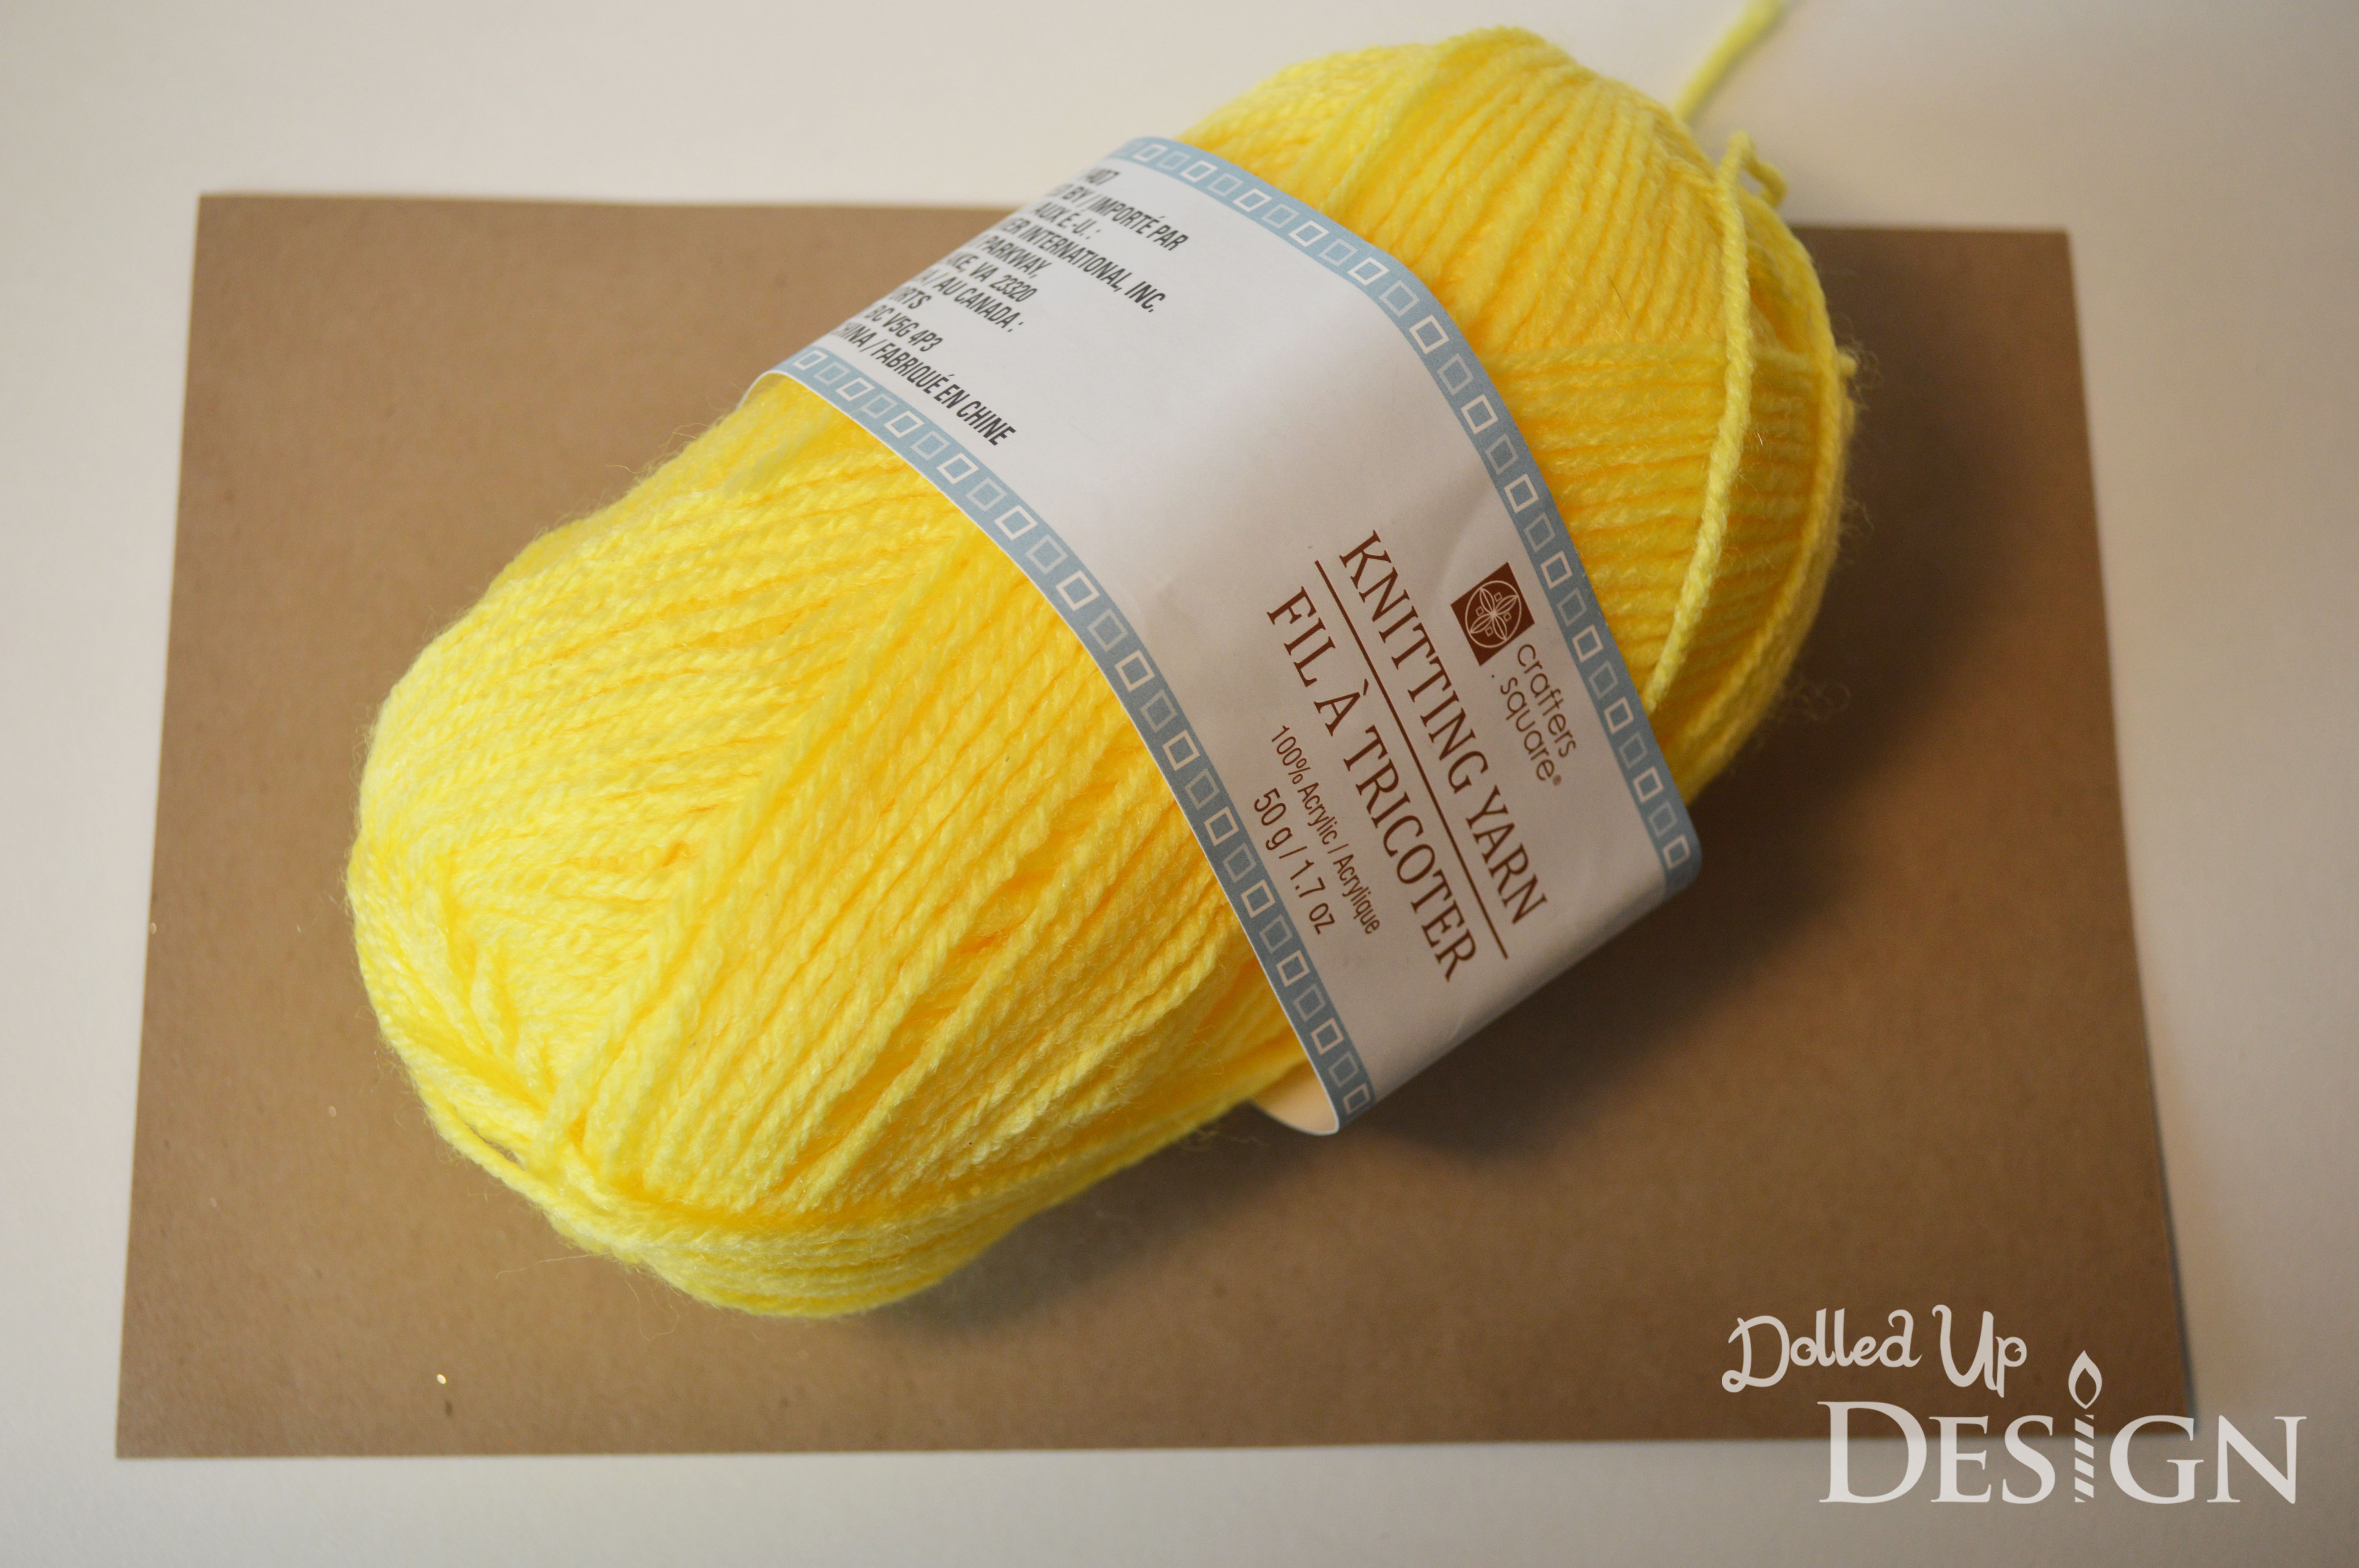
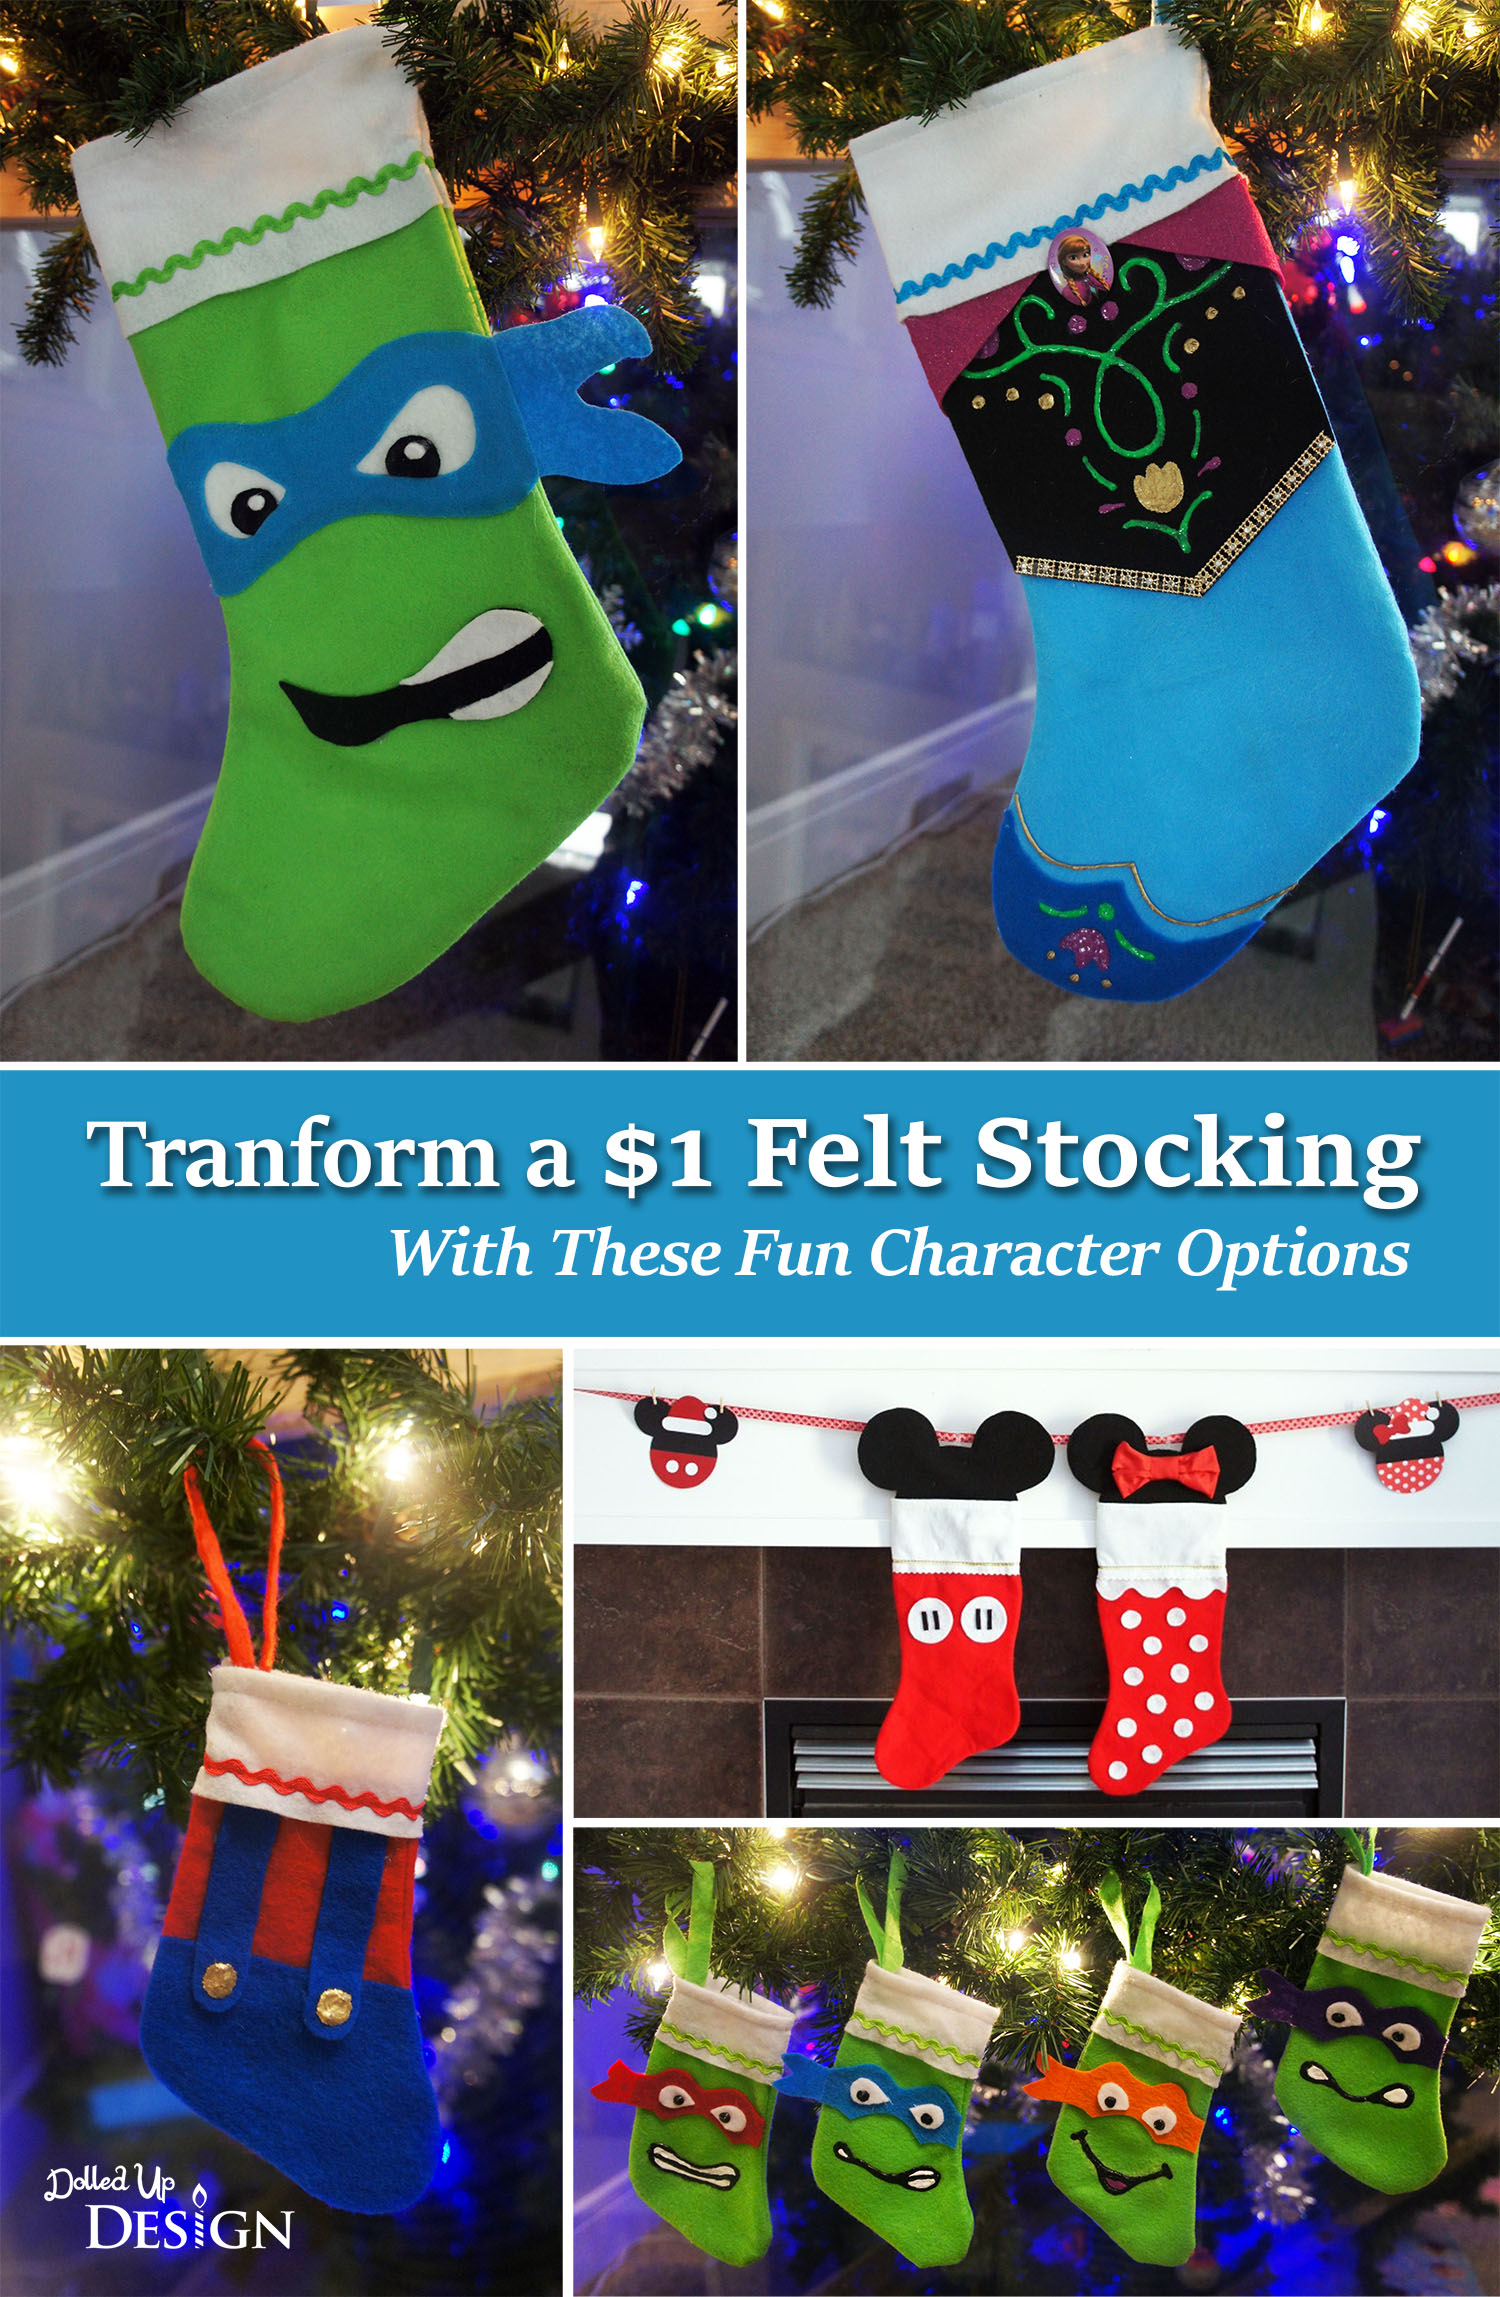
At $1 each, the basic felt stockings seemed like the perfect solution. Typically you can find them in red, but I was excited to see that Target had a few color options I could easily customize to create unique character stockings at a fraction of the cost. One quick (ha!) trip to Michael’s to load up on some sheets of felt, fabric paint and hot glue sticks and I was ready to get to work on my creations.
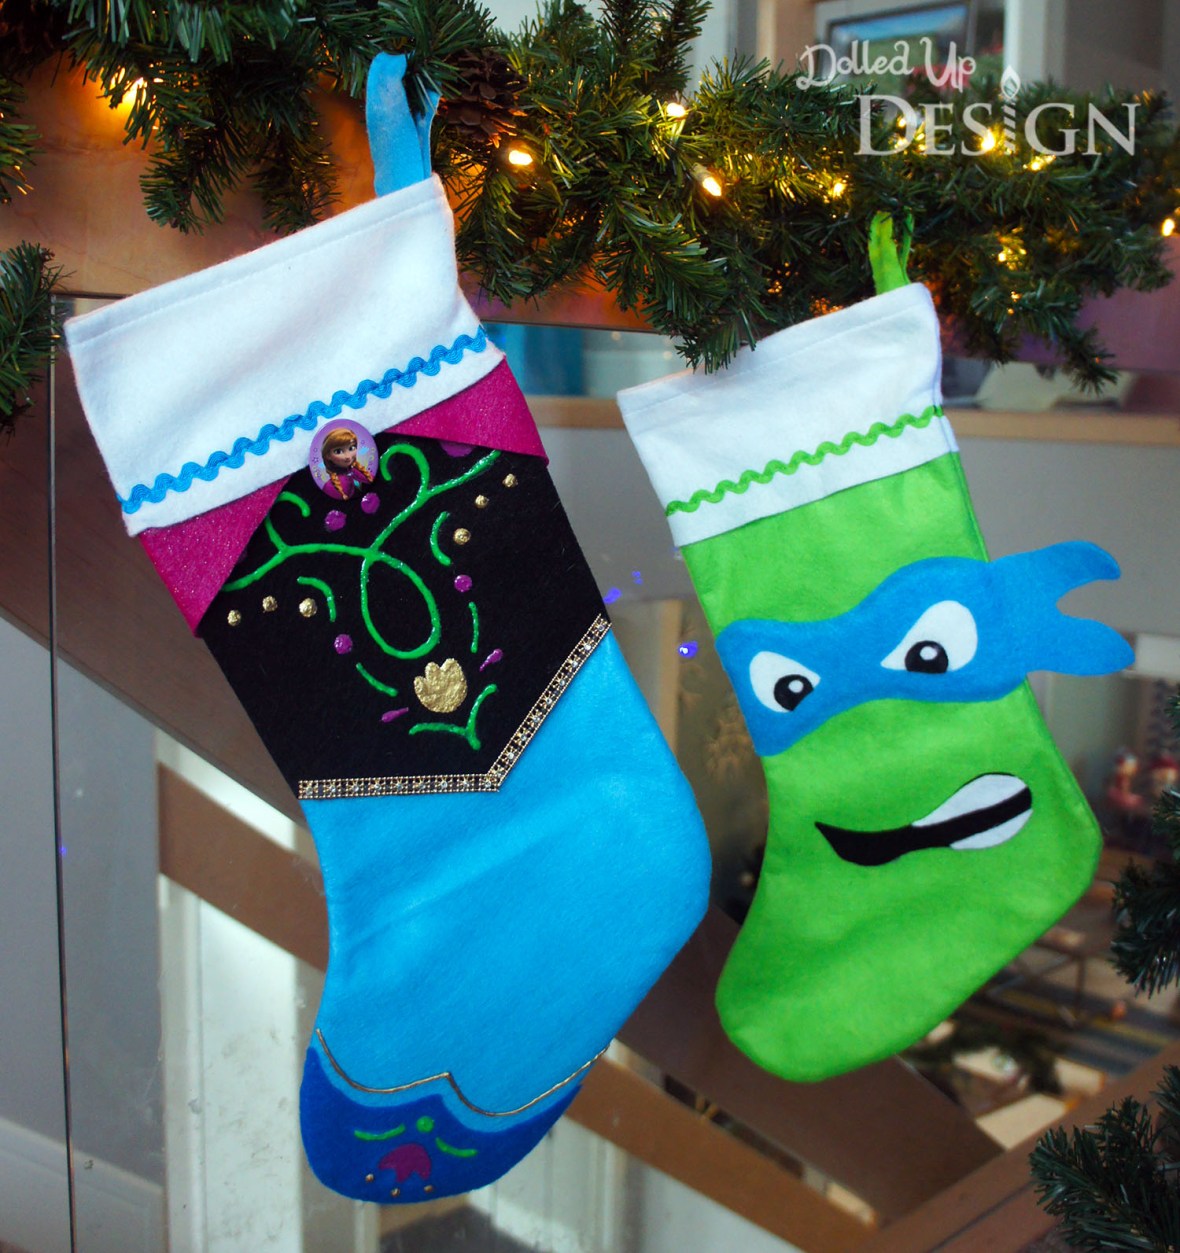
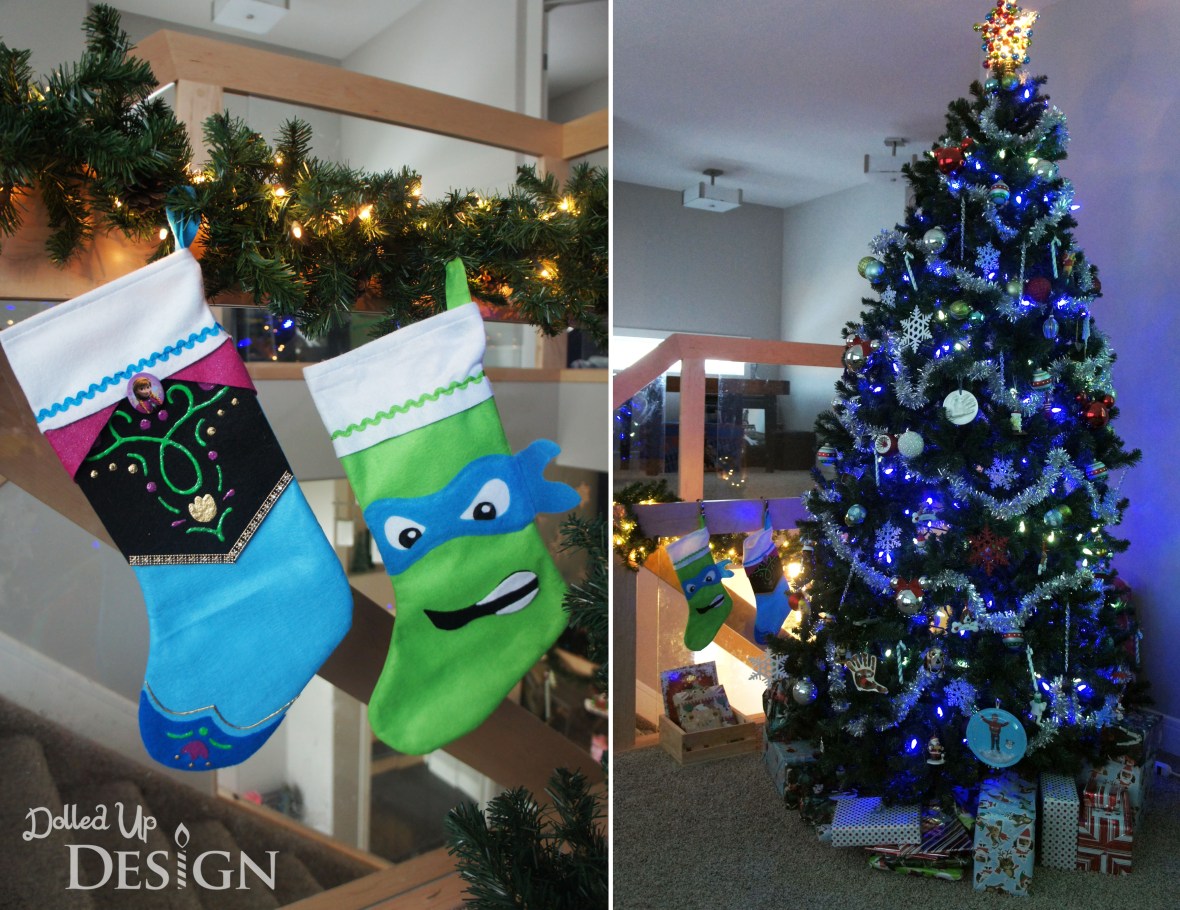
Leonardo Ninja Turtle Stocking
Using a bit of blue, white and black felt, this Ninja Turtle stocking couldn’t have been much easier. I began by tracing the sides of the stocking on plain white paper to make sure my mask template was the right size, and then sketched out a turtle mask. Once satisfied with my mask design, I used scotch tape to adhere the paper template to the blue felt and then cut around it with a pair of sharp scissors. I repeated the same process to draw and cut out the mouth pieces and eyes.
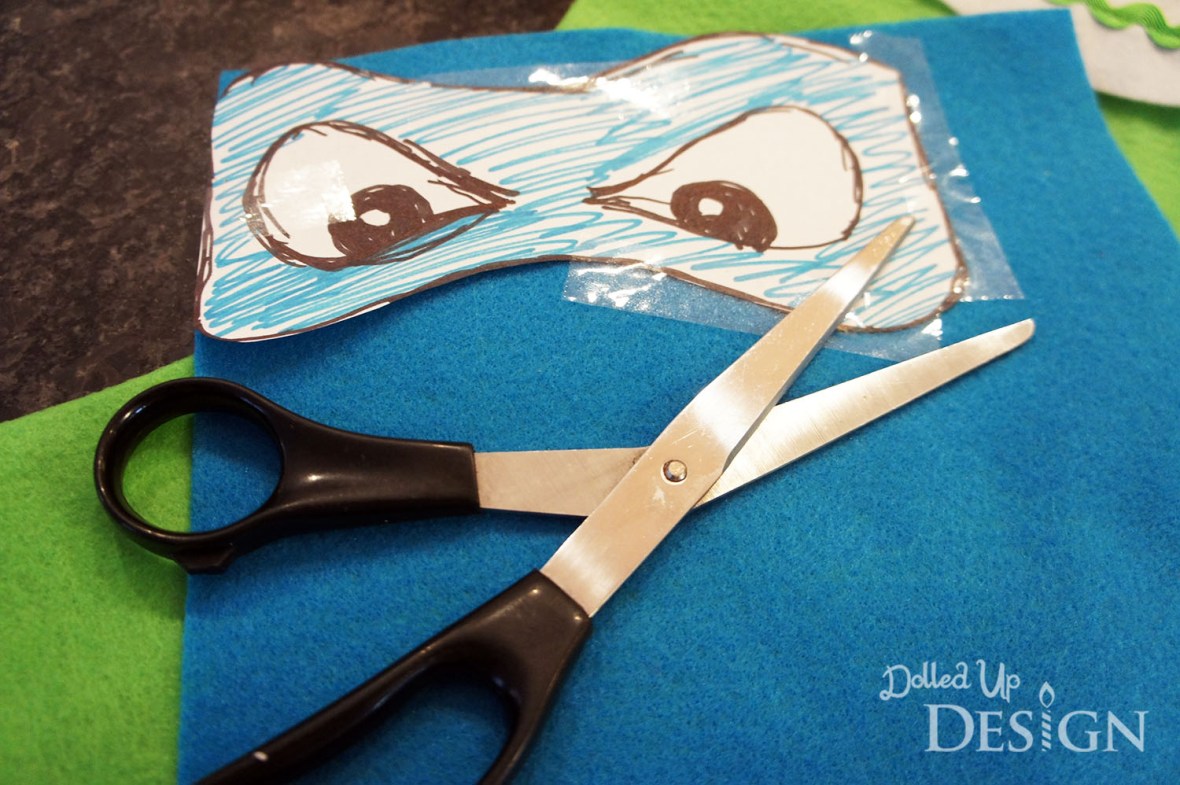
Once all my pieces were cut, I simply hot glued them all onto the felt stocking.
Michelangelo is my son’s favorite turtle so I am still not sure why he chose Leonardo for his stocking, but I was happy to oblige since he worked best with the red, blue and green color scheme I have been going for.
Mini Turtle Stockings
Once I had the idea to do the big Leonardo stocking for my son, I also spotted the mini version stockings on the store racks. They came in packs of 2 red and 2 green for $2.00 so I decided to grab two packs and attempt a full set of Turtle’s as part of a gift for my husband’s coworker.
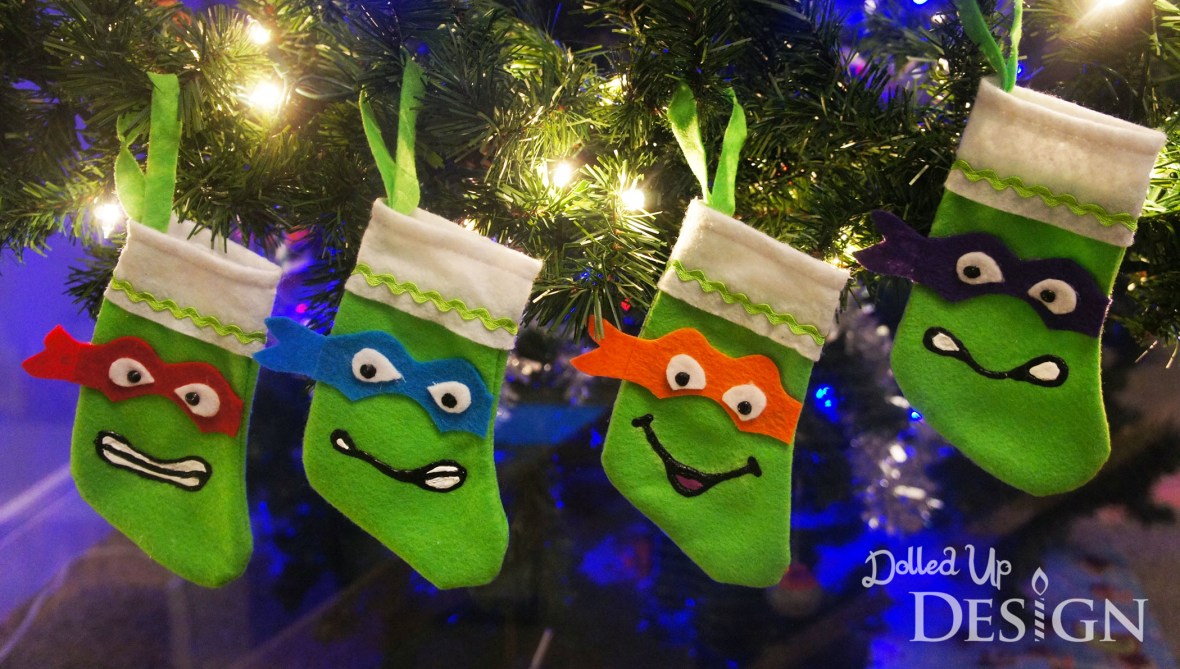
They were actually a bit harder to make because of all the tiny felt pieces to cut, but overall I am happy with the final set. The stockings are a great size to fill with chocolates, gift cards and other small treats.
Mini Mario Stocking
Since I already had the small red stockings that came with those I used for the Ninja Turtle set, I decided to make one into a Mario themed stocking for my son. This was the quickest of the stockings I made and would be cute for any Nintendo lover. You could even make one of the small green stockings into an accompanying “Luigi”.
I think I have way too many stocking stuffers for my as it is, so Santa may use this one as overflow and put some of the tiny Mario figures into it come Christmas Eve.
Frozen Anna Inspired Stocking
I picked up both a pink and blue stocking for my daughter because I still wasn’t sure what I was making for her when we were in the store. Like every other little girl, she is into Frozen this year and the majority of gifts going under the tree and into her stocking will be Frozen merchandise. The light blue stocking would have worked well with an Elsa twist, but I know her favorite character is Anna so I decided to use her dress as the inspiration for my stocking.
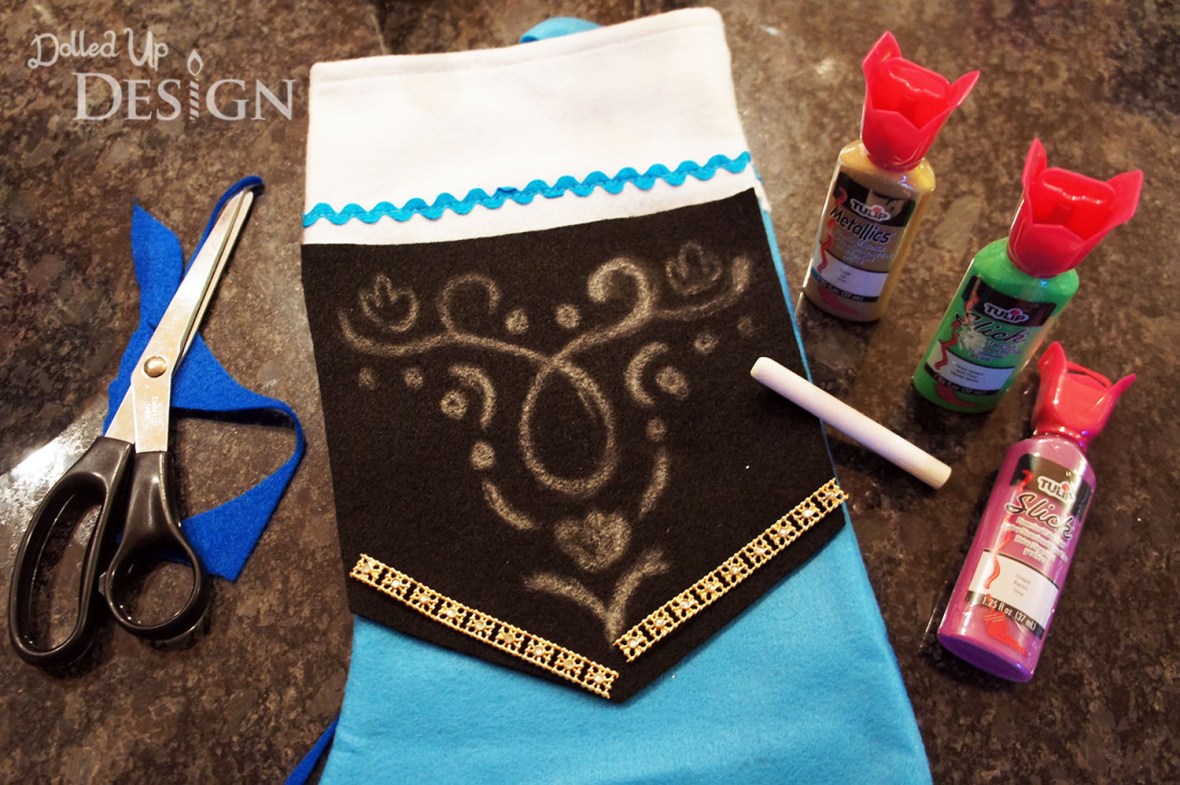
This stocking was a bit more complex then the Ninja Turtle one because it required fabric paint and a very steady hand to put the floral patterns on the dress. I used plain white chalk to draw the patterns on before tracing them out using Neon Green, Gold and Grape Tulip brand fabric paint. After letting the paint set fully overnight, I was able to easily wipe off the remaining chalk lines with a damp cloth.
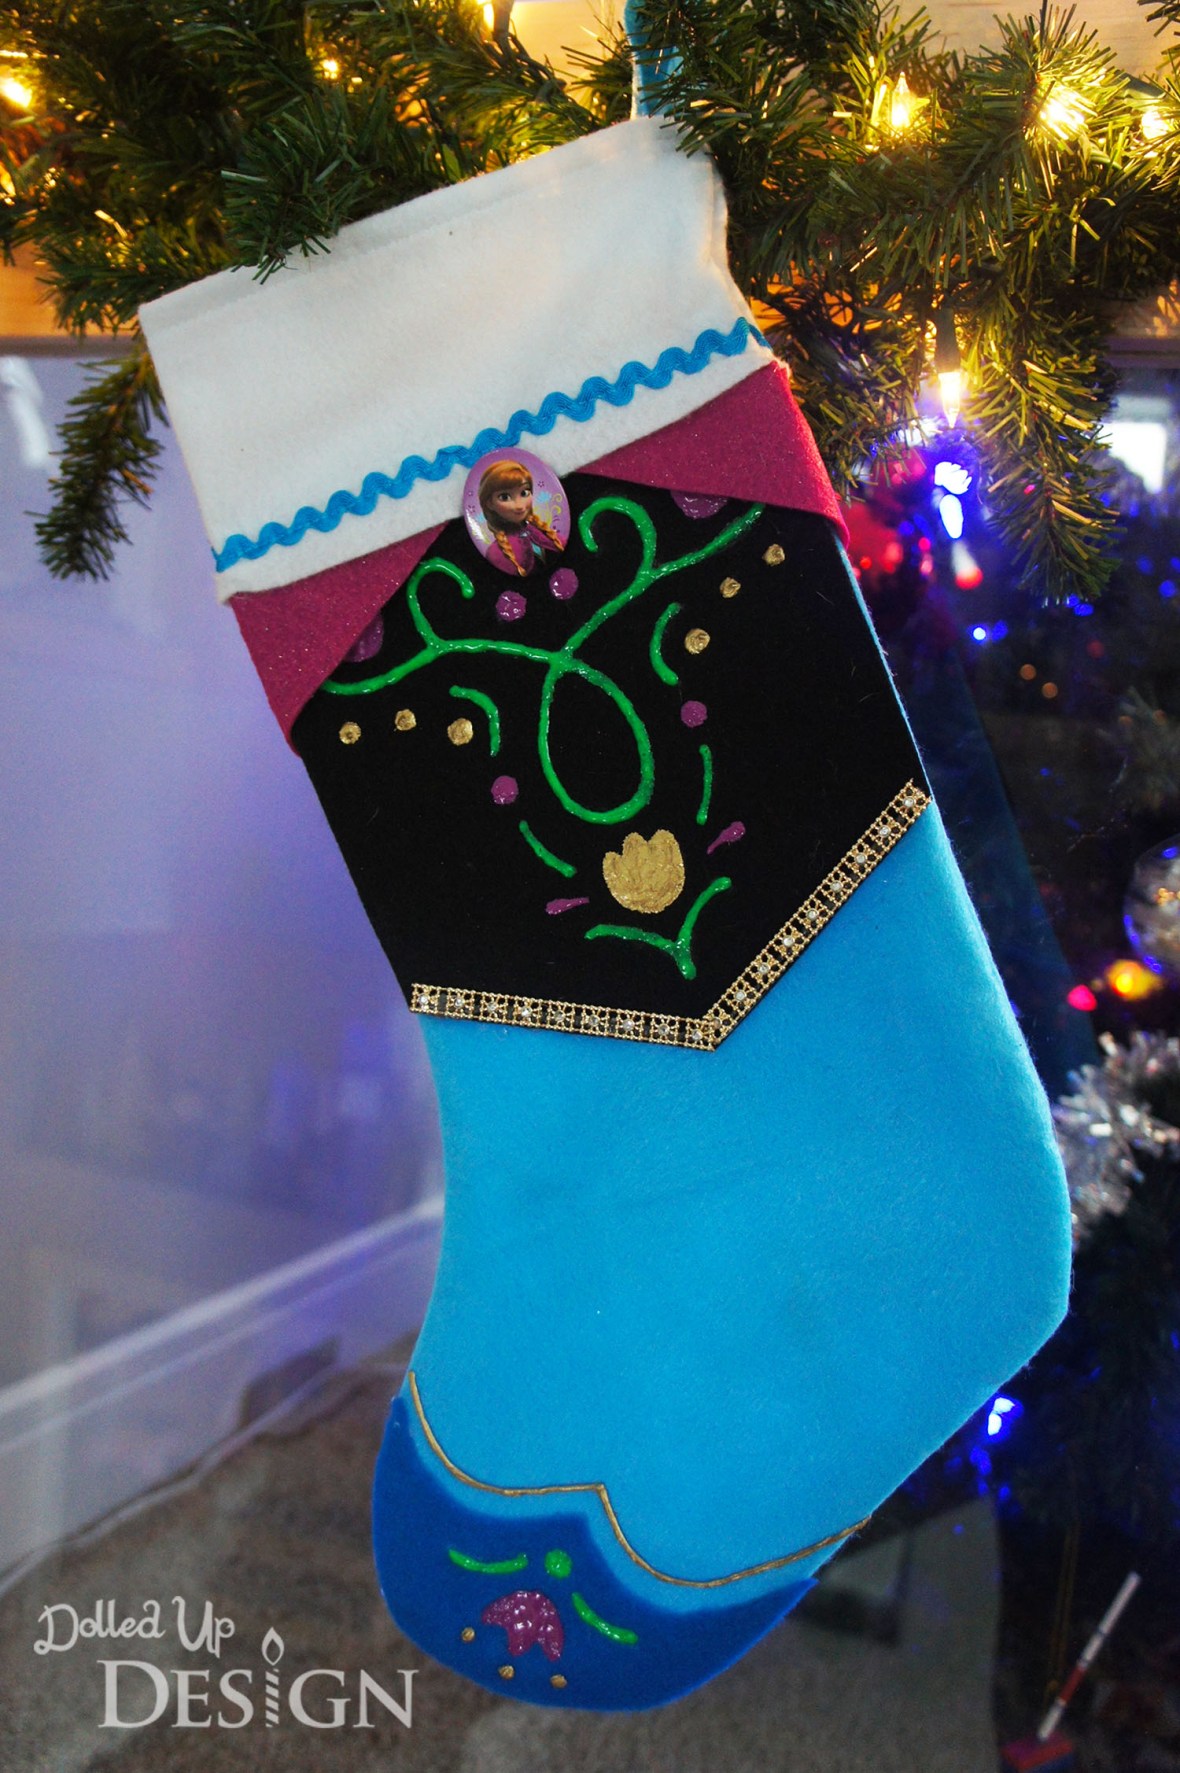
I hot glued the bodice and toe portion onto the stocking, and then embellished it with some gold beaded trim at the end of the bodice and wrapped a bit of sparkly pink felt around the top of the stocking to represent Anna’s trademark cape. The finishing touch was an Anna pin that I borrowed from one of the dress-up costumes Santa will be bringing her Christmas morning. The stocking is a little more figurative, but I think my Frozen fan is still very happy with the end result. Just wait until she sees what it will be filled with Christmas morning!
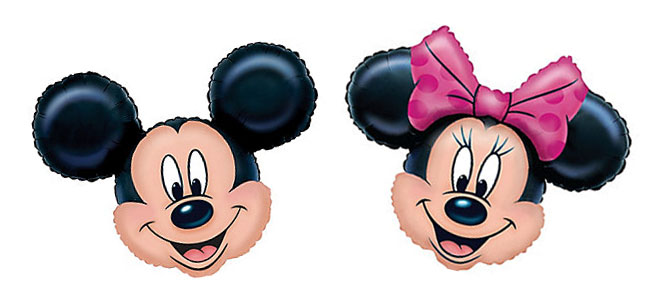
Mickey and Minnie Stockings
And just in case you missed the Mickey and Minnie stockings I made up last year, I am sharing them again as more inspiration for transforming cheap felt stockings. I actually made these using old red felt stockings I already had hanging around my house so all they cost me was the price of the sheets of felt!
You can read about how I created my Mickey and Minnie stockings here. I had actually already hung them up and was happy to use them again this year, but I am glad the kids convinced me to make new ones.
All in all my custom stocking took far less time then I was expecting and the end result was two very excited little kids. My head is already spinning with ideas for future stockings and I still have that pink one I might just try to turn into something Sleeping Beauty or Princess Peach inspired.
These would be cheap and easy gifts to make and fill for the favorite people in your life, and I love that the stockings come in both small and large versions depending on your gift giving needs. My stockings are just a small glimpse at the infinite possibilities out there if you are creative and willing to do a little cutting and gluing.
Happy Crafting!


