Celebrations, Parties

Quidditch Inspired Invites for a Harry Potter Themed Couples Shower

SONY DSC

Confession: I have never read Harry Potter.  I vaguely remember watching the first movie, but that was way back when it first came out and I couldn’t remember any of the details now if I tried.  The second closest I have come to having anything to do with Harry Potter was a small exhibit we happened upon in the Marseilles train station on our Europe trip in 2009.  Displayed within the different train cars were some cool props and memorabilia from the movie, but knowing very little about the series it was not much for me to get excited about.

HP_Potions

When my brother brought up the idea of helping plan a couple’s wedding shower for his bride-to-be and hinted that she would like a Harry Potter theme, I admit I was a little daunted and less then excited.  Then my Pinterest search skills took over and I quickly learned there was a lot that could be done with the theme – hello butterbeer, chocolate frogs, and a Honeydukes themed candy buffet!  I could go on, but I don’t want to spoil too many of the ideas I have in store for the happy couple.

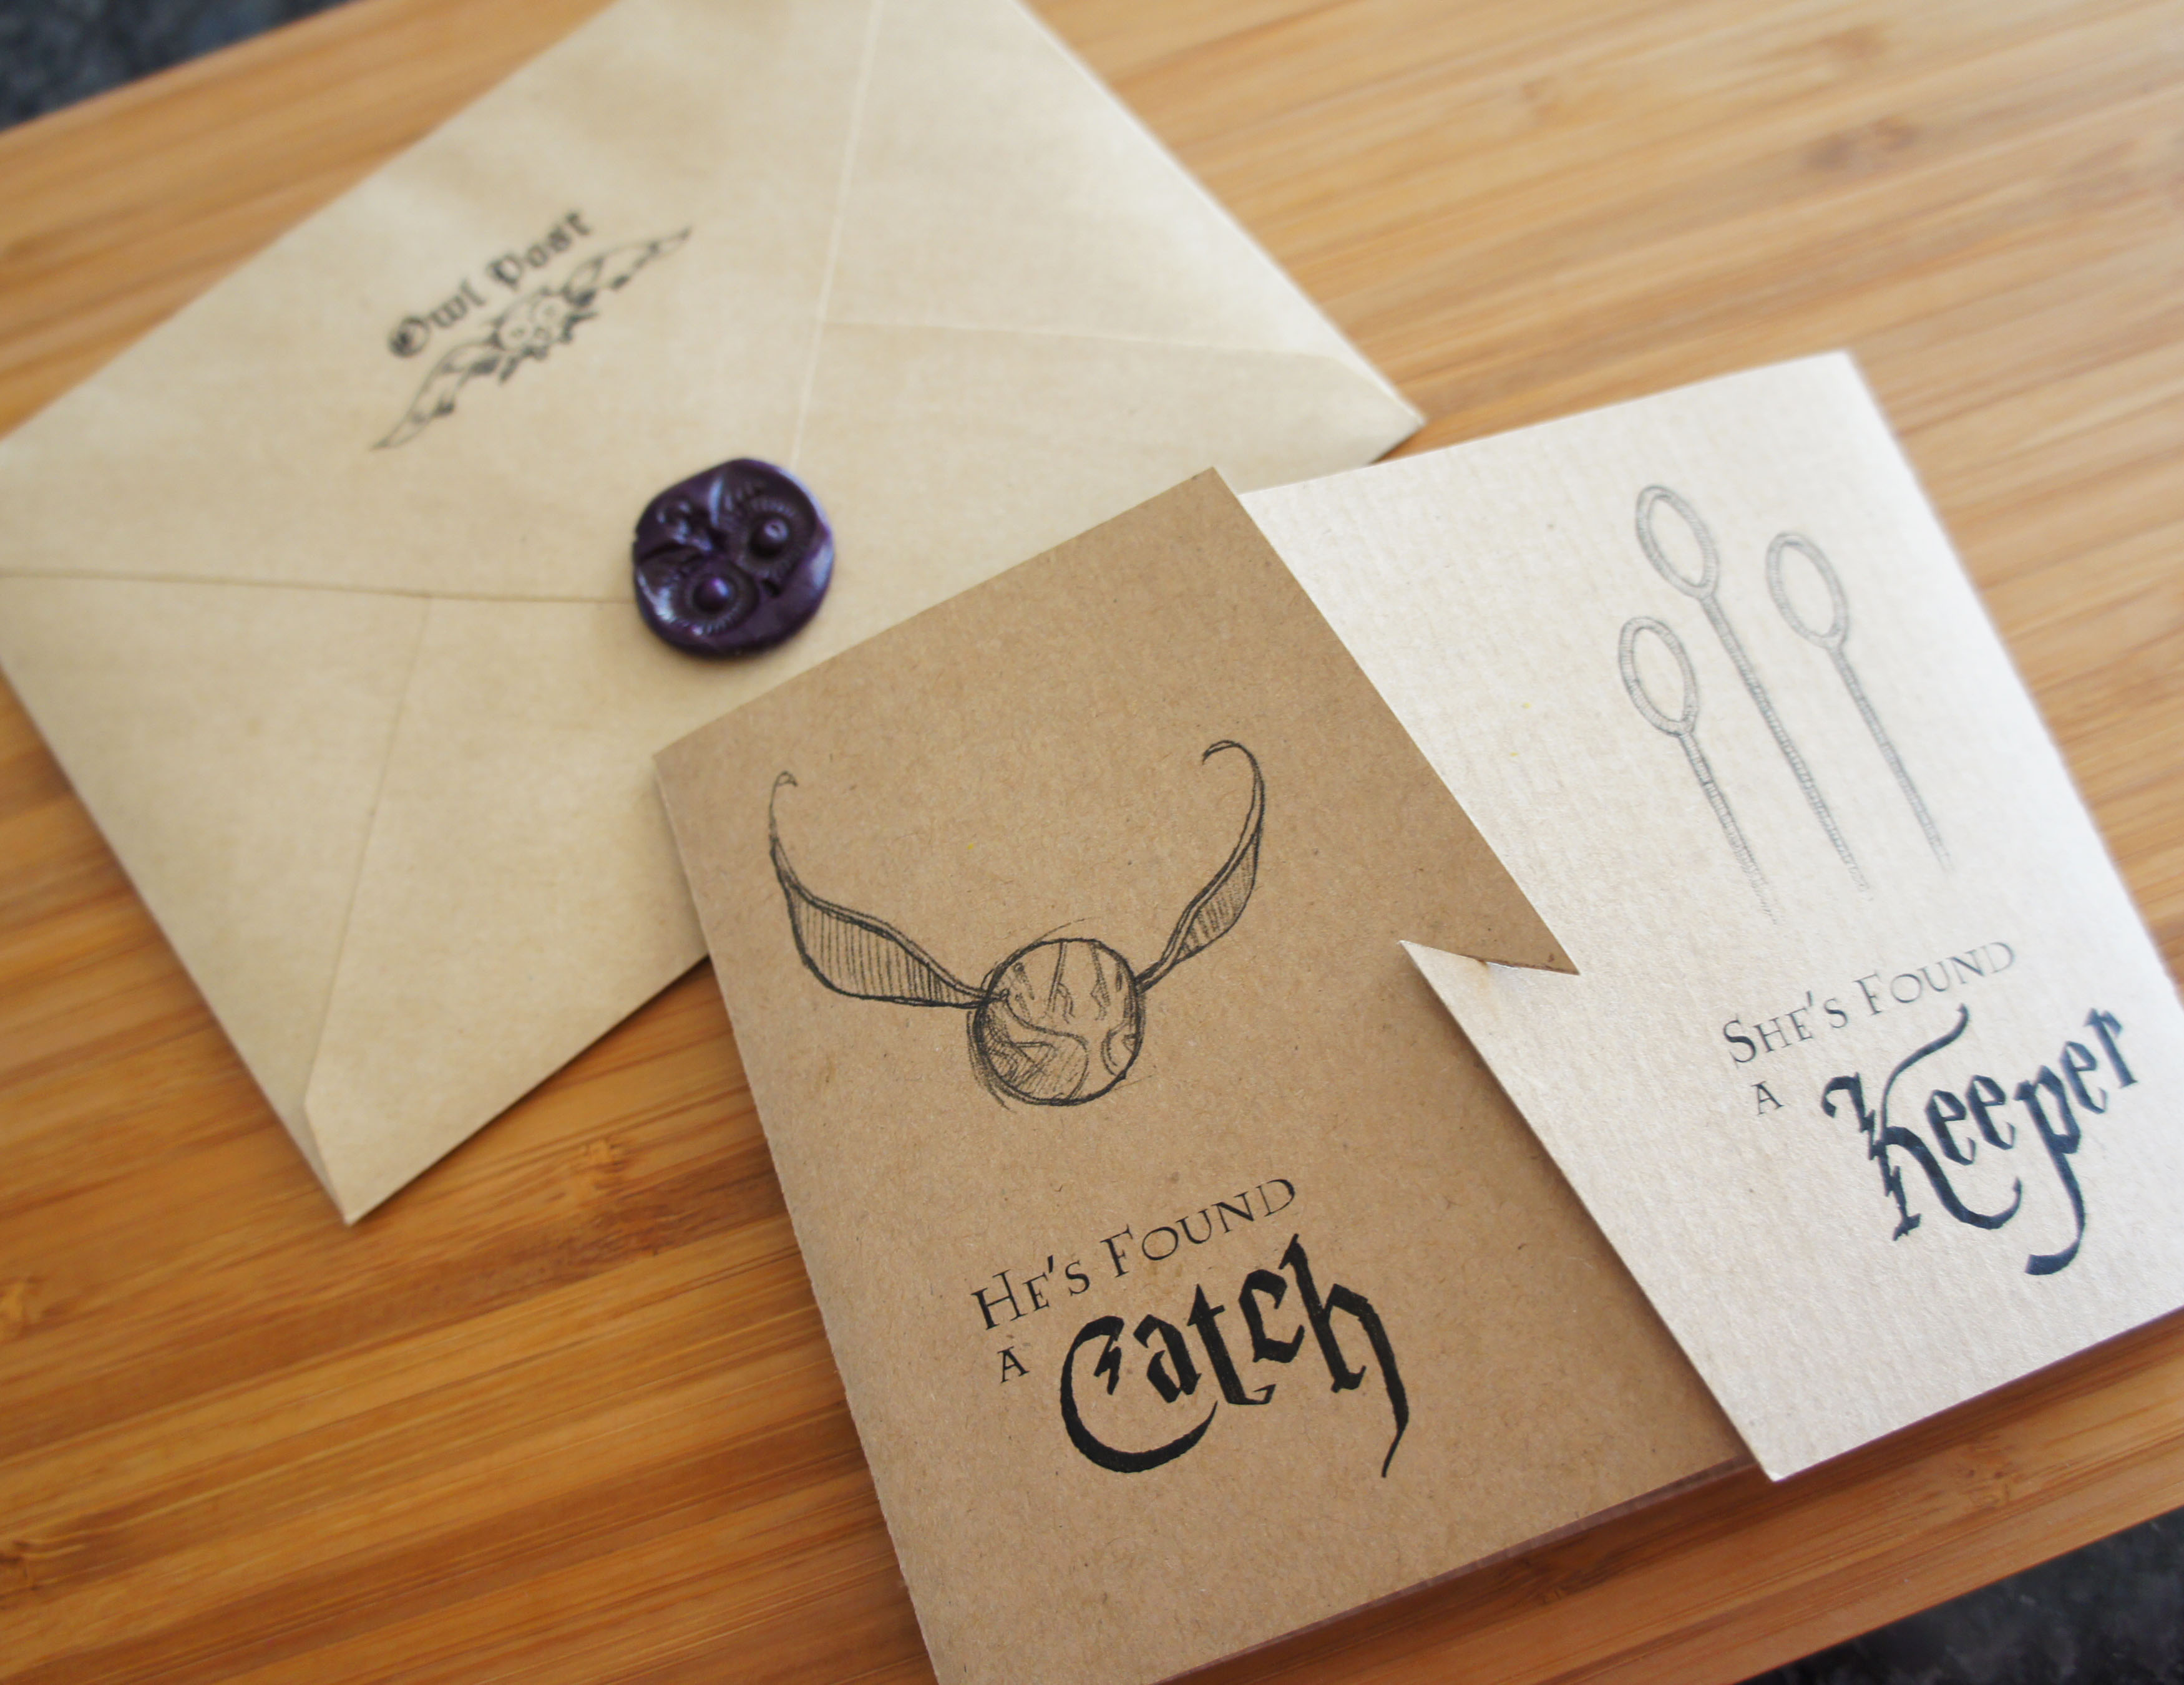
My original thought for the invite was to do something with owls, but in my Pinterest searches I came across these adorable quidditch mugs from TooLegitTooKnit on Etsy and knew right away it would work perfectly for the front of the invite.

Quidditch Mugs

Borrowing the idea, I split my invite down the middle and put “He’s Found a Catch” on one side with the complimentary “She’s Found a Keeper” on the other half.  To add interest, I incorporated an overlapping lightening bolt down the middle which both mimicked Harry’s birth mark and served as a way to close up the invitations.  They was a bit of a pain to individually cut and score with my exacto knife, but luckily I only had 14 of them to make up!

SONY DSC

SONY DSC

The lightening bolt closure opened up to the party details printed inside on clean white cardstock.

SONY DSC

SONY DSC

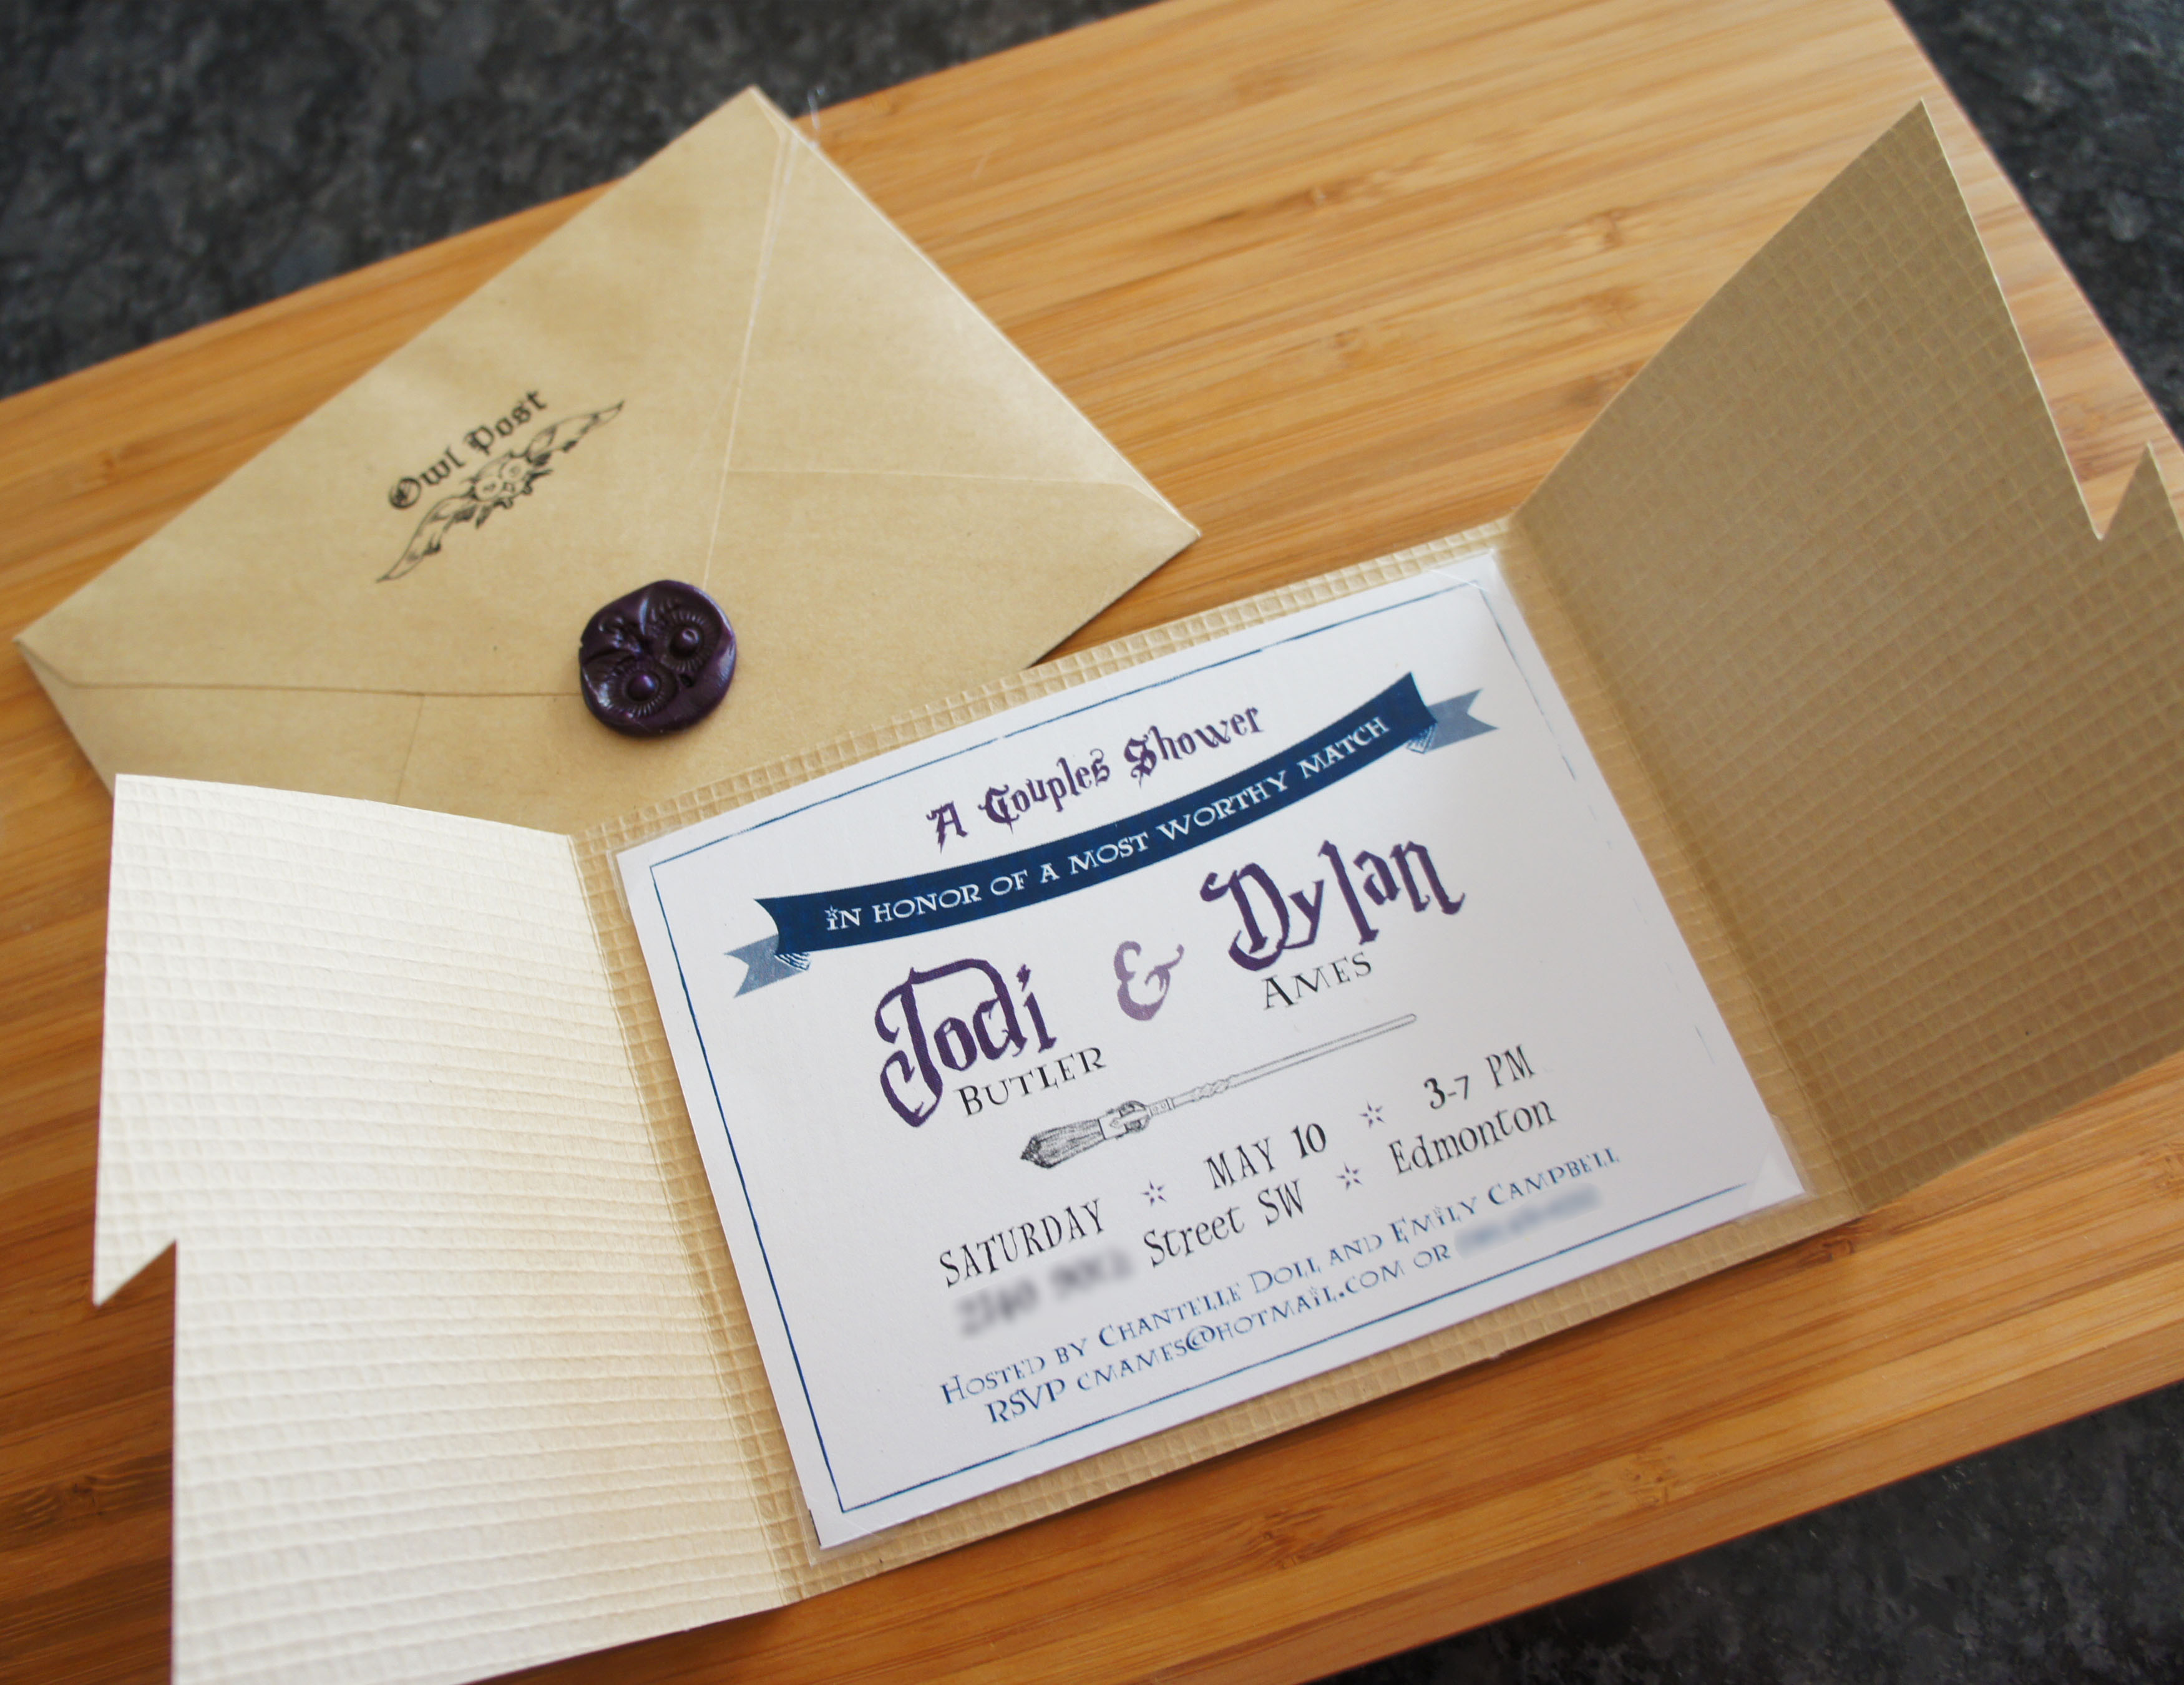
For the envelopes I was able to find some “Owlgram” graphics online that I printed onto the front and backs of the envelopes.  I had to print addresses on anyway, so this really didn’t take much extra effort and gave it that special touch.  I went with a rustic Kraft type envelope to match the paper of the invite inside.

SONY DSC

The maid of honor also suggested we do something with a wax seal and began to hunt high and low for a wax seal kit.  I did a quick search and came across Just Another Day in Paradise‘s post for her Harry Potter Birthday invitations  and was excited to see she was able to get the wax seal look easily with clay.  I ended up finding an owl pendant at Michael’s and used it to imprint into some purple Fimo clay.  I ended up baking my clay medallions and then hot gluing onto each envelope to make sure they survived the trip through the mail.

SONY DSC

I love the way these turned out and am excited to get going on all the other party details, even if I am a bit of a dummy when it comes to Harry Potter.

SONY DSC

I can appreciate the magic and wonder that comes with Harry Potter and I do hope to one day eventually read the books and watch all the movies with my kids.  I know many adults love the series so I can imagine it is that much better when experiencing it together through the eyes of a child!

____________________________________________________________________________________________________

There have been a few requests for the artwork files for these invites so I am providing them here for your use.  You can download the main cover artwork pdf here: HP Shower Invite Artwork_DolledUpDesign

I have laid it out on a legal (8.5″x14″) sized piece of paper and it is designed to be folded and fit neatly in a 5.625″ x 4.375″ envelope.

HP Invite Artwork

The inside details can be added to this high resolution jpeg: Print

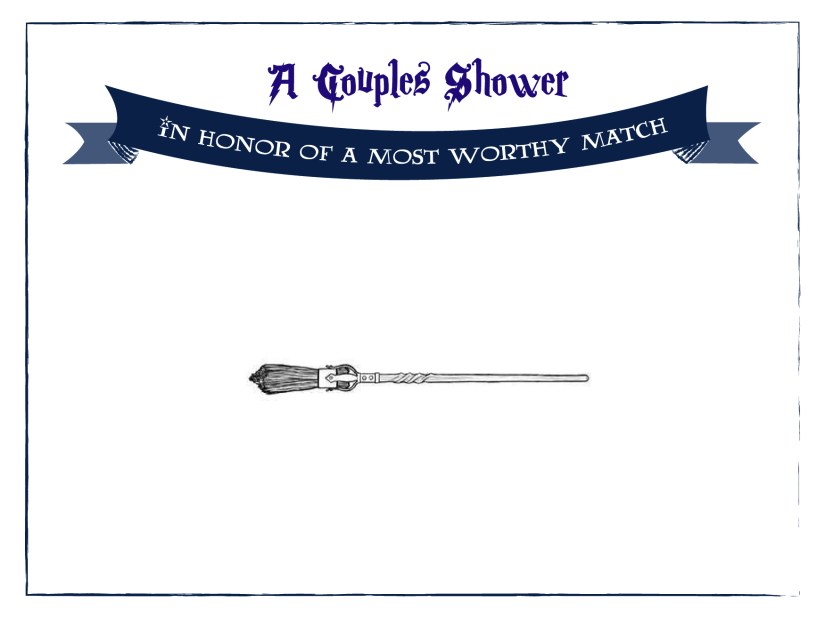
Final size should be 5″x3.75″ to fit neatly inside the above cover.

The fonts I used are:

And, finally, here are a few owl post seals to use on the envelopes:

HP Invitation_owlpostseal (2)

HP Invitation_owlpostseal (1)  HP Invitation_owlpostseal (3)

I appreciate all the positive feedback on the invitations and I hope this can help some of you create your very own!   Don’t forget to check out all my other Harry Potter party posts for other great food and decoration ideas.

Celebrations, Parties

Pizza and a Pinata for my Ninja Turtle Fan!

For the past few years, my in-laws have begun travelling south to warmer weather for 2 months out of the year.  I think it is amazing for them that they are able to do this, but it unfortunately means they miss out on some of the grandkid’s birthday celebrations, including Camden’s.  To make up for it, we usually have a special visit with them as soon as they are back from the States. Continue reading “Pizza and a Pinata for my Ninja Turtle Fan!”

Celebrations, Parties

An Olympic 4th Birthday Party for Camden

OlympicsPartyTitle

SONY DSC

Even though he wasn’t due until March, Camden came as a bit of an early surprise in February of 2010, right during the Vancouver winter Olympics.  My water broke but things were slow to progress so we spent time during contractions in the hospital’s family lounge watching Olympic figure skating and skiing.  Right after he was born, I was lucky to get one of the hospital’s luxury theme rooms which meant a TV to watch Team Canada play hockey while snuggling our brand new baby boy.

Because of this association with the Olympics and my fond memories of that time, I made the decision right after Camden’s third birthday that his 4th birthday should be Winter Olympic themed.  His actual birthday ended up falling on the same Sunday of the Sochi Olympics closing ceremonies so we had a Sunday morning brunch to celebrate.

I started off by designing the invite.  I kept it simple with a flat card that included a graphic image of my birthday boy:

SONY DSC

This was the first kids birthday I hosted outside the house and it ended up working out pretty well.  We rented out a large hall just blocks from our new home and I brought in the decorations, food and activities to keep the kids busy.

SONY DSC

This was my first time having actual seating for everyone so I took the opportunity to make nice place settings at each table.  I found some flag runners and matching plates I layered with gold star shaped dinner plates, Canada flag shaped napkins and small medals I made from ribbons glued to chocolate coins.  At the center of each table and on the food tables were gold colored cardboard trees I found on clearance at Target after Christmas – it always pays to know your party theme well ahead of time and be on the watch for clearance items that might fit the décor.

SONY DSC

Above the cozy fireplace, I hung both the large Olympic Rings Display I crafted out of plumbing insulation tubes and streamers, and the Olympic party banner I designed.

SONY DSC

For food, I had both a brunch foods table and a sweets table.  For the brunch items we had bowls of fruit in the Olympic ring colors, fruit and yogurt parfaits, sugared bacon smokies, raspberry cream cheese french toast roll-ups, mini quiche, 2 bite cinnamon buns and 3 types of muffins (chocolate banana swirl, Orange Pineapple, and Almond Raspberry).

SONY DSC

To display my mini cinnamon buns and muffins I constructed large mountain shaped stands out of dollar store foamcore.  They were a little time consuming to build, but I think the final result was worth it and I will definitely be using the idea again for future parties.

SONY DSC

For the sweets table I had sugar cookies I decorated with M&M’s to represent the Olympic rings, small cups of hot chocolate mousse and edible curling rocks I fashioned out of two bite brownies, some colored melting chocolate and candy rings.

SONY DSC

SONY DSC

SONY DSC

And, of course, there was also birthday cake.  I kept the outside plain and simple, with the surprise being the 5 layers inside colored to match the Olympic rings.  Camden loved his “rainbow cake” and I think it is one of the tastiest cakes I have made to date.

SONY DSC

At the “Decorate Your Own Medal” table, the kids had a fun time stringing colored pasta and a juice can lid on ribbon to craft their own Olympic medal.

SONY DSC

To keep the kids entertained, we also brought in our bouncy castle and set up a set of mini hockey nets with sticks and balls for them to play.  The bouncy castle, by far, was the most popular activity at the party!

SONY DSC

One activity that wasn’t such a huge hit was the Pin the Rocks on the rings game.  The kids all took a turn, but it didn’t turn out to be as exciting for them as I thought it might be.

SONY DSC

For favors, I ended up getting a good deal on mini hockey sticks and balls at the end of summer and  bought enough for each kid to play with at the party and then each take one home.  I continued with the hockey theme in the treat bags and included a small Zamboni toy I found at McDonalds, a foam hockey ball and a small bag of hockey played shaped candies I finished off with a personalized topper.

SONY DSC

It ended up being a crazy hectic weekend for us between getting possession of our new house on Friday and then hosting the party on Sunday, but it all worked out and I was happy to have the chance to celebrate my little boy with family and friends.  I was told the kids all went home exhausted and one of the 3 year olds was even so kind as to tell me it was “the best party ever!”

SONY DSC

I can’t wait to start planning for next year!

Celebrations, Crafts, Little Hands, Parties

Juice Can Lid Olympic Medals

OlympicsPartyTitle

I have to admit I am a little conflicted over whether to share my party projects or to keep them all as a surprise for my party guests who follow the blog.  Lucky for those not coming to the party, I have decided to share my ideas right away and give you time to do it yourself before or during the Olympics.

Today I am sharing a simple Olympic medal craft I have planned for the kids coming to my son’s 4th birthday party.

SONY DSC

Supplies

  • Frozen juice can lids (1 per child)
  • Stickers for decorating
  • String or ribbon
  • Dried pasta with holes (rigatoni, penne, etc.)
  • Rubbing alcohol
  • Gel food coloring
  • Zipper seal bags

I came across the idea to use frozen juice concentrate lids as medals when I was searching Olympic ideas on the internet.  I could have just strung the medal on a thick ribbon, but I decided the craft needed a little more to it to help keep the kids busy.  I came across this Fantastic Fourth Olympic Party  from Put a Bow on It where she had pasta necklaces as an activity for the kids and decided to borrow the idea for the ribbon portion of my medals.

I have never made colored pasta before and was surprised at just how easy it is.  All it took was some rubbing alcohol, gel food coloring and dried pasta mixed up in a plastic bag and I had colored pasta.  For each color I used approximately 2 tablespoons of rubbing alcohol, about 1/4 teaspoon of gel color and 2 cups of pasta.  I double bagged the pasta, as was recommended by Mommy Testers in their How to Make the Best Dyed Pasta tutorial, and then laid the colored pasta out on paper towel lined baking sheets to dry.  I then repeated for each of the 5 Olympic ring colors.  Luckily I needed the gel colors anyway for the cake so I wasn’t buying too many extra supplies for this project.

SONY DSC

Once I had the pasta prepared, I had my husband help drill a hole through my juice can lid and prepared a sample medal for the party.  To decorate the medal juice can lid portion, I used star shaped stickers I found from Dollarama and then strung the pasta on a ribbon I strung through the drilled hole.

SONY DSC

Camden seemed pretty excited about the finished medal so I am hoping the little Olympians at our party have just as much fun creating their own to wear!

Celebrations, Parties

Olympic Rings Display

OlympicsPartyTitle

I have rented out this beautiful space to host my son’s 4th birthday:

SummersideBeachHouseCropped

I love the stone fireplace and think the ski lodge type vibe it gives off works absolutely perfect with the Winter Olympics theme I have chosen.  It is, however, begging to be Dolled Up with a bit of decoration over the mantle – cue another DIY project!

SONY DSC

Supplies

  • 5 pieces of foam plumbing insulation tubing (found in the plumbing section of Home Depot or Lowes)
  • Sharp serrated kitchen knife
  • Crepe paper streamers in Olympic colors (blue, yellow, red, green and black)
  • White glue
  • Hot glue or wire to attach together

SONY DSC

1.  Gather all your supplies.  I recommend Dollar Tree to find your streamers – I ended buying my streamers from Target, Dollarama and Party City because none of the stores had all 5 colors.   Dollar Tree had all colors when I stopped there a week or two later.

SONY DSC

2.  Cut your plumbing insulation tubes down to your desired hoop size using a sharp serrated kitchen knife.  If you make perpendicular cuts, the ends will not fit together to form a nice round hoop – you can see the angles I cut mine at in the picture.  Once you have one cut to the desired size, use it as a template to cut the other 4.

I first considered using pool noodles for this project after seeing inspiration on pinterest, but I found that they were too thick and stiff to bend into a nice circular shape.  The plumbing insulation tubes ended up working perfectly and cost me no more then the Dollar Store pool noodles.

3.  Tape your hoops together using strong tape such as duct tape, packing tape or tuck tape.

SONY DSC

4.  Select a color of crepe paper streamers and begin wrapping all around your hoop.  I didn’t bother gluing at the beginning because it held pretty well once I just overlapped the streamers.

5.  When finished wrapping, apply a small amount of white glue to the end of the streamer to secure in place.

6.  Repeat the wrapping and gluing process with each of the other colors on your remaining hoops.

SONY DSC

7.  Attach all hoops together using thin gauge wire or hot glue.  I haven’t actually decided which method to use for mine yet, but the hot glue gun tends to be my go to.

SONY DSC

And there you have it – an Olympic logo decoration for your party!

I did end up with a lot of leftover streamers so I think I will find a rainbow inspired craft to do with my playgroup kids to use them up.

Celebrations, Parties

Olympic Party Game: Pin the Rocks on the Rings

OlympicsPartyTitle

At 4 years old, I think we are finally to a point where I can begin planning some small games and activities for my son’s birthday parties.  In the past it has just been a free for all with his toys, but this year I wanted to plan a few fun things that related to my theme.

Pin the Tail on the Donkey is a pretty common party game but I decided to give it my own Olympic spin by making it curling themed.  My husband is a curler and the kids and I often spend time at the rink watching him play so I figured this was something fun my birthday boy would recognize and enjoy.

To make the board, I simply created a curling ring design and will be printing it as a 16×20″ print ($8.99 through the Costco Photo Centre).

Pin the Rocks on the Rings Board

The rocks are sized on 4×6″ sheets so they will be printed as standard photos and then cut out.  I will attach double sided tape to the backs before the party so we are all ready to play the game.

Print

For your own game of Pin the Rock on the Rings, please click on each of the images above  and save as a jpeg to your own computer for printing.

Enjoy!

Celebrations, Crafts, Parties

Free Printable: Winter Olympics Party Banner

OlympicsPartyTitle

My little guys Olympic themed party is just over a month away so I have begun work designing printables for the party.   I usually like to do a banner of some sort and when I saw these icons for the Sochi Winter games I knew they would look great as a banner great strung across a table or mantle.

SochiIcons

I selected 10 of  the icons and then put them against the bright colors of the Olympic rings.

WInterOlympicsBanner

And here they are printed and strung up, all ready for the party:

SONY DSC

To print your own, please follow this link for the artwork: OlympicsBannerPrintable_DolledUpDesign

OlympicsBannerImageFinal


Enjoy!

Our Forever Home, Parties

It’s the Final Countdown!

Break out the moving boxes!  After months of anticipation, we final got our notice of possession from our home builder today.  As of February 20th, our Forever House will be all ours.  What once just seemed like a completely unrealistic dream will now be a full fledged reality, and I couldn’t be more excited.  Never did I think we would be able to make the move into an amazing house like this!

I posted an update with plumbing fixtures just the other day and my husband was onsite again today and was able to capture this picture of the hickory hardwood going in on our main floor:

Floors

It is gorgeous and I can’t wait to see it in person.

And since the packing, organizing and cleaning simply isn’t enough to keep me busy over the next month and a half, we are also counting down the last days of Camden being 3 and will be celebrating his 4th birthday just 3 days after we get possession!  I have been pinning ideas for the past year and have a good idea of what I want to do, but it is still going to be a lot all at once.

His actual birthday falls on Sunday, February 23 which also happens to be closing ceremony day of the Sochi Olympics so we are working with a Winter Olympic theme.  I have booked the hall, ordered the invites and managed to get the majority of the supplies bought for the DIY projects I am planning so I am still feeling pretty confident I will be able to pull off an awesome party.

I will try my darnest to share some of these projects in the upcoming weeks when I am not packing or dealing with the normal day to day of being a mommy.  For now, I will leave you with a sneak peek image from the invite:

OlympicSticker

Please visit my Olympic Birthday Party Pinterest board to see my inspiration and ideas for the party!

Celebrations, Four Legged Fun, Two Legged Fun

All I wanted for Christmas and more!

Christmas has come and gone so I figured it is about time I get back to posting.

We had a great Christmas! This year there were very few gifts under the tree for myself, but it was absolutely perfect. As lovely as the new cookware I received from my own mom and my mother-in-law was, I was way more excited to see what the kids got and their reactions to all the new toys and books. Christmas has definitely changed in our house and I am very happy to have it now be all about the kids.

SONY DSC

Well, maybe not ALL about the kids – the dogs didn’t get forgotten either.

SONY DSC

It was Rumbull’s first Christmas and it didn’t take him long to sniff out his stocking and figure out what was up.  He watched longingly as we set the gifts out on Christmas Eve and he was the first “kid” up Christmas morning wanting to get into the pile.

Thanks to our Christmas Book countdown, my 19 month old also had the unwrapping thing down pat.  On Christmas Eve, she was raring to go the moment we got to Grandma and Grandpa’s and she saw the pile under the tree.  She was even lucky enough to get the biggest gift under Grandma and Grandpa’s tree – a Little Tikes Cozy Truck!

SONY DSC

The bottom right picture is a bit blurry, but I included it because it captured my favorite Christmas memory.  Camden had been asking for a Vtech Switch & Go Dino since October so he was ecstatic that his gift from his little sister was the triceratops.  We asked him to thank her and he gave her the biggest hug I have ever seen.  Melt my heart!

The kids were both asleep by the time we got home from opening gifts on Christmas Eve, but that made it easy for Santa to get everything set out for round two on Christmas morning.

SONY DSC

In the morning, Camden was very excited to find that Santa had eaten his cookies and had a drink of milk.  He immediately went for his stocking and started opening it all before I could even convince him to wait for his sister.

SONY DSC

Between ourselves, grandparents, aunts and uncles, the kids were definitely spoiled, but Camden did a good job thanking everyone and acting grateful for all his gifts.

Unfortunately we saved the best item for the very last and the reaction to his brand new iPad from daddy was less then we were hoping for.  Instead of being over the top excited, he acted sad that we were replacing his old, shattered iPad.  Luckily, it only took a few minutes of coaxing and walking him through the new iPad for him to understand that it still had all his same apps and that he wasn’t losing anything by giving up the broken tablet.  As was expected, it is now his favorite gift!

SONY DSC

My husband and I made the decision not to bother with gifts to each other since we have a lot of items to buy for the new house in the upcoming months.  I certainly didn’t feel like I was missing out by not having something to unwrap from him and we made up for it by picking up a few nice things on boxing day.  Except for some boxing week shopping, we stayed home for much of the Christmas break and had a very lazy two weeks watching movies and keeping inside out of the cold.

It was a nice Christmas and I am hoping next year will be that much better with everyone settled into our new house. The only thing really missing was my sweet Bullini, but she certainly was not forgotten amidst all the chaos with a special place on the mantle.

SONY DSC

I hope the 2013 Christmas season was just as Merry for all of you!

Big Hands, Celebrations, Crafts

And the Mickey and Minnie Stockings were hung by the chimney with care…

SONY DSC

My daughter’s stocking last year was a small pink “Baby’s First Christmas” stocking with a teddy bear on it.  It is cute, but no longer appropriate.  I am on the hunt for a set of matching family stockings, but since I still haven’t found anything I love I needed a solution for a stocking for Keira to use this Christmas.  I have seen a few different styles of Disney themed stockings in stores and cute versions on Etsy, but decided I could come up with something I liked better and would probably cost less.

I think these may be my favorite thing I have created for our Mickey and Minnie themed Christmas.  They turned out a lot nicer then I expected and total cost to me was less then $3 for the black and white felt I bought to cut out the embellishments.  I was lucky and already had the stockings from a Christmas advertisement I had created for work several years ago, but you can buy these basic felt stockings for around $1 at any Dollar Store or Department store such as Walmart. Continue reading “And the Mickey and Minnie Stockings were hung by the chimney with care…”