Big Hands, Celebrations, Crafts

Mickey Paper Wreaths

SONY DSC

We have a very large corner mantle over our fireplace that normally gets filled by my Christmas village for the holiday season.  I absolutely love my Christmas village, but each building is boxed up individually and it is a ton of work to bring up from the basement, set out and arrange.  Just like a lot of the other Christmas décor, we decided to keep the Christmas village packed up and that left me to figure out a new way to decorate that space for the holidays.

SONY DSC

My initial idea for the mantle was to do a large wreath.  I had seen other crafters versions where they had various sized artificial wreaths zipped tied together to form a Mickey shape and thought that would be easy enough.  Unfortunately I didn’t have any luck finding smaller sized wreaths for ears, so I went to my plan B which was to buy foam wreath forms from Michaels and wrap them in green garland.  Well, the price on the styrofoam shapes was more then I was expecting so I decided it just wasn’t worth it and moved on to a plan C  – cutting and crafting my own paper wreaths from Dollar Store posterboard.  And, because I had done Mickey and Minnie versions of everything else, it only made sense that I would make 2 versions of the wreaths.

A paper wreath is nice and all, but I was worried it still was going to look pretty plain.  I needed some way to dress them up and that is when I recalled these:

SONY DSC

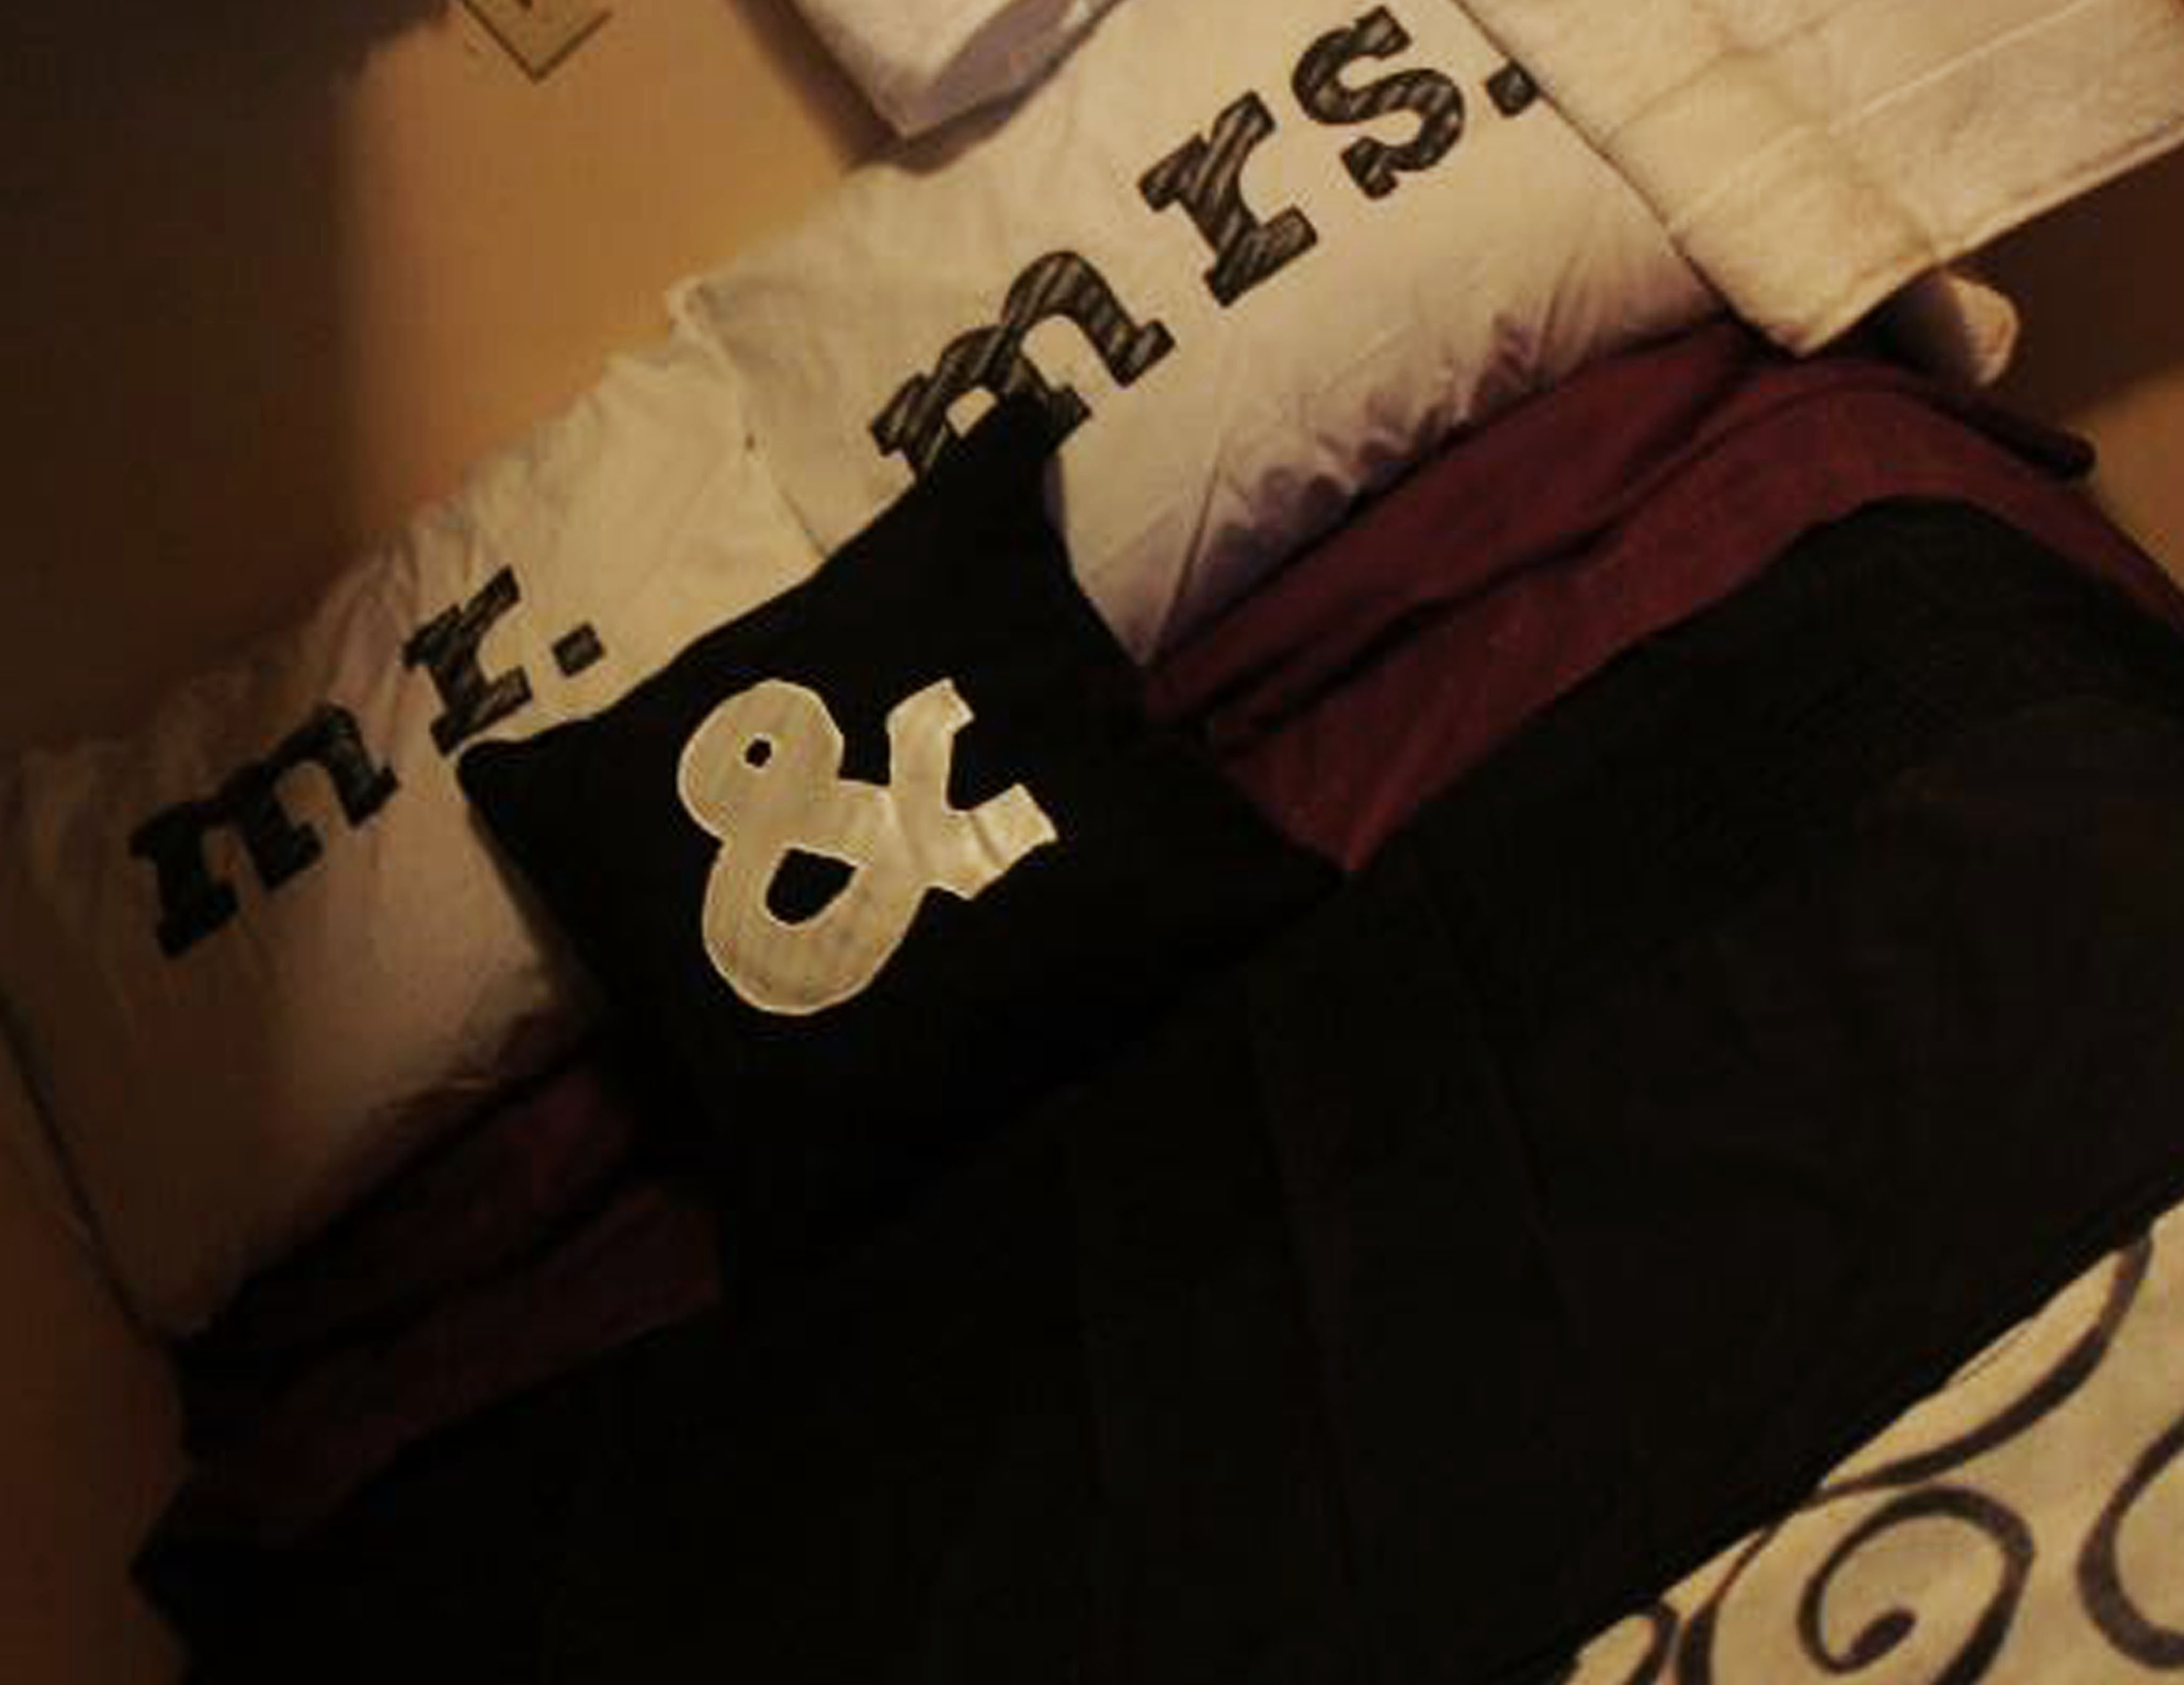
For each of my baby’s first Christmases, I ordered them personalized Santa hats from a wonderful eBay seller out of the UK.  They no longer fit Camden’s or Keira’s head, so I was happy to find a way to repurpose them and put them on display.

I found and followed the Construction Paper Wreath Tutorial from Our Small-Town Idaho Life, with mine just being on a bit larger scale.  The posterboard was a bit awkward to work with due to it’s size and stiffness, but it was worth it for the impact the finished wreaths make.

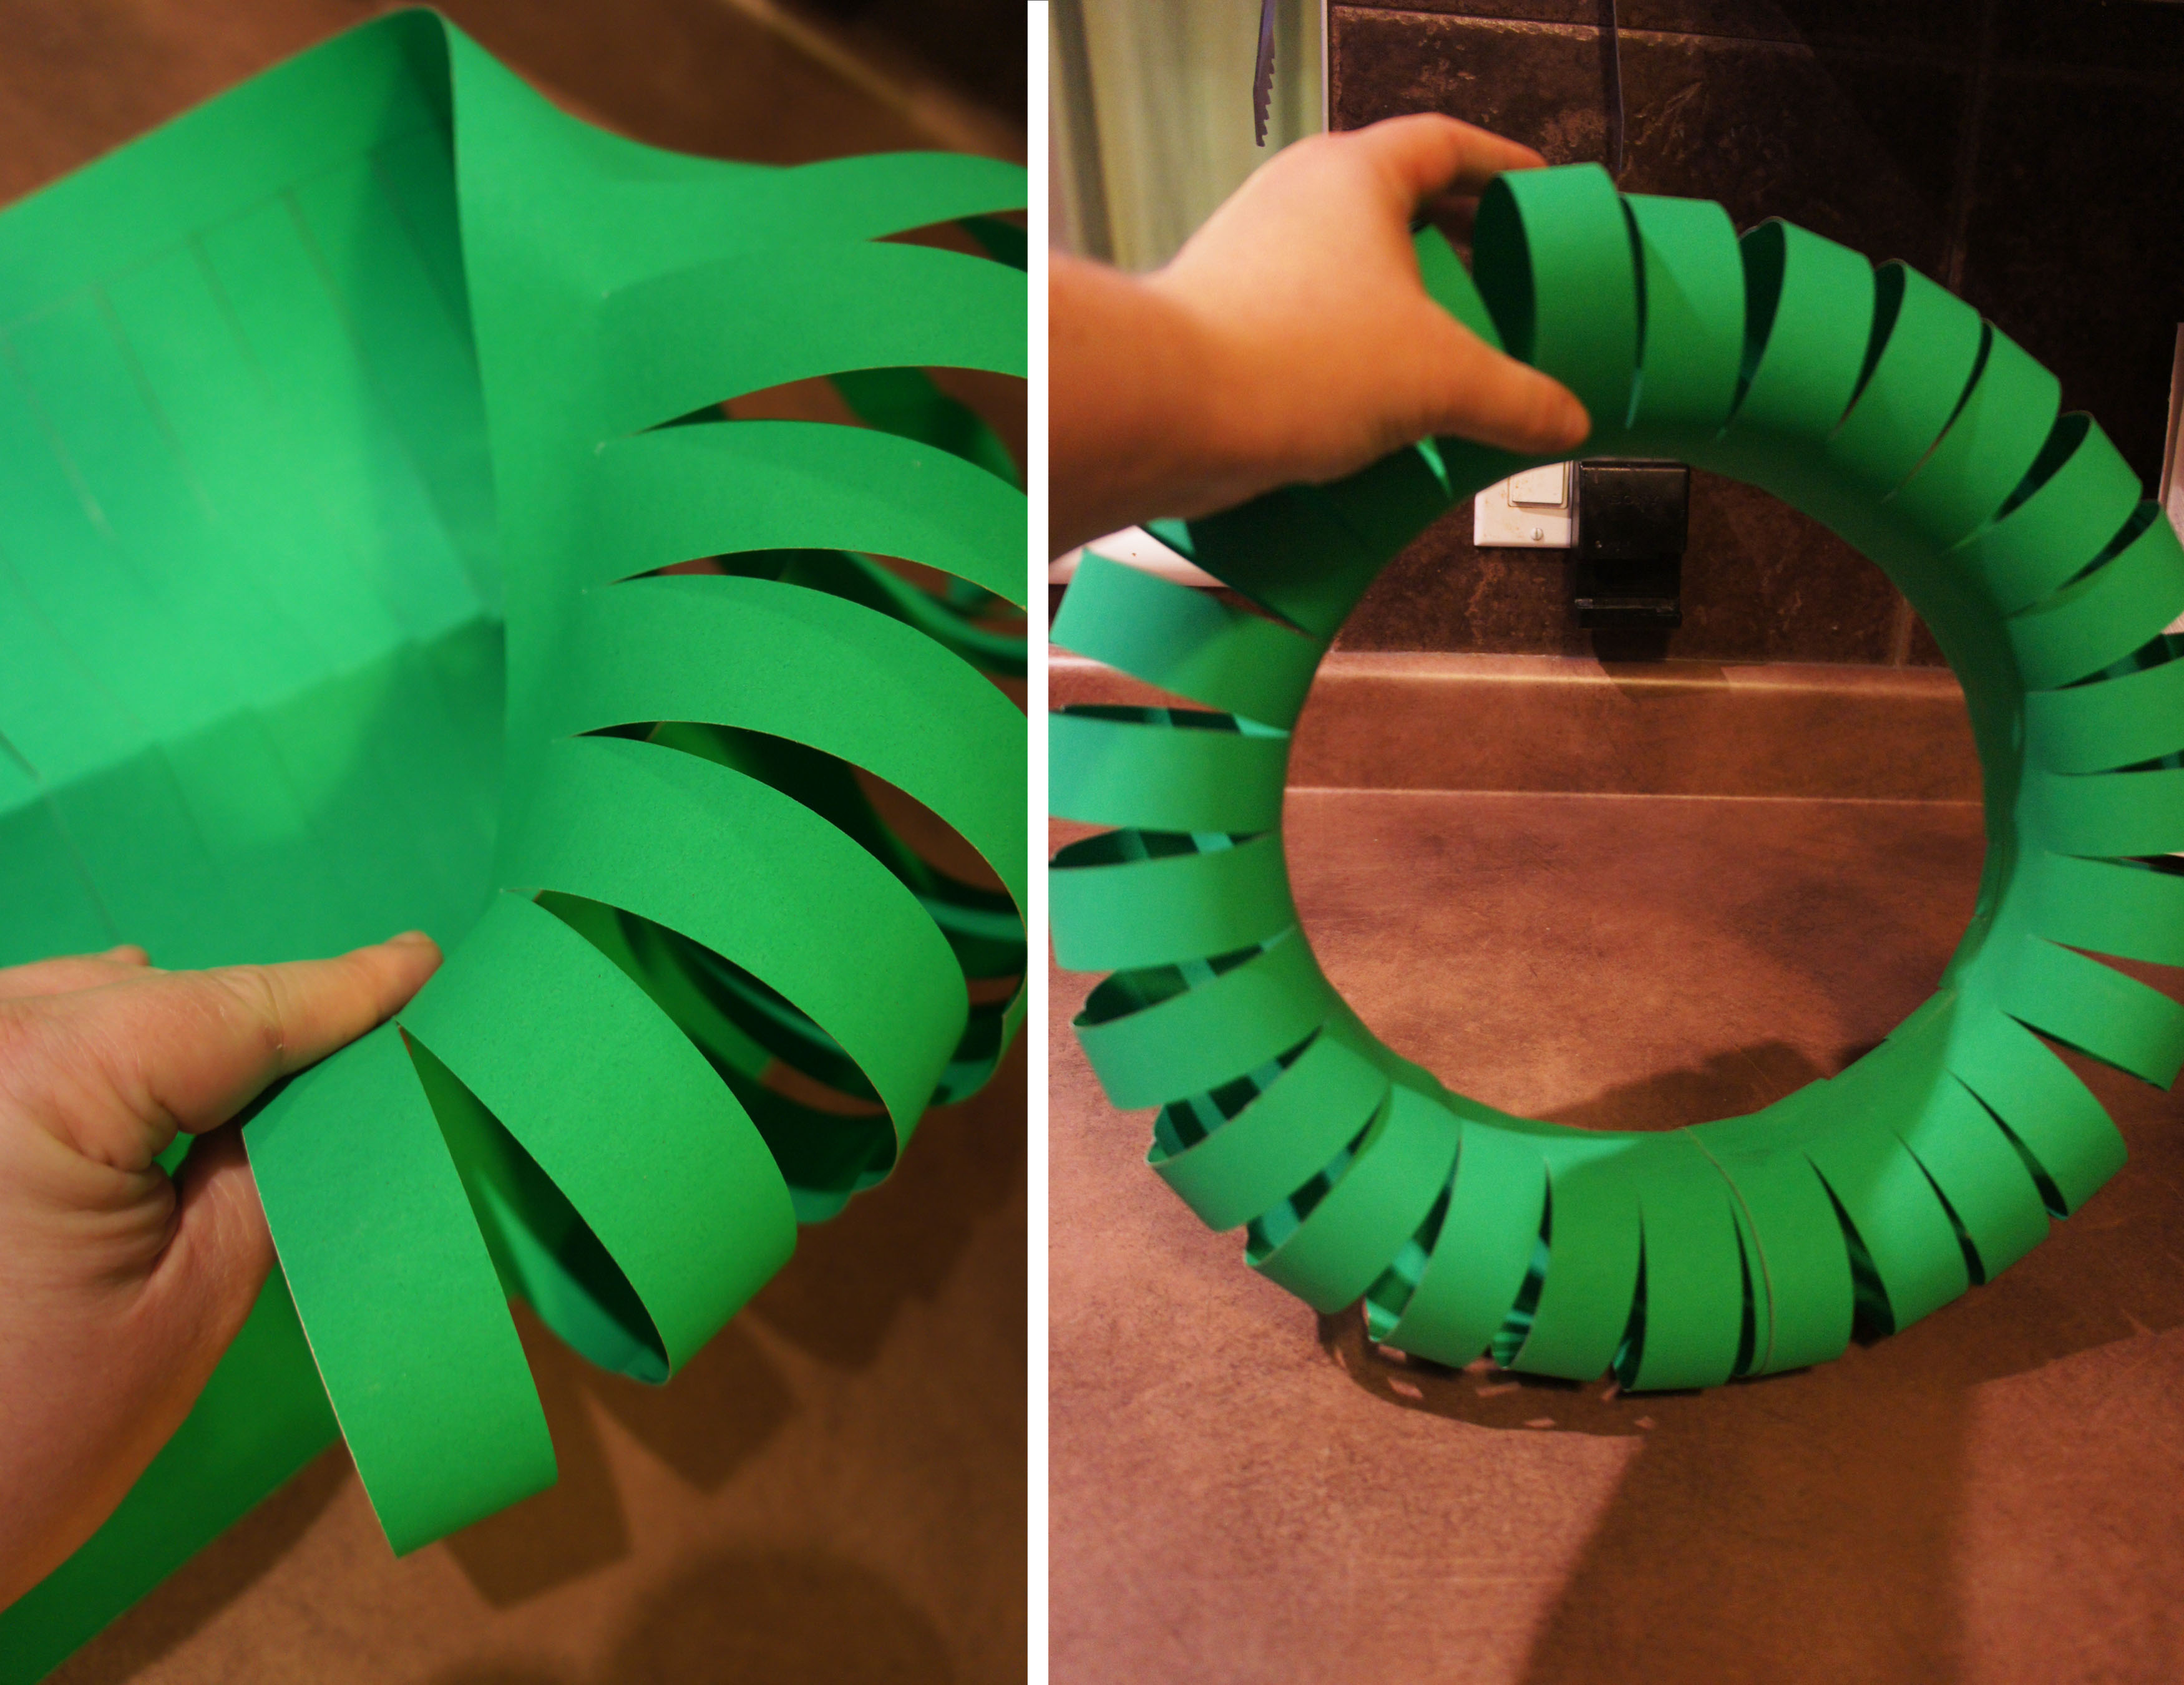
For each of the large wreaths, I began by cutting a full sized piece of posterboard in half lengthwise and then folding each half again lengthwise.

Along the non-folded edge, I marked out 1.25 ” strip that would later be used as my gluing area.  I then marked along the fold in 1″ intervals and used my ruler to draw in straight guide lines perpendicular to my glue strip.

I then cut along each of the lines from the fold upwards, making sure to stop cutting when I reached the glue strip guideline I first marked out.

SONY DSC

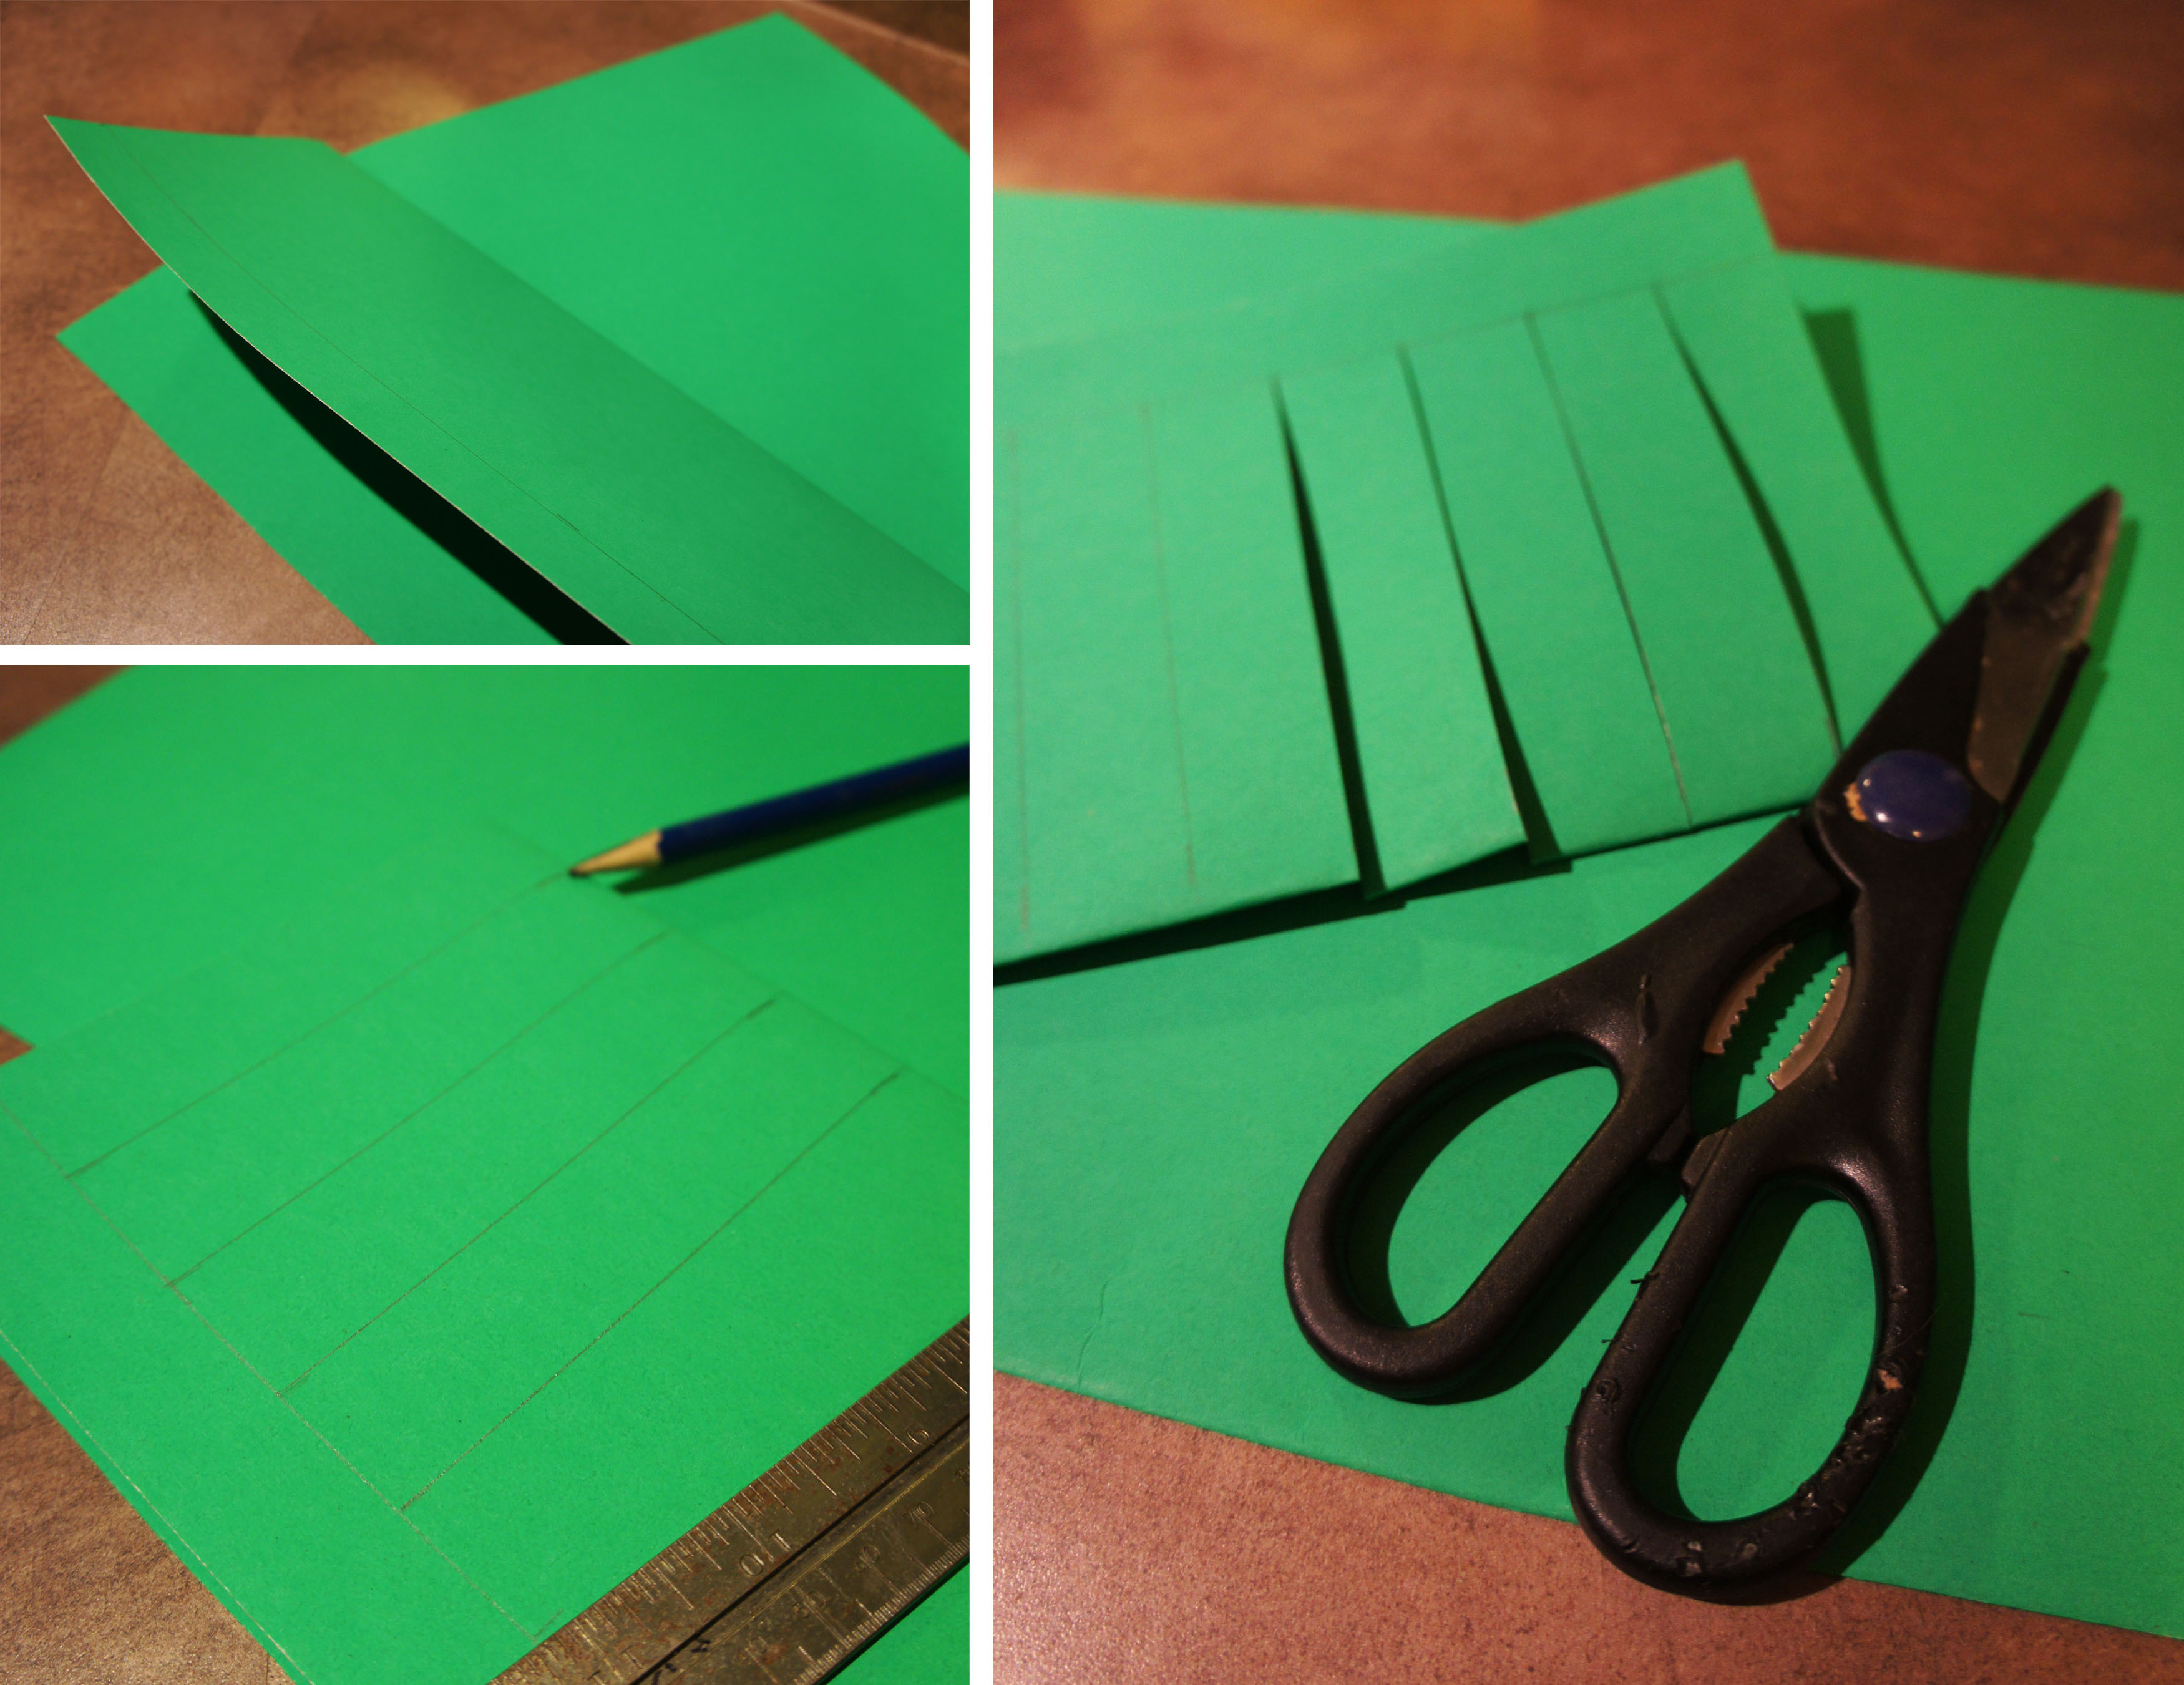
Once all strips were cut, it was time to flip my cut posterboard sheet inside out and join the glue strip on each side together to form a cylindrical tube.   I chose to work with rubber cement because it is fairly forgiving if you need to reposition a little, but it creates a quick, permanent bond (so long as you coat both sides of the paper you are bonding together.)

Once my tube was formed, I inserted the last ring on one end into the last ring on the other end to create a circle.  If you didn’t want a Mickey shaped wreath, you could now decorate your wreath.

SONY DSC

SONY DSC

For the ears, I repeated the same cutting and gluing process to 4 sheets of posterboard I had cut down to 8″ x 11″.  Once I had my tubes, I trimmed each of 4 loops from one end, leaving the glued strip so I had something to attach the ear onto the big wreath form with.  I then fed it through 3 of the loops on the big wreath and attached it on itself on the other side to form the ear.

SONY DSC

I fit the kids Santa hats onto the loops to find the spacing I needed between the ears and then attached the second ear on the other side of the Santa hat.  I was lucky that the hats fit snugly on the loops and I was able to keep them on without gluing or damaging them.

SONY DSC

I then hot glued on some red pom pom’s to both wreaths to create hidden Mickey holly berry bunches.  To differentiate between the Mickey and the Minnie wreath, I also added a red bow to Minnie.

The wreaths were a little flimsy on their own, so for my final step I cut a piece of wrapping paper to fit inside two large square picture frames (from Ikea) and hot glued the wreaths directly onto the wrapping paper.  This will allow me to remove the wreaths and still use the photo frames after Christmas.  I am sure the wreaths would be fine hanging directly on a door or wall, but this seemed to be the best solution for displaying them on my corner shaped mantle.

SONY DSC

SONY DSC

The framed wreaths fill our large mantle up nicely and I love the personal touch they have with the kids names on the Santa hats!  The large stuffed Mickey and Minnie also on the mantle are toys the kids received last Christmas.  They work perfect up there, but it has been a battle with my 3 year old to allow me to keep his Mickey up there.

SONY DSC

Make sure to check back tomorrow to see the Mickey and Minnie stockings I crafted for the kids!

Big Hands, Celebrations, Crafts

Tabletop Decorations: Merry Mickey Snowman and Tabletop Trees

Today I am sharing a couple quick projects I did to spruce up our kitchen table and add some decoration to the side buffet in our dining nook.

SONY DSC

The inspiration for this Mickey project came largely from the Mickey Tree Topper I shared yesterday and the images of Mickey snowmen I kept coming across on the internet.  I was downstairs searching through my Christmas stuff and there he was just staring at me from the shelf begging for a set of mouse ears!  I bought him several years ago, and I still really like him so I was happy to find a way to fit him into my holiday décor and theme.

SONY DSC Continue reading “Tabletop Decorations: Merry Mickey Snowman and Tabletop Trees”

Big Hands, Celebrations, Crafts, Everyday Life

Mickey Top Hat Tree Topper

Creating a Mickey themed Christmas really hasn’t been that difficult given the amount of Mickey stuff already in our home.  I loved Mickey when I was a kid and that certainly hasn’t changed as I’ve gotten older.  For evidence, you need not look any further then my kids toy box or closets.  With a boy and girl I think it is that much worse because I have reason to buy both the Mickey and Minnie versions of things!

I have slowly been adding Mickey and Minnie themed Christmas items to our main floor over the past week and it finally took until Friday for my husband to comment “I guess we’re going with a Mickey theme for Christmas, eh?”.  I love that he rarely questions my obsession and was even willing to go so far as to go give me my dream wedding in Walt Disney World.

While in Disney World for our wedding and honeymoon, they had bride and groom themed mouse ears that I purchased.  I wore my ears headband for most of our time in the parks, but the groom version was a bulky top hat and was too uncomfortable for my other half to really wear in the hot Florida heat.  My bride ears got packed away in a box somewhere in the basement after our wedding, but the top hat has been sitting out on top of a shelf in our living room for the past several years.

SONY DSC

While searching on pinterest for different tree topper ideas, I came across an image of a Santa Mickey top hat and was instantly reminded that we still had the groom hat sitting around.  After trying it on my little tree, I decided it would make the perfect tree topper.

SONY DSC

The hat looked good on the tree as it was, but I have a hard time not adding my own personal touch to things.   To Doll it up and make it more festive, I simply added a strip of red ribbon and a poinsettia embellishment I found at the Dollar Store.

SONY DSC

It’s a little quirky and different, and I love the way it finishes off our tiny tree.

SONY DSC

Hooray for being able to repurpose things I already own!

Big Hands, Celebrations, Crafts

Salt Dough Mickey Snowman Ornaments

This year we have decided to keep our Christmas pretty scaled down in terms of decorating.  After last Christmas, we nicely boxed up all our ornaments and Christmas décor thinking we would be moved into our new house by this point.  We are still a good two months away from being in our new home, but we have made the decision not to pull out all the Christmas decorations and then have to box it back up when we’ll have enough other packing and organizing to do right after Christmas.  I was originally disappointed by not being in our new home for Christmas and not getting a real tree like we normally do, but it has proved to be a bit of a fun challenge for me to come up with alternative cheap and simple solutions to decorate the house.

We have a 4 foot artificial tree I bought several years ago and we will be using that as our tree.  I decided to make some quick Mickey shaped ornaments for it out of Christmas balls, and then things kind of snowballed from there with Mickey themed DIY projects throughout our main floor.  This week I will be sharing with you what I have been up to and highlight a different Mickey themed Christmas project each day.

SONY DSC

Today we have some relatively simple salt dough ornaments I created to hang on the tree alongside the large Mickey Balls.  In my search for ornaments inspiration I came across these adorable Mickey snowman ornaments from busykidshappymom and thought they something simple I could recreate in salt dough.

I remembered I had bought a Mickey shaped cookie cutter about a year and a half ago with the intention of eventually doing a Mickey or Minnie themed birthday party for one of the kids.  I  have all kinds of Mickey party ideas pinned on pinterest, but there are just so many other fun themes to pick from that now I am not sure I will actually ever end up doing a Mickey or Minnie birthday party.  I wasn’t originally planning an entire Mickey/Minnie themed Christmas, but it worked out nicely due to our circumstances and has been a good excuse to put some of those pinned ideas to use.

SONY DSC

Salt D0ugh Recipe

  • 1 part salt (1/2 cup)
  • 1 part water (1/2 cup)
  • 2 parts flour (1 cup)
  • A small bag of glitter to add some sparkle (optional)

SONY DSC

To make the dough, I just dumped all the ingredients into my stand mixer bowl and used the dough hook to combine.  They came together fairly easy with a bit of hand kneading afterwards, but my dough was a little dry and I ended up having to add more water.

SONY DSC

Once the dough was made, I simply rolled it out with a rolling pin, and used my cookie cutter to cut out my Mickey Shapes.  I then transferred the cut shapes to a cut sheet using a metal spatula, just as you would making sugar cookies.

SONY DSC

For the ear hat portion, I used the same Mickey cutter and then used a circle cutter to cut off excess at the bottom.  I decided to do them separately and not stick the two pieces of dough together at this point so painting the ears would be a little easier.

For the small snowman noses, I free shaped them from bits of the dough.

The final step with the dough was to  put a hanging holes in each piece.  I used a drinking straw and just poked through each head and set of ears to create a hole for my string to go through.

Once happy with my cut shapes, I put both pans of ornaments into a 200 degree Fahrenheit oven and let them slowly dehydrate for 2 hours.

SONY DSC

Once dried and cooled, my next step was to paint the ear and nose pieces using acrylic craft paint,  and then assemble each of my snowmen using hot glue.  Most of my string holes lined up pretty well when stacking the pieces, but I did put the strings through before gluing so I wasn’t struggling to feed them through afterwards.  Finally, I drew on the mouth and eyes with a small sharpie pen.

I also had some snowflake pieces I had cut out and baked so I gave those to my son and let him go to town on them with my sharpie markers while I was busy assembling my Mickey’s.

SONY DSC

This was my first attempt with salt dough and it was so easy it is something I will definitely try again.  If I were to make these same ornaments again, I would make the ear pieces a bit thinner, but overall I love the way they turned out.  They look cute on my tree and it was a very inexpensive project using ingredients and supplies I already had on hand.

SONY DSC

Big Hands, Crafts

We’ve Got Ears!! Mickey Christmas Balls

SONY DSC

It isn’t much of a secret that I love all things Mickey.  I first saw these Mickey Christmas balls in the Christmas Store at Downtown Disney on our honeymoon and instantly fell in love.  They were a bit pricy, breakable and I was short on suitcase space so I didn’t end up buying any at the time.  Since then I have found tutorials online how to DIY and have been meaning to make them for the past several years, but never gotten around to it.  This year I finally bought the supplies (Dollar store, of course!) and they were way easier to make then I could have ever imagined.  I can’t wait to see them hanging on our tiny 4 foot Christmas tree! Continue reading “We’ve Got Ears!! Mickey Christmas Balls”

Big Hands, Crafts, Doll House, Our Forever Home

DIY Scrabble Tile Pillows

SONY DSC

I have had this Scrabble tile pillow idea pinned on my pinterest boards forever – since before we even started thinking of buying a new house.  My husband and I both enjoy playing Scrabble so I instantly fell in love with the idea and have been waiting for just the right time/place to use the idea.  After weeks of furniture shopping, we finally just ordered a large custom sectional for the bonus room of our new house and I knew it would be the perfect spot to incorporate the pillows.  I struggled choosing between the words “HOME” or “COZY”, but decided HOME worked best as the décor in our new forever home.

The method I used to create my pillows requires you to cut a stencil out of contact paper.  I had used this method previously to create pillowcases as part of my sister’s wedding gift (below), so I was fairly confident it would work for this project too.

SONY DSC

For the actual pillows, I found these 15×15″ pillows at Jysk.  The cover came off easily, they were a good match to the Scrabble tile colors and at only $3 per pillow I didn’t have to worry too much in case the project was an epic fail.  I am so happy to say it wasn’t and I am able to share this project with you.

Materials Required:

– Pillow covers (1 per letter in your word)

– Home Printer

– Contact Paper (I got mine at Michael’s)

– Exacto Knife (tools section of the dollar store)

– Scotch tape

– Paintbrush

– Black fabric paint

I began the project by laying out the letters and numbers in Adobe Illustrator using the font Arial Narrow Bold.  For my 15×15″ pillows, I ended up doing the letter in 700pt type and the smaller numbers in 365pt.  Once laid out, I printed the letters off on my home computer to use as my template to cut out my stencils from contact paper.

SONY DSC

If you are lucky enough to have a light table, that can be used to overlay the contact paper on the printed letters on cut them out.  I improvised by taping my letters and contact paper up on my patio door so the sunlight acted as a light table.  I then used my exacto knife and carefully cut out each letter/number.  TIP: When placing the contact paper, ensure the side that you peel off is facing down or your letters will be backwards.  For letters/numbers with centers such as the O or 4, you will need to keep the middle sections as part of your stencil.

From there, I placed the contact paper template on my pillowcases to determine exact alignment.  I begin by placing it with the backing still on and marking along the edges with scotch tape.  The tape then gives me a guide once I peel off the backing paper and go to stick it down.  It is a bit of a tricky process, but the contact paper is pretty easy to pull apart if it does stick on itself.  Just don’t try to reposition too much once stuck down because it results in a less clean edge.  Once stuck down, push along all edges to ensure there is a good bond and the paint won’t leak under the stencil.

SONY DSC

The final step is to begin painting.  Place a piece of cardboard inside the pillow so the paint does not leak through to the other side and just begin filling in the open areas with the paintbrush and fabric paint.  For clean edges, always start on the outside of the contact paper and brush in towards the open area.  It is a bit tedious, but it makes for sharper edges.  Once dry, just stuff the pillow back into the case and you are done!

SONY DSC

This method can be used for any type of image or lettering you want to put onto a pillow.  Using the Scrabble tile idea, the possibilities are endless – you could do your child’s name or initial, or spell out “LOVE” or “NAP” for your own bed.  It was a quick and easy project and I am very  happy with the final results.  Now to wait to get into our new house so I can see these on our pretty new sofa.

Big Hands, Crafts, Friday Favorites

Friday Favorites: DIY Chalkboard Buffet Labels

FridayFavoritesTitle

I came across these fantastic chalkboard tags on Etsy when looking for ideas for my country themed candy buffet.  I love the chalkboard look, but was not really sold on the idea of messing around with actual sticks of chalk and handwriting each label so I decided to come up with my own solution.

Chalkboard tags

I already had a chalkboard background and several chalk-like fonts on my computer so I decided designing and printing something would be the easiest way to recreate the look.  To make the wooden frame, I remembered that I still had a bag of coffee stirrers lying around the house from a previous project.  They were easy to cut to length with scissors and I simply attached them to the paper with double sided tape.

SONY DSC

To finish the labels off for the candy buffet, they are either getting a clothespin glued to the back or they will be tied around the candy containers with string.

SONY DSC

I am very happy with the final result and love that the fonts give a more consistent look then I could have gotten by handwriting each one.

All in all it was a pretty quick project and cost me very little.  If you don’t already have them on hand, the basic supplies like cardstock, coffee stirrers, double sided tape, and clothespins can all be found at the dollar store.