Celebrations, Parties

Party Inspiration: Rudolph Treats

22RudolphInspiredTreatsTitle

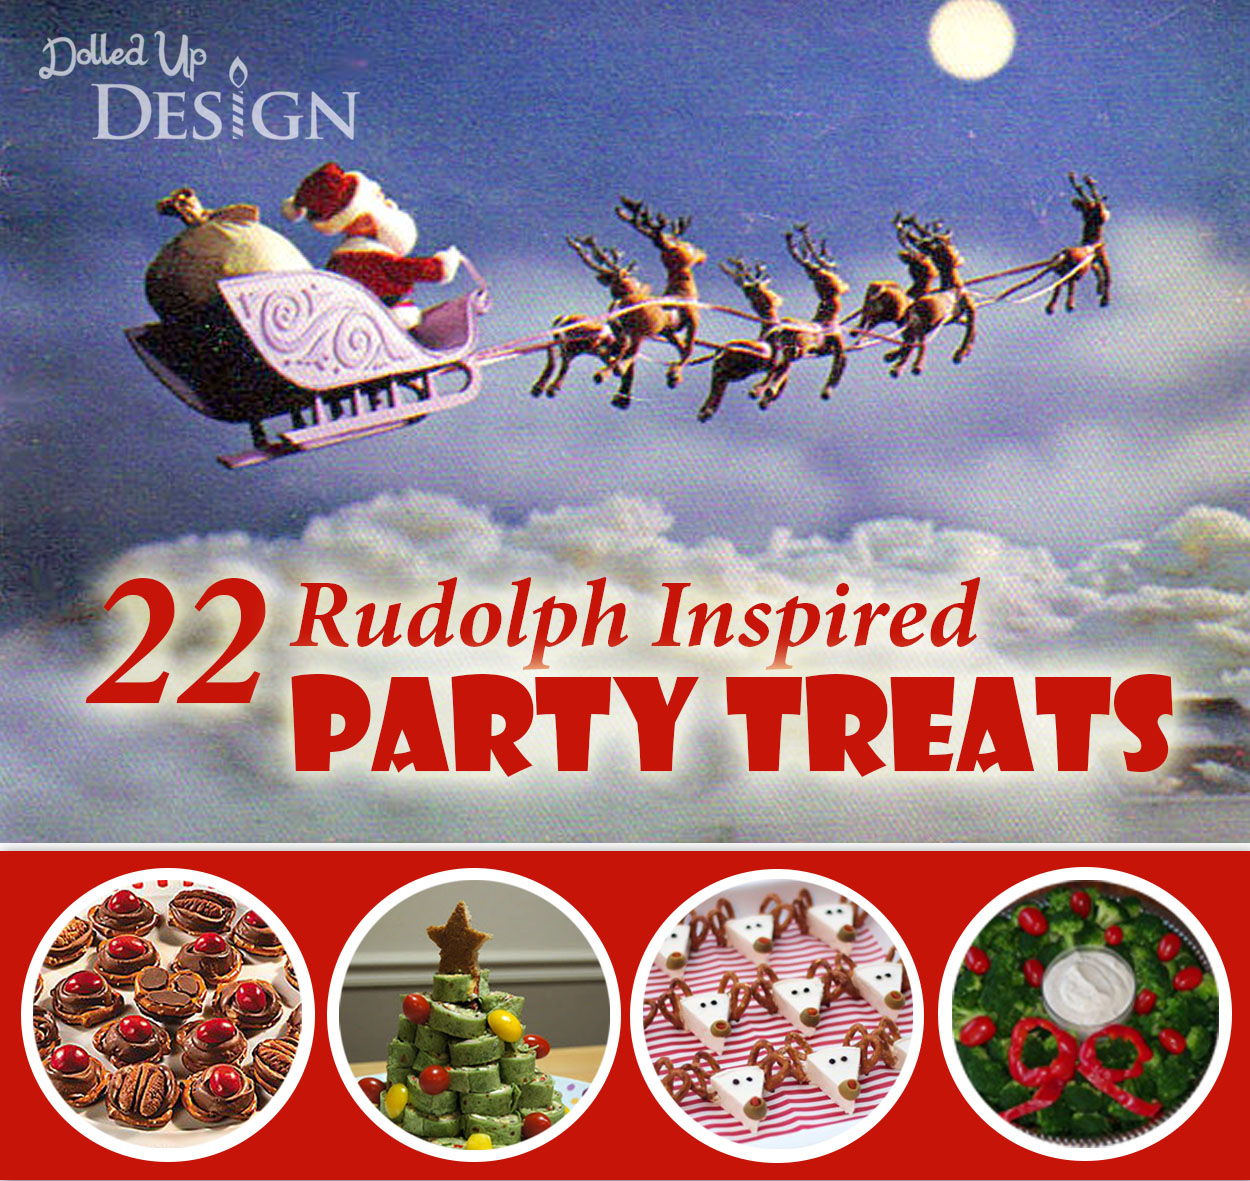
This Holiday Season the classic Christmas tale of Rudolph the Red Nosed Reindeer is celebrating it’s 5oth anniversary.  It is my all time favorite Christmas special and the anniversary this year just gives one more reason to whip up some holiday treats and enjoy the movie with family and friends!  Here are some of my favorite food ideas inspired by the Red Nosed Reindeer and his misfit friends.

Rudolph_HoovesandNoses

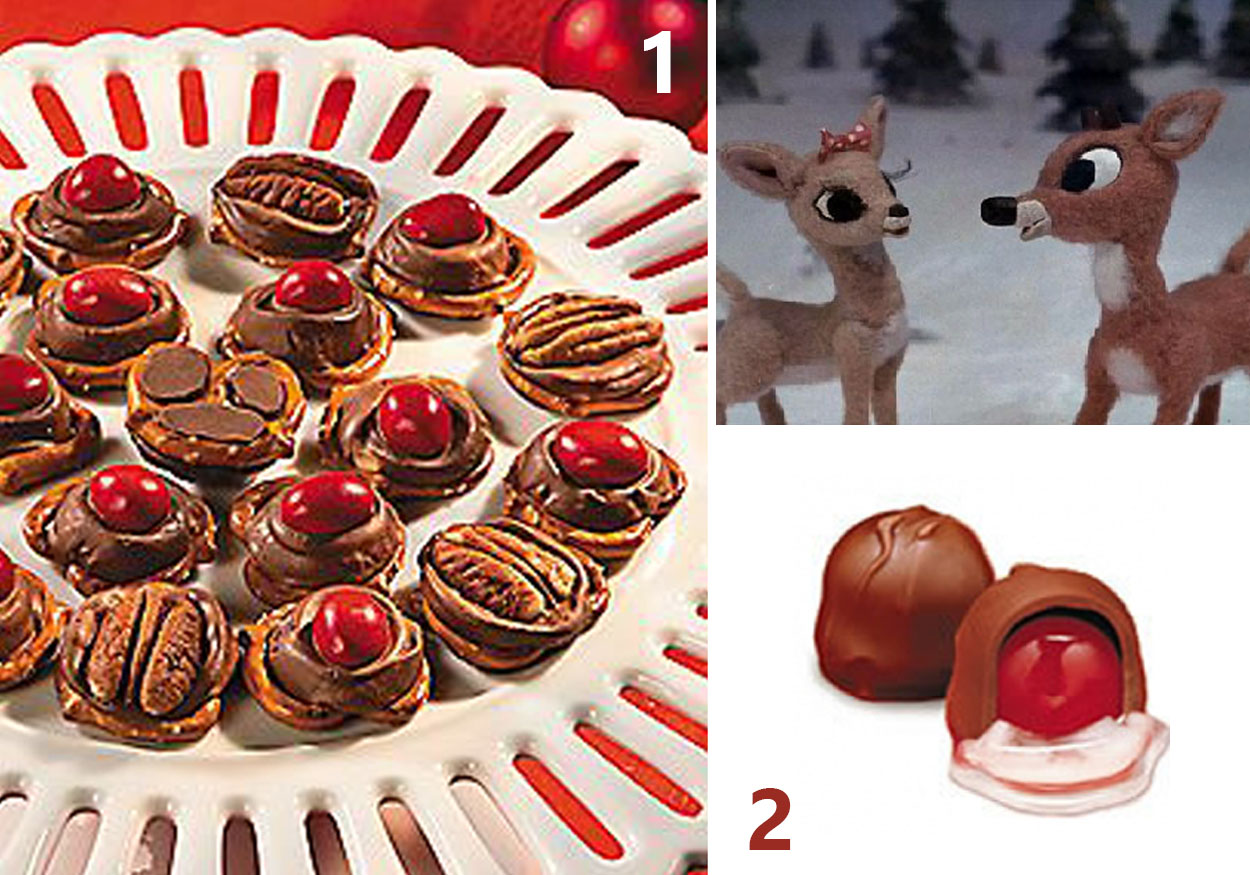
1.  These Reindeer Paws and Noses Christmas Treats from Oriental Trading are an absolute must.  They would be so simple to make and are adorable displayed out on a platter.

2.  Speaking of Reindeer noses, one memorable scene from the movie is when Donner tries to cover up Rudolph’s shiny red nose with mud.  I love chocolate covered cherries this time of year and think they would make the perfect mud covered Rudolph noses!

Cheese

3.  How cute are these Laughing Cow cheese reindeer from Project Denneler?  It is always nice to have some savory options amongst all the sweets at this time of year and these couldn’t be easier thanks to a couple pretzels and some olives.

4.  Another fun idea with cheese, these Santa Belt Babybel over on Cute Food For Kids would be something you could make up well ahead of time.  Babybel’s always seem to be a hit with kids and adults alike.

RitzCrackers

5.  What better to serve with cheese then some festive crackers?  I love these Ritz Holiday Crackers and Snowflake’s from Christie and have a few boxes tucked away in my pantry for upcoming holiday gatherings.

ChristmasDips

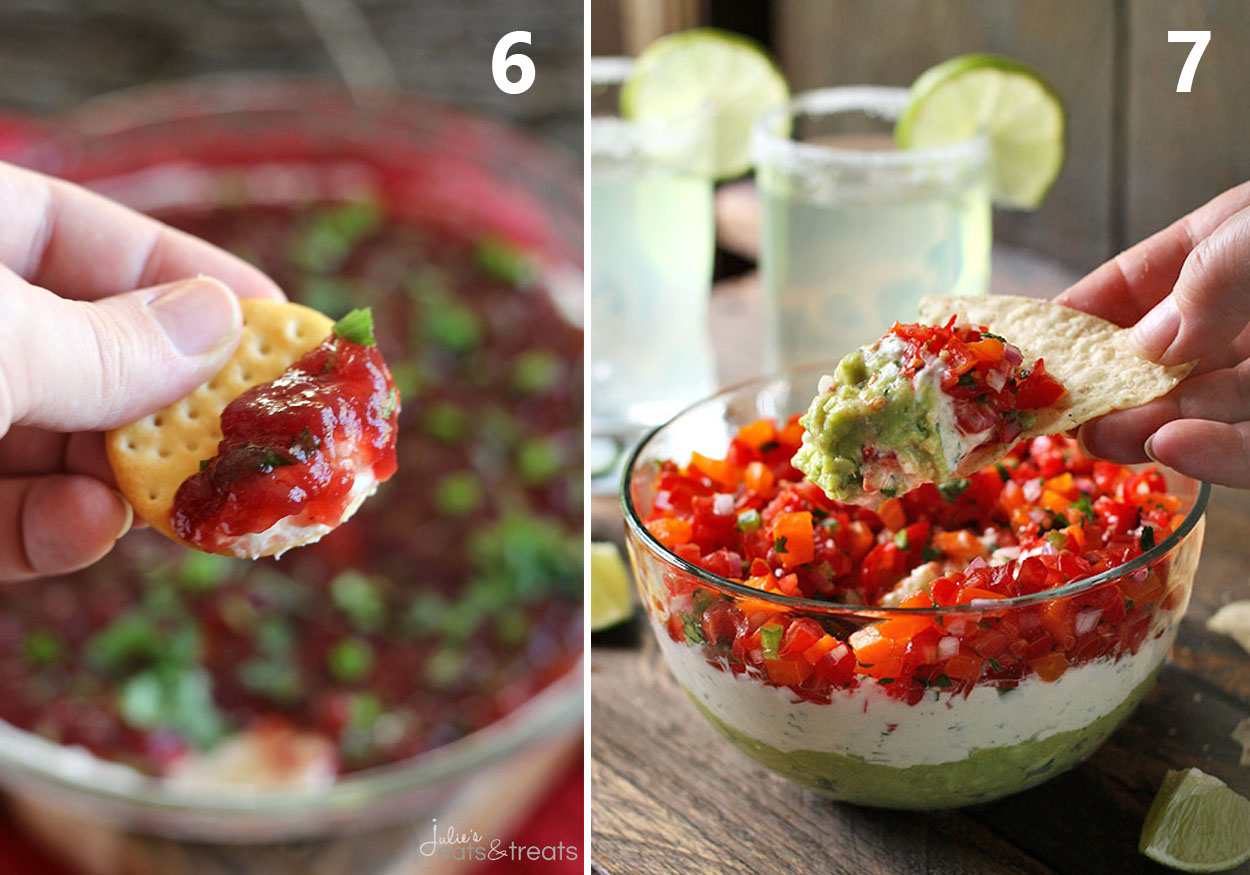
6. Dips are always a hit on a party table, so why not try this festive Cream Cheese Cranberry Dip from Julie’s Eats & Treats.

7.  This Mexican inspired Triple Layer Guacamole Creamy Cotija and Confetti Salsa Party Dip from SoupAddict looks as tasty as it is beautiful with its bright holiday colors.

VeggieWreathFruitTree

8. Looking to get your veggies in?  This Christmas Wreath Vegetable Platter from Divine Health couldn’t be any cuter!

9.  The wreath idea could also be used with fruit, or you could try an easy Tree Shaped Platter as seen on Little Wonders’ Days.

Bumble_Pinwheels

10. Pinwheels make for the perfect party food.  This towering stack of Southwestern Pinwheels from TiramiSusie’s reminds me of the scene near the end of the movie where the Abominable places the star atop the large Christmas tree in Santa’s workshop.

Yukon_SilverandGold

11. Yukon Cornelius spends the movie searching for silver and gold, so why not put out a selection of silver and gold wrapped chocolates?  This idea was inspired by the platter of gold and silver chocolate Sweet Cheeks Tasty Treats had at their Goonies Party.

Bumble_CakePops

12. Sweet Cheeks Tasty Treats also has these amazing Bumble Cake Pops on their site.  I really wish I had the time and patience to create amazing cake pops!

SnowglobeCake_Ornament

13.  With my basic cake decorating skills, I think I could pull off a Snowglobe Cake like this fabulous one on Taste of Home.   With a few Rudolph figurines and a small round glass bowl, it should be simple enough to pull off.  My adorable new Rudolph ornament from Target might work perfect.

ElfHatMeringues

14.  We also can’t forget Hermey.  These Santa Hat Meringues on Frugal Coupon Living could be made as is, or you could layer red and blue to recreate Hermey’s iconic elf hat from the movie.

PeppermintTarts

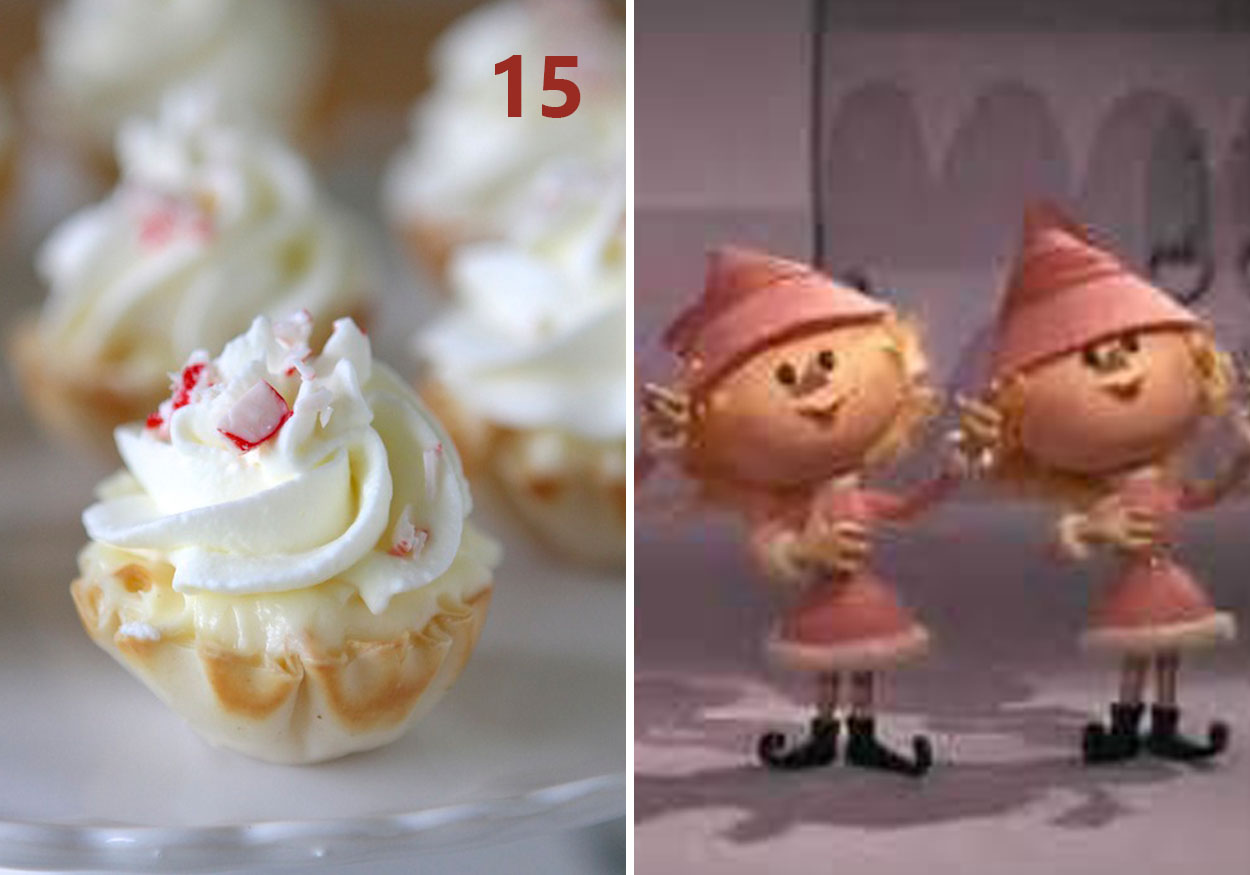
15. What is a Christmas get together without candy canes or peppermint?  These Mini Peppermint Cream White Chocolate Cheesecake Tarts from Lauren’s Latest just looked far too delicious to NOT include on my list.  They are sweet and dainty like the girl elves on the movie.

RudolphSandwichesNEW

16.  As an ode to the misfit Water Pistol who shoots grape jelly, you could make these Rudolph the Red Nosed Reindeer Sandwiches as seen at made from pinterest.

OstrichWingsNEW

17.  One other Misfit inspired idea might be to label Chicken wings as Ostrich wings in honour of the Ostrich riding cowboy on the Island of Misfit Toys.

ChristmasJelloNEW

18.  And there’s always room for J-E-L-L-O!  The Pioneer Women’s red and green layered Christmas Finger Jello looks so festive and fun.

SnowmanPunch

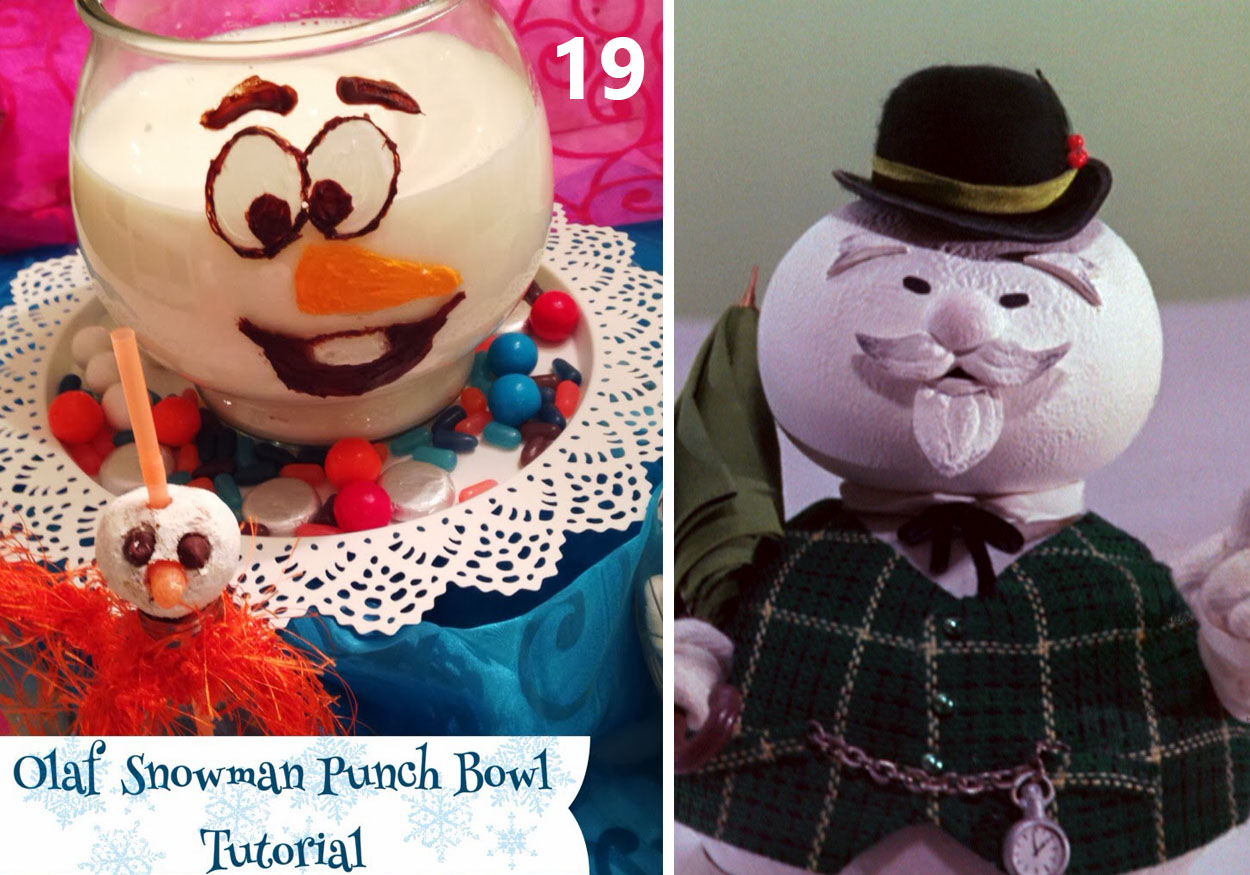
19.  For drinks, an ice cream based white punch would fit the bill.  The punch bowl could even be given a mustached face reminiscent of Sam the narrating snowman following this easy tutorial The Style Sisters have provide for their Olaf punch bowl.

CocoaBar

20.  A hot cocoa bar is also a good choice at this time of year.  How cute is this one from Amy’s Party Ideas with the Rudolph shaped marshmallow Peeps?!

ReinBeer_Martini

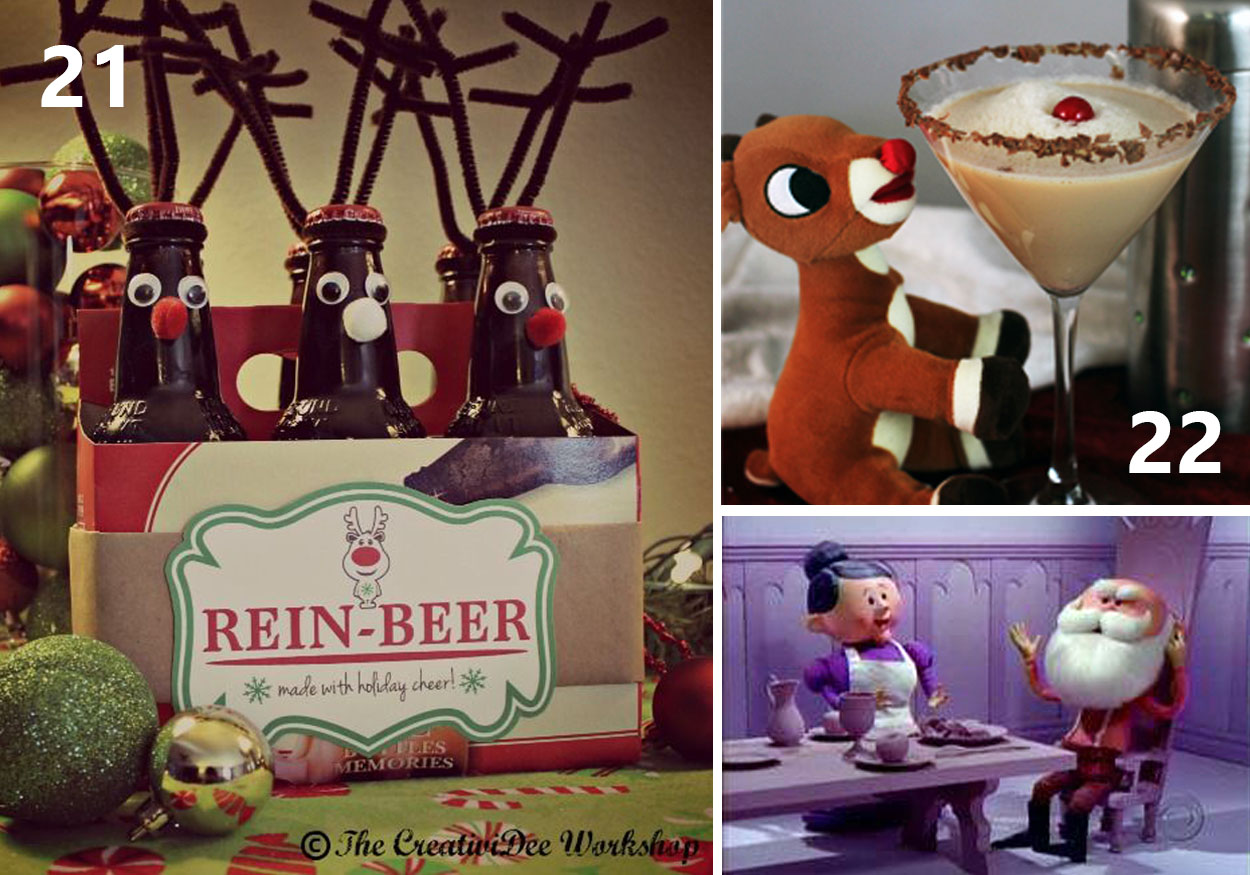
21.  And, finally, the adult guests might appreciate these Rein-beer as seen on The CreativiDee Workshop.

22.  Or, perhaps, one of these Reindeer Games Martini from Bar Products.

I hope you have enjoyed my roundup and I have been able to give you some inspiration for hosting your own Rudolph or Christmas themed party.  As always, you can see more great ideas compiled on my pinterest board.

Celebrations, Crafts, Little Hands, Our Forever Home

How We Are Putting the Happy in our Holidays

The Holiday season is upon us and I want to try and make the most of it with the kids.  There are many things we did last year that the kids enjoyed and I want to attempt again, plus a few new things (weather permitting!).

We started things off yesterday with a little “Gingerbread” House decorating.  My two year old was drawn to these little wooden piggy bank houses at Dollarama and as I was fighting her to put it back on the shelf, I realized they would make adorable little gingerbread houses for the kids to paint and decorate.  After a coat of brown paint, the kids went to town with the glitter glue, foam shapes and pom poms.

SONY DSC

They look great and my 4 year old loves the little lock and keys the house came with so he can lock any small treasures inside!  Perhaps Santa needs to sneak something inside on Christmas Eve…

SONY DSC

Today was bitterly cold so we decided to stay in and decorate the Christmas tree.  It is our first time putting up an artificial tree instead of a real one so having it up this early still feels a little strange to me.  It is also our first Christmas in this house so there was a bit of debate over where the tree should go.   In the end I am happy with it up in our second floor bonus room.

SONY DSC

Our Christmas Countdown activity list:

  • Countdown the Nights Before Christmas by unwrapping a new bedtime story each night in December
  • Write a Letter to Santa (See my great printable template)
  • Decorate the Christmas Tree 
  • Visit and take photos with Santa
  • Take our annual Holiday Photo of the kids
  • Decorate the kids bedroom doors like snowmen
  • Go to the Zoo’s Festival of Lights
  • Decorate a Gingerbread House
  • Do some Christmas baking
  • Host a Rudolph themed holiday party
  • Spend a night watching Christmas movies and have a sleepover in the Bonus Room
  • Spend an evening looking at Christmas lights
  • Go for a Sleigh Ride

Hopefully this is enough to help keep us busy for the next little while.  I will try to post a full photo tour of all our decorations once they are all up.  I have some popsicle stick snowflakes up on my living room walls I can’t wait to share!

What is on your Christmas countdown activity list?


Gift Ideas, Throwback Thursday

Throwback Thursday: Thank You Cookie Trays for the Office

While baking up a large batch of cookies last night, I was reminded of the cookie trays I made up for all my co-workers shortly after my son was born.

SONY DSC

Camden came 2 weeks early and I ended up missing my last week of work and the baby shower that was planned for me.  I ended up going in a couple days after his birth to clean up a few items, and I was given a beautiful gift basket and a Babies’R’Us gift card that helped buy us some of the larger baby items we needed.

Since my co-workers were so incredibly generous with my baby gift I wanted to find a nice way to try and thank everyone that contributed.  I never got to say a proper goodbye to most of them and I felt a bit guilty that they also had to miss out on yummy baby shower treats.  When thinking of what I could do for a thank you, I remembered that we sometimes got boxes of Cookies by George to the office at Christmas and they were always very well received.  Unfortunately I had just gone on maternity leave and ordering cookies wasn’t something in the budget, so I decided to DIY and bake up my own variety of cookies.

Cookie flavors I included were:

  • Oatmeal Raisin
  • Gingersnaps – get my recipe here.
  • White chocolate and Macadamia nut
  • Rolo Filled Chocolate Cookies
  • Mini M&M chip cookies

SONY DSC

I worked for a large company, with staff among four different office buildings, so I ended up making a tray to drop off to each of the lunch rooms.  The cookie baking was time consuming, but I stuck with basic recipes and it went faster then I expected.  It also helped that I had an easy newborn that liked to nap!

SONY DSC

The large plastic trays came from the Dollar Store and I simply lined them with a bit of parchment paper before neatly stacking the cookies on them.  For the cost of the trays and a few baking supplies, I think my thank you gifts turned out great.  I will admit the cookies weren’t quite as good as Cookies By George, but they were all still pretty tasty.  And on my visit I am not sure what my co-workers were more excited to see – me, the new baby, or the giant platters of fresh baked cookies!

Print

Gift Ideas

Olaf Snowman Building Kit with FREE Printable

SONY DSC

It’s no secret that I like to shop at the Dollar Store, especially around this time of year when I am looking for inexpensive and easy Christmas gifts.  The Dollar Store is my go-to for most of the kids stocking stuffers, gift basket fillers, and when I am looking for a little something extra to finish off a gift.

When I came across this Snowman Accessories Kit in the Christmas section at Dollarama, I knew immediately that it would make the perfect friend or neighbour gift.  I had bought a similar kit for $10 last year, so I was excited to see these were only $2 each.

SONY DSC

I’ve been subjected to a lot of Frozen watching lately, so the first thought that came to my head when I saw the kit was “Do You Wanna Build a Snowman?”.  I decided to repackage the kits and personalize with my own topper featuring everyone’s favorite talking snowman.

To tie in my Olaf concept, I dressed my graphic of him up in some of the included accessories from the kit.  Once happy with the design, I simply sent the toppers to print at Staples, then cut them out and stapled them on.  I even decided to keep the kits in the clear plastic bags the kits were already in and just switched out the cardboard topper.

SONY DSC

With the Dollar Store packaging removed, I am excited to give them out as gifts and am willing to bet most people would never even guess how little my finished kits cost.  They are great little gift to make and have on hand for the Christmas season, and I love that it makes for a fun family activity that will work for a wide range of ages.

SONY DSC

These would also make great favors if you are having a Frozen themed or Christmas party.  If you are looking to DIY there are some great tutorials on Pinterest to show how to make your own snowman building kit, but I don’t think I would be able to make them for less then the $2 I paid per kit.

FREE PRINTABLE: To make your own toppers, simply click the artwork below to save and send to print.  I have sized the artwork to 7.75″ wide to fit perfectly over the Dollarama kits.

SnowmanKitHeader_Artwork


Celebrations

Cakes: High Flying Planes and Ruffles

SONY DSC

This weekend I baked up cakes and cupcakes in celebration of two very special little boys – my own nephew and my friend’s brand new nephew.  They didn’t turn out exactly as I had wanted, but I had fun doing it and being able to make their celebrations a little sweeter.

For my nephew, we were celebrating his third birthday!  My sister bravely hosted a house full of young kids so I decided to help out by baking and bringing the cake.  I know most kids are overloaded by stuff these days so my hope is that the gift of my time and talent to make his birthday cake is more valuable then just another toy.

Max is into cars and planes and all things that move.  Last year I made him this construction themed cake so this year I decided to go with the Planes theme and did up this simple blue cake with white clouds and a Dusty toy as the topper.

SONY DSC

The cake was finished off with an inexpensive paper banner flying behind Dusty and a “3” candle from the Dollar Store.

My fluffy white clouds along the sides ended up sliding in transit, but it was easily fixed and overall I was happy with the finished cake.  Max couldn’t wait to get into it and my husband had two slices, so I must have done something right!

SONY DSC

For flavours, I kept things simple and both cakes were chocolate cake filled with a delicious banana creamcheese filling.  As you will see below, my second cake had a monkey theme so the banana seemed fitting.  I also added some Skor bit’s into my nephews cake for good measure and they added a nice little bit of crunch.

SONY DSC

Lucky for me the 2 cakes being for boys also meant I was able to use the same blue icing and save some time (and dirty dishes!) when mixing up buttercream.

The second cake was for a baby shower in celebration of my friend’s new nephew.  When she asked me to make her a cake, I was a bit hesitant because I still don’t feel that my cake making skills are good enough for anyone to actually pay for.  I had done a ruffle cake for my daughter’s birthday cake in May and it turned out pretty well so I suggested that style since I was fairly confident I could pull it off.

I asked my friend to snap some photo’s of the finished cake, but unfortunately she forgot her camera and had a bit of a hectic day so unfortunately my quick, crappy iphone picture  of the finished ruffle cake will have to suffice.  The cake was just a 6″ round, so I also baked up 2 dozen cupcakes to ensure she had enough cake for all her guests at the shower.

SONY DSC

To finish off the cake, I designed a cute paper monkey topper and blocks that spelled out baby’s last name.  For the cupcakes, I incorporated the same monkey into two different paper toppers that got hot glued to striped paper straws to stick into each.

SONY DSC

SONY DSC

Happy 3rd Birthday Max and Welcome to the World Baby Zackary!


Celebrations, Parties

Picnic Time for Teddy Bears!

SONY DSC

I love any excuse for a party.  Unfortunately having only two kids means only two birthday parties to plan during the year, and I now find myself looking for ways to fill that lull between their birthdays.

Cue the playdate!

As mentioned in my Foam Ball Teddy Bear Craft post, my daughter and son both ended up having Teddy Bear picnic themed days in the same week for her dance and his preschool class.  I love the teddy bear picnic theme and already had quite a few party supplies I could reuse so I decided to take advantage of the theme and host a lunch playdate after preschool on a Thursday afternoon.

SONY DSC

To pull off my theme, I didn’t need to look much further than my party supply closet and the kids toy box.  The grass print plastic tablecloth and cardboard picnic basket were leftovers from my daughters 2nd birthday, the trees and white picket fence were used at my sisters Gnome themed bridal shower, and the teddy bears were the kids.  Other items such as platters, jars and baskets were all things I have slowly added to my collection over the past several parties.

SONY DSC

Besides food, the only party supplies I really ended up buying were a couple blue and green checked tablecloths and foam balls from the Dollar Store, some brown and cream paper plates, plastic cutlery, a bit of scrapbook paper and the adorable bear shaped treat containers I used for favors.

SONY DSC

To Doll Up my plain paper plates, I cut ears from scrapbook paper and stapled them to each of the plates.  For a quick and inexpensive banner, I embellished a few of the plates with blue paper bows and strung a them up on a ribbon behind the food table.  For more color and interest, I folded some quick pinwheels from the same blue paper and alternated those with the teddy bears on my banner.

SONY DSC

My adorable “Please Feed The Bears” sign was a bit of a last minute addition and I am so glad I took the little bit of extra time to create it.  All it required was a bit of acrylic paint to handpaint the words onto strips of kraft colored cardstock.  From there, I simply glued them onto a dowel and inserted it into a small flower pot I had on hand.

SONY DSC

The foods were each labelled with some quick tent cards I made up using the cute bear graphics from the invitation.

Print

I tried to keep the menu simple and kid friendly while sticking with the Teddy Bear Picnic theme.  We had bear shaped peanut butter & jelly Cub Sandwiches, Honey Bear Ham Buns, Veggies with Dip, Chocolate Pretzel Twigs and Fresh Bearies, Bear Paw cookies, and Teddy Grahams.  For drinks, I made up a quick Very Beary punch.

SONY DSC

SONY DSC

My favorite food item by far was the Toffee Apple Cheesecake Dip.  The dip was easy to prepare the night before and it paired deliciously with granny smith apples I sliced up right before the party.  Get my recipe here.

SONY DSC

I also finally made this recipe for Ham and Cheese Sliders that I have pinned forever from The Girl Who Ate Everything.  I loved that I could have them prepared ahead of time and just pop them into the oven for a few minutes right before my guests came over.  They tasted great and, as a bonus, I even had leftovers for dinner that night!  If you are looking for food to serve at your next party or even a quick dinner idea, I highly recommend these.

SONY DSC

I  like to send my guests home with a little something and when I remembered seeing these adorable bear shaped containers I knew they would work perfect with the theme.  They came in packs of two in the baby section at Dollar Tree for just $1.25 and made the perfect little favors once filled with mini gummy bears.

SONY DSC

It was a great afternoon.  I finally got to show off our lovely home to some of the ladies have been hearing about for the last year and a half, the kids played so nicely together and I actually got to enjoy some adult conversation.

Thanks to things I already had on hand, this is one of the simplest parties I have thrown together but I think it is one of my favorites because it turned out so cute!

SONY DSC

For more tips on how I pulled off this cute party without breaking the bank, check out my guest post at Moms & Munchkins.

And be sure to head on over to Pinterest to check out all kinds of other great ideas on my Teddy Bear Picnic Board.


Celebrations, Everyday Life, HOME, Two Legged Fun

Family Fun Down on the Farm

It has been a pretty great past several days at the Doll house.  After sitting around all last long weekend waiting for a sod delivery that never came, we finally got our grass on Wednesday evening and were able to get the backyard all done Thursday afternoon.  I love the grass and can’t tell you how happy I am to have the dirt covered up and finally feel like there is an end in sight to our summer long landscaping projects!

SONY DSC

Thursday morning was also a big day for Camden as he got to go check out his preschool classroom and meet his teacher for the first time.  He seems pretty excited to start school next week and was even a little disappointed that Keira and I were staying with him for his first day.

SONY DSC

Friday was my birthday.  We celebrated with a low key lunch out at Red Robin (hello free birthday burger!) and a delicious cake my husband picked up locally from Wild Earth Bakery & Cafe.  It was a delicious banana cake, coated in peanut butter buttercream with a covering of chocolate ganache.  It was also adorned with chocolate covered bacon which we were a little unsure of, but my kids both can’t seem to get enough of.

SONY DSC

I have been trying for the last couple weekends to get my husband to step away from the landscaping/yardwork and accompany the kids and I to the Lacombe Corn Maze.  After managing to get the sod laid Thursday and using my birthday as a bit of a manipulation tool, I convinced him to take the one hour drive south Saturday morning to visit the Kraay Family Farm and get lost in the maze.  The weather was perfect and I was happy to get some quality family time in on what could be one of the last fleeting days of warm weather.

SONY DSC

My husband and I had been to the corn maze several summers back and I was impressed to see how much has changed in the 10+ years since we first went.  From what I remember, the main highlight was the corn mazes and there were only a few small attractions for the kids.  Now, the corn maze seems to play second to all the playgrounds, games, rides, animals, and other kid centered attractions throughout the farm.

SONY DSC

There was a lot to take in, but one of the first things Camden decided to try was the giant bouncing pillows just inside the gates.  Camden had fun, but you do get bounced around pretty good if there are other jumpers nearby.

SONY DSC

Next up Keira led us towards the animals.  There were ducks, chickens, pot bellied pigs, a miniature donkey and some goats.  The goats have a nifty set of catwalks that go all over the animal pens and allow you to view the goats far up above your heads!

SONY DSC

We then took a short tour around some of the farm in a tractor drawn wagon train.  Camden was excited to point out the pumpkins turning orange in the pumpkin patch and Keira was just happy to go for a ride!

SONY DSC

On the drive down I was feeling a little bad about not having completed quite a few of our Summer Bucket List items, but we were able to check off a few from this outing.  Mini golf was on our list, and the farm had a great dinosaur themed course that is included with price of admission.

SONY DSC

And while it isn’t quite go-karting, I am counting these pedal powered karts as going go-karting on our Bucket List.  Camden was just big enough to be able to pedal them and was happy zooming past the other drivers as he made his way around the small track.

SONY DSC

With slides, a tire horse merry-go-round, multiple play structures, a giant sandbox and unique crooked playhouses this is one of the best play areas we have been to all summer.  There were no shortage of things to keep the kids busy and I am sure we could go back repeatedly and they would not be bored.  We had a hard time prying them away to try some of the other activities we wanted to see!

SONY DSC

One activity I was surprised by how much Keira enjoyed was playing in a bin full of dried corn.  I think she would have happily stayed there for hours rolling in it, digging her toes into it and running it through her hands.  There was a giant sandbox just steps away, but she was far more interested in the corn.

SONY DSC

After a quick hot dog lunch, we made out way over to play a few games and get ready to watch one of the twice daily pig races.  There are a couple concession stands throughout the farm as well of plenty of tables and seating if you wanted to bring in your own picnic lunch.  The farm also rents out barbeques and there are tents available for special events such as birthday parties.

SONY DSC

The pig races were short, but cute.  “Boss Hogg” did a good job commentating and getting the kids involved, and it was funny to see some of the pigs not too sure of where they should be running.

SONY DSC

Then, finally, we made our way through one of the three corn mazes.  It was a lot of walking and both kids were getting pretty pooped by the end, but my husband did a good job of not leading us too astray.  There are also clues and employees throughout the maze for those who might be completely directionally challenged!

SONY DSC

And we ended our trip to the farm with, what else, but ice cream!!  I think the kids would be more then happy if I built next summer’s bucket list solely on places we could go to enjoy ice cream.

SONY DSC


The farm and corn maze visit made for a fantastic day, but the icing on the cake was really in the evening when this happened:

SONY DSC

While relaxing with some drinks in the front yard, I watched how well Camden was doing riding his balance bike and decided to take the training wheels off his pedal bike to have him give it a try.  I was expecting some wobbliness and failed attempts, but what he did blew both my husband and I away.  With little more then a small push from my husband, my little guy took off pedalling his 2 wheeler like a pro.  Within minutes he was going up curbs and riding in circles like it was old hat to him!  I didn’t even have the video camera ready to catch the first try because there was no way I thought he would be able to do it that easily.

I couldn’t be prouder of my little boy and can’t think of a more wonderful way to start off being 32.  I  am looking forward to more upcoming family adventures and am excited to watch as the kids continue to grow and surprise us in the year ahead.


For more information on the Kraay Family Farm, be sure to check out their fantastic website or visit the Lacombe Corn Maze on Facebook.  As you can see by my many photos, there is no shortage of things to do on the farm and I would highly recommend it for anyone looking for fun activities to do with their kids in and around Central Alberta.


Print


Celebrations, Four Legged Fun, Friday Favorites

Friday Favorites: BarkBox

This week we celebrated a very special birthday in our house –  our loveable hound dog turned 6 on August 19!

SONY DSC

I have always made an effort to celebrate the dog’s birthdays in our house, but this one was particularly meaningful to me because it is the first 6th birthday we have gotten to celebrate.  Our sweet Bullini sadly passed shortly before her 6th birthday.

SONY DSC

For her birthday, I baked Nova a birthday cake and the kids and I went to the pet store and picked out a couple new toys for the dogs to enjoy.

On top of that, I had decided to sign up for BarkBox last month and our first one arrived at the end of July.  As eager as I was to see what was inside, I decided to hold off opening it until Nova’s birthday.  Both dogs, and the kids, couldn’t wait to see what was inside the box.

SONY DSC

I was hesitant ordering the BarkBox, but after good reviews from my sister I decided to take a chance.  I was super impressed with the first box and can’t wait to get our next!  The dogs love the Bixbi Chicken Jerky Treats and the Healthy Dogma Coconut Flavor Barkers smell so good that I am not even disgusted by the fact that my 2 year old keeps sticking them in her mouth!  I also was worried about the quality of toy, but the Loopies Floppy Fishbone passed my tug test and looks like it will actually stand up to my heavy pullers.

SONY DSC

We are blessed to have Nova in our lives.  She is so sweet and loving.  The kids crawl all over her and she is nothing but patient with them.  One of Keira’s first words was, of course, “dog” and she was quick to expand it to “hound dog”.  Nova is a sensitive soul and hides if there is too much noise or excitement, but never strays too far from the family.  Her favorite spot in the new house has become the back bench and it brings a smile to my face everytime I see her curled up back there as I am going about my day.

Happy Birthday Bassanova!  And thank you BarkBox for providing such a great product for the fur legged members of our family.

FridayFavoritesTitle


Celebrations, Throwback Thursday, Uncategorized

Around the Year in 100 Posts!

OneYearLogo_BlogPost

Today marks one year since I decided to start sharing my ideas with the world through Dolled Up Design and what better way to share then in my 100th post!

I started this blog as an outlet for my creative ideas.  I love reading other blogs and seeing their great parties, interior decorating and creative food ideas.  I waste way too much time on Pinterest and decided I needed to start sharing back some of my own ideas rather then just creating board upon board of other people’s ideas.

This is a creative outlet for me.  I enjoyed my previous job as a graphic designer, but when I made the switch to being at home with the kids I felt my skills starting to fall to the wayside.  I began this blog as a way to try and establish myself as more then just “Camden and Keira’s mom” and am hoping in the process I might inspire other people to bring out their creative side.

I am surprised to see my post count as high as it is because it honestly doesn’t feel like I am able to spend as much time on my blog as I would like.  Between keeping up with the kids and moving this past year, this is definitely an accomplishment for me.  I am also proud and excited to have been chosen to join Moms & Munchkins as a Party Tip contributor so hopefully that gives me the push to come up with even more great ideas in the year ahead.  I have tons of projects floating around in my head, but it is always a matter of finding the time to execute and document these great ideas!

Like a lot of my projects, my blog is a work in progress.  The overall look of the blog still leaves something to be desired and the linking up to all the different avenues of social media makes my head spin!  There is definite room for improvement and I hope as I move forward and my blog continues to grow that it only continues to become better.

So, in celebration of One year and 100 posts, here are my top 10 favorite Dolled Up projects from the past year.  Click on the links to view the full posts!

SONY DSC

SONY DSC

SONY DSC

SONY DSC

SONY DSC

SONY DSC

SONY DSC

SONY DSC

SONY DSC

SONY DSC


And, because it is Thursday, it only seems fitting that I throwback and link to my very first blog post – my Love is Sweet personal candy buffet.

CandyBuffet1

Print

I would like to finish this post with a big thank you to all my readers old and new!

You are the main motivation for this blog and I can’t wait to share more projects and ideas with you in the year ahead.